This chapter describes how to use the Visual Administrator to manage LSM disk configurations.
To start the LSM Visual Administrator, you must be logged into an account that has superuser privileges.
Enter the dxlsm command as follows:
#
dxlsm
The system displays the following message in a pop up window:
dxlsm is coming up, please wait.
When dxlsm comes up, it displays the main LSM Visual Administrator window, called the root window, and the "View of rootdg" window. These windows are described in Section 10.3.
The following sections describe the basic disk operations you can perform using the Visual Administrator. When managing disks, it is important that you recognize the difference between a device name and a disk name. Refer to Section 1.6.2 for more information about how LSM disks are named.
Whenever you add a new disk, you must identify it to the system.
This is also called initializing the disk. The system software cannot make
use of the physical disk device without a software pointer to that disk. In
order for LSM to be able to control a disk, that disk must also be
identified to LSM.
To initialize a disk using dxlsm, follow these steps:
Basic-Ops -> Disk Operations -> Add Disks
| Field | Description |
| New device name | Enter the new physical device name in rznp form. The name must be unique within the disk group. |
| Disk group | Enter the name of the disk group to which this disk is to be added. This field is optional. |
If the operation is successful, a new physical disk icon containing a partition icon appears in the View of Disks window. If a disk group was specified, a new LSM disk icon appears in the view window corresponding to the chosen disk group.
If the fstype in the disk label of the specified partition or an overlapping partition is set, LSM displays a warning message to inform you that initializing the disk might destroy existing data.
If you are sure that the disk partition has no valid data and that the partition can be added to LSM, you can use the Execute with Force option to override the warning message. See Section 11.8.4 for instructions on using this option.
If the disk cannot be initialized because the specified partition or an overlapping partition on the disk is open (that is, a partition is actively in use by UFS, AdvFS, LSM or swap), the initialization process fails and dxlsm exits with an error message informing you of the problem.
Before you use a disk, you should confirm that it has been initialized. With the Visual Administrator, physical disk icons containing partition icons appear in the View of Disks window. Those disks that are under LSM control contain partition icons that are colored or patterned. The LSM disks corresponding to colored or patterned partition icons are displayed in the window for the disk group to which they belong. Disk groups are represented visually as disk group views rather than icons. The "View of rootdg" window contains icons representing all LSM disks that exist within the rootdg disk group.
To see the disk information displayed in the View of Disks window, click MB1 on the Disks button in the Visual Administrator window. A View of Disks window appears (see Figure 12-1).

The Visual Administrator allows you to see detailed information about a particular LSM disk in a properties form.
To display disk configuration information for a particular LSM disk, in the "View of rootdg" window (or appropriate disk group view), click MB3 on the disk icon whose properties you are viewing. The disk's properties form appears, displaying detailed information about the disk.
It is possible to alter certain characteristics of the LSM disk (such as its name) via its properties form by editing the appropriate properties form field and then clicking MB1 on Apply.
Disks are added to and grouped in disk groups for ease of administration.
To add another disk to an existing disk group, do the following:
Advanced-Ops -> Disk Groups -> Add Disk
If you look at the view window for the group you specified, you see that the new disk has been added to that disk group.
Note
You cannot put a disk in more than one disk group. If you attempt to do so, LSM returns an error message.
Disks might be named according to their purpose (for example docs0), their owner (for example smith02), or their work group (for example pubs01). However, it is not necessary to give the disks special names (names such as disk01 suffice). If the owner or purpose of the disk changes, you might want to change the disk name to reflect the change of ownership or use.
To rename a disk, do the following:
A disk group consists of one or more disks that share a common configuration. Disks are grouped together in disk groups for ease of administration.
To create a disk group, perform the following steps:
Advanced-Ops -> Disk Groups -> Initialize
When a disk group is deported, access to that disk group is disabled. Disk groups may be deported if you intend to move or reuse the disks that are currently in the disk group.
To deport a disk group, do the following:
Advanced-Ops -> Disk Group -> Deport Disk Group
In the Deport Disk Group Form, enter the name of the disk group to be deported.
The deported disk group's view disappears.
Importing a disk group enables access to a deported disk group. The disk group to be imported must have been deported at one time and at least one disk that belonged to this disk group before it was deported must remain unused.
To import a disk group, do the following:
Advanced-Ops -> Disk Group -> Import Disk Group
In the Import Disk Group Form, enter the name of the disk group to be imported.
The view button for the disk group that has been imported appears in the Visual Administrator root window.
With the Visual Administrator, disk groups are represented by view windows rather than icons. A view for each disk group that exists is accessible through a button in the Logical Storage Manager Visual Administrator root window.
To view the objects belonging to a particular disk group, click MB1 on the appropriate disk group button in the Logical Storage Manager Visual Administrator root window. The view window for the desired disk group appears, displaying an icon for each object that belongs in that disk group.
Before you add volumes and file systems to your system, you may want to make sure you have enough free disk space to adequately meet your needs. LSM lets you request a display of free space.
To display the free space on a disk, in the "View of rootdg" window (or the appropriate disk group view), click MB3 on the desired LSM disk. The properties form for the selected disk appears. The last field in this window shows the maximum free space available on that particular disk. Confirm that the amount of free space is sufficient.
The disk hardware is removable and can be moved between systems to where it is needed the most. However, before removing the disk from the current system, you must remove the software connections the disk has with the system. First you must remove the disk from its disk group, then you can remove the disk.
To remove a disk from a disk group, do the following:
Advanced-Ops -> Disk Group -> Remove Disks
The disk icon disappears from its disk group view.
To remove a disk that no longer belongs to a disk group, do the following:
Advanced-Ops -> Disk -> Remove Disks
Note
LSM does not allow you to remove the last disk in a disk group. To remove the last disk from a disk group, deport that disk group first, then reuse the disk.
If a disk fails, you need to replace that disk with another. It is possible to replace a disk without disrupting the system; this is referred to as replacing a disk in place. It requires disabling and removing the failed disk and installing a new disk in its place.
To replace a disk in place, perform the following steps:
Basic-Ops -> Disk Operations -> Replace Disks
A volume is a virtual disk on which file systems or databases can be placed. This section describes the volume operations available with the Visual Administrator.
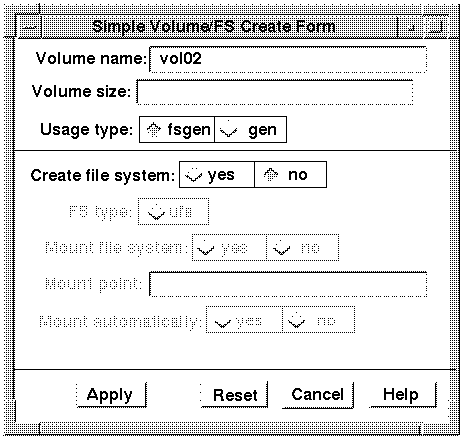
To create a simple concatenated volume, perform the following steps:
Basic-Ops -> Volume Operations -> Create -> Simple
Figure 12-2 shows an example of this form.
Note
Because a file system is not created by default with this operation, the file system fields in the Simple Volume/FS Create Form are greyed out.
A striped volume is one whose plex consists of a number of equal-sized subdisks, each located on a separate disk. Striped volumes provide faster average response time.
To create a striped volume, perform the following steps:
Basic-Ops -> Volume Operations -> Create -> Striped
Figure 12-3 shows an example of this form.

Note
Because a file system is not created by default with this operation, the file system fields in the Striped Volume/FS Create Form are greyed out.
LSM automatically selects the disk or disks each volume will reside on, unless you specify otherwise. If you want a volume to reside on a specific disk, you must designate the disk for LSM.
To create a simple volume on a specific disk, do the following:
Basic-Ops -> Volume Operations -> Create -> Simple
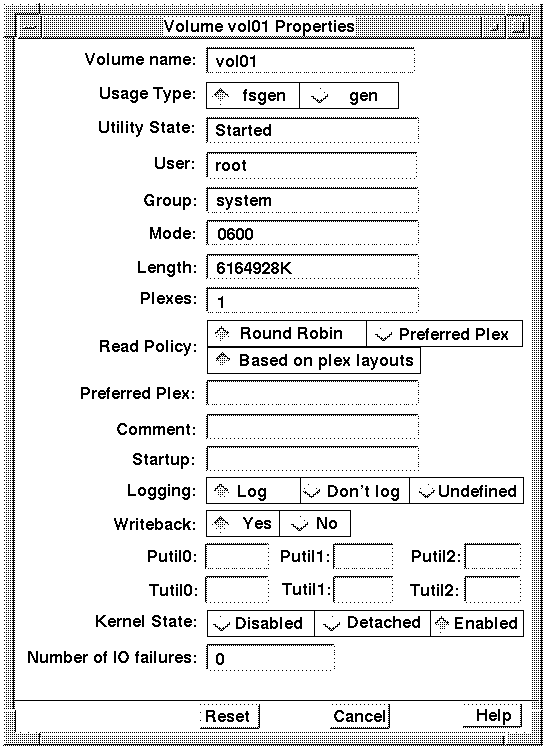
At times, you may want to see how a volume is configured. The Visual Administrator allows you to view detailed information about a particular volume in a volume properties form.
To display volume configuration information for a particular volume, in the "View of rootdg" window (or appropriate disk group view), click MB3 on the volume icon whose properties are to be viewed. The volume's properties form appears, displaying detailed information about the volume (see Figure 12-4).
It is possible to alter certain characteristics of the volume (such as its name) via its properties form by editing the appropriate properties form field and then clicking MB1 on Apply.
A mirror is a copy of a volume. The mirror copy is not stored on the same disk as the original copy of the volume. Mirroring a volume assures you that the data in that volume will not be lost if one of your disk fails.
To mirror a volume, perform the following procedures:
Basic-Ops -> Volume Operations -> Add Mirror
An additional plex appears within the volume icon's borders.
If the volume is not large enough for the amount of data that needs to be stored in it, you need to extend the volume's length.
To extend a volume, follow these steps:
Basic-Ops -> Volume Operations -> Resize
Notes
You cannot extend a striped volume.
To prevent accidental destruction of file systems, the extend operation will fail if a volume is open when you perform the operation. To override the failure, use the Execute menu to reissue the volassist command with an added -f force option.
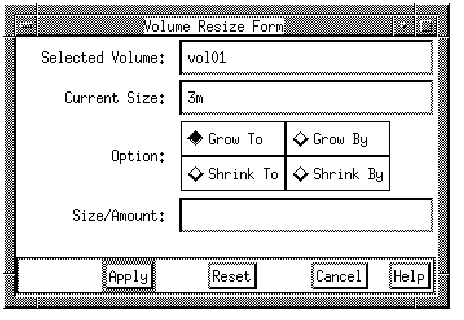
If you find that your volume is much larger than you really need it to be, you can shrink the volume's size. However, be aware that shrinking a volume containing data (perhaps in the form of a file system or database) can result in the loss of any data residing on the part of the volume that is removed.
To shrink a volume, complete the following operations:
Basic-Ops -> Volume Operations -> Resize
Notes
You cannot shrink a striped volume.
To prevent accidental destruction of file systems, the shrink operation will fail if a volume is open when you perform the operation. To override the failure, use the Execute menu to reissue the volassist command with an added -f force option.
Once a volume is no longer necessary (it is inactive and archived, for example), you can remove the volume and free up the disk space for other use. It is possible to remove a volume recursively, which automatically takes care of removing its associated plexes and freeing up its associated subdisks.
To remove a volume recursively, do the following:
Basic-Ops -> Volume Operations -> Remove Volumes Recursively
Click the MB1 button on the OK button to remove the volume and its components.
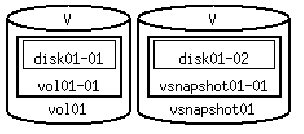
It is very important to make back up copies of your volumes. This provides a copy of the data as it stands at the time of the backup. Backup copies are used to restore volumes lost due to disk failure, or data destroyed due to human error.
To back up a volume, perform the following steps:
Basic-Ops -> Volume Operations -> Snapshot -> Snapstart
Note
For UFS volumes, Digital recommends that you unmount the file system briefly to ensure the snapshot data on disk is consistent and complete.
For volumes used in AdvFS domains, Digital recommends the use of an AdvFS backup method such as cloning.
Basic-Ops -> Volume Operations -> Snapshot -> Snapshot
Basic-Ops -> Volume Operations -> Remove Volumes Recursively
This section describes the file system management operations available with the Visual Administrator.
With the Visual Administrator, a file system can be created on an underlying volume through a single operation. The layout of the volume on which the file system is created can be simple or striped.
To create a file system on a simple concatenated volume, perform the following steps:
Basic-Ops -> UFS Operations -> Create -> Simple
This creates a new volume on which a new file system is created.
Figure 12-7 shows an example of this form.
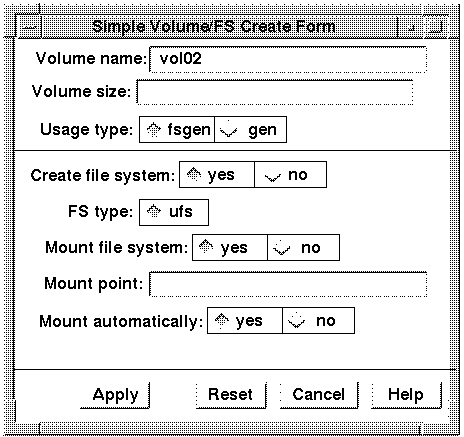
The mount point appears below the volume icon containing the mounted file system.
To create a file system on a striped volume, perform the following steps:
Basic-Ops -> UFS Operations -> Create -> Striped
Figure 12-8 shows an example of this form.
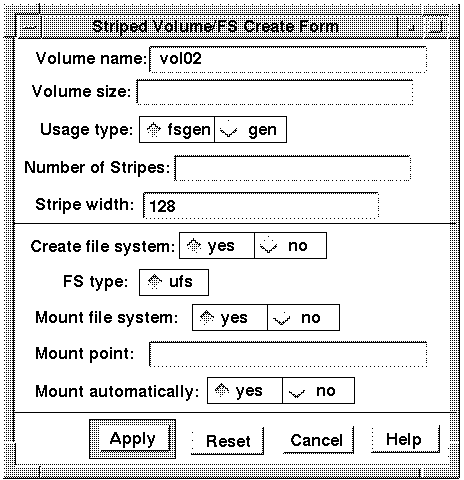
The mount point appears below the volume icon containing the mounted file system.
A mirror is a copy of a volume. The mirror copy is not stored on the same disk as the original copy of the volume. Mirroring a volume containing a file system assures you that the data in that file system will not be lost if one of your disks fails.
To create a mirrored file system, perform the following steps:
Basic-Ops -> Volume Operations -> Add Mirror
With the Visual Administrator, making a file system differs from creating a file system in that a file system is made on a volume that already exists. File systems can be created and placed on existing volumes, one file system per volume.
To make a file system, perform the following steps:
Basic-Ops -> UFS Operations -> Make File System
A file system may exist on a volume, without being mounted.
To mount a file system, do the following:
Basic-Ops -> UFS Operations -> Mount
When the file system is mounted, the mount point appears below the volume icon.
A file system may be unmounted when it is no longer needed.
To unmount a file system, do the following:
Basic-Ops -> UFS Operations -> Unmount
With the Visual Administrator, it is possible to view the properties of mounted file systems.
To display a file system's properties, do the following:
Basic-Ops -> UFS Operations -> Display Properties
To close a Visual Administrator window, select the following from the menu bar of that window:
File -> Close
To end a dxlsm session completely, select the following from the menu bar area of any window.
File -> Exit
A dialog box displays confirming that the dxlsm session is to be closed completely.