The Visual Administrator, also called dxlsm, is a graphical user interface for LSM. This interface is designed primarily for disk and volume operations, but also provides a limited set of file-system operations. You should understand the principles of LSM operations before you use the Visual Administrator. See Chapter 1 for an overview of LSM.
This chapter gives an overview of Visual Administrator features. See Chapter 12 for information on using the Visual Administrator for LSM operations.
A two- or three-button mouse is required to use the Visual Administrator. Table 10-1 describes the mouse buttons, referred to throughout this chapter as MB1, MB2, and MB3.
| Virtual | 3-Button | 2-Button | Function |
| Mouse Button | Access | Access | |
| MB1 | Left | Left | Selects a single icon. |
| MB2 | Middle | Ctrl -Left | Selects either one or multiple icons simultaneously. |
| MB3 | Right | Right | Displays either the properties form or the analysis statistics form for that object, depending on whether the icon is undergoing analysis. |
| Shift -MB1 | Shift -Left | Shift -Left | Toggles between minimizing or maximizing an icon. |
| Shift -MB2 | Shift -Middle | Ctrl -Right | Toggles between starting or stopping projection on the selected icon. |
| Shift -MB3 | Shift -Right | Shift -Right | Displays the properties form for the object, regardless of whether analysis is in effect. |
An icon can be deselected by positioning the pointer over that icon and clicking MB2. This works regardless of which mouse button was used to select the icon.
Note
The examples in this document assume that you are using a three-button mouse, set up according to Table 10-1. It is possible to redefine mouse buttons (using the xmodmap command, for instance). Refer to your X Window System documentation for details.
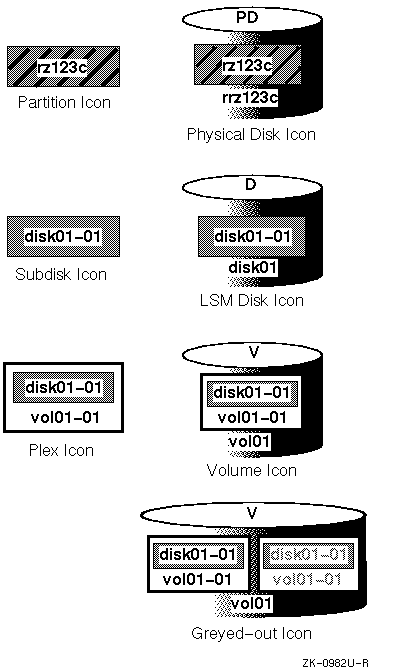
The Visual Administrator interface uses icons to represent LSM volumes, plexes, subdisks, and disks.
Disk groups are represented as view windows rather than icons. The icons representing LSM disks, volumes, and other objects belonging to a particular disk group are all displayed within the view of the disk group.
Figure 10-1 illustrates the icons that dxlsm uses to represent LSM objects. Table 10-2 describes the icons and their characteristics
| Icon | Description |
| Physical Disk | Physical disks appear as cylindrical icons labeled PD. These icons represent physical disks known to dxlsm. Physical disk icons appear in the View of Disks window. |
| Partition | Partitions appear as rectangular icons within physical disk icons. The partition icon is labeled with the device name. If a disk has been added to a disk group, the corresponding partition icon is shaded. Partition icons appear in the View of Disks window. |
| LSM Disk | LSM disks appear as cylindrical icons labeled D. They usually contain subdisks, which are represented as rectangles. LSM disk icons represent disks that are both under LSM control and assigned to a disk group. LSM disk icons are labeled with the disk name, by default. LSM disk icons typically appear in a disk group view. |
| Subdisk | Subdisks appear within LSM disks (and often within plexes) as rectangular shaped icons. Subdisk icons typically appear in disk group views or in the View of Volumes window. Log subdisks (used to log recent disk activity) have icons with double borders to distinguish them from regular subdisk icons. |
| Plex | Plexes appear either alone or within volumes as relatively large rectangles containing subdisks. Plex icons have a heavy border to distinguish them from partition or subdisk icons. Plex icons typically appear in disk group views or in the View of Volumes window. |
| Volume | Volumes appear as cylindrical icons labeled V. These icons often contain plex and subdisk icons. Volume icons are distinguished from disk icons by a heavy border. Volume icons typically appear in disk group views or in the View of Volumes window. |
| Greyed out | With some operations, icons are updated almost instantly to reflect the results of the operation just performed. During other operations, it may take awhile for a particular icon to update itself. While being updated, icons are prevented from accepting input or undergoing configuration changes. Since an icon that is busy being updated should not be selected or manipulated, dxlsm greys out the text in that icon so that the user is aware that it is temporarily inaccessible. No input is accepted by an icon while it is greyed out. As soon as the icon is fully updated, it returns to its normal visual state and accepts input again. Icons that are temporarily greyed out in this manner are also referred to as blocked icons. |
There are two ways to manipulate icons:
| Style | Description |
| Select-Operate | An icon representing an LSM object is selected and then the desired operation is performed on that object via menus and forms. |
| Drag and Drop | An object is manipulated by dragging its icon and then dropping it elsewhere (such as on another object in any view window). |
The select-operate operation works as follows:
The drag and drop operation works as follows:
When an icon is dragged and dropped, the resulting operation depends on the icon type and drop location. The drop location can be another icon or a different location.
Note
When dropping an icon onto another icon, the dragged icon must be positioned so that the pointer (in the image of a hand) is directly over an unobscured portion of the icon on which it is to be dropped.
Some icons can be copied from one user-created view window to another. Only one copy of a particular icon may appear in a view, however. Attempts to drop a second copy are ignored.
Table 10-3 summarizes the possible drag and drop operations.
| Icon Type | Drop Location | Action |
| Free subdisk | View window | Create a plex and associate the subdisk to the plex. |
| Free subdisk | LSM disk | Create an identically-sized subdisk on the disk. |
| Free subdisk | Plex | Associate the subdisk to the plex. |
| Associated subdisk | Free subdisk | Swap the associated subdisk with the free subdisk. The free subdisk becomes associated and replaces the original subdisk, which is removed. |
| Associated subdisk | LSM disk | Create an identical free subdisk on the LSM disk, then swap the associated subdisk with the new free subdisk. The free subdisk becomes associated and replaces the original subdisk, which is removed. |
| Associated subdisk | View window | Dissociate the subdisk. |
| Associated plex | View window | Dissociate the plex. |
| Dissociated plex | User's view window | Copy the plex icon to the user's view. |
| Plex | Volume | Associate the plex to the volume. |
| Disk | User's view window | Copy the physical or LSM disk icon to the user's view. |
| Volume | User's view window | Copy the volume icon to the user's view. |
| Partition | Disk group view | Add a LSM disk (corresponding to the partition) to that disk group. |
Note
If you perform a drag and drop operation that is not recognized by the Visual Administrator, that drag and drop operation is either ignored or a warning message box appears. In some cases, the Command Info Window displays an error relating to an unacceptable drag and drop attempt.
You can use dxlsm to graphically display various aspects of LSM objects. For example, you can display all the disks under LSM control. You can also create a display for a particular disk group. This section describes the windows accessible through dxlsm.
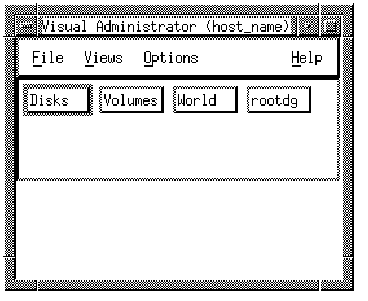
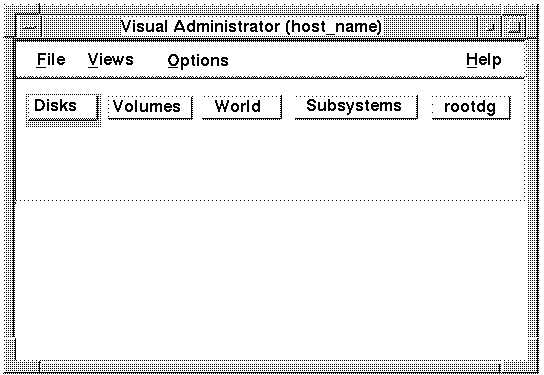
When the Visual Administrator comes up, it displays the main Visual Administrator window, also known as the root window. The root window contains a menu bar and a set of buttons. The set of buttons varies slightly depending on whether you have RAID (Redundant Arrays of Independent Disks) subsystems installed on your system. If you do not have RAID subsystems installed, the root window displays as shown in Figure 10-2.
If you have RAID subsystems installed, the root window displays as shown in Figure 10-3.
The menu bar contains the following pull-down menu items. See Chapter 11 for more information on the operations you can perform using these menus.
| Item | Description |
| File | Closes the current window or exits the Visual Administrator interface completely |
| Views | Creates and manipulates user view windows |
| Options | Sets user preferences for dxlsm and displays the command window |
| Help | Accesses the help facility |
Immediately after the root window displays, the "View of rootdg" window also appears automatically. This view displays icons representing everything that currently exists in the rootdg disk group.
From the Visual Administrator root window, you can display the view windows, also referred to as views. View windows allow you to examine and manipulate different parts of the physical and logical storage systems. Each view window title includes the name of the machine on which the session is running.
The Visual Administrator root window provides a view button area containing a button for every view on the system. The buttons for the Disks, Volumes, World, and rootdg views windows are shown in Figure 10-2. To access a view window, click MB1 on one of the view buttons.
The Visual Administrator allows for two types of views: default and user-created. Both types function identically, but certain restrictions are placed on default views. Default views cannot be removed or renamed, as user-created views can.
Click MB1 on the view buttons to access the following default view windows:
| Menu Buttons | Window | Access |
| Disks | View of Disks | Displays all physical disks on the system |
| Volumes | View of Volumes | Displays all volumes, as well as plexes and associated subdisks, on the system |
| World | View of World | Displays everything on the system including physical and LSM disks, volumes, and other objects |
| rootdg | View of rootdg | Displays everything in the default disk group, rootdg, including LSM disks, volumes, and other objects |
A user-created view is a view window that focuses on a particular part of a physical and a logical mass storage system, as defined by the system administrator. For example, a system administrator can create a view window for each disk group.
User-created views differ from default views in that they contain copies of icons from default views. Operations performed on these icon copies are reflected in the default views that display the affected icons. However, icons that appear in user-created views are not always updated whenever those icons are altered in the corresponding default view.
Use the Views menu from the Visual Administrator root window to create a new view window. Once the view is created, you can use its Icon menu to add icons, by copying them over from existing views.
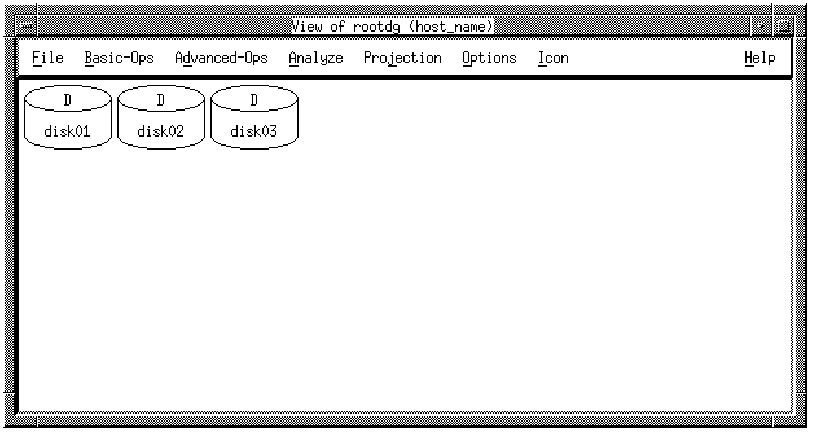
The "View of rootdg" window contains objects belonging to the rootdg disk group. By default, it appears immediately after the Visual Administrator window displays (see Figure 10-4). Whenever possible, perform operations in the "View of rootdg" window, or in another disk group view.
Figure 10-4 shows a "View of rootdg" window that does not yet contain any volumes. See Chapter 11 for information on the operations that can be performed from the "View of rootdg" and other disk group windows.
The Visual Administrator provides pull-down menus that provide access to various Visual Administrator features. Once you have accessed a pull-down menu you can select any available option. Unavailable options are displayed within the menu in greyed-out text to distinguish them from available ones. Some menu selections lead to other submenus; some lead to forms that can be completed and then applied; some simply execute a specific operation immediately. Help is available on every menu to assist you in understanding the current operation.
Each window contains a title bar that identifies the window. Below the title bar is a menu bar, which contains the names of each available pull-down menu. One of the characters of each menu name is underlined; this is the mnemonic associated with that particular menu.
Figure 10-5 illustrates both the title bar and menu bar of a typical view window.

The Visual Administrator uses forms to present textual information for you to examine and change. These forms provide useful information about existing objects and configurations.
There are two types of forms:
The following subsections describe form fields, buttons, and error messages.
Many forms require input to proceed with an operation. If a required form field is either blank or incorrect, an error message will result. Other form fields already contain information (such as default values), which you may either alter or accept. Yet other form fields are read-only and therefore cannot be changed; these fields beep if you attempt to change them.
Form fields can be altered or completed in various ways, depending on the type of field. Some require text to be typed in, while others make use of assorted buttons that can be toggled or selected.
Figure 10-6 illustrates a volume properties form.
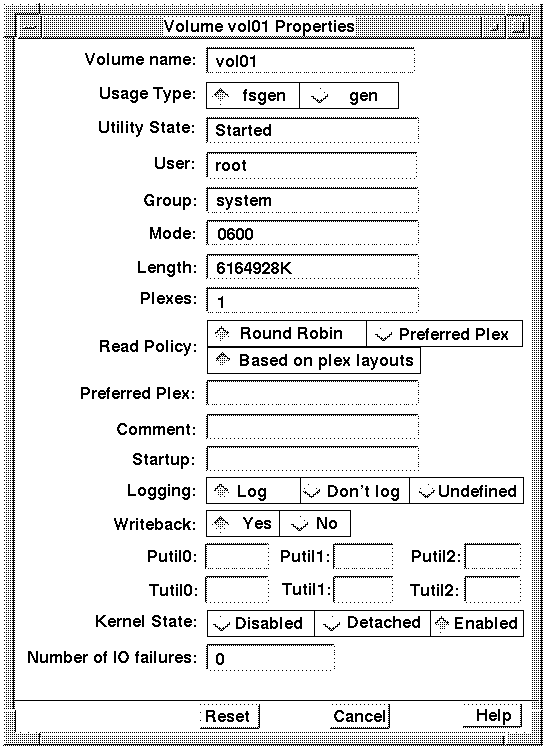
All forms have buttons on the bottom of the screen that perform standard functions:
| Apply | Accepts the information on this form, checks for errors, and continues with an operation. Pressing the Return key is equal to selecting the Apply key with a form. For a properties form, the Visual Administrator issues the appropriate commands to make the changes. |
| Reset | Fills in the fields of the form with its default values. If the form is a properties form, the Visual Administrator uses the values that were present when the form first displayed. |
| Cancel | Ignores all changes made on the form and closes it. If the form was brought up as part of an operation, that operation is canceled. |
| Help | Displays the Help window with information about the form. |
Some forms are read-only; only the the Help key and the Cancel buttons are provided on these forms.
Note
On some displays, certain forms may be too long to fit entirely on the screen and the buttons and fields at the bottom of the form may not be visible. If this is the case, the window manager's move window function ( Alt - F7 , by default) can be used to move the form to view the desired buttons or fields.
Error messages are displayed if you select the Apply button with one or more fields incorrect on the form. A message is printed at the bottom of the form, and you can correct the values for those fields. If the error cannot be corrected or the operation is no longer desired, you should select the Cancel button.
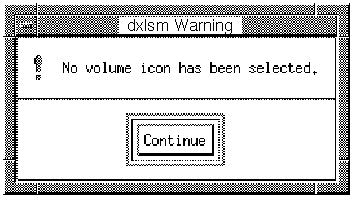
The Visual Administrator uses dialog boxes to present error or warning messages. When a message is displayed in this manner, you must acknowledge it by selecting one of the buttons displayed in the error dialog box before proceeding. Some warning boxes announce that a prerequisite has not been met and require you to acknowledge this by clicking the displayed Continue button before reattempting the operation (see Figure 10-7).
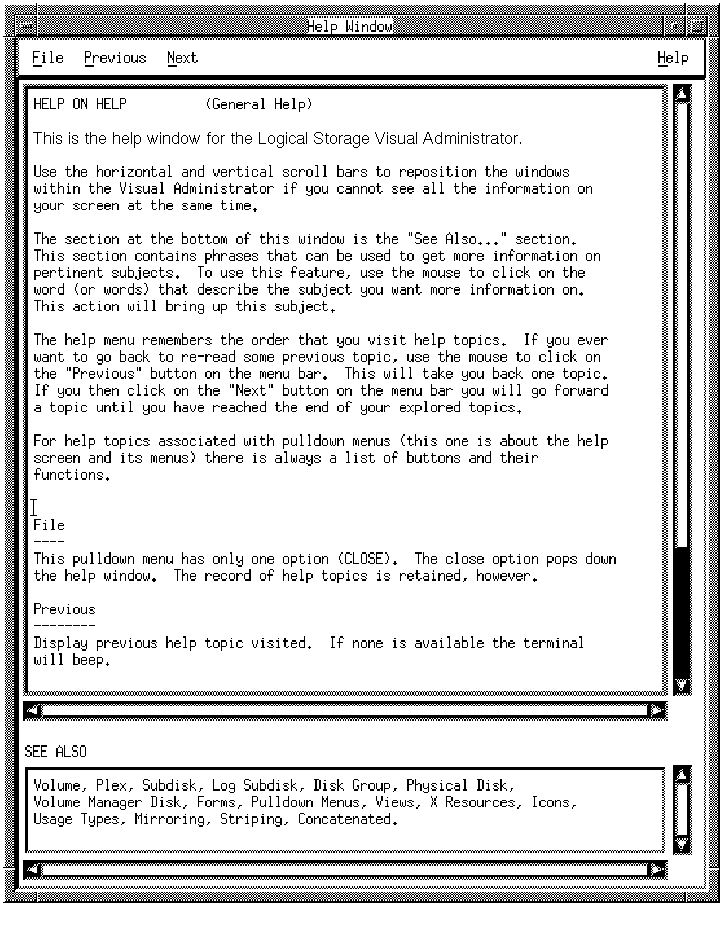
You can access on-line help text from the menu bar of the Visual Administrator root window and the view windows. In addition, help text is available through the Help option in submenus or through the Help button at the bottom of a form.
Once you invoke Help, a Help window containing information relevant to the current window, menu, form, or operation appears. The Help window is equipped with both horizontal and vertical scrollbars, which can be used to scroll through the available Help text.
At the bottom of each Help window is a SEE ALSO area. This area lists similar or related Help topics. To access any of the listed Help topics, simply click the MB1 button on the appropriate words in the SEE ALSO list. The Help facility keeps track of the order in which Help topics are visited, so you can return to a previous topic. Selecting Previous from the menu bar displays the previous topic. Selecting Next displays the next topic.
The Help menu in the menu bar of the Help window itself provides access to the following information:
| General Help | Accesses Help text that includes general information on the Visual Administrator Help facility and how it is used. |
| Help Index | Accesses a complete listing of the available Help topics, arranged in logical groupings. Once a topic is identified from this list, that topic can be directly accessed from the SEE ALSO section of this Help window, which lists all topics alphabetically. |
To close the Help window, select the Close option from the File menu. The record of help topics visited is retained.
Figure 10-8 illustrates a typical Help window.
