This chapter provides the information you need to prepare a RIS server. Topics include:
This section only applies if you are installing a new version of the operating system into a RIS environment on a server that is running a previous version of the operating system. If not, go to section Section 3.2.
Note
If you plan to serve third-party software products from this RIS area, where a new driver is needed to boot the client, the RIS server must be running Tru64 UNIX Version 4.0F. If this is the case, go to section Section 3.2.
To install the operating system into a RIS environment on a RIS server running a previous version of the operating system, you must do the following on the server as superuser:
If your distribution media is CD-ROM, enter a
mount
command similar to the following:
#mount -rd /dev/rz4c /mnt
This example uses a CD-ROM drive that is unit 4 and specifies
/mnt
as the mount point; if your drive is a different unit, substitute
the device special file name for that unit.
If you are uncertain of your CD-ROM's unit number, use the
file
command as follows:
#file /dev/rrz*c/dev/rrz1c: char special (8/1026) SCSI #0 RZ25 disk# 8 (SCSI ID # 1) /dev/rrz2c: char special (8/2050) SCSI #0 RZ25 disk# 16 (SCSI ID # 2) /dev/rrz3c: char special (8/3074) SCSI #0 RZ25 disk# 24 (SCSI ID # 3) /dev/rrz4c: char special (8/4098) SCSI #0 RRD43 disk# 32 (SCSI ID # 4)
The CD-ROM device corresponds to the RRD device, in this example RRD43.
To update the necessary RIS utilities on the server, assuming
the distribution media is mounted at
/mnt, enter the following:
#/mnt/isl/utilupdate -r -m /mnt
In this example, the
-r
flag causes
utilupdate
to copy several files from the distribution CD to the
server's
/usr/sbin
directory.
This ensures RIS compatibility
with the operating system.
The
-m
directory
is the mount point of the distribution media.
In this example,
directory
is
/mnt, and is a required parameter.
This command copies any files in
/usr/sbin
that would be overwritten to files with a
*.pre-V4.0F
suffix.
For example:
/usr/sbin/setld
is copied to
/usr/sbin/setld.pre-V4.0F.
When the
utilupdate
script completes, this RIS server
can serve a RIS client.
Appendix C
describes the
utilupdate
utility.
When you are installing the operating system, if the utility finds existing
*.pre-V
files on your system, the existing utilities are updated
with no changes to the saved
*.pre-V
files.
If the server
is already running the new or updated version of the operating system, a confirmation
message is displayed and no copies are made.
Please note the following system compatibility restrictions:
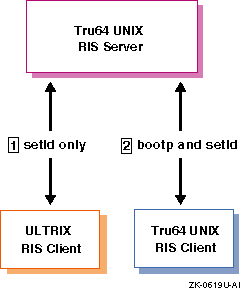
Support of differing bootstrap protocols restricts the use of the Tru64 UNIX and ULTRIX operating systems together in RIS environments.
Alpha-based clients can broadcast
bootp
requests.
VAX-based or MIPS-based clients broadcast only Maintenance Operation
Protocol (MOP) requests, which means they cannot boot from the servers.
After a client's operating system is installed and running,
a server can serve additional product subsets to a client running either an
ULTRIX or a compatible operating system.
The client loads the additional
subsets by using the
setld
utility.
Figure 3-1 shows these relationships:
ULTRIX RIS clients cannot be booted by Tru64 UNIX
RIS servers.
This means that a Tru64 UNIX server cannot serve the ULTRIX
base operating system over the network.
However, after the ULTRIX operating
system is up and running on the client, the Tru64 UNIX server can serve
an ULTRIX client additional product subsets.
The ULTRIX client loads additional
product subsets by using the
setld
utility.
A RIS client can be booted by a RIS server by using the
bootp
protocol.
This means that a server can serve both the base
operating system as well as additional product subsets to the client over
the network.
The client loads additional product subsets by using the
setld
utility.
Before beginning an installation, you must calculate the amount of disk storage required for the software subsets in the RIS areas on the server. If space on the server's system disk is an issue and your server's distribution media is a CD-ROM, you might want to create symbolic links from the RIS server area to the software on the CD-ROM. Section 4.1 briefly describes the advantages and disadvantages of establishing symbolic links instead of extracting the software subsets into the RIS server area.
See Chapter 1 for a description of the RIS area's contents. A given server can have multiple RIS areas, in which some of the subsets can be duplicated. To organize your RIS server's disk space, perform the following steps:
Determine how many RIS environments you want.
Choose the software subsets you want to install, organizing them by the environments where they are to be installed.
Use the subset size information in the Installation Guide to ensure that you have adequate disk space.
The Installation Guide describes how to install the operating system on the server. It lists all of the standard supported software subsets with subset names, sizes, and descriptions of their contents. This information will help you organize the process before you perform the installation.
Because RIS areas are created in
/var/adm/ris,
you may want to specify a separate
/var
file system during
the installation to get extra disk space.
To specify a separate file system
for
/var, refer to the instructions in the
Installation Guide.
A RIS server must have the
Remote Installation Service
and
Additional Networking Services
subsets installed.
These
subsets contain the
tftp
networking utility and the
joind
bootstrap daemon.
Enter the following command to see if these subsets are installed:
#/usr/sbin/setld -i | egrep "RIS|INET"
Information similar to the following should be displayed:
OSFCLINET440    installed       Basic Networking Services
OSFINET440      installed       Additional Networking Services
OSFRIS440       installed       Remote Installation Service
The
Basic Networking Services
subset is mandatory
and is installed automatically.
If the
Additional Networking Services
and
Remote Installation Service
subsets are
not installed, you must install them by using the
setld
utility.
See the
Installation Guide
for more information about using the
setld
utility to install subsets.
You
must connect the RIS server and all of the client processors to a LAN using
either Ethernet, FDDI, or Token Ring.
The server and clients all must be on
the same network or subnetwork unless the router connecting the networks or
subnetworks can forward
bootp
requests.
For instructions on setting up a local area network, refer to the Network Administration guide.
The Tru64 UNIX Server Extensions license (OSF-SVR or
UNIX-SERVER) provides the right to use the RIS software on Tru64 UNIX
systems.
A product authorization key (PAK) accompanies the license.
You must
register the PAK information for your system before it can be configured as
a RIS server.
Register the PAK information by using the License Manager application.
Refer to
dxlicense(8)
for additional information.
See the
Software License Management
guide and the License Manager online help for more information about registering
license PAKs.
After you have registered the PAK information, you can complete the server setup tasks described in Chapter 4.
If your RIS server
will have C2 security enabled, the
ris
user file must be
changed to ensure that the
ris
password does not expire
and deny client access.
Perform the following steps on the RIS server as superuser to
modify the
ris
user file if you are going to use RIS with
C2 security enabled:
Edit the file
/tcb/files/auth/r/ris.
Each
field is delimited by a colon ( : ).
Set the current password field
u_pwd
to
an asterisk ( * ).
Set the
u_succhg
value to any non-zero
value.
This value is a
time_t
type printed with
%ld.
Set the
u_life
and
u_exp
fields to zero.
The following is an example of a modified
/tcb/files/auth/r/ris
user file:
ris:u_name=ris:u_id#11:u_oldcrypt#0:u_pwd=*:u_exp#0:u_life#0:
u_succhg#79598399:u_suclog#79598399:u_lock@:chkent:
After you make these changes, the RIS password should not expire and cause a denial of service to clients.