The Network Time Protocol (NTP) provides accurate, dependable, and synchronized
time for hosts on both wide area networks (WANs) like the Internet network
and local area networks (LANs).
In particular, NTP provides synchronization
traceable to clocks of high absolute accuracy, and avoids synchronization
to clocks keeping bad time.
The Tru64 UNIX NTP subsystem is derived from
the University of Maryland's implementation,
xntpd
Version
3.4m.
The
/etc/ntp.conf
file is the configuration file
for the
xntpd
daemon.
This chapter describes:
The Tru64 UNIX NTP subsystem and its components
Guidelines for configuring and administering NTP
NTP configuration planning
NTP configuration
Day-to-day NTP management tasks
For introductory information on NTP, see the
ntp_intro(7)
reference
page.
Also, for information about the latest releases of NTP, more examples
of how to configure NTP subnets, and extensive NTP troubleshooting information,
visit the NTP website at
http://www.eecis.udel.edu/~ntp.
As an alternative to NTP, you can set your system time by using the
rdate
command or the
timed
daemon.
Note
You should use NTP for time synchronization. The
timeddaemon is provided only for compatibility. If you plan to run both thetimeddaemon and NTP, you should configure NTP first and run the timed daemon with the-Eoption.
For more information on the
rdate
command, see
rdate(8)
and
ntp_manual_setup(7).
For more information on the
timed
daemon, see
timed(8)
and
timedsetup(8).
In the NTP environment, systems can have the following roles:
Client -- An NTP client system is a system that synchronizes its time with local NTP servers.
Server -- An NTP server is a local system that synchronizes its time with an Internet NTP server or with a local reference clock, or both for better accuracy.
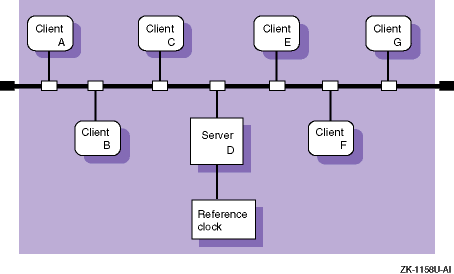
Figure 10-1 shows a sample NTP configuration on a LAN in which Host D is an NTP server that uses a local reference clock as its time source. Hosts A, B, C, E, F, and G are NTP clients, synchronizing their time with Host D.
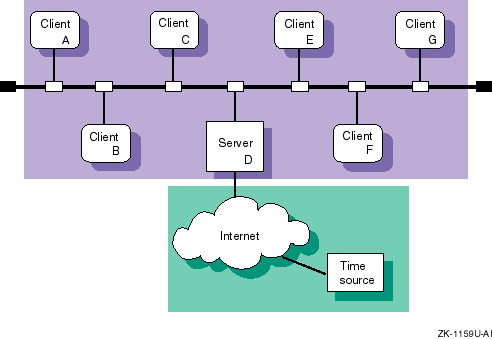
Figure 10-2 shows a sample NTP configuration in which host D is an NTP server that uses an Internet time server as its time source. Hosts A, B, C, E, F, and G are NTP clients, synchronizing their time with Host D.
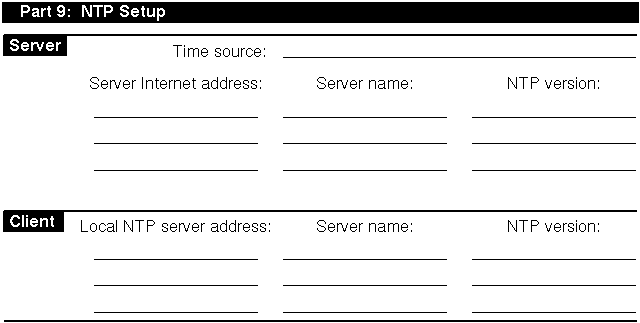
Appendix A contains a worksheet that you can copy and use to record the information that you need to complete the tasks in this book. If you are viewing this manual online, you can use the print feature to print a copy of this part of the worksheet.
Figure 10-3 shows Part 9 of the Configuration Worksheet. The following sections explain the information you need to record in Part 9 of the worksheet.
Your system can be a local NTP server or an NTP client, or both.
Your system's time source. For local NTP servers, the time source is one of the following:
Internet NTP servers --
If
your system is connected to the Internet, you can obtain a list of possible
NTP Internet servers from
http://www.eecis.udel.edu/~ntp
on the World Wide Web.
You should select a minimum of three systems from the
server list with which to synchronize the time on your local NTP servers.
Obtain permission from the contact person listed for each Internet server
before specifying it as a server for your local NTP servers.
A local reference clock --
If your network is not connected to the Internet network, you must select
a system on your network to be the local reference clock.
A local reference
clock is a lightly loaded and highly available system that keeps good time.
See
ntp_manual_setup(7)
and
ntp.conf(4)
for information on setting up a local
reference clock.
The IP address of the Internet NTP server or the local reference clock. Local NTP servers are the time sources for NTP clients.
The host name of the Internet NTP server.
The version of NTP daemon running on the Internet NTP server
or the local reference clock.
This can be Version 1 (the
ntpd
daemon), Version 2 (the
xntpd
daemon), or Version 3 (the
xntpd
daemon).
The local NTP server IP address. Local NTP servers are the time sources for NTP clients.
The local NTP server name.
The version of NTP daemon running on the local NTP server.
This can be Version 1 (the
ntpd
daemon), Version 2 (the
xntpd
daemon), or Version 3 (the
xntpd
daemon).
Servers running Version 3.2 or earlier of the Tru64 UNIX operating system
run Version 2 (the
xntpd
daemon); servers running Version
4.0 of the Tru64 UNIX operating system run Version 3 (the
xntpd
daemon).
After you gather the necessary information and select your Internet
servers, configure NTP by using the
ntpsetup
script.
The
script enables you to configure all NTP clients and local NTP servers, provided
they use Internet NTP servers as their time source.
Note
Do not use the
ntpsetupscript to configure NTP on local NTP servers that use a local or external reference clock as a time source. Instead, seentp_manual_setup(7) for instructions.
If you plan to use both NTP and the
timed
daemon,
set up NTP prior to setting up the
timed
daemon.
To configure NTP, do the following:
Invoke the
ntpsetup
script by choosing
the Network Time Protocol (NTP) option from the Setup Menu or by entering
the following command:
#/usr/sbin/ntpsetup
An explanation of the
ntpsetup
script appears on your screen.
If the
timed
daemon has been configured on the system,
the following message is displayed:
NOTE: timed has been configured on this system.

In order to insure proper coexistence, timed must be
configured AFTER NTP.

If you continue with the NTP configuration, the timed
configuration data will be removed (which means timed cannot run).
You will need to re-enable timed by using timedsetup again.

Do you wish to continue (yes/no) [no default]?
Press Return following the script's explanation of what
ntpsetup
does.
Indicate whether or not you want to run the
xntpd
daemon with authentication.
Authentication enables you to verify the authenticity of received NTP packets and indicate authenticity of outgoing NTP packets. If you want to use authentication, enter Y. If you do not want to use authentication, press Return.
Enter the names of the NTP servers for this system.
For clients, enter the names of your site's local NTP servers. For servers, enter the names the Internet NTP servers. (See Section 10.2.1 for information on selecting Internet servers.) In either case, you should specify a minimum of three NTP servers.
For NTP clients, entries in the
ntp.conf
file are
designated server entries because clients can only synchronize their time
with them.
NTP servers, however, can contain server and peer entries.
The
term peer indicates that the local server can be synchronized to the remote
server and that the remote server can be synchronized by the local server.
If you enter the name of a host that your system cannot find an address
for in the local
/etc/hosts
database or through BIND or
NIS, the
ntpsetup
script prompts you for its IP address.
For example:
Hostname of NTP server/peer [no default]:host1Mode for host1 (server or peer) (s/p) [s]:[Return]Looking up host host1Cannot find an address for "host1".To add "host1" to the /etc/hosts file, you must know"host1"'s internet (IP) address.Would you like to add "host1" to the /etc/hostsfile (y/n) [y]?[Return]What is host1's internet (IP) address [no default] ?120.105.1.2Is 120.105.1.2 correct (y/n) [no default] ?yIs host1 running ntpd (V1) or xntpd (V2/V3) (V1/V2/V3) [V3] ?V2 [Return]Hostname of NTP server/peer [no default]:host2Mode for host1 (server or peer) (s/p) [s]:[Return]Looking up host host2 ...found.Is host2 running ntpd (V1) or xntpd (V2/V3) (V1/V2/V3) [V3] ?V2 [Return]Hostname of NTP server/peer [no default]:host3Mode for host1 (server or peer) (s/p) [s]:[Return]Looking up host host3 ...found.Is host3 running ntpd (V1) or xntpd (V2/V3) (V1/V2/V3) [V3] ?V2 [Return]Hostname of NTP server/peer [no default]:[Return]
If you have selected to use authentication,
the
ntpsetup
script prompts you for a key number to be
associated with each server after it prompts you for the mode, as follows:
Enter the key number to be associated with hostname:
The
ntpsetup
script then displays the list of servers that you entered.
If the list is
correct, enter c to continue.
If the list in incorrect or incomplete, enter
r to redo it.
Press Return following the script's explanation that if any
of your NTP servers are not on your subnet you must run either the
routed
or the
gated
daemon to access them.
For information on running the
gated
or
routed
daemon, see
Chapter 2.
Indicate whether or not you want to run the
xntpd
daemon with the
-g
option.
The
-g
option allows
xntpd
to correct time differences of more than 1000 seconds between your system
and that of your system's NTP servers that occur after the
xntpd
daemon is started.
Initial time differences are corrected before
the
xntpd
daemon is started by the
ntpdate
command, which is run at boot time by the
/sbin/init.d/settime
script.
If your system is sensitive to security threats, do not use the
-g
option.
If you do not
use the
-g
option, time differences of more than
1000 seconds will cause the
xntpd
daemon to log a message
to the
syslog
daemon and exit.
Indicate whether you want to run the
xntpd
daemon with the
-x
option.
The
-x
option prevents the
xntpd
daemon from setting the system time backward.
The default is to allow
xntpd
to set the system time backward.
If you have chosen authentication, enter the authentication
keys and key identifiers to be put in the
/etc/ntp.keys
file.
Enter as many as you need.
For example:
Enter key and key identifiers separated by one space (no default):1 defcdEnter key and key identifiers separated by one space (no default):[Return]
The
ntpsetup
script then displays the list of keys and key identifiers
that you entered.
If the list is correct, enter c to continue.
If the list
in incorrect or incomplete, enter r to redo it.
The
ntpsetup
script displays a message similar to
the following and exits:
Configuring your system to run NTP...done.

Starting the NTP daemon (xntpd)...
Setting kernel timezone variable
Setting the current time and date with ntpdate
Ntpdate succeeded.
Network Time Service started
To monitor NTP, type "/usr/bin/ntpq -p".
The operating system includes an optional high-resolution clock that can be used for time-stamping and for measuring events that occur on the order of microseconds, such as the time spent in a critical code path. Programmers might be able to use this information to find the source of a bug or to determine where a program should be optimized to improve performance.
To enable the high-resolution clock, add the following line to the kernel configuration file and rebuild the kernel:
options MICRO_TIME
The system clock (CLOCK_REALTIME) resolution as
returned by the
clock_getres
function does not change,
nor does the timer resolution.
However, the time as returned by the
clock_gettime
routine is extrapolated between the clock ticks, and
the granularity of the time returned is in microseconds.
The resulting time
values are SMP-safe, they are monotonically increasing, and they have an apparent
resolution of 1 microsecond.
You can monitor the hosts running the
xntpd
daemon by using either the
ntpq
command or the
xntpdc
command.
To monitor the local host's NTP status using the
ntpq
command, use the following syntax:
ntpq
[options...]
To monitor remote hosts' NTP status using the
ntpq
command, use the following syntax:
ntpq
[options...]
host1 host2...
Table 10-1
shows the
ntpq
command options.
| Option | Function |
|
Interprets command as an interactive format command and adds it to a list of commands to be executed on the specified host or hosts |
-i |
Forces
ntpq
to operate in interactive mode |
-p |
Prints a list of peers and a summary of their state |
In interactive mode, use the
host
command to set
the host to use as a reference for the other options; the local host is the
default.
Use the
peers
option to display the offsets between
the current host and its
xntpd
servers.
See
ntpq(8)
for more information.
The following example shows normal output from the
ntpq
command with the
-p
option:
%ntpq -premote refid st when poll reach delay offset disp ========================================================================== *host2.corp.com host121.corp.co 2 47 64 377 31.3 93.94 16.5 +host4.corp.com host2.corp.com 3 212 1024 377 33.8 89.58 16.9 host8.corp.com host2.corp.com 16 never 64 0 0.0 0.00 64000
The last line of the previous example shows that host8 is either not running NTP or cannot be reached.
To monitor the local host's NTP status
using the
xntpdc
command, use the following syntax:
xntpdc
[options...]
To monitor remote hosts' NTP status using the
xntpdc
command, use the following syntax:
xntpdc
[options...]
host1 host2...
Table 10-2
shows some of the
xntpdc
command options.
| Option | Function |
|
Interprets command as an interactive format command and adds it to a list of commands to be executed on the specified host or hosts. |
-i |
Forces
xntpdc
to operate in interactive mode. |
-l |
Prints a list of peers that are known to the server. |
-p |
Prints a list of peers and a summary
of their state.
This is similar in format to the
ntpq -p
command. |
See
xntpdc(8)
for more information on this command and its options.
The following example shows normal output from the
xntpdc
command with the
-p
option:
%xntpdc -premote refid st when poll reach delay offset disp ========================================================================== *host2.corp.com host121.corp.co 2 47 64 377 31.3 93.94 16.5 +host4.corp.com host2.corp.com 3 212 1024 377 33.8 89.58 16.9 .host5.corp.com host12.usc.edu 2 111 1024 377 39.1 46.98 17.7
You
can monitor the hosts running the
ntpd
daemon by using
the
ntpdc
command; however, you should use the
xntpdc
command because it works with all versions of NTP and provides
additional features.
You can query time by
using the
ntp
and
ntpdate
commands.
However, you should use the
ntpdate
command because it
works with all versions of NTP and provides additional features to those provided
by the
ntp
command.