After developing your device driver, you should produce the single binary module and then statically or dynamically configure it into the kernel. The chapters in Part 4 explain how to accomplish these tasks.
After your driver is statically or dynamically configured into the kernel, you should test it. One way to test a device driver is to write a test program. Implementing the test program involves the following tasks:
Each of these tasks is discussed in the following sections.
The test program for the /dev/none device driver performs the following tasks:
The test program follows:
/***************************************************
 * testdevnone.c - Test program for /dev/none      *
 *                 driver                          *
 ***************************************************/
/***************************************************
 *                                                 *
 * Author: Digital Equipment Corporation           *
 *                                                 *
 ***************************************************/
/***************************************************
 *         INCLUDE FILES                           *
 *                                                 *
 ***************************************************/
/***************************************************
 *                                                 *
 *                                                 *
 * Header files required by testdevnone.c          *
 *                                                 *
 *                                                 *
 ***************************************************/


#include <stdio.h>
#include <sys/ioctl.h> [1]
#include <sys/file.h>
#include <sys/limits.h>
#include <io/ESA100/nonereg.h> [2]


char buf[100]; [3]

main()
{
	int d; [4]
	int count; [5]

	if((d = open("/dev/none",O_RDWR)) == -1) [6]
	{
		perror("/dev/none");
                exit(1);
	}

	ioctl(d,DN_GETCOUNT,&count); [7]
	printf("saw %d bytes\n",count); [8]

	write(d,&buf[0],100); [9]
	printf("wrote 100 bytes\n"); [10]

	ioctl(d,DN_GETCOUNT,&count); [11]
	printf("saw %d bytes\n",count); [12]

	ioctl(d,DN_CLRCOUNT,&count); [13]
	printf("set count\n"); [14]

	ioctl(d,DN_GETCOUNT,&count); [15]
        printf("saw %d bytes\n",count);

	count = read(d,&buf[0],100); [16]
        printf("was able to read %d bytes\n",count); [17]


	exit(0); [18]
}
The example passes two arguments:
Look up /dev/none in the file system
Notice that /dev/none is a character-special device
Look up the driver entry for /dev/none in the dsent table
Locate the pointer to the noneopen interface that was put there when the /dev/none driver called the devsw_add interface to register the noneopen interface in the dsent table
Call the noneopen interface, passing to it a data structure that describes the device being opened
If the open system call executes successfully, it opens the device and returns a nonnegative value to the test program. However, if the system call fails, the kernel (in cooperation with the driver's noneopen interface) will have set the global variable errno to a constant value that describes the error. If an error occurs, the test program prints the error, using the perror interface, and quits. [Return to example]
Remember that the noneioctl interface in the driver is used to read or clear the count of characters written to /dev/none. Here, the ioctl system call is used to read the count of characters written to the device. The kernel notices that the file associated with the descriptor d is actually a special file, looks up its ioctl interface in the dsent table, and invokes the driver's noneioctl interface. The kernel copies the return value from noneioctl back to the count variable defined in the test program because the bitmask for DN_GETCOUNT instructs it to do so. [Return to example]
The test program passes three arguments to the
read
system call:
As discussed previously, the kernel notices that the file descriptor d is associated with a device and finds the dsent entry for the device's read interface, noneread. The kernel calls noneread to service the read request. The number of bytes successfully read is returned by the read system call. [Return to example]
The following shows the output from a sample run of the test program, which verifies that the driver is working correctly:
saw 0 bytes
wrote 100 bytes
saw 100 bytes
set count
saw 0 bytes
was able to read 0 bytes
You can expand the test program for the /dev/none device driver to do even more complete testing. For example, the test program could check the character count between each of several writes.
Because /dev/none is a simple driver, the test program is relatively straightforward. More complicated drivers require more complicated test programs, but the strategy is the same: for each interface you provide in the driver, test it independently from the other interfaces.
If the driver fails to behave as expected, you need to track down the problem and correct it. Use the following aids and hints:
You cannot use the
printf
interface to debug all driver types.
For example,
printf
frequently is not useful in debugging terminal drivers because use of
the terminal driver may be required to display the contents of
printf
to the terminal.
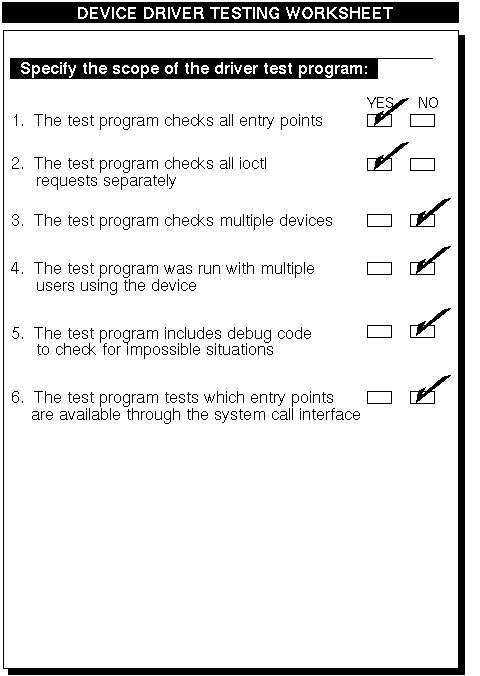
Figure 11-1 shows the device driver testing worksheet for the /dev/none device driver. To identify the scope of your driver test program, use the device driver testing worksheet in Appendix C.
