The Network File System (NFS) is a facility for sharing files in a heterogeneous environment. This chapter describes:
For introductory information on NFS, see
nfs_intro(7).
For troubleshooting
information, see
Section 9.8
for clients and
Section 9.7
for servers.
4.1 NFS Environment
In the NFS environment, systems can have the following roles:
Client -- A system that imports file systems.
A client
can mount file systems by using either the
/etc/fstab
file
or an automatic mounting daemon, such as the
automount
or
autofsd
daemons.
All methods are explained in this
chapter.
Server -- A system that exports file systems.
Your system can be set up as an NFS server, a WebNFS server, an NFS
client, or all three.
4.1.1 Distributing the hosts Database
If your network is running the
Network Information Service (NIS) or the Domain Name System (DNS) to distribute
host information, you do not need to list each server that is referenced in
a client's
/etc/fstab
file in the client's local
/etc/hosts
file.
However, the server's host information must be
in the NIS or DNS database.
Similarly, if your network is running NIS or DNS to distribute host
information and the client information is listed in the
hosts
database, you do not have to list each client that is referenced in a server's
/etc/exports
file in the server's local
/etc/hosts
file.
4.1.2 Automatic Mounting Daemons
The
automount
and
autofsd
daemons
offer alternatives to mounting remote file systems with the
/etc/fstab
file, allowing you to mount them on an as-needed basis.
When a user on a system running one of these daemons invokes a command that must access a remotely mounted file or directory, the daemon mounts that file system or directory and keeps it mounted for as long as the user needs it. When a specified amount of time elapses (the default is 5 minutes) without the file system or directory being accessed, the daemon unmounts it.
You specify the file systems to be mounted in map files. These maps can be customized to suit your environment and are administered in the following ways:
Use NIS to create and distribute the maps
Administer the maps locally
Use a combination of both methods
See
Appendix A
for information on creating these
maps.
With a few restrictions, as documented in the Restrictions section of
autofsmount(8),
Automount and AutoFS maps can be used interchangeably.
Note
The Automount daemon will be retired in a future release of the operating system. For information about migrating from Automount to AutoFS, see Section 4.6.2.4.
4.1.2.1 Serving Automount and AutoFS Maps with NIS
NIS allows you to create and distribute customized Automount and AutoFS maps. When NIS is used to distribute maps, the administrator of the NIS master server creates and administers the maps for the NIS domain. In this case, you must configure each system that uses Automount or AutoFS as an NIS client so that it can receive the maps.
If many clients in an environment remotely mount the same file system
by specifying it in their
/etc/fstab
file, that file system
is a good candidate for inclusion in a map distributed by NIS.
Carefully
constructed maps can allow client systems to eliminate a large part of their
/etc/fstab
files.
If the location of a file system that is included
in a distributed map changes, or its server changes, the administrator changes
the map on the NIS master server.
The change is then propagated throughout
the domain without users on the client systems having to edit their
/etc/fstab
files.
See
Section 3.3.1
for information on configuring a master
NIS server to serve maps.
4.1.2.2 Local Automount and AutoFS Maps
Local Automount and AutoFS maps might be useful to you under the following circumstances:
Your system mounts remote file systems that are not typically mounted by other NIS clients.
Your network is not running NIS.
You need to test a map.
Administering the
automount
or
autofsd
daemons locally is the same as administering them when NIS distributes the
maps, except that you, as administrator of your system, create and manage
the maps.
A local
auto.master
map serves the same function
as one distributed in an NIS domain.
If you specify a local
auto.master
map, the daemon consults it for the location of other maps, their
local mount points, and the mount options.
You can use an
auto.master
map that is distributed by NIS, a local
auto.master
map, both, or neither, if the selected daemon is invoked correctly.
4.1.2.3 WebNFS
WebNFS is an NFS protocol that allows clients to access files over the
Internet in the same way that local files are accessed.
WebNFS uses a public
file handle that allows it to work across a firewall.
This public file handle
also reduces the amount of time required to initialize a connection.
The public
file handle is associated with a single directory (public)
on the WebNFS server.
See
exports(4),
exportfs(2), and
nfs_intro(4)
for further information.
4.2 Planning NFS
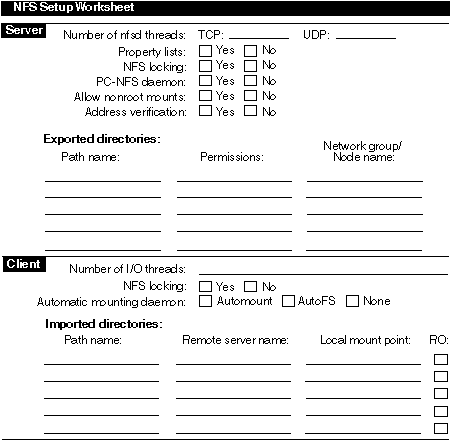
Figure 4-1
shows the NFS Setup Worksheet, which
you can use to record the information required to configure NFS.
If you are
viewing this manual online, you can use the print feature to print a copy
of this worksheet.
The following sections explain the information you need
to record on the worksheet.
Figure 4-1: NFS Setup Worksheet
Enter the number of
nfsd
TCP and UDP server threads to run.
These threads service requests
from NFS clients.
The default number of 8 is adequate for an average work
load.
You can configure a combined total of 0 to 128 TCP and UDP server threads.
On systems that support Cache Coherent NUMA, the number of threads is
per Resource Affinity Domain (RAD).
See
nfsd(8)
and
numa_intro(3)
for more information.
If you want
to run the property list daemon, check Yes; otherwise, check No.
The property
list daemon allows the server to handle requests to get, set, or delete the
property lists associated with NFS-served file system objects.
See
proplistd(8)
and
proplist(4)
for more information.
If you want
to run the NFS lock manager (rpc.lockd) and status monitor
(rpc.statd), check Yes.
Running these daemons allows users
to use the
fcntl
and
lockf
functions
to lock file regions on NFS files (in addition to local files).
If you do
not run these daemons, users can use advisory locking primitives only on
local files.
For more information on the
fcntl
and
lockf
functions, see
fcntl(2)
and
lockf(3).
If you want
to run the PC-NFS daemon (rpc.pcnfsd), check Yes; otherwise,
check No.
The PC-NFS daemon allows the server to handle NFS requests from
PCs.
If you allow nonroot mounts, users on client systems who do not have root privileges can still mount the file systems or directories exported from this system. If you do not allow nonroot mounts, only the superusers on the client systems can mount file systems from this host. The default setting does not allow nonroot mounts.
If you want the server to verify the Internet address of any host that requests an exported directory, check Yes; otherwise, check No. If you choose Yes and you also want to verify that the host is in the server's domain or subdomain, check Domain Checking, Subdomain Checking, or both.
Use the following fields to define file systems that your server will export to client systems:
The path name of the file systems or directories that you intend to export.
The permissions
to assign for each exported file system or directory.
You can specify whether
a file system or directory is exported with read-write (rw) or read-only (ro)
permission, and you can map client superuser access to a root user ID (UID)
number other than the default of -2.
If you have a WebNFS server with
the
-public
option set, the mount access list is ignored
by the server so that all hosts using the WebNFS protocol have access to this
directory.
For more information on assigning permissions to exported file
systems or directories and on specifically mapping the root UID for clients,
see
exports(4).
The network groups or individual host names to which you will
export these file systems or directories.
For information on defining network
groups, see
netgroup(4).
If you want to limit the hosts that can import a file system or directory,
you must explicitly specify the individual hosts or network groups in the
/etc/exports
file.
If you do not specify individual hosts or network
groups, all hosts can import that file system or directory.
If you are exporting a file system to a client that has multiple network interfaces on a subnet, you must specify the host names for all of the interfaces; otherwise, export requests from the unspecified interfaces will be denied. See Network Administration: Connections for more information about multiple interfaces in a subnet and connection balancing.
The number of I/O threads to run.
The default number of 7 is recommended
for optimum load generation on servers.
You can configure from 0 to 64
nfsiod
threads.
In addition, you can start
nfsiod
threads from the
command line.
See
nfsiod(8)
for information on starting
nfsiod
threads from the command line.
If you want
to run the NFS lock manager (rpc.lockd) and status monitor
(rpc.statd), check Yes.
Running these daemons allows users
to use the
fcntl
and
lockf
functions
to lock file regions on NFS files (in addition to local files).
If you do
not run these daemons, users can use advisory locking primitives only on local
files.
For more information on the
fcntl
and
lockf
functions, see
fcntl(2)
and
lockf(3).
If the client is to run an automatic mounting daemon, such as Automount or AutoFS, check the box for one of these daemons; otherwise, check None.
You can select only one automatic mounting daemon.
While AutoFS provides
higher efficiency and availability than Automount, there are some restrictions
for its use.
See the Restrictions sections of
autofsd(8)
and
autofsmount(8)
for more information.
If the network is running the NIS, the Automount or AutoFS maps are better administered and served from the NIS master server. The format of the maps is the same whether they are local or served by the NIS master server. For information on creating maps, see Appendix A.
Use the following fields to define the remote file systems that your client will import:
The complete pathnames of the file systems or directories that you want to import.
The host names of the servers from which you are importing file systems or directories.
The mount point on the local system where you want the imported file systems or directories to reside.
The permissions for the imported file systems or directories. Check the box for a read-only mount. Leave the box unchecked for a read-write mount.
Note
If you mount your user area from a server, make sure that your UID on the client is the same as your UID on the server. NFS uses your client UID to check against file access permissions on the server. If your UID is different on the client and server, you cannot modify your own NFS mounted files (assuming that you have the permissions on the mounted files set so that only you can modify them). Since the server does the access checking, the only UID allowed to modify the files is the one that the server knows.
Use
the SysMan Menu application of the Common Desktop Environment (CDE) Application
Manager to configure NFS on clients and servers.
To invoke the SysMan Menu
application, follow the instructions in
Section 1.2.1.
4.3.1 Configuring an NFS Server
To configure an NFS server, complete the following steps. If you want your system to import file systems, see Section 4.3.2 for information on configuring an NFS client.
From the SysMan Menu, select Networking-->Additional Network Services-->Network File System (NFS)-->Configure system as an NFS server to display the Configure NFS Server dialog box.
Alternatively, enter the following command on a command line:
# /usr/bin/sysman nfs_server
Enter the number of server TCP threads to be run in the appropriate field.
Enter the number of server UDP threads to be run in the appropriate field.
Select the Enable Property List Daemon check box if you want
to run the property list daemon (proplistd).
Deselect the Enable Locking check box if you do not want to
run the NFS lock manager (rpc.lockd) and status monitor
(rpc.statd) daemons.
Locking is enabled by default.
Select the Enable PC-NFS Daemon check button if you want to
run the
rpc.pcnfsd
daemon.
If you run the PC-NFS daemon, you must export to the client the directories
you want to mount on the PC client.
To enable the client to utilize network
printing, you must export the
/usr/spool/pcnfs
directory
to the PC client.
For information on exporting directories, see
Section 4.5.2.
Select the Allow Nonroot Mounts check box if you want to allow users other than root to mount file systems.
Deselect the Internet Address Verification check box if you
do not want the
mountd
daemon to verify the IP address
of each host requesting a mount or unmount.
Internet Address Verification
is enabled by default.
Select the Internet Address Verification & Domain Checking
check box to have the
mountd
daemon verify that the host
requesting a mount or unmount is in the server's domain.
Select the Internet Address Verification & Subdomain Checking
check box to have the
mountd
daemon verify that the host
requesting a mount or unmount is in the server's subdomain.
Specify the directories you want to export by following steps 2 through 7 in Section 4.5.2.
Select OK to validate your changes. The utility prompts you to start the NFS daemons.
Select Yes to save your configuration, start the daemons, and apply the changes immediately; or select No to save your configuration, close the Configure NFS Server dialog box, and apply the changes the next time you reboot your system.
If you choose Yes, you are informed that the NFS daemons have been started. Select OK to dismiss the message and to close the Configure NFS Server dialog box.
You can also modify or deconfigure your server configuration after the
initial setup.
See the online help and
Section 4.4
for more information.
4.3.2 Configuring an NFS Client
To configure an NFS client, do the following:
From the SysMan Menu, select Networking-->Additional Network Services-->Network File System (NFS)-->Configure system as an NFS client. The Configure NFS Client dialog box is displayed.
Alternatively, enter the following command on a command line:
# /usr/bin/sysman nfs_client
Enter the number of client I/O threads to be run in the appropriate field.
Select the Enable Locking check box to specify locking configuration
if the status of the
lockd
daemon is Stopped.
If the status
of the daemon is Running, locking is already set.
Select the Enable Automount Daemon check box to
configure the
automount
daemon.
See
Section 4.1.2
for information on Automount and
Appendix A
for information
on Automount maps.
If you would like to configure the AutoFS daemon, see
Section 4.6.2.2
for more information.
Enter appropriate arguments to the
automount
daemon in the Automount Arguments field.
See
Section 4.6.2.3
for more information.
Specify the directories you want to import, those not already
imported by
automount, by following steps 2 through 10
in
Section 4.6.1.
Select OK to validate the changes.
(Due to the myriad of
automount
arguments available to the user, the validation of these
arguments is deferred until the
automount
daemon starts
and verifies them.)
You are asked if you would like to start or restart the NFS daemons.
Select Yes to save the configuration, start the daemons, and apply your changes immediately; or select No to save the configuration, close the Configure NFS Client dialog box, and apply the changes the next time you reboot your system.
If you choose Yes, you are informed that the NFS daemons have been started. Select OK to dismiss the message and to close the Configure NFS Client dialog box.
You can also modify or deconfigure your client configuration after the
initial setup.
See the online help and
Section 4.4
for more information.
4.4 Deconfiguring NFS
You can use the SysMan Menu to deconfigure NFS servers and clients. When you deconfigure an NFS server or an NFS client, the corresponding NFS daemons stop and all of the corresponding NFS configuration information is deleted from the system. This action cannot be undone. To restore your NFS server or client, you must configure it again using the SysMan Menu.
When you deconfigure an NFS server, the client services are not removed. Likewise, when you deconfigure an NFS client, the server configuration is not removed. If you would like to deconfigure both the client and server configurations on a system, you must perform each action independently.
To deconfigure an NFS server, select Deconfigure system as an NFS Server from the SysMan Menu, or enter the following command on the command line:
# /usr/sbin/sysman nfs_deconfig_server
To deconfigure an NFS client, select Deconfigure system as an NFS Client from the SysMan Menu, or enter the following command on the command line:
# /usr/sbin/sysman nfs_deconfig_client
For both client and server, the Deconfigure NFS dialog box is displayed.
Select Yes to deconfigure the service.
You are informed that the service has
been deconfigured.
Select OK to dismiss the message and to close the dialog
box.
4.5 Managing an NFS Server
This section describes how to perform the following NFS server tasks:
The
/etc/exports
file defines an export list for
each file system and directory that a client can mount.
When creating entries
in the
/etc/exports
file, remember the following:
Make only one entry for each exported file system or directory; multiple entries are not supported.
Each entry exports that directory and all subdirectories in it, except for those subdirectories that reside in a file system (disk partition) different from the exported directory.
File systems and directories are exported with read-write access by default.
If no remote system (client) names are specified for a file system or directory, any client on the network can mount that file system or directory.
If one or more client names are specified for a file system or directory, only those clients can mount the exported file system or directory.
If you are exporting a file system to a client that has multiple network interfaces on a subnet, you must specify the host names for all of the interfaces.
If you start the
mountd
daemon with the
-i
option, only
those hosts in the
server's host database are allowed mount access.
If you start the
mountd
daemon with the
-d
or
-s
option, only those clients in the same domain or subdomain,
respectively, are allowed mount access.
Exporting specific directories to specific clients provides more security than does exporting an entire file system to all clients.
Protect sensitive exported data on the server by making the data files owned and accessible only by root, and do not allow superusers on client systems root access over NFS.
The
-public
option can be specified by
only one exported file system.
4.5.2 Exporting a File System or Directory
Exporting a file system or directory makes it available for client systems on the network to mount remotely. If you want your system to be an NFS server and to export file systems and directories, be aware that your system will be less secure. However, depending on how you export your files, you can minimize the security risks.
To export a file system by using the SysMan Menu, do the following:
From the SysMan Menu, select Networking-->Additional Network Services-->Network File System (NFS)-->Configure system as an NFS server to display the Configure NFS Server dialog box.
Alternatively, enter the following command on a command line:
# /usr/bin/sysman nfs_server
Select the Shared Local Directories button to display the Share Local Directory dialog box.
Select Add to add a shared directory. The Add/Modify dialog box is displayed.
Enter the full path name of the directory to be exported in the Share this Directory field.
Select whether the directory has read/write or read-only access and whether all hosts or only selected hosts can have access. By default, the directory is exported with read/write permissions to all hosts.
If you choose Selected in either the Read/Write or Read-Only dialog box, enter the name of each host that can have access to this directory in the appropriate field. Select Add for each host.
Select OK to validate the entry and to close the Add/Modify dialog box. Repeat steps 3 through 6 for additional directories.
Select OK to save the list of directories you chose to export
in the
/etc/exports
file.
You are informed that the changes
have been made.
Select OK to dismiss the message and to close the Share Local
Directory dialog box.
Select OK to close the NFS Server dialog box.
You can also modify and delete exported directories with the Share Local Directory dialog box. See Section 4.5.3 and the online help for more information.
Optionally, you can use a text editor to add, modify, and delete exported
directories directly in the
/etc/exports
file.
See
exports(4)
for more information about editing this file.
4.5.3 Halting Export of a Directory or File System
Halting export of a directory or file system prevents client systems from accessing the particular directory or file system; you can still export other directories or file systems. If you do not want to export any file systems, you might want to deconfigure your NFS server as documented in Section 4.4.
To halt the export of a file system by using the SysMan Menu, do the following:
From the SysMan Menu, select Networking-->Additional Network Services-->Network File System (NFS)-->Configure system as an NFS server to display the Configure NFS Server dialog box.
Alternatively, enter the following command on a command line:
# /usr/bin/sysman nfs_server
Select the Shared Local Directories button to display the Share Local Directory dialog box.
Select the entry that you no longer want to export from the list of shared directories.
Select Delete to remove the highlighted entry from the list. Repeat steps 3 and 4 to halt the export of additional entries.
Select OK to save the remaining list of exports in the
/etc/exports
file.
You are informed that the changes have been made.
Select OK to dismiss the message and to close the Share Local Directory dialog
box.
Select OK to close the NFS Server dialog box.
You can also add and modify exported directories with the Share Local Directory dialog box. See Section 4.5.2 and the online help for more information.
Optionally, you can use a text editor to add, modify, and delete exported
directories directly in the
/etc/exports
file.
See
exports(4)
for more information about editing this file.
4.5.4 Enabling Client Superuser Access to Files
By default under NFS, a superuser (root) on a client system does not have superuser privileges on the server and cannot do the following:
Access remotely mounted files and directories whose permissions do not allow world access
Change the ownership of remotely mounted files (run the
chown
command)
For security reasons, it is best not to allow a remote superuser access to your system as superuser unless both the remote host and superuser are trusted. However, in a friendly network environment, you can explicitly allow superuser access over the network.
To
allow a superuser on a client access to your server system, edit the
/etc/exports
file on your server and add the
-root=0
option to the entry you want to make available.
The
-root=0
option maps the remote superuser's identification to UID 0.
All
future mount requests will be honored with root mapping.
By default, this
option allows superuser access from any client system on the network.
To restrict
the superuser access to specific systems, use the
-root=host_list
option, where
host_list
is a list of host names.
See
exports(4)
for more information.
By default,
NFS servers regard superusers and those users without UNIX authentication
(personal computer systems) as anonymous users.
This class of users can only
access files that are accessible to the world.
To prevent anonymous users
from accessing file systems or directories, use the
-anon=-1
option.
If you still want to allow client superusers access to
the file systems or directories, specify the
-root
option in addition to the
-anon
option.
The
-root
option overrides the
-anon
option for client superusers only.
A superuser on a client system can assume the identity of any other user on the client system by substituting the UID number. The client superuser could then have the access rights of another user on the server. Therefore, to protect sensitive exported data on the server, make root the owner of the data files and do not export the directory or file system with root mapping. This is useful if you need to export other files in the file system.
The following example shows entries in an
/etc/exports
file:
/usr/games -root=0 host8  [1]
/usr/templates -root=host8  [2]
Exports the
/usr/games
file system.
It can
be mounted remotely (read-write) only by the client system host8.
However,
the client superuser has superuser access to the file system.
The superuser's
UID is 0 (zero).
[Return to example]
Exports the
/usr/templates
file system.
It can be mounted remotely (read-write) by any client in the network.
However,
only the superuser on host8 has superuser access to the file system.
[Return to example]
If the
/usr/spool/mail
directory is remotely mounted from the server, and
the directory is not exported with the
root=0
option, client
users will not be able to send mail to the superuser (root) on the server.
To enable clients to send mail to root, set the root and admin aliases to
the login name or names of the system administrators for that system.
Then,
users can address all mail intended for the administrators of that system
as follows:
admin@system
To enable clients to send mail to root, follow these steps:
Edit the
/var/adm/sendmail.cf
file and
add the alias name admin to the following line:
CN MAILER-DAEMON postmaster
The resulting line will look like the following line:
CN MAILER-DAEMON postmaster admin
This adds the name admin to the class N.
Alternatively, you can run the Mail Configuration application and add admin as a local user. See Chapter 7 for more information.
Edit the
/var/adm/sendmail/aliases
file,
add the login names
of the system administrators, and redefine
(alias) the name root to be admin.
Restart the
sendmail
daemon by using the
following command:
# /sbin/init.d/sendmail restart
If you are enabling clients to send mail to root, remember the following:
It is best for all systems in the local area network (LAN) to follow this convention. Mail for root or admin on any system can be automatically directed to any user login on any system.
A
/usr/spool/mail/root
mailbox is not created
or used.
The following example shows the steps involved in enabling clients to send mail to root:
# vi /var/adm/sendmail/sendmail.cf  [1]

.
.
.
# vi /var/adm/sendmail/aliases  [2]

.
.
.
# /sbin/init.d/sendmail restart  [3]
Opens the
/var/adm/sendmail/sendmail.cf
file to add the admin alias.
[Return to example]
Opens the
/var/adm/sendmail/aliases
file
to add the login names and root alias.
[Return to example]
Restarts the
sendmail
daemon.
[Return to example]
The following example shows entries in the
/var/adm/sendmail/aliases
file for the system administrators John, Mary, and Joe:
admin:john,mary,joe
root:admin
4.5.6 Enabling Port Monitoring
Only privileged users can attach to Internet domain source ports known as privileged ports. By default, NFS does not check to see if a client is bound to a privileged port. You might want to activate NFS server port monitoring to be sure that file access requests are generated by the client kernel rather than forged by an application program.
Although this operating system enforces the privileged port convention, some operating systems do not. If hosts running a different operating system are on your network, activating port checking might not improve security, but could prevent those systems from functioning properly as NFS client systems.
To start NFS server port monitoring, enter the following command:
# /usr/sbin/nfsportmon on
To stop source port monitoring, enter the following command:
# /usr/sbin/nfsportmon off
Monitoring the NFS load allows you to see the number of NFS requests, both client and server, being executed on the local machine. It is a good idea to monitor NFS requests periodically to determine whether you need additional NFS server threads.
To monitor NFS requests, use the
nfsstat
command
with the following syntax:
nfsstat -n
See
nfsstat(8)
for more information on monitoring NFS load.
The following example shows the client and server activity on a local machine:
# /usr/bin/nfsstat -n
 nfs:
calls      badcalls
69228      0

Server nfs V2:
null       getattr    setattr    root       lookup     readlink   read
1  0%      24 0%      0  0%      0  0%      60  0%     0  0%      5  0%
wrcache    write      create     remove     rename     link       symlink
0  0%      58030 83%  20  0%     0  0%      0  0%      0  0%      0  0%
mkdir      rmdir      readdir    statfs
0  0%      0  0%      0  0%      2  0%

Server nfs V3:
null       getattr    setattr    lookup     access     readlink   read
0  0%      667  0%    1009  1%   2598  3%   101  0%    200  0%    1408  2%
write      create     mkdir      symlink    mknod      remove     rmdir
1280  1%   376  0%    71  0%     200  0%    0  0%      676  0%    70  0%
rename     link       readdir    readdir+   fsstat     fsinfo     pathconf
100  0%    100  0%    468  0%    0  0%      1750  2%   2  0%      0  0%
commit
10  0%

Client nfs:
calls      badcalls   nclget     nclsleep
224664     0          224664     0

Client nfs V2:
null       getattr    setattr    root       lookup     readlink   read
0  0%      51328 22%  1069  0%   0  0%      41643 18%  455  0%    28793  12%
wrcache    write      create     remove     rename     link       symlink
0  0%      64665 28%  589  0%    1052  0%   352  0%    250  0%    250  0%
mkdir      rmdir      readdir    statfs
171  0%    170  0%    2689  1%   1814  0%

Client nfs V3:
null       getattr    setattr    lookup     access     readlink   read
0  0%      2038  0%   2180  0%   8534  3%   430  0%    450  0%    3136  1%
write      create     mkdir      symlink    mknod      remove     rmdir
3158  1%   1048  0%   243  0%    450  0%    1  0%      1848  0%   242  0%
rename     link       readdir    readdir+   fsstat     fsinfo     pathconf
452  0%    350  0%    1240  0%   0  0%      3506  1%   3  0%      0  0%
commit
75  0%
Your system can be an NFS client if the following conditions exist:
Your system can reach an NFS server over the network.
Your system's host or network group name is included in the
server's
/etc/exports
file, or the server is exporting
a file system to all systems on the network.
This section describes how to perform the following NFS client tasks:
4.6.1 Mounting a Remote File System or Directory
You can mount a remote file system or any subdirectory within a remote file system onto a local mount point. While mounted, it is treated as a file system by the local system.
To mount a remote file system or directory by using the SysMan Menu, do the following:
From the SysMan Menu, select Networking-->Additional Network Services-->Network File System (NFS)-->Configure system as an NFS client to display the Configure NFS Client dialog box.
Alternatively, enter the following command on a command line:
# /usr/bin/sysman nfs_client
Select the Mount Network Directories button to display the Mount Network Directory dialog box.
A list of NFS-mounted directories that are saved in the
/etc/fstab
file is displayed.
Remote file systems that you mounted by using
the
mount
command are not included in this list.
Select Add to add a remote directory. The Add/Modify dialog box is displayed.
Enter the host name of the NFS server from which the remote directory is exported in the Remote Host Name field.
Enter the full path name of the directory to be imported in the Remote Directory Path field.
Enter the full path name of the local directory on which the imported directory is to be mounted in the Local Mount Point field.
Select whether the directory has read-only or read/write access with the appropriate radio button.
Select the Mount on Reboot checkbox if you want the directory to be mounted each time you reboot.
Select OK to validate the entry and to close the Add/Modify dialog box. Repeat steps 3 through 9 for additional directories.
Select OK to save the list of directories you chose to import.
The names of those directories that are to be mounted on reboot are saved
in the
/etc/fstab
file.
You are informed that the changes have been made. Select OK to dismiss the message and to close the Mount Network Directory dialog box.
Select OK to close the NFS Client dialog box.
You can also modify and delete your imported directories with the Mount Network Directory dialog box. See Section 4.6.3 and the online help for more information.
Each directory imported via the Mount Network Directory dialog box is
mounted using the
bg
and
hard
options
of the
mount
command.
If the first attempt to mount the
directory fails, the client tries mounting it in the background (bg
option), and it continues attempting to mount the directory until
the server responds (hard
option).
No other
mount
options can be selected via the dialog box.
Optionally, you can use the
mount
or
umount
commands to mount or unmount remote file systems from the command
line.
Or, you can use a text editor to directly add, modify, or delete entries
in the
/etc/fstab
file.
You would use these alternatives
if you need to specify
mount
options that are not supported
by the Mount Network Directory dialog box.
See
mount(8),
umount(8),
and
fstab(4)
for more information.
4.6.2 Automatically Mounting a Remote File System
The following sections describe how to configure Automount and AutoFS, two services that allow you to automatically mount a remote file system or directory at the time of access.
Note
The Automount daemon will be retired in a future release of the operating system. For information about migrating from Automount to AutoFS, see Section 4.6.2.4.
Before starting the configuration procedure for either service, determine
whether or not you are using local maps or NIS-distributed maps.
See
Section 4.1.2
for a description of local and NIS-distributed maps.
4.6.2.1 Using Automount to Mount a Remote File System
To use local Automount maps, do the following:
Log in as root.
Create a local
auto.master
map.
You can
create this and other maps in any directory on the system, but they are conventionally
located in the
/etc
directory, where the SysMan Menu
expects to find them.
See Appendix A for information on creating maps.
Note
If you are modifying an existing
auto.mastermap, you must stop and restart theautomountdaemon to apply the revised map.
Create the local maps for your system.
Start the
automount
daemon by using the
NFS Client dialog box of the SysMan Menu.
See
Section 4.3.2
for information on starting the
automount
daemon.
When the
automount
daemon starts, it uses
the local
auto.master
file to determine the location of
other maps, their local mount points, and the mount options.
To use NIS-distributed Automount maps, do the following:
Set up your system as an NIS client. See Section 3.3.3 for information on setting up an NIS client.
Start the
automount
daemon by using the
NFS Client dialog box of the SysMan Menu.
See
Section 4.3.2
for information on starting the
automount
daemon.
The NIS master server serves all Automount maps in the domain.
When the
automount
daemon starts, it uses the master
auto.master
file to determine the location of other maps, their
local mount points, and the mount options.
If you alter your local or NIS-distributed Automount maps at any time,
you must restart the
automount
daemon on clients as follows
to apply the changes:
From the SysMan Menu, select Networking-->Additional Network Services-->Network File System (NFS)-->Configure system as an NFS client to display the Configure NFS Client dialog box.
Alternatively, enter the following command on a command line:
# /usr/bin/sysman nfs_client
Deselect the Enable Automount check box.
Select OK to disable Automount and Yes to restart the NFS daemons. A message indicates the the daemons are restarted; select OK to dismiss the message and close the NFS Client dialog box.
Open the NFS Client dialog box again.
Select the Configure for Automount check box.
Select OK to enable Automount and Yes to restart the NFS daemons. A message indicates the the daemons are restarted.
Select OK to dismiss the message and to close the NFS Client Setup dialog box.
See
automount(8)
for information on the
automount
command and its arguments.
4.6.2.2 Using AutoFS to Mount a Remote File System
To use local AutoFS maps, do the following:
Log in as root.
Create a local
auto.master
map.
You can
create this and other maps in any directory on the system, but they are conventionally
located in the
/etc
directory.
See Appendix A for information on creating maps.
Note
If you are modifying an existing
auto.mastermap, you must process the map with theautofsmountcommand to apply the changes.
Create the local maps for your system.
Start the
autofsd
daemon by entering the
following command:
# /usr/sbin/autofsd &
Execute the
autofsmount
command to process
your local master file:
# /usr/sbin/autofsmount -m -f local_master_file
Use the
rcmgr
utility to configure AutoFS
to start each time you boot your system.
The AutoFS parameters in the following
steps are case sensitive and must be typed in uppercase as shown.
Enable the AutoFS daemon by entering the following command:
# rcmgr -c set AUTOFS 1
Specify arguments for the
autofsd
daemon and the
autofsmount
command, as follows:
# rcmgr -c set AUTOFSD_ARGS "arguments"
# rcmgr -c set AUTOFSMOUNT_ARGS "-m -f local_master_file"
You must define the
AUTOFSD_ARGS
parameter, even
if you do not need to define arguments for the
autofsd
daemon.
If there are no arguments, specify open and close quotation marks
("").
See
autofsd(8)
and
autofsmount(8)
for information about
valid arguments.
When the
autofsmount
command is executed,
it installs intercept points into the kernel based on the maps you created.
When users access the associated file systems, the kernel communicates with
the
autofsd
daemon to mount and unmount the file systems
based on the map entries.
To use NIS-distributed AutoFS maps, do the following:
Set up your system as an NIS client. See Section 3.3.3 for information on setting up an NIS client.
Start the
autofsd
daemon by entering the
following command:
# /usr/sbin/autofsd &
Use the
rcmgr
utility to configure AutoFS
to start each time you boot your system.
The AutoFS parameters in the following
steps are case sensitive and must be typed in uppercase as shown.
Enable the AutoFS daemon by entering the following command:
# rcmgr -c set AUTOFS 1
Specify arguments for the
autofsd
daemon
and the
autofsmount
command, as follows:
# rcmgr -c set AUTOFSD_ARGS "arguments"
# rcmgr -c set AUTOFSMOUNT_ARGS ""
You must define the
AUTOFSD_ARGS
parameter, even
if you do not need to define arguments for the
autofsd
daemon.
If there are no arguments, specify open and close quotation marks
("").
Setting the
autofsmount
command to run with no arguments
indicates that AutoFS is to use the NIS-distributed
auto.master
file.
See
autofsd(8)
and
autofsmount(8)
for information about
valid arguments.
The NIS master server serves all AutoFS maps in the domain.
When the
autofsmount
command is executed, it uses the master
auto.master
file to determine the location of other maps, their local mount
points, and the mount options.
If you alter your local or NIS-distributed maps at any time, you must
process the map with the
autofsmount
command to apply the
changes.
Note that you cannot update map entries while an active NFS file
system is mounted on the designated mount point.
You must unmount the NFS
file system before the AutoFS mount-update takes effect.
See
autofsd(8)
and
autofsmount(8)
for more information.
See
sys_attrs_autofs(5)
for tuning information.
4.6.2.3 Specifying automount and autofsmount Arguments
You can specify arguments for the
automount
or
autofsd
daemons from the command line, in
a local
auto.master
map, in an NIS-distributed
auto.master
map, or some combination of the three.
However, it
is important to know that the daemons read and carry out their instructions
in the following order:
Command line information, such as additional mount points or replacements to entries in a master map, are read first. Command line information takes precedence over instructions in any maps -- local or NIS-distributed.
Instructions in a local
auto.master
map
(specified with the
-f
option) are read next.
The
information in the local master map overrides information in an NIS-distributed
master map.
Information in the NIS-distributed master map is read last.
When you invoke the
automount
or
autofsmount
commands without any arguments, they look for a distributed NIS
map called
auto.master.
If they find one, the commands
check the master map for information about the location of other maps, their
local mount points, and the mount options.
If they do not find one, and if
no local
auto.master
map is specified, the commands exit.
You can pass command arguments to the
automount
daemon
from the NFS Client dialog box of the SysMan Menu as documented in
Section 4.3.2.
You can also pass arguments to either the
automount
or
autofsmount
command in one of the
following ways:
Specify all of the arguments to either command on the command line. For example:
# automount /net -hosts \
  /home /etc/auto.home -rw,intr \
  /- /etc/auto.direct -ro,intr
Specify all of the arguments
to either command in the
rc.config.common
file by using
the
rcmgr
utility.
Arguments you specify in this file are
passed to the command when you boot your system.
For example:
# rcmgr -c set AUTOMOUNT_ARGS "/net -hosts \
  /home /etc/auto.home -rw,intr \
  /- /etc/auto.direct -ro,intr"
For the
autofsmount
command, the parameter to
set is
AUTOFSMOUNT_ARGS, as follows:
# rcmgr -c set AUTOFSMOUNT_ARGS "/net -hosts \
  /home /etc/auto.home -rw,intr \
  /- /etc/auto.direct -ro,intr"
Include the arguments from the previous examples in an NIS-distributed
auto.master
map:
/net    -hosts
/home   /etc/auto.home          -rw,intr
/-      /etc/auto.direct        -ro,intr
If this NIS
auto.master
map is distributed, typing the
automount
or
autofsmount
command at the superuser prompt (#) produces
the same results as the previous command line.
Include the arguments in a local
auto.master
file and use the
-f
option to instruct the
automount
or
autofsmount
command to process the
local
auto.master
file.
The
-f
option instructs these commands to consult the local master map first and
then the NIS-distributed master map.
For example:
# automount -f /etc/auto.master
You can also add the
-m
option, which forces
the commands to ignore the NIS-distributed master map, if there is one.
For
example:
# automount -m -f /etc/auto.master
Specify mount points on the command line, in addition to those
included in the local
auto.master
file.
For example:
# automount -f /etc/auto.master \
  /src /etc/auto.src -ro,soft
Nullify one of the entries in the local
auto.master
map.
For example:
# automount -f /etc/auto.master /home -null
This option is currently not supported by the
autofsmount
command.
Replace an entry in the local
auto.master
map with one of your own.
For example:
# automount -f /etc/auto.master \
 /home /mine/auto.home -rw,intr
AutoFS provides one additional convenience for complicated configurations
that require many cumbersome
autofsmount
arguments.
It
allows you specify your
autofsmount
arguments in an environment
variable called
AUTOFSMOUNT_EXPARGS, which is subsequently
imported by the
autofsmount
command when you invoke it
with the
-e
option.
You can arrange for this by adding the
appropriate statements to the configuration file for your shell, as follows.
For C Shell (in
.cshrc
file):
setenv AUTOFSMOUNT_EXPARGS `rcmgr -c get AUTOFSMOUNT_ARGS`
For Korn Shell (in
.profile
file):
AUTOFSMOUNT_EXPARGS=`rcmgr -c get AUTOFSMOUNT_ARGS`
export AUTOFSMOUNT_EXPARGS
With the environment variable set in this manner, you can invoke the
autofsmount
command with all of your predefined options as follows:
# autofsmount -e
If necessary, you can include additional options after the -e option.
See
automount(8)
and
autofsmount(8)
for more information
on these commands and their arguments.
4.6.2.4 Migrating from Automount to AutoFS
Automount will be retired in a future release; therefore, if you are using Automount, you will eventually need to migrate to AutoFS. If you want to migrate now, you can use the instructions in this section to complete the task. (If your system is a node in a cluster, see the TruCluster Server Release Notes for information about migrating from Automount to AutoFS in a cluster environment.)
There are two procedures for migrating from Automount to AutoFS. The primary difference between the procedures is that the first one requires you to reboot the operating system, and the second one allows the system to remain in multi-user mode. The first procedure is recommended because it is less complicated and it ensures that all automounted file systems will be cleanly unmounted, but the second procedure is provided as an alternative for high-availability systems that cannot be rebooted.
It is recommended that you familiarize yourself with AutoFS by reading
Section 4.1.2,
Section 4.6.2,
autofsd(8),
and
autofsmount(8)
before proceding with these migration steps.
Note that Automount and AutoFS maps are compatible, with the few exceptions
that are mentioned in the Restrictions section of
autofsmount(8).
4.6.2.4.1 Recommended Migration Path
To migrate from Automount to AutoFS on a system that can be rebooted, do the following:
Determine the arguments that you must pass to the
autofsmount
command at boot time.
See the
autofsmount
reference page for a list of valid options and arguments.
Note that these arguments are typically a subset of those you have already
specified for the
automount
daemon in the
AUTOMOUNT_ARGS
parameter of the
/etc/rc.config.common
file.
To view that parameter, execute the following command:
# /usr/sbin/rcmgr -c get AUTOMOUNT_ARGS
To set the corresponding arguments for the
autofsmount
command, define the
AUTOFSMOUNT_ARGS
parameter as follows:
# /usr/sbin/rcmgr -c set AUTOFSMOUNT_ARGS "arguments"
Determine the arguments that you must pass to the
autofsd
daemon at boot time.
See the
autofsd
reference page for a list of valid options and arguments.
These arguments are typically any environment variable definitions (-D
option) that you have already specified for the
automount
daemon in the same
AUTOMOUNT_ARGS
parameter
that was mentioned in step 1.
To set the corresponding arguments for the
autofsd
daemon, define the
AUTOFSD_ARGS
parameter as follows:
# /usr/sbin/rcmgr -c set AUTOFSD_ARGS "arguments"
If you have not defined any environmental variables with the
automount
daemon, it is possible that there will be no
autofsd
arguments.
In this case, you must specify the
AUTOFSD_ARGS
parameter with open and close quotation marks ("").
Disable Automount and enable AutoFS in the
/etc/rc.config.common
file by entering the following commands:
# /usr/sbin/rcmgr -c set AUTOMOUNT 0
# /usr/sbin/rcmgr -c set AUTOFS 1
These values specify that AutoFS will be the only automatic mounting service in effect when the system boots.
Reboot the system to put the new AutoFS configuration into effect.
Note that Automount will remain fully functional until you reboot. Do not attempt to start AutoFS while Automount is running.
4.6.2.4.2 High-Availability Migration Path
To migrate from Automount to AutoFS on a system that cannot be rebooted, do the following:
Follow steps 1-3 in Section 4.6.2.4.1.
Release all auto-mounted file systems by eliminating their use.
In terminal windows, if you are operating in an automounted file system, change directory into another file system. If you have any files open in an automounted file system, close the files and, if necessary, close any applications that might have a lock on these files.
Stop the
automount
daemon.
Determine the process IDs of all Automount tasks by entering the following command:
# ps -ef | grep automount
Stop each Automount process by entering the following command:
# kill -SIGTERM process-ID
Verify that automounted file systems are no longer mounted by entering the following command:
# /sbin/mount -e | grep temporary_mount_dir
Replace
temporary_mount_dir
with the name
of the directory in which Automount temporarily mounts file systems.
By default,
this directory is
tmp_mnt.
This command searches for instances of temporary_mount_dir in the current list of all mount points. If any such mount points still exist, they will still be usable under their temporary_mount_dir pathnames, but they will no longer be usable via the expected pathnames under which they were served by Automount. If these mount points later become idle, you can remove them by entering the following command:
# /sbin/umount -f mount-point
None of these mounts will affect AutoFS, because AutoFS does not use a temporary mount directory.
Start the AutoFS service with the arguments you previously
specified in the
/etc/rc.config.common
file.
Start the
autofsd
daemon, as
follows:
# /usr/sbin/autofsd arguments
To display the arguments you already defined for
autofsd, enter the following command:
# /usr/sbin/rcmgr -c get AUTOFSD_ARGS
Invoke the
autofsmount
command,
as follows:
# /usr/sbin/autofsmount arguments
To display the arguments you already defined for
autofsmount, enter the following command:
# /usr/sbin/rcmgr -c get AUTOFSMOUNT_ARGS
If you properly set the AutoFS arguments in the
/etc/rc.config.common
file, you will not need to start AutoFS in this manner again.
It will automatically start each time that you boot the operating system.
4.6.3 Unmounting a Remote File System or Directory
Unmounting a remote file system or directory removes access to a particular file system or directory that is being imported from an NFS server; you can still import other directories or file systems. If you do not want to import any file systems, you might want to deconfigure your NFS client as documented in Section 4.4.
To unmount a remote file system or directory by using the SysMan Menu, do the following:
From the SysMan Menu, select Networking-->Additional Network Services-->Network File System (NFS)-->Configure system as an NFS client to display the Configure NFS Client dialog box.
Alternatively, enter the following command on a command line:
# /usr/bin/sysman nfs_client
Select the Mount Network Directories button to display the Mount Network Directory dialog box.
A list of NFS-mounted directories that are saved in the
/etc/fstab
file is displayed.
Remote file systems that you mounted by using
the
mount
command are not included in this list.
Use the
umount
command to unmount these file systems.
See
umount(8).
Select the entry that you want to unmount from the list.
Select Delete to remove the highlighted entry from the list. Repeat steps 3 and 4 to remove additional entries
Select OK to save the current list of imported directories
in the
/etc/fstab
file.
You are informed that the changes have been made. Select OK to dismiss the message and to close the Mount Network Directory dialog box.
Select OK to close the NFS Client dialog box.
You can also add and modify your imported directories with the Mount Network Directory dialog box. See Section 4.6.1 and the online help for more information.
Optionally, you can use the
mount
or
umount
commands to mount or unmount remote file systems from the command
line.
Or, you can use a text editor to directly add, modify, or delete entries
in the
/etc/fstab
file.
See
mount(8),
umount(8),
and
fstab(4)
for more information.