6 Full Installation Procedures
This
chapter includes step by step instructions for invoking the Full Installation
and supplying all information required by the Full Installation setup process.
Summary of Full Installation Procedures:
Make sure you have performed all prerequiste tasks and are
ready to begin
before beginning this procedure:
Set console environment
variables for certain processors.
Set console environment variables
for all processors.
Boot the system from the distribution
media.
Provide the information
requested by the Full Installation interface.
Check your selections
to make sure they are what you want; go back and change your responses
if necessary.
Give your final confirmation
to start installing software.
Optionally
select
kernel components to build into the kernel.
Log in to the newly installed system.
Review installation log files.
Go to
Chapter 7
to set up and configure
the system for general use,
the Full
Installation is complete.
6.1 Are You Ready to Begin?
Before beginning the Full Installation, perform all prerequisite tasks
described in
Chapter 5.
The last prerequisite task is
to update the system firmware, so your system should be in console mode (at
the
>>>
prompt).
If your system is not in
console mode, use the
shutdown -h now
command.
Caution
A Full Installation does not preserve user or data files on disks that
you are installing onto, so make sure your current operating system has been
backed up before you begin.
If errors occur that prevent a successful installation
of the operating system, you may need to restore the previous version of the
operating system.
6.2 Step 1: Set Console Environment Variables for Certain Processors
Some system types require one or
more special console environment variables to be set in addition to the standard
console variables that are set for all processors (as shown in
Section 6.3).
Follow this procedure to determine whether or not your processor type
requires special console environment variable settings:
Look for the corporate logo on the front panel of your hardware
to determine what kind of processor you have.
Look for your processor type in
Table 6-1.
If you find your processor, proceed to Step
3.
If your processor does not appear in
Table 6-1,
do not execute any of the commands and go directly to
Section 6.3.
Execute the commands
shown for your processor.
Note
Every attempt was made to make the information in
Table 6-1
complete and accurate for every supported system.
However, it is recommended
that you also check the hardware documentation to make sure your system type
does not require any other variables to be set before beginning a Full Installation.
The hardware documentation is customized for each system type and is the definitive
source for supported console variables.
Table 6-1: Processor-Specific Console Variables
| Processor |
Command to Set Console Variable |
AlphaServer 800
AlphaServer 1000, 1000A
AlphaServer 1200
AlphaServer 2000
AlphaServer 2100/2100A
AlphaServer 4000/4100A
AlphaServer 4100A
Alpha VME 2100
|
>>>
show bus_probe_algorithm
bus_probe_algorithm
old
>>>
set bus_probe_algorithm new
>>>
init
|
| AXPpci Single Board Computers with ATI Mach64
graphics controllers |
>>>
set pci_parity off
>>>
init
|
AlphaServer 1000, 1000A
AlphaStation 500
AlphaStation 600/600A
AXPvme
AXPpci
Alpha VME
AlphaPC64, 164
EB64+, EB66+, EB164 Single Board Computers
PICMG Alpha CPUs
Personal Workstation XP1000
|
>>>
set boot_file
|
Personal Workstation 433au, 500au, 600au
Ultimate Workstation 533-au2
|
>>>
set os_type unix
>>>
init
|
AlphaServer 8200
AlphaServer 8400
GS160 Server
GS140 Server
|
>>>
set boot_reset on
>>>
set os_type unix
>>>
set console serial
|
| DEC 10000 |
>>>
set boot_reset on
|
| DEC 7000 |
>>>
set boot_reset on
>>>
set keyboard
type
[Footnote 7]
|
| DEC 3000 |
>>>
set scsi_reset 4
>>>
set boot_reset on
|
| DEC 2000 |
>>>
set keyboard
type
[Footnote 7]
|
6.3 Step 2: Set Console Environment Variables for All Processors
Set the following console environment variables for all processors:
Clear and reset the
boot_osflags
variable:
>>> set boot_osflags ""
Enter the following command to ensure that your system returns
to the console prompt (>>>) after a system crash or power
failure during installation:
>>> set auto_action halt
[Footnote 8]
Note
Most processors will reboot automatically after the software subsets
are loaded.
If you are installing the operating system on behalf of another
user or customer, you may want to disable this feature.
Disabling automatic
reboot lets you run the installation interface, load the software, then hand
the system to the eventual user thus allowing the user to boot it and enter
host and site specific information.
Enter the following command to disable automatic reboot:
>>> set boot_osflags h
Processors that do not support auto-reboot include the DEC 2000, 3000,
and 7000 series, the AlphaStation 255, and the AlphaServer 8400.
6.4 Step 3: Boot the System
The procedure in this section applies
to all supported systems and describes how to boot from CD-ROM.
If you are
performing the installation over the network from a remote installation services
(RIS) server, refer to the
Installation Guide -- Advanced Topics
for network boot instructions.
If you have problems booting your system, refer to the hardware documentation
for your particular processor.
If the problem is not hardware related, refer
to the
System Administration
guide.
The
System Administration
guide provides information
about booting a generic kernel (genvmunix) or booting an
alternate custom kernel.
Note
If you are booting a DEC 3000 series processor from a SCSI TURBOchannel
option card, see
Section 6.4.1.
Use this procedure to boot your system from the operating system CD-ROM:
Insert the CD-ROM labeled
Operating System Volume 1
into the disk drive.
If you have not already done so, enter the
init
command for AlphaServer 300, 400, 1000/1000a, 2000, 2100, 2100A, 4000/4100,
VME 2100, AlphaStation 200, 250, 255, 400, 600, 800 and DEC 4000 and 7000
series processors:
>>> init
Determine the console device name of your CD-ROM drive by
entering the following command:
>>> show device
Depending upon your system type, a device
information table similar to the following is displayed:
dka0.0.0.0.0               DKA0                           RZ28
dkb0.0.0.1.0               DKB0                           RZ28
dkc0.0.0.2.0               DKC0                           RZ26
dkc100.1.0.2.0             DKC100                         RZ26
dkc200.2.0.2.0             DKC200                         RZ26
dkc300.3.0.2.0             DKC300                         RZ26
dke100.1.0.4.0             DKE100                         RRD43   <==
mka500.0.0.0.0             MKA500                         TLZ04
mke0.0.0.4.0               MKE0                           TZ85
ewa0.0.0.6.0               EWA0              08-00-2B-2C-CE-DE
p_d0.7.0.3.0                                          Bus ID 7
pka0.7.0.0.0               PKA0                  SCSI Bus ID 7
pkb0.7.0.1.0               PKB0                  SCSI Bus ID 7
pkc0.7.0.2.0               PKC0                  SCSI Bus ID 7
pke0.7.0.4.0               PKE0                  SCSI Bus ID 7
In
the third column to the right, look for the line with the characters
RRD
or
CD-ROM.
These characters denote a CD-ROM
device.
The second column in the table shows the console device name assigned
to each device on your system.
In this example, the
RRD43
CD-ROM console device
name is
DKE100.
You will enter this device
name with the
boot
command in the next step.
Note
The
show device
command output for DEC
nnnn
series (example, DEC 3000) processors is different.
In this
case, look in the
DEVNAM
column for the characters
RRD.
The device name is in the
BOOTDEV
column.
Enter the boot command with the following syntax:
boot
cdrom_device_name
The
cdrom_device_name
is the name
obtained in Step 3.
Using this example, enter the following command to boot
the system:
>>> boot dke100
Output similar to the following is displayed:
(boot dke100.1.0.4.0)
block 0 of dke100.1.0.4.0 is a valid boot block
reading 16 blocks from dke100.1.0.4.0
bootstrap code read in
base = 1ee000, image_start = 0, image_bytes = 2000
initializing HWRPB at 2000
initializing page table at 1e0000
initializing machine state
setting affinity to the primary CPU
jumping to bootstrap code

Tru64 UNIX boot - Fri Apr 28 15:49:49 EDT 2000

.
.
.
Starting installation from CD-ROM.  Please wait.
Note
The boot process can take several minutes.
Several hardware-specific
messages will be displayed.
The more complex the system (several peripheral
devices, and so on), the longer the boot process takes.
This completes system boot; go to
Section 6.5.
6.4.1 DEC 3000 Series Processor: Booting from a SCSI TURBOchannel Option Card
Follow these steps to boot a DEC 3000 processor from a SCSI TURBOchannel
option card:
To boot
from the dual SCSI TURBOchannel option card (PMAZB or PMAZC), complete the
following steps:
Determine which controllers and devices are configured on
your system by entering the following command at the console prompt:
>>> show conf
Your system displays output similar to the following (the output differs depending
on your system configuration):
DEC 3000 - M500
VPP PAL X5.37-82000101/OSF PAL X1.28-82000201 -
Built on 17-MAR-1998 13:39:58.02

TCINFO    DEVNAM   DEVSTAT
------    -------- --------
    CPU    OK KN15-AA -V2.0-S1F4-I039-sV1.0-DECchip 21064
P3.0
    ASIC   OK
    MEM    OK
8
    CXT    OK
7
    NVR    OK
    SCC    OK
     NI    OK
    ISDN   OK
6
    SCSI   OK
3-PMAF-AA   TC3
2-PMAZ-AA   TC2
1-PMAZB-AA  TC1
0-PMTNV-AA  TC0
The numbers under the TCINFO column (and the entries
in the DEVNAM column) represent the unit number assigned to the PMAZB or PMAZC
option card.
Determine the number of your boot device by entering a command
with the following syntax:
t
tcslot_numbercnfg
For example, to determine the device number of a disk on a
PMAZB option card, enter the following command:
>> t tc1 cnfg
A table similar
to the following is displayed:
DEC       PMAZB-AA  V1.0        (Dual SCSI [53C96])
BOOTDEV     ADDR   DEVTYPE NUMBYTES  RM/FX WP  DEVNAM  REV
-------     ----   ------- --------  ----- --  ------  ---
DKA200      A/2/0  DISK       426MB  FX        RZ25    0700
(rz200A)
DKA400      A/4/0  RODISK     409MB  RM    WP  RRD42   4.3d
(rz400A)
..HostID..  A/7    INITR

..HostID..  B/7    INITR
To boot from the PMAZB (or PMAZC) option card, enter the
boot
command with the following syntax:
boot
"slot_number/device_number"
For example, to boot from disk number 4 on the PMAZB option
card located in slot 1, enter the following command:
>>> boot "1/dka400"
This completes system boot; go to
Section 6.5.
6.5 Successful System Boot -- Select a Language for the User Interface
Upon successful system boot,
you have the option to view the installation screens in one of three languages:
United States English
Chinese
Japanese
After making this selection, the remaining installation windows
and dialog boxes will be displayed in the language you choose.
The installation
process continues as shown in
Section 6.6.
6.6 The Welcome Screen
After you select a language in which to view the installation user interface,
a Welcome message is displayed:
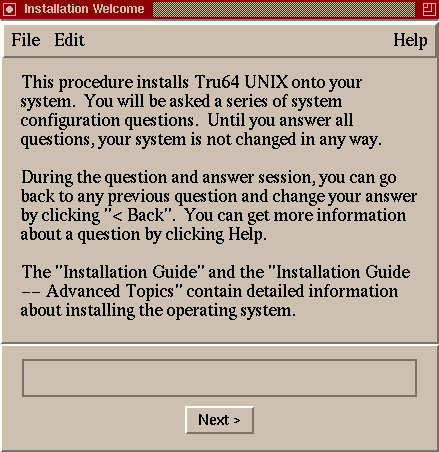
On systems capable of graphical display, the
Installation
Welcome
dialog box shown in
Figure 6-1.
The graphical user interface steps you through each phase of the installation
setup process.
The user interface has a task-like design and lets you go backward
and forward at any time.
Except for setting the system date and time immediately
when you enter it, your system is not changed in any way (unless you repartition
a disk or disks) until the last dialog box where you confirm the start of
the installation.
Online help is available from the
Help
menu.
Figure 6-1: Installation Welcome Dialog Box
If your system presents the graphical interface, but you would prefer
to use the text-based interface, select the
Quit
option
from the
File
menu to exit from the installation user interface.
Then, enter the following command:
# restart nogui
On systems without graphics capabilities, the following is
displayed:
          Welcome to the Tru64 UNIX Installation Procedure

This procedure installs Tru64 UNIX onto your system.  You will be
asked a series of system configuration questions.  Until you answer all
questions, your system is not changed in any way.

During the question and answer session, you can go back to any
previous question and change your answer by entering:  "history"
You can get more information about a question by entering:  "help"

Refer to the "Installation Guide" and "Installation Guide -- Advanced
Topics" for more detailed information about installing Tru64 UNIX.

** This system is currently running firmware revision: n.n
   See the "Tru64 UNIX Release Notes" for information regarding the
   required firmware revision.

The following options are available:

o  The "U.S. English Installation" installs only the Tru64 UNIX base
   software onto your system.

o  The "Installation with Worldwide Language Support" (WLS) allows you
   to internationalize your system.  This option will allow you to install
   the Tru64 UNIX base software as well as WLS software.  The additional
   software subsets provide support for various countries and their native
   languages.

o  The "Exit Installation" option stops the installation, and puts your
   system in single-user mode with superuser privileges.  This option
   is intended for experienced UNIX system administrators who want to
   perform file system or disk maintenance tasks prior to the
   installation.  This option may also be used for disaster recovery
   on a previously installed system.

Remember, you can always get extra information by typing help.

1) U.S. English Installation
2) Installation with Worldwide Language Support
3) Exit Installation

Enter your choice:
Online help is available by entering
help
at any prompt.
You can change or review your selections by entering
history
at any time at any prompt, and a list of your previous selections
similar to the following is displayed:
Enter your choice: history


Select the question you want to revisit.

1) Installation type  ( 1 )
2) Set root password  ( LSWNUMtIomZVg )
3) Confirm root password  ( LSWNUMtIomZVg )
4) Software selection type  ( custom )
5) Select software subsets  ( 34 items: OSFADVFSBIN505 OSFBASE505
   OSFBIN505 OSFBINCOM505 OSFCDEDT505 OSFCDEMAIL505...)
6) Confirm chosen subsets  ( 1 )
7) Select locales  (  )
8) DISMISS history menu

Enter your choice:
If the Full Installation process finds an
install.cdf
file, which indicates that this system is to be installed using
the Installation Cloning process, the following screen is displayed (regardless
of the user interface):
Found file install.cdf on <location>

A Configuration Description File was specified for use during the
installation of this system.

The Configuration Description File can be used by the installation to
provide the information related to file system layout and software
selection.

If you choose to use the Configuration Description File, the installation
will proceed and you will not have to answer any questions.  If you decide
not to use the Configuration Description File, the installation will
continue interactively.

Would you like to use the Configuration Description File? (y/n) [y]:  y

In a few moments, the installation will begin.  However, the Configuration
Description File will first be validated for use on this system.  Once the
validation completes, you no longer need to be present.
If CDF validation is successful, the installation procedure continues
as shown in
Section 6.17.1.
File systems and swap space
are created as specified in the CDF, and the software subsets defined in the
CDF begin loading after file system creation.
Site-specific information such
as host name, location and area, and date and time is obtained from the RIS
server if a RIS installation is performed.
If a CD-ROM installation is performed,
the host name, location, and area are all provided by fields in the CDF.
If
the CDF variable
timeset
is blank or is set to
no, the system requests the date and time.
If
timeset
is set to
yes, the system time is set when the first user
logs in and sets it using the
date
command.
Later in the installation process, you will be required to boot from
the newly installed disks, as shown in
Section 6.17.2
and
to enter a root password as shown in
Section 6.11
(if a password
is not already contained in the CDF).
If you need more information about Installation Cloning, especially
if you encounter CDF validation errors, refer to the
Installation Guide -- Advanced Topics.
6.7 Step 4: Supplying the Setup Information Required for a Full Installation
Table 6-2
describes the information you have to supply to the Full Installation process.
The information you supply is the same regardless of the user interface,
but the order in which it is requested may be different.
For instance, the
graphical interface begins by asking you to supply host-specific information;
the text-based interface begins by asking you if you intend to install Worldwide
Language Support software.
Table 6-2: Information You Supply for a Full Installation
| Information Requested by Full
Installation |
User Action |
| Host Information |
If you are installing from a CD-ROM,
supply the following information:
If you do not enter this information during the installation
setup, you will be prompted for it later in the configuration phase.
Section 6.8,
Section 6.9, and
Section 6.10
provide guidelines for entering host- and site-specific information.
When installing the operating system from a RIS server, the host
and site information is obtained automatically from the server. |
| Root Password |
Create a password
for the
root
user.
If you do not enter a password
during installation setup, you will be asked to create and confirm a password
before system configuration (after reboot).
Guidelines for choosing an effective
password are shown in
Section 6.11. |
| Software Selection |
Select the type of software subsets you want
to install.
The default is to install only mandatory software subsets.
But,
you have the opportunity to install optional software or to install all mandatory
and all optional software subsets.
Section 6.12
describes the subset selection options. |
| Worldwide Language Support |
Specify whether or not you want to install
support for additional languages.
The text-based interface asks you to make
this decision at the onset of the process; the graphical user interface asks
you to specify the countries to support during the software selection step. |
| File System Layout |
You decide whether to use the default file
system layout or to customize the file system layout for the
/,
/usr,
/var, and
i18n
file
systems and
swap
areas.
You can accept the defaults if
you are installing the operating system on a single disk and want to use the
recommended file layout.
Section 6.14
describes your file system
layout options.
Section 6.14.4
describes the option
to install into Logical Storage Manager (LSM) volumes on each disk you use
for the installation. |
| Kernel Component Options |
Select the type of kernel components to build
into the kernel.
You can choose the option to include mandatory components
only, mandatory plus your choice of optional components, or all mandatory
and all optional components.
Section 6.18
describes
these kernel options.
If you select the option to customize kernel component
selection, you perform that task later after the first system reboot. |
The Full Installation procedures start in
Section 6.8
and end in
Section 6.16.
These sections more closely
follow the sequence of the graphical interface, however, you should use the
same guidelines for the text-based interface.
Any difference in how you supply
information is noted.
Note
If you are installing the operating system on behalf of another user
or customer, you may not want to supply any host or site-specific information.
You can accomplish this by doing the following:
Set the console environment variable
boot_osflags
to
halt
(see
Section 6.3).
Do not enter a host name, the date or time, location or area,
or a root password; the Full Installation will halt after the software subsets
load to request this information.
This allows the eventual user of the system
to boot the system and specify their own host- and site-specific information.
6.8 Setting a Host Name
The
host name is used to identify your system on the network.
For the graphical interface, a variety of host and site-specific information
is supplied on the
Host Information
dialog box shown in
Figure 6-2.
Refer to
Section 6.9
and
Section 6.10
for information about supplying information for the remaining fields on this
dialog box.
Figure 6-2: Host Information Dialog Box
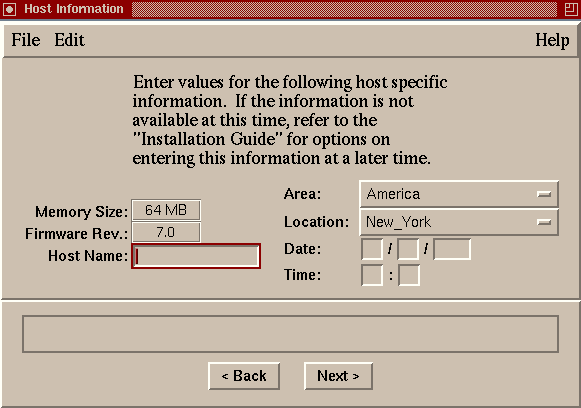
If you do not supply a host name, the Full Installation stops after
the system reboots but before building the tailored kernel to prompt you for
a host name.
6.8.1 Guidelines for Choosing a Host Name
The following are guidelines for choosing a host name:
Host names may contain from 2 to 63 alphanumeric upper or
lower case characters ( a-z, A-Z, 0-9 ).
Fully qualified host names (for example,
mysystem.boston.bigcorp.com) can contain a maximum of 254 characters.
Each component of the
domain name can contain up to 63 characters and must be separated by a period.
Host names must begin with a letter.
Hyphens ( - ) and periods
( . ) are permitted in host names.
Before deciding upon a host name, consult with the site administrator
to make sure you choose a unique name and to determine if site-specific restrictions
(such as maximum length) or naming conventions have been defined.
If your system is running a previous version of the operating
system and is already connected to a network, you should keep the same host
name because changing it would impact how your system is recognized on the
network.
6.8.2 Host Name Samples
Table 6-3
shows samples of correct and incorrect
host names:
Table 6-3: Samples of Correct and Incorrect Host Names
| Correct Host Names |
Incorrect Host Names |
mysystem |
generic
or
binary
[Footnote 9]
|
y2k-system.com |
2000-system.com |
system1 |
1.system |
xyz-college.edu |
xyz_college.edu |
6.9 Setting the System Date and Time
To
set the system date, enter today's date in the following order:
Digits entered in the format and order
07 06 2000
and
07 06 00
both represent July 6, 2000.
The
text-based interface requires that a hyphen ( - )
separate each set of digits, for example,
07-06-00.
To set the system time, enter the time in two sets of two digits (using
the 24-hour clock format) in the following order:
For example, the number
14
entered in the
hh
field represents 2 o'clock in the afternoon, and the number
06
entered in the
mm
field represents the sixth
minute of the hour.
If you enter either a date or a time, you must enter the other.
As soon
as you enter a date and time, the system date and clock is set immediately.
If you do not supply a date and time, and did not set up your system
to halt before system reboot, the Full Installation stops after the system
reboots but before building the tailored kernel to prompt you for the current
date and time.
6.10 Setting the Location and Area (Formerly Time Zones)
Starting with Version 5.0
of the operating system, the naming convention for time zones is the
Area/Location
format (for example,
Asia/Tokyo
or
Pacific/Honolulu) where
Area
is the
name of a continent or ocean, and
Location
is the name
of a major city or locale within that area.
Earlier versions of the operating
system used the
Country/Zone
style (for example,
US/Eastern).
All
/etc/zoneinfo
directories
and time zone files are still available for compatibility, however many of
the files are now hard links to their renamed counterparts.
Country/zone to
location/area mappings are provided in
Table 6-4.
Your location and area sets the time zone.
You should select the location
and area that best describes your geographic location.
The default location
is
America/New York.
You have the option to set the Location
and Area to
none
if you are installing this system on behalf
of another user.
Note
If a
system is relocated to another site, you can change the time zone by using
the
tzselect
utility.
Refer to the
tzselect(8)
reference
page and the
System Administration
for more information.
Table 6-4: Mapping of Time Zones to Location/Area Style
| Obsolete Time Zone |
New Location/Area |
| Australia/ACT |
Australia/Sydney |
| Australia/LHI |
Australia/Lord_Howe |
| Australia/NSW |
Australia/Sydney |
| Australia/North |
Australia/Darwin |
| Australia/Queensland |
Australia/Brisbane |
| Australia/South |
Australia/Adelaide |
| Australia/Tasmania |
Australia/Hobart |
| Australia/Victoria |
Australia/Melbourne |
| Australia/West |
Australia/Perth |
| Australia/Yancowinna |
Australia/Broken_Hill |
| Belfast |
Europe/Belfast |
| Brazil/Acre |
America/Porto_Acre |
| Brazil/DeNoronha |
America/Noronha |
| Brazil/East |
America/Sao_Paulo |
| Brazil/West |
America/Manaus |
| Canada/Atlantic |
America/Halifax |
| Canada/Central |
America/Winnipeg |
| Canada/East-Saskatchewan |
America/Regina |
| Canada/Eastern |
America/Montreal |
| Canada/Mountain |
America/Edmonton |
| Canada/Newfoundland |
America/St_Johns |
| Canada/Pacific |
America/Vancouver |
| Canada/Saskatchewan |
America/Regina |
| Canada/Yukon |
America/Whitehorse |
| Chile/Continental |
America/Santiago |
| Chile/EasterIsland |
Pacific/Easter |
| Cuba |
America/Havana |
| Dublin |
Europe/Dublin |
| Egypt |
Africa/Cairo |
| GB-Eire |
Europe/London |
| GMT |
Etc/GMT |
| GMT+0 |
Etc/GMT+0 |
| GMT+1 |
Etc/GMT+1 |
| GMT+10 |
Etc/GMT+10 |
| GMT+11 |
Etc/GMT+11 |
| GMT+12 |
Etc/GMT+12 |
| GMT+13 |
Etc/GMT+13 |
| GMT+2 |
Etc/GMT+2 |
| GMT+3 |
Etc/GMT+3 |
| GMT+4 |
Etc/GMT+4 |
| GMT+5 |
Etc/GMT+5 |
| GMT+6 |
Etc/GMT+6 |
| GMT+7 |
Etc/GMT+7 |
| GMT+8 |
Etc/GMT+8 |
| GMT+9 |
Etc/GMT+9 |
| GMT-0 |
Etc/GMT-0 |
| GMT-1 |
Etc/GMT-1 |
| GMT-10 |
Etc/GMT-10 |
| GMT-11 |
Etc/GMT-11 |
| GMT-12 |
Etc/GMT-12 |
| GMT-2 |
Etc/GMT-2 |
| GMT-3 |
Etc/GMT-3 |
| GMT-4 |
Etc/GMT-4 |
| GMT-5 |
Etc/GMT-5 |
| GMT-6 |
Etc/GMT-6 |
| GMT-7 |
Etc/GMT-7 |
| GMT-8 |
Etc/GMT-8 |
| GMT-9 |
Etc/GMT-9 |
| GMT0 |
Etc/GMT0 |
| GMT1 |
Etc/GMT+1 |
| GMT10 |
Etc/GMT+10 |
| GMT11 |
Etc/GMT+11 |
| GMT12 |
Etc/GMT+12 |
| GMT13 |
Etc/GMT+13 |
| GMT2 |
Etc/GMT+2 |
| GMT3 |
Etc/GMT+3 |
| GMT4 |
Etc/GMT+4 |
| GMT5 |
Etc/GMT+5 |
| GMT6 |
Etc/GMT+6 |
| GMT7 |
Etc/GMT+7 |
| GMT8 |
Etc/GMT+8 |
| GMT9 |
Etc/GMT+9 |
| Greenwich |
Etc/Greenwich |
| Hongkong |
Asia/Hong_Kong |
| Iceland |
Atlantic/Reykjavik |
| Iran |
Asia/Tehran |
| Israel |
Asia/Jerusalem |
| Jamaica |
America/Jamaica |
| Japan |
Asia/Tokyo |
| Libya |
Africa/Tripoli |
| London |
Europe/London |
| Mexico/BajaNorte |
America/Tijuana |
| Mexico/BajaSur |
America/Mazatlan |
| Mexico/General |
America/Mexico_City |
| NZ |
Pacific/Auckland |
| NZ-CHAT |
Pacific/Chatham |
| Navajo |
America/Denver |
| PRC |
Asia/Shanghai |
| Poland |
Europe/Warsaw |
| ROC |
Asia/Taipei |
| ROK |
Asia/Seoul |
| Singapore |
Asia/Singapore |
| Turkey |
Europe/Istanbul |
| UCT |
Etc/UCT |
| US/Alaska |
America/Anchorage |
| US/Aleutian |
America/Adak |
| US/Arizona |
America/Phoenix |
| US/Central |
America/Chicago |
| US/East-Indiana |
America/Indianapolis |
| US/Eastern |
America/New_York |
| US/Hawaii |
Pacific/Honolulu |
| US/Indiana-Starke |
America/Indiana/Knox |
| US/Michigan |
America/Detroit |
| US/Mountain |
America/Denver |
| US/Pacific |
America/Los_Angeles |
| US/Samoa |
Pacific/Pago_Pago |
| UTC |
Etc/UTC |
| Universal |
Etc/Universal |
| W-SU |
Europe/Moscow |
| Zulu |
Etc/Zulu |
If you do not supply a location and area, and did not set up your system
to halt before system reboot (see
Section 6.6), the Full
Installation stops after system reboot and prompts you for location and area
information.
6.11 Setting the Root Password
A UNIX operating system permits a superuser to have
permissions that supersede those of ordinary users.
This superuser is often
referred to as the
root
user.
The superuser is usually
the person who is responsible for system administration tasks.
This user has
access to all files and all devices and is not restricted from changing anything
on the operating system.
For this reason, the
root
user
(or
root
account), needs a special password.
Section 6.11.1
contains guidelines for choosing an effective
root
password.
Figure 6-3
shows the
Set root Password
dialog box.
Figure 6-3: Set Root Password Dialog Box
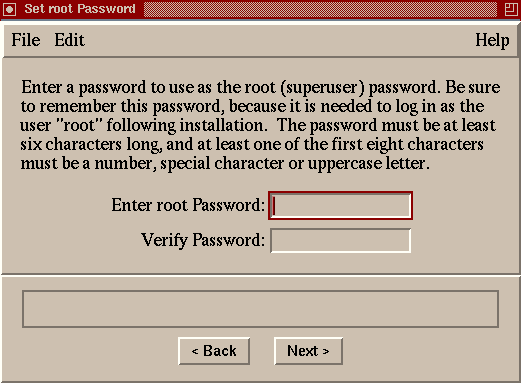
Choose a password that conforms to the following rules:
Passwords must contain a minimum of six to a maximum of 16
characters.
The password should contain a combination of upper and lower
case letters.
At least one of the first six characters must be a number,
a special character, or an upper case letter.
It is recommended, but not mandatory, to use numbers and special
characters such as the dollar sign ( $ ),
the percent sign ( % ), the number sign ( # ), the period ( . ), the
hyphen ( - ), the underscore ( _ ), or the at sign ( @ )
in your password.
If you do not use a special character or number in the password,
at least one of the first six characters must be an upper case letter or a
number.
When you enter the password, it is not displayed on your screen for
security reasons.
You must enter the new password again for verification.
Remember this password because you will need it to log in as the
root
user the first time you log in to the system after the installation.
You can change the
root
password at any time (using the
passwd
command) after the system is installed.
If you do not supply a root password, and did not set up your system
to halt before system reboot, the Full Installation stops after the system
reboots but before building the tailored kernel to prompt you for a
root
password.
6.11.1 Guidelines for Choosing Effective Passwords
When choosing a root password, you should
not
use:
Words found in any dictionary (in any language)
Personal information about you or your family such as first
and last names, addresses, birth dates, telephone numbers, names of pets,
and so on
Any combination of words in the dictionary and personal information
Do not choose a password that can be guessed by someone who knows you.
Because the
root
user has absolute power over the operating
system, the
root
password should be carefully protected.
The basic guideline is to make the password something that you can remember
but difficult for someone else to guess.
6.11.2 Root Password Samples
Table 6-5
shows examples of passwords that adhere to suggested guidelines and some
that do not.
These passwords are shown for illustrative purposes only; do
not use any of them for your password.
Table 6-5: Sample Root Passwords
| Correct Root Passwords |
Passwords That Are Not Recommended |
Why Password Violates Guidelines |
OhU8one2to |
johnsmith
|
Proper name with all letters lower case |
UrGr8t!! |
123MainStreet
|
Home address |
parTe2knite |
MyDogLassie
|
Name of pet |
99Pnt.99% |
7-6-58
|
Birth date of family member |
6.12 Choosing the Type of Software to Be Installed
After supplying host information, setting the date
and time, and specifying a root password, the next step in the Full Installation
is to select the type of software to install.
If you are using the graphical
user interface, the
Software Selection
dialog box is shown
in
Figure 6-4.
The text-based interface displays the same
information.
Figure 6-4: Software Selection Dialog Box
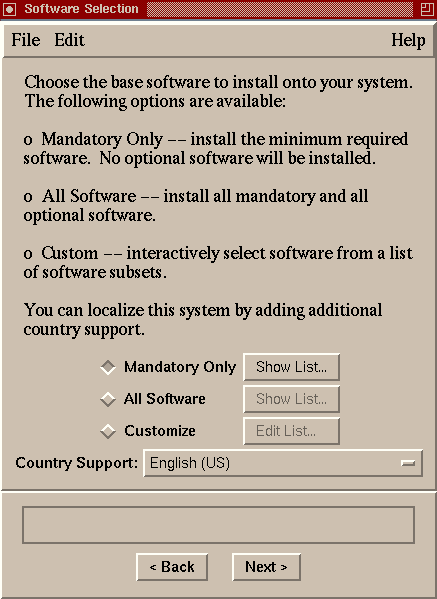
Table 6-6
describes the three classifications
of software subsets.
Appendix C
provides descriptions
of the individual software subsets.
Table 6-6: Description of Software Selection Options
| Option |
Description |
| Mandatory Only |
This option installs the software subsets
that are the minimum required to run the base operating system.
Mandatory
software subsets are always installed.
This is the default choice for the
graphical user interface. |
| All Software |
This option installs all mandatory software
subsets and all optional software subsets, excluding Worldwide Language Support
subsets (unless you select additional country support). |
| Customize |
This option lets you choose which optional
software subsets to install in addition to the mandatory software.
Section 6.12.1
provides hints for customizing the software selection process. |
| Country Support |
This is where you select support for one
or more additional languages if you are using the graphical user interface.
Each country has a set of software subsets that is designed to allow localization
of the operating system.
The default is the United States English language.
If you install all base operating system subset plus one or more additional
languages, all WLS subsets for each selected country are installed. |
Refer to
Appendix C
for a description of the mandatory,
optional, and WLS software subsets.
6.12.1 Hints for Selecting Optional Software
Selecting the
Customize
option and clicking
on the
[Edit List...]
button displays the
Software
Section: Edit List
dialog box shown in
Figure 6-5,
which is where you select the optional software you want to install.
Note
The legend at the bottom of the dialog box describes the current status
of each software subset.
Click on a plus sign (+) to view the individual software
subsets contained in a software category; click on a minus sign (-)
to close a category.
Figure 6-5: Software Subsets: Edit List Dialog Box

When making software subset selections, you can select a software subset
category (such as
General Applications), or an individual
software subset within a category (such as
DOS Tools).
If you select a software subset that has a dependency with another subset
that is not yet selected, the other subset is selected automatically.
When
a subset with dependencies is selected, a dialog box with a message similar
to the following is displayed:
The chosen subset(s) require one or more additional subset(s)
which will be loaded automatically:
  * Doc. Preparation Tools  (OSFDCMT505)
An alternative to selecting one software subset (or category) at a time
is to select the topmost category,
Tru64 UNIX V5.0 Operating
System
, and then click on the categories or subsets you do not want.
Adding all subsets results in more software than your system needs, so remember
to remove all of the hardware-specific subsets related to keyboard types,
X servers, and fonts.
The user interface will not let you remove software
subsets that are mandatory for your system's hardware configuration.
A suggested procedure for selectively choosing optional software to
install:
Review
Appendix C
for a description of
all software subsets.
In the
Software Selection
Dialog Box, select
Customize, then click on the
[Edit List...]
button.
Select the optional software subsets you want.
When you have
completed selecting the subsets, note the
Disk Space Required
for the
/,
/usr, and
/var
file systems, which is shown at the bottom of the dialog box.
Use this information
to select disks and partitions that are large enough to hold the software
you want to install
Note
If you do not want to use the recommended partitions offered by the
Full Installation process, read the
Installation Guide -- Advanced Topics
for information about
partitioning disks, then use the
Disk Space Required
figures
to select which disks to select later on in the Full Installation process.
6.13 Choosing the Type of Kernel Components to Build into the Kernel
The next
step in the Full Installation is to choose the type of kernel components to
build into the kernel later in the configuration phase of the installation
process.
Regardless of the interface, you have three options for including
kernel components into the kernel.
Figure 6-6
depicts what
you see if you are using the graphical interface.
Figure 6-6: Kernel Options Dialog Box
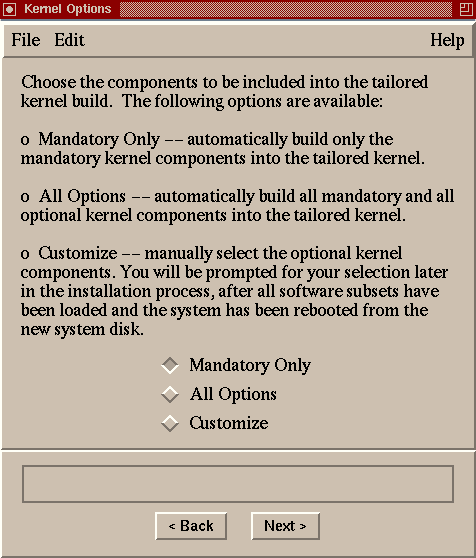
Table 6-7
describes the kernel component
options:
Table 6-7: Description of Kernel Selection Options
| Option |
Description |
| Mandatory Only |
This option builds into the kernel the minimum
kernel components required for the proper operation of the software subsets
you plan to install.
This is the default option for the graphical user interface. |
| All Options |
This option builds all kernel components
into the kernel.
Each kernel component loads additional code into the kernel;
therefore, selecting
All Options
can significantly and
unnecessarily increase the size of the kernel and impact performance. |
| Customize |
This option lets you select specific kernel
components from a
Kernel Options Selection
menu that is
presented after system reboot (see
Section 6.17.2).
The kernel
components presented on the menu depend on the software subsets that were
installed.
See
Section 6.18
for more information
about selecting kernel components. |
6.14 Selecting the Type of File System Layout
After selecting the
software subsets to install, you have to decide where to install them.
Selecting
the file system layout involves selecting the disk or disks and disk partitions
on which you want to install the standard UNIX file systems:
/,
/usr,
/var,
/usr/i18n
(if you selected one or more additional languages), and swap space.
You have
to then decide whether you want to assign the Advanced File System (AdvFS),
which is the default, or the UNIX File System (UFS) as the file system type
for each file system.
The Full Installation offers the option to choose a
default file system layout or the option to completely customize the file
system layout.
The dialog box shown in
Figure 6-7
shows the file
system layout choices.
Figure 6-7: Select File System Layout Dialog Box
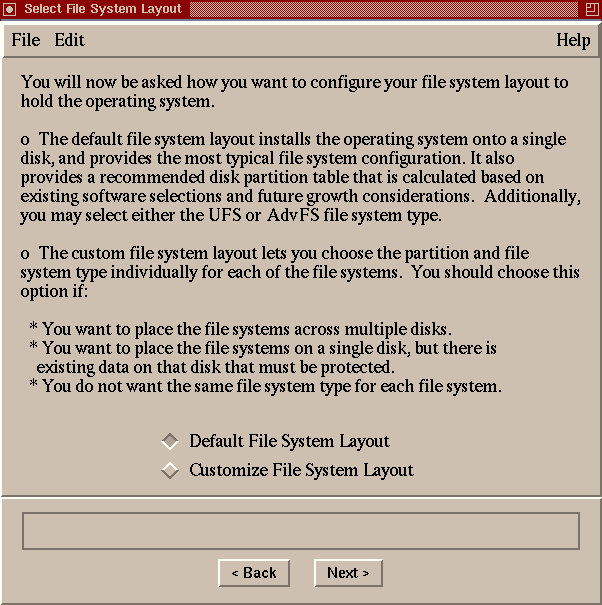
Section 6.14.1
describes the situations when you should choose the default file system layout,
and
Section 6.14.2
describes the situations when you
should choose to customize the file system layout.
6.14.1 When Should I Use the Default File System Layout?
You should use the default file system layout if any one of the following
statements is true:
When you do not have any data on the disk that you want to
retain.
The default file system layout rewrites the disk partition table and
may overwrite existing data.
Your system has only one disk (which must have 1 GB or greater
capacity).
You want to install the operating system on one disk (even
if your system has more than one).
You do not need to create custom disk partitions.
You only need one swap area.
You only want one file system type for all file systems.
Regardless of the interface you are using, you have to make a few choices
if you want to use the default layout:
Choose one disk
--
The disk you choose to contain the operating system must be 1GB or greater
in size.
The
a
partition on this disk must be a minimum
of 128 MB to hold the
/
(root) file system.
As shown in
Figure 6-8, instead of the
rz*
device names you may have been accustomed to in previous versions
of the operating system, you will see
dsk*
device names.
Refer to
Appendix A
for general information about device
naming conventions.
Refer to
Section A.4
for
information about preserving your existing device name database during a Full
Installation if your system already is running a previous version of the operating
system.
Choose one file system type for all file systems
-- Choices are the Advanced File System (AdvFS),
which is the default, or the UNIX file system (UFS).
For a description and
comparison of UFS and AdvFS, see the
Installation Guide -- Advanced Topics.
Note
If this system is going to be a member of a cluster, you must use AdvFS
as the file system type.
Decide whether or not to install into LSM volumes
--
Section 6.14.4
provides
more information about the Logical Storage Manager (LSM) to help you decide
whether or not you want to install into LSM volumes.
What you see if you choose the default file system layout depends upon
the interface you are using:
If you are using the graphical user interface, choosing the
Default File System Layout
option opens the dialog box shown in
Figure 6-8.
Figure 6-8: Default File System Layout Dialog Box
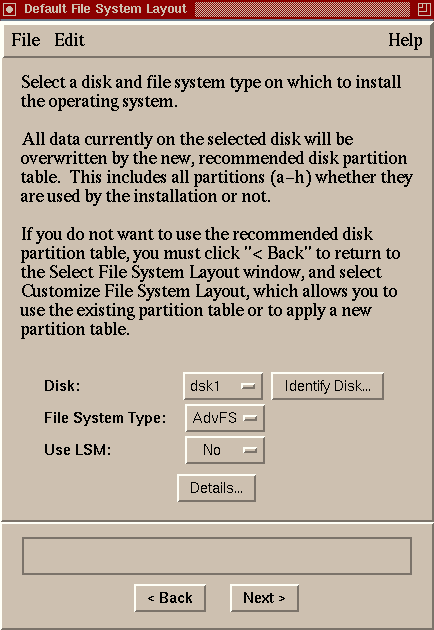
Hold the left mouse button down
over the disk button labeled
dsk1
to obtain a list of disks
available on your system.
Highlight the disk you want to use, then release
the mouse button.
If you are using the graphical interface, you can verify that you selected
the correct disk by clicking on the
[Details...]
button to
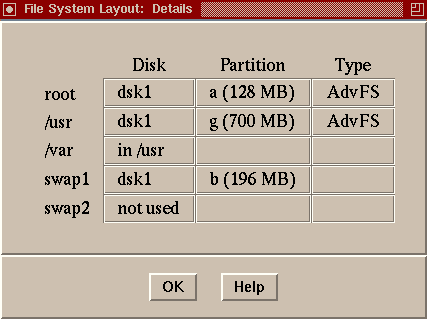
display the disk details shown in
Figure 6-9.
The partition
sizes shown are for illustrative purposes only.
Your disk partition sizes
will depend upon the software subsets you have chosen.
The
/usr/i18n
file system contains the subsets required for
internationalization
(i18n) and is shown only if you selected support for one or more
additional languages.
Figure 6-9: Default File System Layout: Details Dialog Box
If after reviewing the disk details you are not satisfied with the disk
or file system type you chose, close the Details dialog box and choose another
disk or file system type.
If you are still not satisfied, go back to the
File System Layout dialog box
and select the
option to
customize the file system layout
to obtain a more suitable configuration.
If you are unable to determine which of the physical disks is associated
with a
dsk*
device name, click on the
[Identify
Disk...]
button to open the dialog box shown in
Figure 6-10.
Follow the instructions in the dialog box to blink the input/output light
on the disk.
Figure 6-10: Identify Disk Dialog Box

Example 6-1
shows the text-based interface
disk selection dialog box for a default file system layout
Example 6-1: Textual Interface: Default File System Layout
Select a disk for the root file system.  The root file system
will be placed on the "a" partition of the disk you choose.

To visually locate a disk, enter "ping <disk>", where <disk>
is the device name (e.g., dsk0) of the disk you want to
locate.  If that disk has a visible indicator light, it will
blink until you are ready to continue.
     Device   Size  Controller  Disk
     Name    in GB  Type        Model       Location
 1)   dsk0     8.5  SCSI        RZ1DF-BF   bus-0-targ-0-lun-0
 2)   dsk1     8.5  SCSI        HSZ70      bus-4-targ-0-lun-0
 3)   dsk2     8.5  SCSI        HSZ70      bus-4-targ-0-lun-1

Select the file system type.  All of the file systems will be
created with this type.

1) UFS -- UNIX File System
2) AdvFS -- Advanced File System

Enter your choice: 1

You have requested this file system layout:

  * root file system on dsk0a, type UFS
  * /usr file system on dsk0g, type UFS
  * var will be a directory in the /usr file system
  * i18n will be a directory in the /usr file system
  * first swapping area (swap1) will be on dsk0b
  * no second swapping area (swap2)

Is this the correct file system layout (y/n)
Example 6-2
shows a default file system
layout screen when the system has only one disk.
Example 6-2: Text--Based Interface: Default File System Layout with One Disk
Only one disk detected in this system (/dev/dsk0, SCSI RZ1DF-BF
type).  All file systems will be on that disk.

Select the file system type.  All of the file systems will be
created with this type.

1) UFS -- UNIX File System
2) AdvFS -- Advanced File System

Enter your choice:
If you are using the text-based interface and you are not sure which
physical disk is associated with a particular
dsk*
name,
you may be able to identify it by entering
ping
disk_name
as shown in
Example 6-3.
If
the disk has a visible input/output light, it will start blinking.
Not all
disks have an input/output light, so not all disks can be identified using
this method.
Example 6-3: Identifying Disks in the Textual Interface
To visually locate a disk, enter "ping <disk>", where <disk>
is the device name (e.g., dsk0) of the disk you want to
locate.  If that disk has a visible indicator light, it will
blink until you are ready to continue.
     Device   Size  Controller  Disk
     Name    in GB  Type        Model       Location
 1)   dsk0     8.5  SCSI        RZ1DF-BF   bus-0-targ-0-lun-0
 2)   dsk1     8.5  SCSI        HSZ70      bus-4-targ-0-lun-0
 3)   dsk2     8.5  SCSI        HSZ70      bus-4-targ-0-lun-1

Enter your choice: ping dsk0

** Identifying device dsk0
When you have made your decisions for the default file system layout,
the Full Installation continues as described in
Section 6.15.
6.14.2 When Should I Customize the File System Layout?
You should customize the file
system layout if any one of the following statements is true:
You want to install the standard UNIX file systems on more
than one disk.
Up to six different disks can be specified.
Each file system
and swap area can reside on its own disk.
You want to use both AdvFS and UFS file system types.
You want to create custom disk partition sizes.
You need two swap areas.
You want to preserve existing data on disks you are installing
to as described in
Section 6.14.5.
You plan to use the system as a dataless server or a RIS server.
The
Installation Guide -- Advanced Topics
provides details about the extra space needed in
the
/var
file system for these types of servers.
You have to make a few choices if you want to use the Custom File System
Layout:
Decide whether or not to install into LSM volumes
--
Section 6.14.4
provides
more information about LSM to help you decide whether or not you want to use
it.
Choose a disk and disk partition for each file system
-- You must choose a disk and disk partition
to hold each of the following file systems:
/,
/usr,
/var, and
/usr/i18n
(if you want
/usr/i18n
to be a file system rather than
a directory).
The
/usr/i18n
file system contains the subsets
required for
internationalization
(i18n) if you selected
additional language support.
The
/
file system must be
on the
a
partition of the disk you choose to hold it; you
cannot change this.
You have the option to locate the
/var
and
/usr/i18n
file systems within the
/usr
file system instead of on their own disk partition.
If you are unable to determine which of your physical disks is associated
with a
dsk*
device name, click on the
[Identify
Disk...]
button to open the identify disk dialog box shown in
Figure 6-10, or enter
ping
disk_name
if you are using the text-based interface.
As shown in
Figure 6-11, instead of the
rz*
device names you may have been accustomed to in previous versions
of the operating system, you will see
dsk*
device names.
Refer to
Appendix A
for general information about device
naming conventions.
Refer to
Section A.4
for
information about preserving your existing device name database during a Full
Installation if your system is already running a previous version of the operating
system.
Choose a disk and disk partition for one or two swap areas
-- You have the option to allocate two
swap areas.
It is recommended that you place swap areas on different disks
and choose the fastest disks for swap areas.
The
Installation Guide -- Advanced Topics
contains
more recommendations for calculating the amount of swap space you need and
where to place swap space.
As a frame of reference, the recommended file system
layout uses 128 MB as the default size of the swap partition.
Choose a file system type for each file system
-- Choose between the Advanced File System (AdvFS),
which is the default, or the UNIX file system (UFS) for each file system.
For a description and comparison of UFS and AdvFS, see the
Installation Guide -- Advanced Topics.
Note
If this system is going to be a member of a cluster, you must use AdvFS
as the file system type.
What you see when customizing the file system layout depends upon the
interface you are using:
If you are using the graphical user interface, the
Customize File System Layout
option displays the dialog box shown
in
Figure 6-11.
Figure 6-11: Custom File System Layout Dialog Box
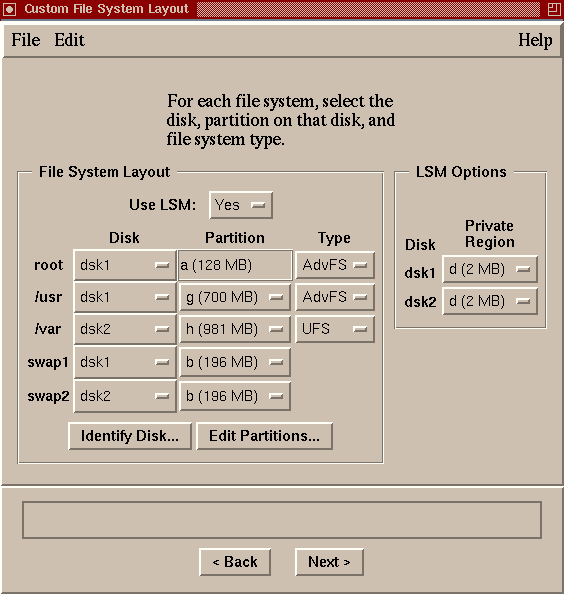
The
Custom
option lets you configure your disks and
file systems any way you choose.
For
a typical installation, the recommended minimum file system size is shown
in
Table 6-8.
Table 6-8: Suggested Minimum Partition Size for File Systems
| File System or Area |
Size in Megabytes (MB) |
/
(root) |
128 |
/usr |
745 |
swap1 |
128 |
The
a
partition of the disk that contains the
/
(root) file system must be at least 128 MB in size or you will
not be able to continue the installation.
The disk selection screens of the text-based interface are
similar to those shown in
Example 6-4.
The interface provides
some guidelines for selecting partitions that are large enough to hold each
file system.
In this example, the user chose to install into LSM volumes,
hence the 2 MB
d
partition to hold the LSM private region.
Example 6-4: Customized Disk Selection Using the Text-Based Interface
Select the dsk0 partition where the LSM private region
will reside. This partition must be larger than 2 MB in
order to accommodate the LSM configuration for this disk.

                         Start      End
   Partition    Size     Block     Block    Overlaps
1)     b        128MB    262144    524287   c
2)     d        2.0MB    524288    528383   c
3)     e        372MB    528384   1289621   c g
4)     f        372MB   1289622   2050859   c g
5)     g        743MB    528384   2050859   c e f

Enter your choice: 2

Select the dsk0 partition where the /usr file system
will reside. This partition must be larger than 269 MB in
order to fit the software that you have selected.  However,
a size of 700 MB or greater is recommended to allow for
additional layered software and future upgrade
considerations.
                         Start      End
   Partition    Size     Block     Block    Overlaps
1)     b        128MB    262144    524287   c
2)     e        372MB    528384   1289621   c g
3)     f        372MB   1289622   2050859   c g
4)     g        743MB    528384   2050859   c e f

Enter your choice: g

Select the file system type for the /usr file system.

1) UFS -- UNIX File System
2) AdvFS -- Advanced File System

Enter your choice: 2
Continue making disk and disk partition selections until all file
systems and swap areas are assigned.
When you have made your decisions for the customized file system layout,
the Full Installation continues as described in
Section 6.15.
6.14.3 Partitioning Disks for a Custom File System Layout
Both user interfaces provide access to disk configuration tools if you
need to repartition a disk to accommodate a customized file system layout:
The Disk Configuration application,
diskconfig,
is invoked directly from the graphical user interface by clicking on the
[Edit Partitions...]
button on the
Custom File System Layout
dialog box.
After making your
changes and exiting the Disk Configuration application, resume with the Full
Installation tasks (all of your previous selections are intact).
The
disklabel
command is accessed from
the text-based interface by pressing
[Ctrl/c]
at any prompt
to bring the system back to a UNIX shell.
After making disk changes, restart
the Full Installation; any installation choices you have made up to this point
are lost.
Note
Disk partitioning changes take effect immediately even if the installation
is canceled.
Because disk partitioning is considered a task that only experienced
users should attempt, the Disk Configuration application, tasks that can be
performed from the UNIX shell, and how to use the
disklabel
command are documented in the
Installation Guide -- Advanced Topics.
6.14.4 Should I Install into LSM Volumes?
Whether
you choose the default file system layout with one disk or decide to customize
the file system layout on more than one disk, you have to decide whether or
not to install into LSM volumes.
By selecting the LSM option, LSM is automatically configured and the
/,
/usr, and
/var
file systems
and swap areas are directly configured within LSM volumes instead of disk
partitions.
LSM is an integrated, host-based disk storage management tool
that protects against data loss, improves disk input/output performance, and
customizes the disk configuration.
LSM builds virtual disks, called volumes,
on top of UNIX system disks.
A volume is a special device that contains data
used by file systems, databases, or other applications.
LSM transparently
places a volume between a physical disk and an application, which then operates
on the volume rather than on the physical disk.
The Full Installation automatically
installs the software subsets required by LSM.
Section 4.1.3
provides an overview of LSM features if you need more information to make
the decision to use it.
You need a separate license to use the mirroring and
striping features of LSM.
Section 6.14.4.1
contains
information about selecting a partition to use for the LSM private region.
Installing into LSM volumes is not typical nor required during a Full
Installation.
But, if you have previous experience using this feature, it
is offered as an option now to eliminate the need to install LSM as a separate
task.
Note
Section 6.14.4.2
contains information about the special
processing done by a Full Installation on a system that previously was configured
to use LSM.
6.14.4.1 Selecting a Partition for the LSM Private Region
If LSM is selected, you are required to select a private region
partition for each disk being installed.
LSM uses these private regions to
hold configuration information for the entire system.
Multiple private regions
on multiple disks provide backup functionality in the unlikely event of a
disk failure.
The LSM private region requires 2 MB of disk space.
As such,
the partitions for the LSM private region need to be at least 2 MB in size.
Partitions can be larger, but the excess space will not be available for any
other use.
The recommended disk partition layout provided by the Full Installation
interface includes a 2 MB
d
partition on all disks.
This
partition should be used for the LSM private region whenever possible.
6.14.4.2 Special Processing for Systems Previously Configured with LSM
If you decide to install and configure LSM on a system
with an existing LSM configuration, a clean up procedure prepares the system
for the new LSM selections.
This procedure removes LSM from the following
partitions so that your Full Installation selections can be applied:
Any sliced disk or simple disk partitions that have been selected
for the new file systems (/,
usr,
var,
/usr/i18n, or swap space).
Any sliced disk or simple disk partitions that overlap those
that were selected for the new file systems.
Any sliced disk or simple disk partition that contains LSM
information with one or more of the standard names that the Full Installation
procedure will use to create the new LSM configuration.
Table 6-9
lists the standard LSM names.
Table 6-9: LSM Standard Names
| LSM Component |
Standard Names |
| disk |
root01, usr01, var01, swap01, sswap01,
i18n01 |
| volume |
rootvol, usrvol, varvol, swapvol,
sswapvol, i18nvol |
| plex |
rootvol-01, usrvol-01, varvol-01,
swapvol-01, sswapvol-01, i18nvol-01 |
| subdisk |
root01-01, usr01-01, var01-01, swap01-01,
sswap01-01, i18n01-01 |
This clean up procedure preserves all information (volumes, private
regions, disks, and so on) from the existing LSM configuration that is not
overwritten by your Full Installation selections.
All existing LSM information
that is not identified in the four LSM components listed in
Table 6-9
will be preserved.
This cleanup procedure is applied to any LSM partitions,
even if you are installing to a different disk than your current boot disk.
If, for any reason, a component cannot be removed, the Full Installation
exits to single user mode with an error message.
From this point, various
commands can be used to interrogate the existing LSM configuration and manually
remove the source of the problem so that the installation can be restarted.
See
Section G.1.1.1
for more information about the commands
that can be used to interrogate the existing LSM configuration and how to
manually remove the source of the problem.
6.14.5 Preserving Data on Previously Used Disks
When you are installing the operating system onto
a single disk and you want to preserve data on an existing partition, choose
the
Customize File System Layout
option so that the existing
partition sizes and offsets will not be changed.
By choosing the custom option, you can select the disk partitions on
which the
/,
/usr, and
/var
file systems and
swap
areas will be installed.
If the partitions you choose contain data or user files, the data is lost
(overwritten) when the new file systems are built.
Selecting a partition for
one of these file systems that overlaps the partitions containing the data
to be preserved has the same effect.
Also, modifying the partition information
in the disk label in such a way that the partitions containing data have their
size and offset modified causes the data to be lost.
However, if the partitions
containing the data are undisturbed, their contents are preserved.
Assuming that the partitions to be preserved were undisturbed during
the installation, the data in them can be used on the newly-installed system.
If the partition contained a file system, it can be mounted and accessed
again.
Refer to the
mount(8)
reference page for more information about mounting
file systems.
Note
The Full Installation procedure does not update the
/etc/fstab
file with the partitions that contain user data or user
file systems.
In order to mount these partitions to make the data available
to users, you manually add the entries for partitions with preserved data
to the new
/etc/fstab
file after the Full Installation
is complete.
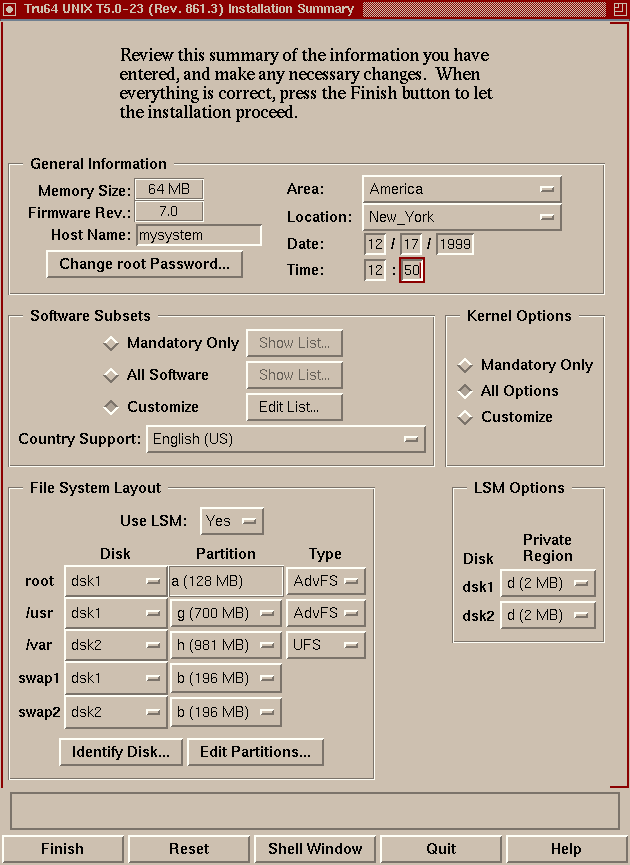
6.15 Step 5: Check Your Selections
Except for the system date and time, your system has not been changed
in any way unless you have used the
Disk Configuration
application or
disklabel
command to reconfigure disk partitions.
This is the last chance you have to verify your disk and software selections.
If you are using the graphical interface, the
Installation Summary
dialog box shown in
Figure 6-12
is displayed
after you make your disk and file system layout selections.
The summary data
shown is based on a custom file system layout.
You can change any of the
information directly from this dialog box.
Once you are satisfied with all
your selections, click on
[Finish].
You will have another opportunity
to confirm the start of the installation.
If you are using the text-based interface, you are asked to confirm
the file system layout.
Use the
history
command to revisit
any of your entries and change them.
Figure 6-12: Installation Summary Dialog Box
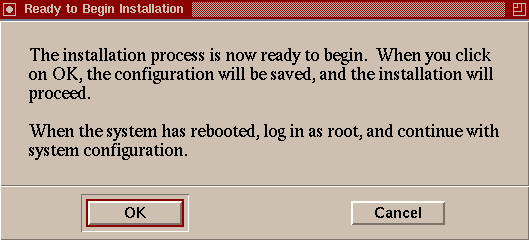
6.16 Step 6: Final Confirmation
After verifying all of your selections, you have one more chance to
confirm the start of the installation process:
If you are using the graphical interface, the confirmation
dialog box shown in
Figure 6-13
is displayed after you click
on
[Finish]
in the Summary dialog box.
To begin the installation,
click on
[OK]
here.
Figure 6-13: Ready to Begin Installation Dialog Box
If you are using the text-based interface, press the
[Return]
key at the following prompt to start the installation:
You have now answered all questions needed to install
Tru64 UNIX on this system.  Press Ctrl/c to cancel the
installation; or type "history" to modify your earlier
answers; or press RETURN to proceed with installation:
Section 6.16.1
describes how to cancel the installation.
6.16.1 Canceling and Restarting the Full Installation
If for any reason you do not want to start the installation at this
point, you can cancel it:
If you are using the graphical interface, click on
[Cancel]
in the
Ready to Begin
dialog box to return
to the
Installation Summary
dialog box.
Then, click on
[Quit]
in the
Summary
dialog box to put the system
in single-user mode.
If you are using the text-based interface, press
[Ctrl/c]
to put the system in single-user mode.
To restart the Full Installation setup process from single-user mode
regardless of the interface you were using, enter the following commands:
# cd /
# restart
If
your system has graphics capabilities but you prefer to restart the installation
setup process in the text-based interface, enter the following commands:
# cd /
# restart nogui
6.17 What Happens Next?
Once you click on
[OK]
in the
Ready to Begin
dialog box or press the
[Return]
key in the text-based
interface, the Full Installation process starts making changes to your system.
First,
file systems are created and software
is loaded
followed by a
system reboot
and
software configuration
phase.
The user interaction at this point in the installation process is:
Enter the boot commands that are displayed on the screen (Section 6.17.2.) to reboot the system.
Enter host- or site-specific information or a root password
if you have not already done so after the software subsets are loaded and
the system reboots.
Refer to
Section 6.7
if you need
help entering this information.
Insert the CD-ROM labeled
Associated Products Volume 1
just before the software
configuration phase to load WLS software if you selected support for additional
languages.
6.17.1 File System Creation and Software Subset Load Phase
When the actual installation
begins, the
/,
/usr,
/var,
and
/usr/i18n
file systems and
swap
areas are created on the disks and partitions you selected.
The software subset
load phase follows file system creation.
A progress bar shows the percent
complete of each phase to give you an indication of how far along the process
is.
If you are using the text-based interface, messages similar to the following
are displayed:
Continuing installation...

Applying the selected disklabel on device dsk0

Creating the root file system on device dsk0a

Creating the usr file system on device dsk0g

Creating the var area in the usr file system

Creating the swap1 file system on device dsk0b

The installation procedure will now load a total of 31 software subsets
on your disk partitions. This total includes the following products:

        * 31 Base Operating System subsets

This process will take from 45 to 120 minutes to complete depending on
your distribution media and processor type.

LOADING THE BASE OPERATING SYSTEM SOFTWARE SUBSETS
Note
The Full Installation process does not use the default inode density
when creating UFS file systems for the
/,
/usr, and
/var
file systems.
A lower density value
is used to maximize available usable file system space.
6.17.2 System Reboot Phase
The boot commands required
to boot from the newly created system disk are displayed on the screen.
At
the console mode prompt (>>>), enter the boot command sequence
shown on your screen.
Do not
enter the boot variables
that are shown in
Example 6-5.
Example 6-5: Sample Boot Command Sequence
Issue the following console commands to set your default bootpath
variable and to boot your system disk to multiuser:

        >>> set boot_osflags A
        >>> set bootdef_dev DKA0
        >>> boot

syncing disks... done
CPU 0: Halting... (transferring to monitor)

?05 HLT INSTR
  PC= FFFFFC00.0044CA90 PSL= 00000000.00000005
Write down your system's boot commands here for future reference:
>>>
>>>
>>>
Software configuration
begins after the system boots, which is followed by the
kernel build
procedure.
6.17.3 Software Configuration Phase
Software configuration occurs automatically after your system reboots
from the system disk and refers to the process of tailoring the software subsets,
setting the host name, root password, and time zone, system tuning, and building
a tailored kernel for use by the operating system and by your hardware.
If you did not provide certain essential host- and site-specific
information (such as a root password, your system's host name, the date and
time, and location and time zone) earlier in the installation procedure, you
will be prompted to enter that information now.
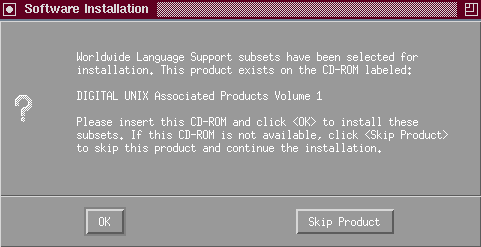
If you chose to install Worldwide Language Support (WLS) software, and
you are installing from CD-ROM, you will see the dialog box shown in
Figure 6-14
.
Remove the CD-ROM labeled
Operating System Volume 1
from the
drive and insert the CD-ROM labeled
Associated Products Volume 1, which contains the WLS
software.
If, for any reason, you do not have the second CD-ROM available, you
can skip WLS installation at this time, and install it later using the
wwinstall
script.
The
Installation Guide -- Advanced Topics
provides instructions
for running the
wwinstall
script.
Note
If you are performing the WLS installation from RIS, you are not prompted
at all because the WLS software subsets are already available in the RIS area
to which your system is registered and they were installed onto the system
before the system reboot.
Figure 6-14: Software Installation Dialog Box
If you chose the option to select optional kernel components during
the Full Installation setup, go to
Section 6.18
to select kernel options.
6.18 Optional Step 7: Select Kernel Components
If you chose the option to install mandatory or all kernel components
during the Full Installation setup, the kernel is built automatically with
the required kernel components for your system configuration.
After the kernel
build, continue with
Section 6.19, which shows you how to log
in to your system for the first time.
If you want to build a kernel with optional
components later, refer to the
doconfig(8)
reference page.
If you chose the option to customize kernel component selection during
the Full Installation setup, a
Kernel Option Selection
menu is displayed after the system reboots.
The kernel components you see listed on the
Kernel Option Selection
menu depend on the software subsets that
were installed.
The installation procedure gives you the option to include
or exclude the use of these components in the kernel.
If you need to install
a kernel component after Full Installation is complete, use the
doconfig(8)
command.
If you need a description of any kernel component, use the
Help
option to display an online description.
The Kernel Option Selection menu is similar to the following:
    Selection   Kernel Option
--------------------------------------------------------------
        1       System V Devices
        2       NTP V3 Kernel Phase Lock Loop (NTP_TIME)
        3       Kernel Breakpoint Debugger (KDEBUG)
        4       Packetfilter driver (PACKETFILTER)
        5       Point-to-Point Protocol (PPP)
        6       STREAMS pckt module (PCKT)
        7       Data Link Bridge (DLPI V2.0 Service Class 1)
        8       X/Open Transport Interface (XTISO, TIMOD, TIRDWR)
        9       ISO 9660 Compact Disc File System (CDFS)
        10      Audit Subsystem
        11      Alpha CPU performance/profiler (/dev/pfcntr)
        12      ACL Subsystem
        13      All of the above
        14      None of the above
        15      Help
        16      Display all options again
--------------------------------------------------------------

Enter your choices.

Choices (for example, 1 2 4-6) [14]: 5 9
Note
The
ISO 9660 Compact Disc File System
(CDFS) is a dynamically loadable
kernel module.
You can build it into the kernel by selecting it now, otherwise,
it will be loaded on an as needed basis.
After entering your choice of kernel components, the system verifies
the list of options you selected and asks you to confirm your choice.
For
example:
You selected the following kernel options:

        Point-to-Point Protocol (PPP)
        ISO 9660 Compact Disc File System (CDFS)

Is that correct? (y/n) [y]:
If the displayed kernel components are
the ones you want, enter
y
or press
[Return]
to accept the default response.
If the displayed kernel components
are not the ones you want, enter
n
at the prompt.
The
Kernel Option Selection
menu is redisplayed for you
to select kernel components again.
6.18.1 Optional Step: Edit the Kernel File if Necessary
After you select and confirm your kernel options, you have the option
to edit the kernel file.
The kernel configuration file is a text file that
defines the components built into the kernel; it is located in the
/usr/sys/conf/
SYSTEM_NAME
file.
Caution
Although you are given the option to edit this file, it is not recommended.
The
Command and Shell User's Guide
contains a tutorial that teaches you how to
use the
ed
text editor (as well as the
vi
text editor).
You will see a prompt similar to the following:
Do you want to edit the configuration file? (y/n) [n]:
If you enter
n
or press
[Return]
(to enter the default response) to skip the edit of the configuration file,
the kernel build process begins as shown in
Section 6.18.2.
If you enter
y
to edit the file, the following
message is displayed:
Using 'ed' to edit the configuration file.  Press return
when ready, or type 'quit' to skip the editing session:
Enter the
word
quit
if you want to skip the editing session and
start the kernel build process or press the
[Return]
key if
you want to edit the file.
The kernel build begins when you save and quit
the editing session.
6.18.2 The Kernel Build Phase
When the subsets are configured, the installation procedure invokes
the
doconfig
utility to automatically make the device special
files needed by the hardware and build the kernel for your system.
Messages
similar to the following are displayed:
The system will now automatically build a kernel
and then reboot. This will take approximately 15
minutes, depending on the processor type.
When  the login prompt appears after the system
has rebooted, use 'root' as the  login name and
the SUPERUSER  password that was entered during
this procedure, to log into the system.


*** PERFORMING KERNEL BUILD ***
Working....Fri Apr 28 15:45:24 EST 2000
Working....Fri Apr 28 15:47:24 EST 2000
Working....Fri Apr 28 15:49:25 EST 2000
Working....Fri Apr 28 15:51:26 EST 2000
6.18.3 If Your System Boots to Single-User Mode
Your system may boot to single-user mode if the
boot_osflags
variable was not set as described in
Section 6.17.2.
To bring the system to multiuser mode, press
[Ctrl/d]
at the
root prompt ( # ).
You are prompted to enter the run level.
Four run levels are available:
0
specifies the halt state
S
or
s
specifies single-user
mode
2
specifies multiuser mode without network
services
3
specifies multiuser mode with network
services
Enter the following command to boot the system to multiuser mode:
# init 3
6.19 Step 8: Log in to the System as the User root
After the final system reboot, the next step is to log into the newly
installed system as the user
root.
On newly installed
systems, the only user name recognized by the system is
root.
When prompted, enter the root password you set earlier.
6.20 Step 9: Review Installation Log Files
Before you configure the system for general use, it is recommended that
you review the installation log files to make sure the software was installed
and configured correctly.
If any installation errors occurred, they will be
listed in the log files, which are described in
Appendix F.
6.21 Full Installation Is Done
After reviewing the installation log files, the Full Installation is
done.
Go to
Chapter 7, which describes the SysMan
(System Management) tools that you use to configure the system for general
use by yourself and other users.