This chapter describes which system management applications to use to set up services on a system after a Full Installation. The following topics are discussed:
Using the graphical System Setup application to configure and set up your system for general use
Invoking the System Setup application after the initial system configuration
Using the text-based System Setup menu to configure and set up your system for general use if your system does not have graphics capabilities
An overview of additional system management and monitoring tools
Pointers to system administration and configuration documentation
Reconstructing the
/etc/fdmns
directory
if your system was previously installed
with the operating system and was using AdvFS as a file system type
Enabling realtime preemption after the installation
Enabling unattended reboots on multiprocessor systems
7.1 Graphical Interface: The System Setup Application
To
make a newly installed system able to communicate with other systems and users,
network services, printers, software licenses, and mail delivery must be configured.
Initial system configuration tasks are performed from the
Quick Setup
application or the
Custom Setup
application
(in the previous releases, this application was called the
Checklist).
Note
Cluster configuration is described in Cluster Administration.
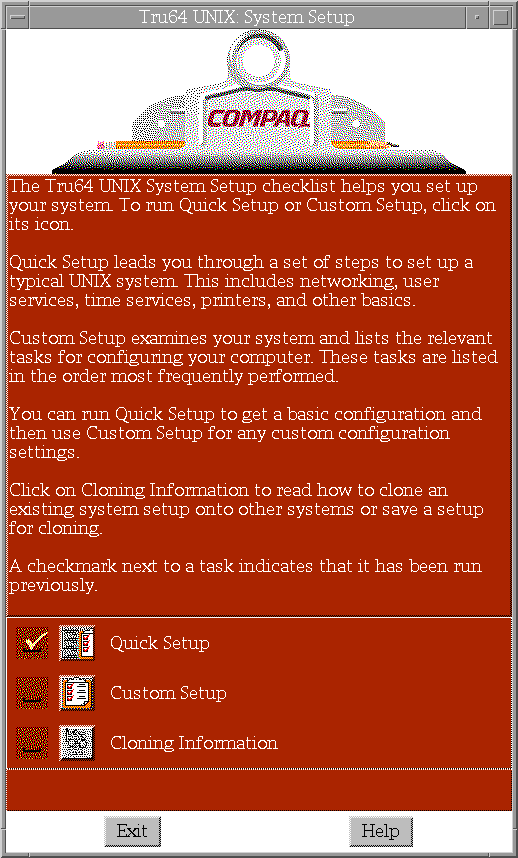
When you log in to a newly-installed system as the user
root
for the first time, and your system has graphics capabilities,
the
System Setup
window shown in
Figure 7-1
is displayed:
Figure 7-1: The Tru64 UNIX System Setup Window
The
System Setup
window is the launch point for the
following configuration tools:
Quick Setup, which is a way to quickly
configure a system with basic services, is described in
Section 7.1.1.
Custom Setup, which is a launch point for
more advanced configuration tasks, is described in
Section 7.1.2.
Cloning Information
provides basic information
about Configuration Cloning.
Configuration Cloning duplicates the configuration
from an already configured system onto one or more systems to eliminate the
need to perform configuration tasks at each system.
Configuration Cloning
procedures are documented in the
Installation Guide -- Advanced Topics.
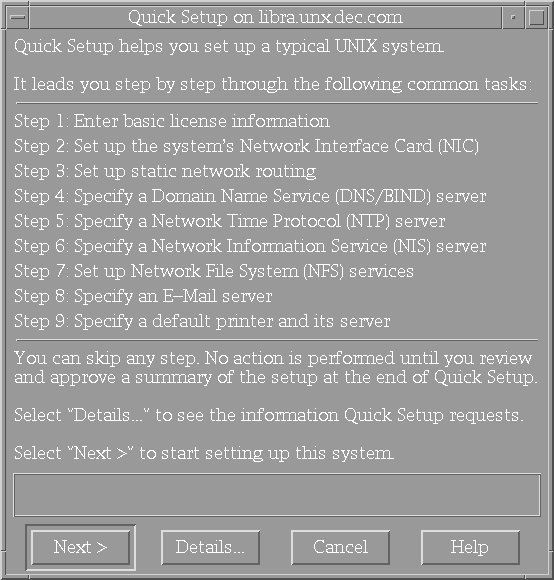
7.1.1 The Quick Setup Application
If your system does not use an asynchronous transfer mode (ATM)
adapter for network connections, you quickly can set up your system for general
use by using the
Quick Setup
application.
As shown in
Figure 7-2,
Quick Setup
requires you to
answer a few simple questions about basic system configuration items.
Quick Setup
is a task-oriented application that leads you
step by step through basic system configuration tasks.
If your system configuration
needs are not complicated, using
Quick Setup
is a way to
quickly get your system up and running on the network.
Quick Setup
also has online help if you need assistance.
If you need to configure
additional items, you have the option to use the
Custom Setup
application later.
Figure 7-2: The Quick Setup Application
7.1.2 The Custom Setup Application
The
Custom Setup
application is shown in
Figure 7-3
and is the launch point for additional SysMan configuration applications.
Use
Custom Setup
if your system requires additional configuration
or if you want to perform additional system administration tasks such as adding
users or groups.
In previous releases of the operating system, the
Custom Setup
application was known as the
Checklist.
Figure 7-3: The Custom Setup Application
The applications on the
Custom Setup
application
are listed in the approximate order in which it is recommended they be run.
For instance, if you plan to connect or add the system to a network, the first
task you should perform is to set up the network by using the
Network
Configuration
application followed by the
DNS(BIND)Configuration
application,
NIS - Network Information Service,
and the
NFS Configuration
application.
If you do not want
to set up networking, the first task you should perform is to load and register
your Product Authorization Keys (PAKs) by using the
License Manager
application.
After you open and exit an application, a check mark appears in the box to the left of the icon. The date and time you last opened an application is shown under the application name. The time stamp does not mean that the application was executed; it only indicates that the application was opened. If an application is dimmed, it cannot be opened.
Online help is available for each application by clicking on the
Help
button or
Help
menu in the application.
The online help describes the tasks that can be performed from the application
and provides a description of all fields, buttons, and menus in each window
or dialog box.
7.2 Invoking the System Setup Application After the Initial Configuration
Use one of the following methods to invoke the System Setup application after the initial system configuration:
To start the
Tru64 UNIX: System Setup
application
from the command line, as superuser or
root, enter the
following command:
#/usr/sbin/checklist
Either a graphical or text-based interface is displayed depending upon the type of hardware you have.
To start the
Tru64 UNIX: System Setup
application
from the Common Desktop Environment (CDE) front panel:
Click on the application manager icon on the CDE front panel. The application manager icon looks like an open drawer of a typical filing cabinet.

Double click on the
System_Admin
application
group icon.
Double click on the
Tru64 UNIX: System Setup
application icon.
7.3 Text-Based Interface: The System Setup Application
When you log in to a newly-installed system as the user
root
for the first time, and your system does not have graphics capabilities,
the
System Setup
window shown in
Example 7-1
is displayed.
Example 7-1: The Text-Based System Setup Application
                Tru64 UNIX: System Setup

Tru64 UNIX System Setup helps you set up your system.
To run Quick Setup, press return, or enter one of the
numbered choices and press return.

Quick Setup leads you through a set of steps to set up
a typical UNIX system. This includes networking, user services,
time services, printers,and other basics.

Custom Setup examines your system and lists the relevant tasks
for configuring your computer. These tasks are listed in the
order most frequently performed.

You can run Quick Setup to get a basic configuration and then
use Custom Setup for any custom configuration settings.

Click on Cloning Information to read how to clone an existing
system setup onto other systems or save a setup for cloning.

1) Quick Setup
2) Custom Setup
3) Cloning Information
4) Exit

Please enter your selection [1]:
Refer to
Section 7.1
for a description of
the choices on this menu.
7.4 System Management and Monitoring
This section provides overview information about the SysMan tools that are available to monitor and manage a system after it is installed and configured:
The SysMan Menu provides a menu of system management tasks in a tree-like hierarchy with branches of general categories, and leaves for actual tasks. You can expand or contract a branch to show the subbranches and leaves within a main branch. Selecting a leaf invokes a task, which opens a dialog box for performing the task. There are branches for Accounts, Mail, Monitoring and Tuning, Networking, Printing, Security, Hardware, Software, Storage, Support and Services, and General Tasks. To start the SysMan Menu from a command prompt, enter the following command:
#/usr/sbin/sysman
The SysMan Station provides a high profile view and status of a system's physical and logical objects. It is intended to be the central point from which to manage a system. SysMan Station launches other SysMan tools to perform system management tasks. The SysMan Station lets you monitor a system, group of systems, or an entire cluster and administer system resources. It can run on a standard Java capable display (such as a UNIX workstation) or within a PC's browser, or it can be downloaded and run directly on a PC. To start the SysMan Station from a command prompt, enter the following command:
#/usr/sbin/sysman -station
The Event Manager provides a single point of focus for the multiple channels through which system components report event and status information by combining events from all sources into a single event stream. You can either monitor the combined stream in realtime or view historical events retrieved from storage. EVM's viewing facilities include a graphical event viewer, which is integrated with the SysMan application suite, and a full set of command line utilities, which allow events to be filtered, sorted, and formatted in a variety of ways. Enter the following command to start the Event Manager from the command line:
#/usr/sbin/sysman event_viewer
The Insight Manager is a web-based management utility that enables you to look across a heterogeneous computing services environment and access information about any entity connected to the network. Entities are referred to as devices and can be computer systems, networked printers, or network components such as routers. You can obtain information about the configuration of systems and their components or peripherals and in some cases, perform certain administrative tasks. For example, systems can be configured to enable remote booting and Insight Manager enables you to boot remote systems from their own local system. Insight Manager can facilitate other administrative tasks such as asset management, asset security, workload management, and event management. You can activate these Web browsing features from a dedicated HTTP port, or from the Compaq Insight Manager CIM32 or CIMXE Management Consoles running on Compaq NT servers. Insight Manager Agents for Tru64 UNIX includes SNMP based subagents and WBEM capabilities to present SNMP data in a format viewable by a Web browser. It provides a rich view of the data using HTML 2.0 and JavaScript in the form of Web pages.
Section 7.5
provides pointers to system administration
and configuration documents.
7.5 System Administration and Configuration Documents
If you need more information about configuring, administering, or monitoring your system, read the relevant sections of these manuals in the documentation set:
Network Administration provides information about configuring and administering a network.
System Administration provides information about system administration tasks such as configuring printers, file system management, adding user accounts, backing up and restoring files, shutting down the system, event management, using the Insight Manager, SysMan invocation, and other topics pertaining to system administration.
TruCluster Server Software Installation describes cluster-specific installation tasks.
TruCluster Server Cluster Administration describes how to administer and manage a cluster.
Software License Management provides information about loading and registering license PAKs.
AdvFS Administration provides information about Advanced File System (AdvFS) administration.
Logical Storage Manager provides information about administering the Logical Storage Manager (LSM).
System Configuration and Tuning provides information about tuning the kernel to achieve optimum system performance.
To view the documentation set on line on a system that is capable of
graphical display, mount the documentation CD-ROM as described in
Chapter 8,
then use Netscape or Acrobat Reader to view the manuals.
If your system does
not have online viewing capabilities, use the order sheet in the back of this
manual or contact your support representative to order a printed copy of the
documentation set.
7.6 Reconstructing the /etc/fdmns Directory
If
your system was running a previous version of the operating system and was
using the Advanced File System (AdvFS) type, the Full Installation overwrote
the
/etc/fdmns
directory, which contained important AdvFS
configuration data.
To reconstruct this directory, you must run the
advscan
utility with the
-r
flag for each disk on the system.
Because
of the device naming conventions that were introduced in Version 5.0,
simply restoring the directory from a backup copy is not sufficient.
Refer
to the
AdvFS Administration
for more information about using the
advscan
utility.
7.7 Enabling Realtime Preemption
The operating system kernel provides options to enhance the performance of realtime applications conforming to POSIX 1003.1b-1993 (formerly 1003.4 Draft 14). The realtime kernel makes it possible for the operating system to guarantee that an application has access to resources in a timely and predictable manner.
The realtime kernel that supports kernel preemption was previously an option during an installation. Now, the POSIX 1003.lb portions are included in the kernel automatically and a separate kernel is not needed. Preemption capabilities are disabled by default but can be selected and enabled when the kernel is configured and built.
To enable realtime preemption capabilities, follow this procedure to
modify the
/etc/sysconfigtab
file:
Use the text editor of your choice to add the following lines
to a temporary file (such as
/tmp/stanza):
generic:
                 rt_preempt_opt=1
Use the
sysconfigdb
command to merge the
temporary file with the existing
/etc/sysconfigtab
file:
#sysconfigdb -m -t /etc/sysconfigtab -f /tmp/stanza generic
Note
Never use a text editor to directly modify the
/etc/sysconfigtabfile.
7.8 Enabling Unattended Reboots on Multiprocessor Systems
To reduce system down time due to a processor failure on a multiprocessor system, an unattended reboot feature is available for multiprocessor platforms.
To enable unattended reboot functionality, log in as the user
root
and set the following console variables:
#consvar -s boot_osflags a#consvar -s boot_reset off#consvar -s auto_action restart#consvar -a
When processor failures are detected on a multiprocessor platform, the system
marks the faulting processor as failed, and the entire system is rebooted
without any operator intervention.
The faulting processor will not be restarted
when the reboot occurs.
To restart the faulting processor, corrective action
must be taken.
The system will not try to restart the failed processor until
the power has been recycled on the system or the console
init
command is issued at the console prompt ( >>> ).
7.9 Enabling Automatic Reboot on Single Systems
If you want your system to automatically reboot after a processor or power failure, shut down the system to console mode and set the following console variable:
#set auto_action restart
This console variable should be valid on most system types. If this variable is not valid for your system type, refer to your hardware owner's guide for a list of supported console environment variables.