Dynamic Host Configuration Protocol (DHCP) enables you to centralize and automate IP address administration. Using a graphical application, you can configure several computers at once, ensuring that configurations are consistent and accurate. Even portable computers can be automatically configured each time they attach to the network.
This chapter describes the DHCP implementation on Tru64 UNIX systems,
and provides basic information for setting up and maintaining the DHCP database.
In addition, this chapter provides information on the
xjoin
application, and the different DHCP configurations.
The implementation of DHCP in Tru64 UNIX is based on the JOIN®
Server Version 4.1 from JOIN Systems, Inc.
For additional
information about DHCP, see the
DHCP(7)
reference page and the
JOIN Server Administrator's Guide.
The latter is provided by JOIN
Systems in HTML format, and it can be accessed by opening the following file
with a web browser:
/usr/doc/join/TOC.html
Note
Starting with Tru64 UNIX Version 4.0F, DHCP database files are stored in a new format that is incompatible with older formats. An online document explains the reasons behind this change, lists the files that are affected, and provides instructions for converting the files to the new format. The document,
README-DB237, and conversion utility,conv185-237, are located in the/etc/joindirectory.
In the DHCP environment, systems can have the following roles:
Server -- A system that offers DHCP and BOOTP services to other systems on the network. There can be one DHCP server on a subnetwork. Multiple servers can exist on a subnetwork, but each server's IP address range cannot overlap.
Client -- A system that requests configuration information from a DHCP server.
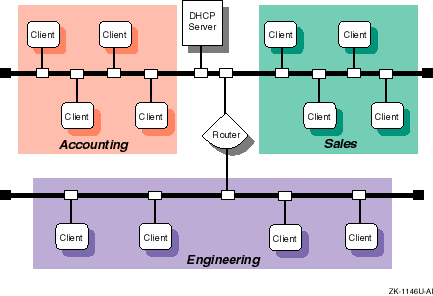
Figure 3-1
shows a sample corporate LAN in which
a DHCP server is configured to supply IP addresses to clients in three different
functional areas.
In this configuration, the router must be configured to
forward BOOTP packets.
DHCP packets are BOOTP packets with DHCP extensions.
See the
bprelay(8)
reference page for more information.
In the DHCP environment, DHCP parameters can be assigned to the following named entities:
Groups -- Group parameters apply to all clients (nodes) on the network that share the same configuration values. By grouping these clients together, you can simplify the implementation and maintenance of your network configuration. You define a parameter once for a group instead of once for each individual node. After the group parameters are defined, you can use the settings for other subnetwork or node configurations.
You can group nodes by logical area, by functional area, by physical area, or in any way you want. Groups can also be grouped together with other groups, subnetworks, and nodes.
Subnetworks -- Subnetwork parameters apply to all clients (nodes) on a subnetwork. A subnetwork can also be considered a group, but a group that also shares a common subnetwork address. subnetworks can be grouped together with other subnetworks and nodes.
Nodes -- Node parameters apply to an individual client (node) in the network, and typically override subnetwork or group parameters.
These entities and their parameters have a hierarchical relationship to each other in your network. For example, Figure 3-1 shows a small business network named acme-net, comprising two subnetworks and three distinct groups, Accounting, Sales, and Engineering. A DHCP administrator might look at this network as one group named acme-net, consisting of two subnetworks, floor1 and floor2, that contain the individual nodes.
The acme-net group, at the top level of the hierarchy, specifies those parameters that apply to all systems in the network. At the next level, the floor1 subnetwork specifies those parameters that apply to all nodes on that subnetwork and the floor2 subnetwork specifies those parameters that apply to all nodes on that subnetwork. If it were necessary to assign parameters on a group basis, the administrator could have the floor1 subnetwork consist of the Accounting and Sales groups, with the individual nodes assigned to their respective groups. However, since these groups are on the same subnetwork, this is probably unnecessary.
If Figure 3-1 showed a single LAN network with no subnetworks (no router), a DHCP administrator might look at this network as one group named acme-net, consisting of three groups (Accounting, Sales, and Engineering) that contain the individual nodes, respectively.
Groups can also be used to define a group of settings for one Ethernet or subnetwork number, allowing you to reuse the settings for other nodes or subnetwork configurations.
You can restrict client access to the DHCP server by creating a Media Access Control (MAC) address database. Only those clients with addresses in the database are allowed to receive an IP address. See Section 3.8 for more information.
This section describes the tasks you need to do before configuring DHCP.
For a DHCP server system, verify that the DHCP server is installed by entering the following command:
#setld -i | grep OSFINET440
If the subset is not installed, install it by using the
setld
command.
For more information on installing subsets, see the
setld(8)
reference page, the
Installation Guide, or the
System Administration
manual.
For DHCP client systems, the DHCP client software is installed with the mandatory subsets.
After you verify that the DHCP software is installed, you configure
DHCP by using the
xjoin
utility to:
Specify server parameters
Specify basic DHCP parameters for groups, subnetworks, and nodes
The information you need depends on how you define the DHCP environment. Appendix A contains a worksheet that you can use to record the information required to configure DHCP.
Figure 3-2 shows Part 2A of the Configuration Worksheet.
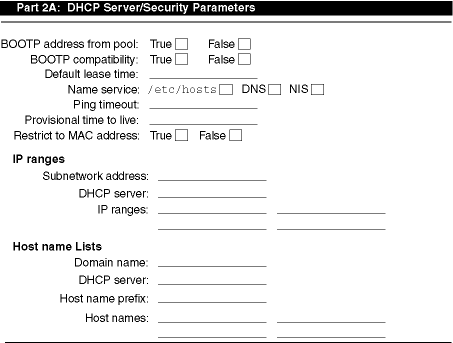
If you are viewing this manual online, you can use the print feature to print part of the worksheet. The following sections explain the information you need to record in Part 2A of the worksheet.
If you want the DHCP server to allocate an address from the
pool to BOOTP clients, check True.
The address allocation is permanent.
If you want the DHCP server to support BOOTP clients whose address is configured
in the
/etc/bootptab
file (the usual method), check False;
this is the default.
If you want the server to act as a BOOTP server in addition to a DHCP server when a client requests a BOOTP address, check True. For no BOOTP client support, check False. If you want to configure a BOOTP server only, see Section 3.10.
The default time (in days, hours, minutes, and seconds) of a client's DHCP lease, unless one is explicitly configured for the node, subnetwork, or group.
The name service to be used by the server. A name service must be configured for the DHCP server. The name service is used to authenticate, route, address, and perform naming-related functions for other systems on the network. The following types of name services can be used by the server:
The Domain Name Service (DNS) automatically translates host names to their numeric IP address.
The Network Information Service (NIS) allows you to distribute host name information in a network.
A Local Name Service updates the
/etc/hosts
file with information about dynamically assigned names and addresses.
The time (in milliseconds) for the
ping
timeout.
The
ping
command is used to determine if a client
on your network is available.
When the
ping
program sends
a request to the client, the client responds to the request and includes its
IP address in the response.
The Ping timeout parameter is used to check that
no other client is using an IP address prior to it being assigned by the server.
After the timeout, the
ping
command stops checking.
The maximum time (in hours, minutes, and seconds) that an IP address remains on the provisionally allocated list before it can be allocated to another client. This prevents an IP address from being reused too quickly after a lease has expired.
If you want to assign an IP address to a client's matching MAC address, check True; otherwise, check False. See Section 3.8 for additional information on restricting client access to the server.
IP ranges are those IP addresses available for assignment to clients on the network. Although multiple DHCP servers can reside on the same subnetwork, the IP address ranges administered by each server must not overlap. For IP ranges, supply the following information:
Subnetworks are logical subdivisions of a single TCP/IP network. The subnetwork IP number identifies one segment of the network. As the number of networks grows, routing IP addresses can get very complicated. Using subnetworks allows more flexibility when assigning network addresses and simplifies the administration of network numbers. The IP address consists of the following information:
Network address
Subnetwork address
Host address
The IP address is divided into four fields, each separated by a period. Each field represents an element of the address; for example, the following is a typical IP address:
128.174.139.47
In the preceding example,
128.174
is the network
address,
139
is the subnetwork address, and
47
is the host address; therefore, the full subnetwork address is
128.174.139.0.
The IP address of the DHCP server.
The group of unique IP addresses that will be assigned to clients on the selected subnetwork. Using the preceding subnetwork address as an example, if there are 25 clients on the subnetwork, the range of IP addresses is: 128.174.139.47 to 128.174.139.72.
A subnetwork address may have more than one corresponding IP Address Range.
The DHCP server can configure clients on more than one subnetwork as
long as the routers between the server and the client forward BOOTP packets.
See
Section 3.2.2.2
and the
bprelay(8)
reference page
for information about boot file and BOOTP parameters.
A host name list contains the names that are assigned clients when they are also assigned an IP address. For host name lists, supply the following information:
A domain represents computers that are grouped together for administrative reasons. Domain names are usually assigned to a company, and make administering the domain easy. For example, if a domain is changed to have access to a new service on the network, each computer that is part of the domain automatically has access to the new service.
Write down the domain name exactly as it was assigned by the NIC Domain
Registrar, and include its top-level domain extension; for example,
school.edu,
Company.com, and
city.gov.
A specific host name prefix that is assigned to a system when
the system requests a host name and there are no host names available for
assignment.
For example, in the
company.com
domain, if
the names in the Host name list box are all assigned and the host name prefix
is
net12host, the next computers to request host names
will receive
net12host1,
net12host2,
and so on as their host names.
The host names to be assigned to systems that request them.
Figure 3-3 shows Part 2B of the Configuration Worksheet.
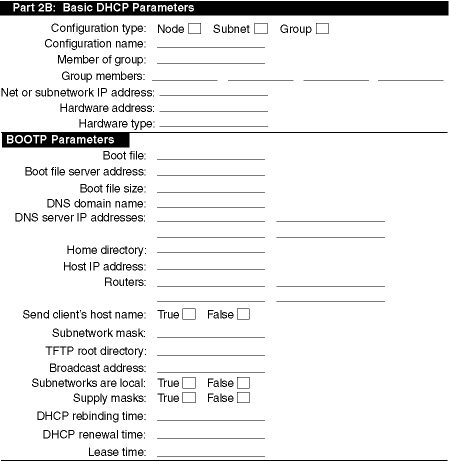
If you are viewing this manual online, you can use the print feature to print part of the worksheet. The following sections explain the information you need to record in Part 2B of the worksheet.
For node configuration, check Node. For subnetwork configuration, check Subnet. For group configuration, check Group.
The name of the node, group, or subnetwork.
For node, subnetwork, and group configurations, the name of a configuration from which to inherit DHCP parameter values. Parameters defined for that group also apply to this configuration.
For group configuration, the nodes, subnetworks, and groups that compose this group.
For subnetwork configuration, the IP address of the subnetwork. The IP address format is ddd.ddd.ddd.ddd. For example, if your subnetwork is 16.128, enter 16.128.0.0; you must include the trailing zeros.
For node configuration, the Ethernet address of the client node.
For node configuration, a descriptive name to identify the system.
For node, subnetwork, and group configuration, BOOTP parameters allow you to specify how to pass configuration information to hosts on the network. For BOOTP parameters, supply the following information:
The fully qualified path name of the client's default boot image.
The IP address of the server that stores the boot file. The IP address format is ddd.ddd.ddd.ddd.
The length, in 512-octet blocks, of the default boot image for the client. The file length is specified as a decimal number.
The domain name the client should use when resolving host names using the Domain Name Service.
A list of IP addresses of DNS (STD 13, RFC 1035) name servers available to the client, in order of preference. The address format is ddd.ddd.ddd.ddd.
The pathname for the boot file, if it is not specified in the boot file name.
The host IP address for BOOTP clients. The address format is ddd.ddd.ddd.ddd.
A list of IP addresses for routers. The address format is ddd.ddd.ddd.ddd.
If you want to send the client's host name, check True. If you do not want to send the client's host name, check False.
The client's subnetwork mask as per RFC 950. A subnetwork mask allows the addition of subnetwork numbers to an address, and provides for more complex address assignments. If both the subnetwork mask and the router option are specified in a DHCP reply, the subnetwork mask option must be specified first. The subnetwork mask format is ddd.ddd.ddd.ddd.
The root directory for Trivial File Transfer Protocol (TFTP).
For subnetwork and group configuration, IP layer parameters affect the operation of the IP layer on a per-host basis. The required IP layer parameters are as follows:
The broadcast address in use on the client's subnetwork. The address format is ddd.ddd.ddd.ddd.
If all subnetworks of the IP network to which the client is connected use the same maximum transfer unit (MTU) as the subnetwork to which the client is directly connected, check True; otherwise, check False. The client should assume that some subnetworks of the directly connected network may have smaller MTUs.
If the client should respond to subnetwork mask requests using ICMP, check True; otherwise, check False.
For a list of additional parameters and a description of each, see the
JOIN Server Administrator's Guide
(/usr/doc/join/TOC.html).
For node, group, and subnetwork configuration, lease parameters allow you to specify information about IP lease times. Lease times determine the length of time an IP address is used. The lease parameters, supply the following information:
The time interval (in seconds) from address assignment until the client requests a new lease from any server on the network.
The time interval (in seconds) from address assignment until the client attempts to extend the duration of its lease with the original server.
The amount of time (in months, days, hours, minutes, and seconds)
the DHCP server will allow a DHCP client to use an IP address; for example,
2 months 5 days 45 minutes.
The actual lease time is negotiated
between the client and server.
Use the
xjoin
application
to configure a DHCP server.
To start the application, enter the following
command:
#/usr/bin/X11/xjoin
You can configure the following server information:
Server/Security parameters
IP ranges
Host names
Subnetworks
DHCP client nodes
Groups
To update the server so that the new configuration takes effect, click
on the Add/Update button in the lower right-hand side of the window.
To exit
the application, select File and Exit from the menu bar.
See the
xjoin(8)
reference page and the
JOIN Server Administrator's Guide
(/usr/doc/join/TOC.html) for more information.
To configure the Server/Security parameters, do the following:
Click on the Server/Security tab in the
xjoin
main window.
Select the Server item from the left side of the window.
Select Server/Security parameters from the pull-down menu.
Select a server parameter.
Select True or False, or enter a value.
Repeat steps 4 and 5 for all server parameters you want to configure.
Click on the Add/Update button to update the server with the new Server/Security parameters.
To configure IP ranges, do the following:
Click on the Server/Security tab in the
xjoin
main window.
Select the Server item from the left side of the window.
Select IP Ranges from the pull-down menu.
Select the New IP Range item.
Enter the subnetwork address, server address, and IP range. For each IP range, do the following:
Enter the beginning of the IP Address Range for the subnetwork (network, subnetwork, and host address).
Press Tab to move to the next field.
Enter the end of the IP Address Range.
Repeat steps 4 and 5 for each new IP range.
Click on the Add/Update button to update the server with new IP ranges.
You configure host name lists only if the Accept Client Name server parameter is set to False. (See Section 3.2.2.1.) If the Accept Client Name server parameter is set to True, the server automatically accepts the name a client suggests for itself; do not configure host name lists.
To configure a host name list, do the following:
Click on the Server/Security tab in the
xjoin
main window.
Select the Server item from the left side of the window.
Select Hostname Lists from the pull-down menu.
Select the New Hostname List item.
Enter the domain name, DHCP server name, host name prefix, and host names for each host name list.
Repeat steps 4 and 5 for each host name.
Click on the Add/Update button to update the server with new host name lists.
To configure a subnetwork, do the following:
Click on the Subnets tab in the
xjoin
main
window.
Select the New Record item from the left side of the window.
Select the Name parameter.
Enter the name of the subnetwork configuration, for example, Subnet3.
Select the Member of Group parameter. Enter the name of the group of which the subnetwork will be a member.
Select the Net or Subnet IP Address parameter. Enter the Net or Subnet IP address that identifies the subnetwork portion of the network.
Select the Broadcast Address parameter. Enter the broadcast address for this subnetwork.
Enter information for basic DHCP parameters in the appropriate
fields.
See
Section 3.2.2
and the
JOIN Server Administrator's Guide
(/usr/doc/join/TOC.html) for descriptions
of these parameters.
Note that you do not have to change each parameter value in the Subnets tab; only those that describe your particular network configuration.
Click on the Add/Update button to update the server with new subnetwork configuration information.
Edit the
/etc/join/netmasks
file and add
an entry for each subnetwork in your network.
The format of each entry is
as follows:
subnet_address subnet_mask
To configure a node, do the following:
Click on the Nodes tab in the
xjoin
main
window.
Select the New Record item from the left side of the window.
Select the Name parameter.
Enter the name of the node configuration; for example, Client5.
Select the Hardware Type parameter. Enter the type of network to which the node is connected; for example, Token Ring, Ether3, Pronet, Arcnet, or 0.
Select the Hardware Address/Client ID parameter. Enter the hardware address or the client ID of the node. If the Hardware Type defined in the previous step is zero, enter the Client ID (an alphanumeric string that you define).
If you are using the hardware address (MAC address) of the node, enter it in the format nn:nn:nn:nn:nn:nn (for instance, 08:00:26:75:31:81). The hardware address is assigned when a workstation is manufactured, and is often displayed when the workstation is turned on or rebooted. The hardware address is also called the Ethernet address.
Select the Member of Group parameter. Enter the name of the group of which the node will be a member.
Enter information for basic DHCP parameters.
See
Section 3.2.2
and the
JOIN Server Administrator's Guide
(/usr/doc/join/TOC.html) for descriptions of these parameters.
Note that you do not have to change each parameter value in the Nodes tab, only those that describe your particular network configuration.
Click on the Add/Update button to update the server with new node configuration information.
To define a group, do the following:
Click on the Groups tab in the
xjoin
main
window.
Select the New Record item from the left side of the window.
Select the Name parameter.
Enter the name of the group configuration; for example, Global.
Select the Member of Group parameter. If appropriate, enter the name of the group of which that the new group will be a member.
Select the Group Members parameter. Enter the names of subnetworks, nodes, or other groups that will be members of the group. Press Tab between entries.
Enter information for basic DHCP parameters.
See
Section 3.2.2
and the
JOIN Server Administrator's Guide
(/usr/doc/join/TOC.html) for descriptions of these parameters.
Note that you do not have to change each parameter value in the Groups tab, only those that describe your particular network configuration.
Click on the Add/Update button to update the server with new group configuration information.
After you install the OSFINET440 optional subset, run the installation script, and configure the server, you must start the server to implement the new configuration. Use the Network Configuration application of the Common Desktop Environment (CDE) Application Manager to start the DHCP server on systems with graphics capabilities.
To start the Network Configuration application, log in as root, and double click on Network Configuration icon in the Configuration group. The Network Configuration main window is displayed, showing available network components and configured network components.
To exit the Network Configuration application, choose File then Exit.
See the
netconfig(8X)
reference page for more information.
To start the DHCP server, do the following:
Select the DHCP Server Daemon from the Available Network Components list box in the Network Configuration main window.
Click on Configure. The Configuring DHCP Server Daemon Dialog Box is displayed.
Click on the Enable button in the DHCP Server Daemon field to start the DHCP server daemon each time the system boots.
Click on Commit to save the configuration and display a pop-up dialog box.
Click on Yes to start the DHCP daemon and close the pop-up window.
Click on Close to close the Configuring DHCP Server Daemon dialog box. See the online help for additional information.
Note
You should never use the
kill -9command to stop the DHCP server daemon; it can corrupt your database files. Use the Configuring DHCP Server Daemon dialog box or thekill -HUPcommand instead.
For more information about
joind, see the
joind(8)
reference page.
When you configure the basic network connections on the client system you must specify an Internet address source. If you specify DHCP server and restart the network, the DHCP client daemon starts and uses DHCP to obtain IP configuration information. From then on, the DHCP client automatically starts each time the client computer boots.
After the initial DHCP server configuration,
you can check the status of a DHCP client by examining the contents of the
/var/join/log
file or by doing the following:
Log in as root to the DHCP server host.
Invoke the
xjoin
application by entering
the following command:
#/usr/bin/X11/xjoin
Click on the Server/Security tab in the
xjoin
main window.
Select Active IP Snapshot from the pull-down menu. The Active IP Snapshot window is displayed, listing each configured DHCP client.
Click on a record on the left side of the window to display all current configuration information for the client.
You can also use the
xjoin
application to modify
client configuration information, permanently map a hardware address to an
IP address, import a file into the active IP database, and remove records
from this window.
See the
xjoin(8)
reference page and the
JOIN Server Administrator's Guide
(/usr/doc/join/TOC.html) for more information.
Typically, a client is assigned the first available IP address from the pool of IP addresses. However, you might want to permanently assign an IP address to a client's hardware address. The IP address mapped to a hardware address does not need to come from the IP addresses you have already defined. To permanently map an IP address to a client's hardware address, do the following:
Log in as root to the DHCP server.
Invoke the
xjoin
application by entering
the following command:
#/usr/bin/X11/xjoin
Click on the Server/Security tab in the
xjoin
main window.
Select Active IP Snapshot from the pull-down menu. The Active IP Snapshot window is displayed.
Select the New Record item.
Enter a value for each parameter.
Press Return or Tab after
each entry.
Specify the integer
-1
for Lease Expiration
to ensure that the IP address assignment will be preserved in the DHCP database
(it will never expire).
Click on the Add/Update button to add the new record to the database.
Repeat steps 5, 6, and 7 for each MAC address.
You restrict client access to the DHCP server only if you set the Restrict to Known MAC Address server parameter to True. (See Section 3.2.2.1.) If you set the Restrict to Known MAC Address server parameter to True, you must create a list of MAC addresses that can access and accept IP address assignments from the DHCP server. If you set the server parameter to False, do not create a list of MAC addresses.
To create a list of MAC addresses that can access the DHCP server, do the following:
Click on the Server/Security tab in the
xjoin
main window.
Select Preload MAC Addresses from the pull-down menu. The Preload MAC Addresses window is displayed.
Select the New Record item.
Enter a value for each parameter. Press Return after each entry.
Click on the Add/Update button to add the new record to the database.
Repeat steps 3, 4, and 5 for each MAC address.
Alternatively, you can import a file into the MAC address database by
clicking on Import and entering a file name.
See the
jdbmod(8)
reference page
for information on the imported file format.
To remove records from the MAC address database, select a MAC address from the left side of the window and click on Delete.
To register a client to use BOOTP only, do the following:
Log in as root.
Invoke the
xjoin
application by entering
the following command:
#/usr/bin/X11/xjoin
Click on the Nodes tab in the
xjoin
main
window.
Enter BOOTP client information, including the boot file name, host IP address, subnetwork mask, and any other required information. The basic BOOTP parameters are grouped together below the Key parameters in the middle column. To display additional parameters, click on the Basic DHCP Parameters pull-down menu and then select DHCP parameters.
Click on the File/Update button to update the server with these changes.
In some cases, you might want to disable DHCP
address assignment and use the BOOTP and DHCP server daemon (/usr/sbin/joind) to respond to BOOTP requests only.
To disable all DHCP address
assignment features in the DHCP and BOOTP server, do not specify an IP address
range for any subnetwork (this is the default).
If no IP address ranges are
defined, the server never sends a DHCP reply in response to a DHCP client
request.
If DHCP address assignment is disabled, DHCP clients that have previously registered with this server continue to operate until their leases timeout; the server will fail to renew the client lease.
If DHCP clients have problems obtaining DHCP information from the server, do the following:
Log in as root.
Stop the
joind
daemon with the
kill -HUP
command.
(Never use
kill -9
to stop the DHCP daemon; it can corrupt your database files).
Restart the
joind
daemon with the debug
flag as follows:
#/usr/sbin/joind -d4
If you are running
joind
from the
/etc/inetd.conf
file, do the following:
Edit the
/etc/inetd.conf
file and add the
-d4
flag.
Stop the
joind
daemon with the
kill -HUP
command.
Stop the
inetd
daemon with the
kill -HUP
command.
This forces
inetd
to
reread the
/etc/inetd.conf
file.
Review the
/var/join/log
file for information
about the cause of any DHCP client problems.
Example 3-1
shows a
/var/join/log
file message that indicates a DHCP discover message arrived at the server
system, but the IP subnetwork address range is not defined.
DHCPDISCOVER from HW address 08:00:2b:96:79:b6 : network not administered
        by server
This problem can also occur if an address range is defined, but the
/etc/join/netmasks
file is missing the subnetwork mask definition
for this IP network.
In this case, edit the netmasks file, add an entry for
the subnetwork, and restart the DHCP server,
/usr/sbin/joind.