


Common Desktop Environment: User's Guide
3 Getting Help
Contents of Chapter:
- Requesting Help
-
- Press F1 -- The Help Key
-
- Using an Application's Help Menu
-
 To Select On Item Help
-
- Using Help Manager
-
- Using Help Windows
-
- Selecting Help Topics
-
- Using the Topic Tree
-
 To Select A Topic
-
- Using Hyperlinks
-
 To Select A Hyperlink
-
- Moving between Help Topics
-
 To Display the Help Pop-up Menu
-
- Knowing Where You Are
-
- Knowing Where You've Been
-
 To Use History To Return to a Topic
-
- Searching for Specific Information
-
 To Search for Topics Using the Help Index
-
- Browsing Help on Your System
-
 To Open Help Manager
-
 To Duplicate a Help Window
-
- Displaying a Man Page
-
 To Display a Man Page
 -
- Printing Help Topics
-
 To Print a Help Topic
 -
- Printing Configuration
-
 To Set the Printer Resource for an Application
-
- Modifying Help Window Colors
-
 To Change Help Window Colors for an Application
-
Online help is available for each of the standard applications in the Common Desktop Environment (CDE). Whether you are using File Manager, Calendar, or Mailer for example, you request and display help topics in the same way. You can also browse help information on your system using the desktop Help Manager.
Other applications installed on your desktop may take advantage of using
the desktop's Help System or provide help in other ways.
Here are the ways you can request Help:
- Press F1--also known as the "help key"--to get context-sensitive help
- Choose a command from an application's Help menu
- Open Help Manager from the Front Panel to browse help on your system
- Open the Help subpanel to choose help about the desktop or to choose On Item Help
Press F1 -- The Help Key
When you have a question, the quickest and easiest way to get help is to press F1. When you press F1, the application you are using displays a help topic most closely related to the component--a window or button for example--that is highlighted. Because the application determines which help topic is most appropriate, this type of help is called context-sensitive.
The F1 key is a quick way to get help on an application menu or dialog box. For example, to request help about the File Manager File menu, display the File menu and press F1. File Manager displays a description of each item in the menu. Or, if a dialog box is open, pressing F1 will display an explanation of the dialog box. The F1 key is a shortcut for clicking the dialog box's Help button.
Note: Some computers have a dedicated "Help" key on the keyboard. If yours does, it may take the place of the F1 key.
Using an Application's Help Menu
Most applications have a Help menu that contains commands for requesting different types of help such as an introduction, application tasks, or reference information.
Figure 3-1 CDE application Help menu
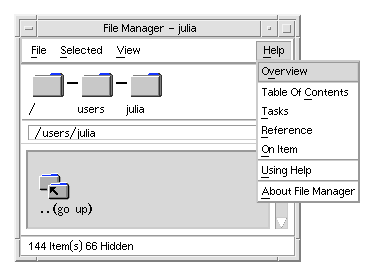
A typical CDE Help menu includes these commands:
- Overview
- Displays the home topic for the application. The home topic is the first topic of the application's help topic hierarchy.
- Tasks
- Displays task instructions for most operations performed with the application.
- Reference
- Displays reference summaries for various components, such as windows and dialog boxes, menus, and application resources.
- On Item
- Enables you to click an item in any window of an application and view a description of the item.
- Using Help
- Provides help on using the help windows.
- About Application
- Displays the version and copyright information for the application.
Applications can include additional choices. Also, non-CDE applications may have different commands in their Help menus.
On Item Application Help
On Item help is interactive. It enables you to move the pointer to a specific item (such as a menu, button or dialog box) and click the item to display its corresponding help.
- Choose On Item from the Help menu.
The pointer changes to a ? (question mark).
- Move the pointer to an item in the application and clickmouse button 1.
A description of the item is displayed.
Help Manager is a special help volume that lists all the online help registered on your system. Clicking the Help Manager control in the Front Panel opens the Help Manager help volume.
Figure 3-2 Help Manager control

Click any of the underlined titles to view the corresponding help information. For additional instructions about using Help Manager see "Browsing Help on Your System".
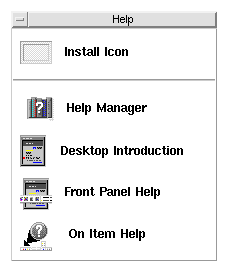
For convenience, you can also find help about the desktop and the Front Panel in the Help subpanel. It also provides On Item help for the Front Panel and its subpanels.
Figure 3-3 Help subpanel
The Help System is built into each of the CDE applications (and possibly other applications installed on your system). When you ask for help while using an application, the application displays a help window.
Applications can use two types of help windows to display help topics: a general help window and a quick help window, shown in Figure 3-4.
Figure 3-4 Types of help windows
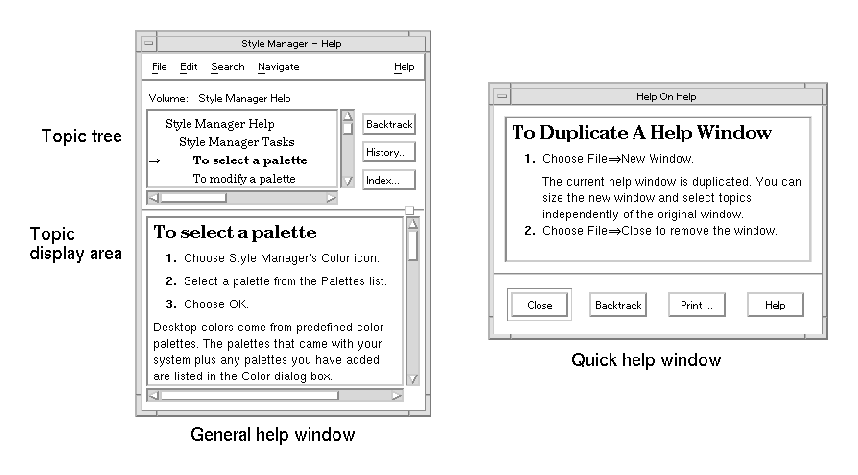
General help windows have a topic tree and a topic display area. The topic tree is a list of help topics that you can browse to find help on a subject. When you choose a topic, it is displayed in the lower portion of the help window called the topic display area.
Quick help windows are streamlined help windows. A quick help window has just a topic display area and one or more buttons.
There are two ways to select a help topic. You can choose a topic from the topic tree. Or, within a help topic, you can select a hyperlink. A hyperlink is an active word or phrase that "jumps" to another related help topic. Any underlined text in a help window is a hyperlink.
Graphic images can also be used as hyperlinks. For more information about hyperlinks, see "Using Hyperlinks".
Using the Topic Tree
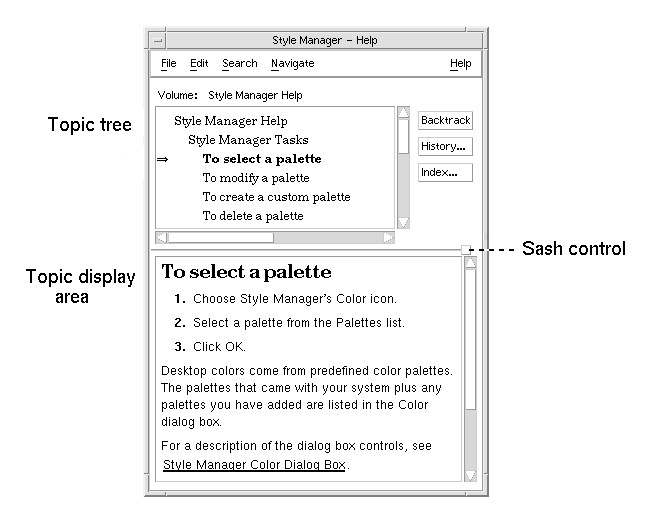
The topic tree is an outline of a help volume's major topics. Subtopics are indented under main topics. The current topic, whose contents are displayed in the topic display area, is marked with an  (arrow). You can scroll the topic display area to see all your choices or resize the entire help window.
You can also change the size of the topic pane. To do so, drag the sash control shown in Figure 3-5. Then release the mouse button to set the new size.
Figure 3-5 Resizing the topic tree
 To Select A Topic
- Move the pointer into the topic tree.
- Click mouse button 1 on the topic you want to display.
Any underlined text in a help window is a hyperlink. It is easy to "jump" to related help topics using hyperlinks--just click the underlined text.
What Hyperlinks Look Like
A solid underline identifies a standard hyperlink that displays the new topic in the current help window. For example, the last paragraph in Figure 3-5 shows a hyperlink of this type.
A dashed underline indicates a definition link, which displays a quick help window.
A graphic--an icon, for example--can also be a hyperlink. A grey open-cornered border identifies a graphic hyperlink. Figure 3-6 shows the different hyperlink formats that can be used in help topics.
Figure 3-6 Hyperlink formats

Links That Display a New Window
Most hyperlinks display the related topic in the same window. However, if you choose a hyperlink that jumps to a help topic for another application, a new window is displayed. Links that jump from one application's online help into another's are called cross-volume or cross-application hyperlinks.
 To Select A Hyperlink
- Move the pointer to the underlined text or graphic image.
- Click mouse button 1.
To move between help topics, use these commands on the Navigate menu:
- Backtrack
- Returns to the previous topic. Backtrack enables you to return to each topic you have visited.
- History
- Displays a History dialog box that lists help volumes and topics you have visited. Select a help topic to re-display it.
- Home Topic
- Returns to the home topic, or beginning of the help volume.
For convenience, Backtrack and History are also provided as push buttons.
Help Pop-up Menu
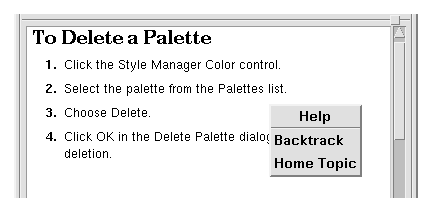
In a general help window, you can also use the Help pop-up menu as a shortcut. The pop-up menu includes both Backtrack and Home Topic, which are frequently used commands.
Quick help windows do not have a pop-up menu.
 To Display the Help Pop-up Menu
- Point to the topic display area and press mouse button 3.
- Choose Backtrack or Home Topic.
Figure 3-7 Help pop-up menu
Knowing Where You Are
Each application that provides online help has a help volume. A volume consists of a group of help topics that describe the application and explain how to use its features. For instance, an application could organize its help using these main topics: Concepts, Tasks and Reference.
Figure 3-8 Help volume organization
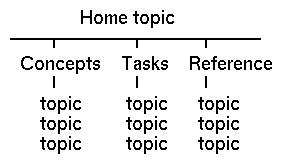
The home topic is the first topic, or beginning of the help volume. Main level topics are accessible from the home topic, or may also be listed in your application's Help menu.
Browsing between Different Help Volumes
Frequently hyperlinks take you to another topic in your application's help volume. While browsing the Tasks topics, for example, you might select a hyperlink to a topic in the Reference section.
A group of related applications, however, may use hyperlinks to cross-reference information in different help volumes. For example, an application could include a hyperlink to the desktop's introductory help volume that explains basic mouse and keyboard skills.
Because hyperlinks can quickly take you from one piece of information to another, you may need to know where you are. A quick look at your help window can give you the information you need.
- The line located below the menu bar reports the name of the volume you are viewing. This is helpful when you have explored several help volumes using Help Manager, the help index, or cross-volume links.
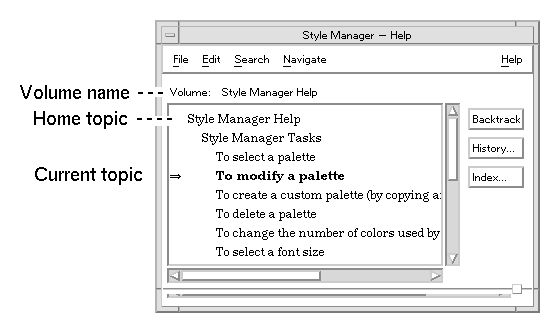
- Within the topic tree, the first item is the home topic, or the beginning of the help volume. After exploring topics, you can easily return to the home topic by scrolling to the top of the topic tree. Or, you can choose Home Topic from the Navigate menu or pop-up menu.
- An
 (arrow) points to the title of the current topic. As you choose topics, the arrow moves to identify your selection. Scrolling the topic tree shows you where you are located relative to other topics.
Knowing Where You've Been
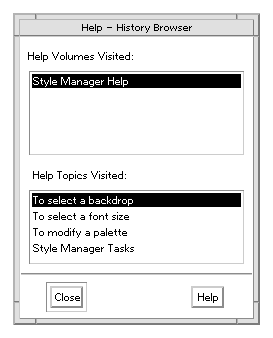
A general help window keeps track of the topics that you have visited. The History command opens a dialog box that lists the help volumes and help topics you have visited.
Figure 3-9 History dialog box
 To Use History To Return to a Topic
- Click the History button.
- Choose the title of the help volume or topic that you want to display.
- When you're done, click Close.
Like a book, a help volume has an index of important words and phrases that you can use to find help topics on a subject. You can browse or search the index of the current volume, selected volumes, or all help volumes available on your system.
Figure 3-10 Index Search dialog box
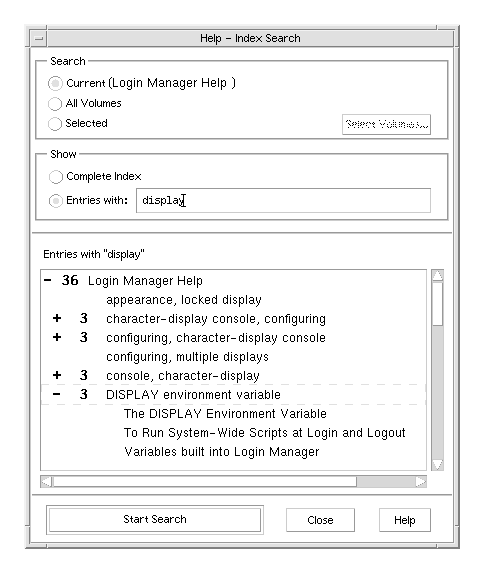
Because the help index can be quite large even for a single volume, index entries can be expanded or contracted. A + (plus) sign indicates that the index entry relates to more than one help topic. The number shows the count of help topics. You can click the index item to list the topics.
For instance, the result of an index search for the word "display" is shown in Figure 3-10. The -36 prefix tells you that there are 36 index entries that contain the keyword "display." Clicking any title marked by a + (plus) expands the list and the + (plus) changes to a - (minus) sign. The last index entry shown in the figure has been expanded in this way.
 To Search for Topics Using the Help Index
Note: The help index is available only in a general help window
- To open the index, click the Index button.
The index lists all of the entries for the current help volume. You can choose All Volumes to view an index for all available help volumes or choose Selected if you want to select only certain volumes.
- Select the Entries with field, type the word or phrase you are looking for, and press Return.
Index searches are not case sensitive. Wildcards such as * (asterisk) and ? (question mark) can be used (see "Pattern Searches" below).
- Select the index entry you want to view.
If the entry has a + (plus sign) prefix, the list will expand to show additional choices. Then select a help topic to view.
You may view as many topics as you want.
- Click Close when you are done.
In a pattern search certain characters (known as "wildcards") have special meaning. You can combine these characters in a variety of ways.
Two frequently used wildcards are asterisk (*) and question mark (?). The * matches any string of characters (including no characters), and ? matches any single character. Other wildcards include:
- . (period)
- Matches any character
- | (vertical bar)
- Specifies two search patterns and matches either pattern (logical OR)
- ( ) (parentheses)
- Encloses a pattern expression
To search for a character that has special meaning in a regular expression, precede the character with a \ (backslash).
Examples
- mouse.*clicking
- Matches entries that contain the word "mouse" followed by any number of characters followed by "clicking"
- mouse | click
- Matches entries that contain the word "mouse" or "click"
- (session | style).*manager
- Matches entries that contain "Session Manager" or "Style Manager"
You can browse all application help volumes registered on your system without having to start each individual application--just start Help Manager from the Front Panel.
At the top level, Help Manager groups help volumes into help families. For example, the help family Common Desktop Environment lists help volumes for the standard desktop applications. You can browse and display any of the volumes listed.
 To Open Help Manager
- Click the Help Manager control in the Front Panel (see Figure 3-2).
A help window displays a list of help families with online help. This is the top level of Help Manager.
Figure 3-11 Top-level view in Help Manager
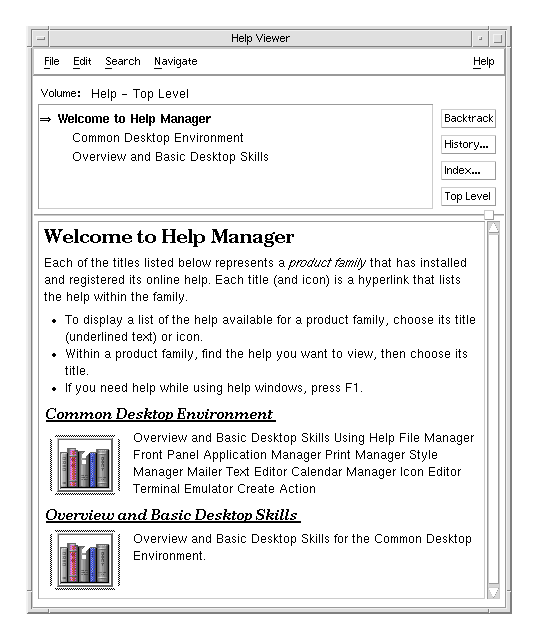
- Scroll the window to find the product group you are interested in and click its title (underlined).
This lists the help volumes available for that product.
- To open a particular help volume, click its title (underlined text).
- To return to the top level of Help Manager, click the Top Level button.
Example
To browse File Manager's online help:
- Click the Help Manager control.
- Choose Common Desktop Environment.
- Scroll the list of help volumes until you see File Manager Help.
- Click File Manager Help.
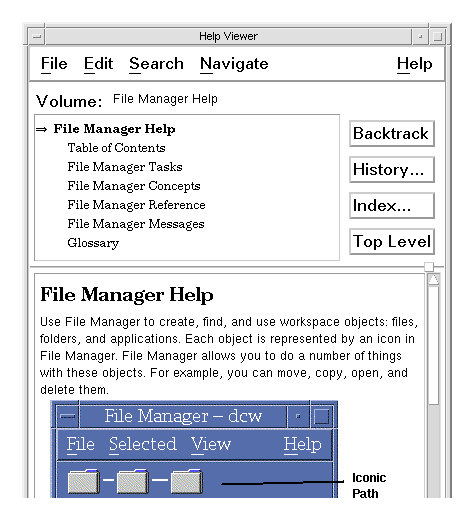
File Manager's help is displayed. This is the same help information you would see if you opened File Manager and chose Overview from the Help menu.
Figure 3-12 File Manager help viewed in Help Manager
 To Duplicate a Help Window
- Choose New Window from the Help Manager File menu.
The current help window is duplicated. You can size the new window and select topics independently of the original window.
- To remove the window, choose Close from the File menu.
Note: The New Window command is only available in the Help Manager help window (see"Browsing Help on Your System".
Displaying a Man Page
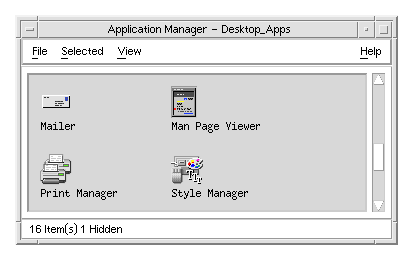
Manual reference pages, traditionally known as "man pages," can be displayed using the Man Page Viewer action. The action icon is located in the Desktop_Apps folder in Application Manager.
Figure 3-13 Man Page action icon
 To Display a Man Page
- Click the Application Manager control in the Front Panel.

- Double-click the Desktop_Apps icon.
- Click the Man Page Viewer icon.
A dialog box is displayed, prompting you to enter a man page name.
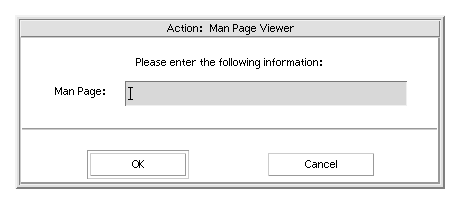
- Type the name of the man page you want to see and press Return.
The man page is displayed in a quick help window.
- Click Close to dismiss the man page.
Sometimes you may want to have a printed version of a help topic for a particular application. You can print an individual help topic, a table of contents and index, or the entire help volume. Printing options, such as paper size, number of copies, and destination printer, can also be set in the Print dialog box.
Printed help topics are directed to your default printer unless you provide a different printer name in the dialog box. Printed output is text only.
 To Print a Help Topic
- Choose Print from the File menu. (In a quick help window, click the Print button.)
You can use the default values in the Print dialog box and skip to step 5 or enter new values for your print job.
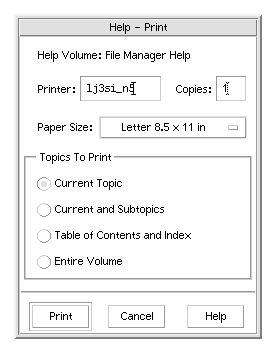
- Optional. Type the name of the printer that you want to use.
- Optional. Type the number of copies to print.
- Optional. Click the paper size button to choose a paper size.
- Select the topic or topics you want to print.
- Current Topic (the default)
- Prints only the current topic
- Current and Subtopics
- Prints the current topic and its subtopics
- Table of Contents and Index
- Prints the help volume table of contents and index
- Entire Volume
- Prints the contents of the help volume including the table of contents and index
- Click Print.
Printing Configuration
The Print dialog box displays the name of your default printer. You can change the default printer name by modifying the LPDEST environment variable. You can also change the printer for a specific application by modifying the application's application defaults file.
 To Set the Printer Resource for an Application
 Edit your HomeDirectory/
.Xdefaults file by adding this resource:
-
application_name*printer name
- If you do not have an
.Xdefaults file, create the file in your home directory.
Example
You want to direct all printed help topics of an application named ImageScan to a printer named laser2 rather than to your default printer.
Add this resource to your .Xdefaults file:
ImageScan*printer: laser2
Modifying Help Window Colors
You can change the colors of the topic tree or topic display area of a help window by setting application resources. Choosing constrasting colors is important. This ensures that text (foreground color) will be visible against the background color.
- Edit your HomeDirectory/
.Xdefaults file by adding these resources:
application_name*DtHelpDialog*DisplayArea.foreground:   color
application_name*DtHelpDialog*DisplayArea.background:   color
application_name*DtHelpDialog*TocArea.foreground:   color
application_name*DtHelpDialog*TocArea.background:   color
application_name*DtHelpQuickDialog*DisplayArea.foreground:   color
application_name*DtHelpQuickDialog*DisplayArea.background:    color
Substitute the name of the application whose help windows you want to change for application_name.
You can ask your system administrator for a list of colors that you can use or refer to your system documentation.
- Save and close the file.
When you restart your application, it will use the new color values for the topic tree and topic display area in its help windows.
Example
These resource entries change the foreground and background colors of the topic tree (TocArea) and topic display area (DisplayArea) for an application named DtCardCatalog.
DtCardCatalog*DtHelpDialog*TocArea.foreground:  yellow
DtCardCatalog*DtHelpDialog*TocArea.background:  blue
DtCardCatalog*DtHelpDialog*DisplayArea.foreground:  yellow
DtCardCatalog*DtHelpDialog*DisplayArea.background:  blue
DtCardCatalog*DtHelpQuickDialog*DisplayArea.foreground:  yellow
DtCardCatalog*DtHelpQuickDialog*DisplayArea.background:  blue
Quick help windows do not have a topic tree, so the TocArea resource is omitted.


Generated with CERN WebMaker
To Select On Item Help


