

Common Desktop Environment: Advanced User's and System Administrator's Guide
4 Registering an Application
Contents of Chapter:
- Overview of Application Registration
-
- Features Provided by Application Registration
-
- The Purpose of Application Registration
-
- General Steps for Registering an Application
-
- Step 1: Modifying Font and Color Resources
-
- Modifying Font Resources
-
- Modifying Color Resources
-
- Step 2: Creating the Desktop Application Root
-
- Step 3: Creating the Registration Package Directories
-
- Step 4: Creating the Actions and Data Types for the Application
-
- Actions and Data Types Required by an Application
-
- Location for Action and Data Type Definition Configuration Files
-
- Ways to Create Actions and Data Types
-
 To Create Actions and Data Types Using Create Action
-
 To Create Actions and Data Types Manually
-
- Step 5: Putting the Help Files in the Registration Package
-
- Step 6: Creating Icons for the Application
-
- Icons Required for the Desktop
-
- Step 7: Creating the Application Group
-
- Creating the Application Group Directory
-
- Application Group Name
-
- Configuring the Application Group To Use a Unique Icon
-
- Creating the Contents of the Application Group
-
- Step 8: Registering the Application Using dtappintegrate
-
 To Register an Application with dtappintegrate
-
- How dtappintegrate Integrates Applications
-
- Example of Creating a Registration Package
-
This chapter describes how to create a registration package for an application and how to register the application onto the desktop.
When an application is fully registered onto the desktop, it has:
- Its own application group at the top level of the Application Manager
- An action that starts the application. The action is represented by an icon in the application group
- Optionally, data types for its data files
Application registration is a non-invasive operation to the application:
- It does not involve modification of the application executable itself. Therefore, you can register existing applications on a system.
- It does not require that any of the application's delivered files (such as the executable and app-defaults) be moved to other file locations.
- It can be undone easily. The dtappintegrate tool, which is used to register applications, provides a command-line option for reversing the process.
You will want to create a registration package if you are:
- A system administrator who wants to register an existing application onto the desktop
- A software programmer who wants to create an installation package for a desktop-smart application
This section explains:
- The purpose of application registration
- Features provided to your application by application registration
Note: For a detailed example that shows how to register an existing application, see "Example of Creating a Registration Package".
Application registration provides a graphical way for users to:
The Purpose of Application Registration
A registered desktop application has certain configuration files used by the desktop to provide the application's user interface:
- Action and data type definition files
- Icon image (pixmap or bitmap) files
- A directory and files that create the application group
- Optionally, desktop help files and Front Panel definition files
In order for these files to be recognized and used by the desktop, they must be in certain directories specified by the desktop's search paths.
It can be difficult to administer an application when its configuration files are scattered among numerous directories. Therefore, the desktop allows an application to keep all its desktop configuration files gathered under a single directory. This grouping of files is called a registration package.
If the application is desktop smart, it supplies a registration package as part of its installation package. If you are a system administrator creating the configuration files yourself, you can create the registration package yourself.
The configuration files in the registration package are not available to the desktop because they are not located in the proper search path directories. The process of placing these files in the proper locations is called registering, or integrating, the application.
The desktop provides a tool, dtappintegrate, that performs the registration by creating symbolically linked representations of the files in the proper search path directories.
Many desktop-smart applications will automatically run dtappintegrate during the installation process. If you are a system administrator integrating an existing application, you can run it yourself after you've created the registration package.
Once an application is registered on a system's desktop, the application is available to all users on the system. If the system is configured as a desktop application server, the application will also be available to other systems throughout the network.
The dtappintegrate tool has a command-line option that reverses the process by breaking the links. This makes it easy to remove the application from the Application Manager so that it can be moved to a different application server or updated.
Note: For a detailed example that uses these steps to create an application package, see "Example of Creating a Registration Package".
- Modify any application resources that set fonts and colors. Otherwise, the desktop's dynamic fonts and colors will not work properly.
See "Step 1: Modifying Font and Color Resources".
- Create an application root location.
See "Step 2: Creating the Desktop Application Root".
- Create the directory structure underneath the application root.
See "Step 3: Creating the Registration Package Directories"
- Create the actions and data types for the application.
See "Step 4: Creating the Actions and Data Types for the Application".
- Put the help files in an appropriate directory.
See "Step 5: Putting the Help Files in the Registration Package".
- Create the icons for the application
See "Step 6: Creating Icons for the Application".
- Create the application group for the application.
See "Step 7: Creating the Application Group".
- Register the application using dtappintegrate.
See "Step 8: Registering the Application Using dtappintegrate".
Note: For an example of modifying resources for an application, see Step 1 of the "Example of Creating a Registration Package".
The desktop provides mechanisms for setting and manipulating interface fonts and window colors. In order for an application to use these mechanisms properly, you may have to modify the application's app-defaults file.
Modifying Font Resources
Note: This section applies to applications created using
OSF/Motif 1.2 (or later versions). Style Manager cannot set interface fonts for applications written using earlier versions of OSF/Motif.
The desktop Style Manager will set interface fonts for applications created using OSF/Motif 1.2 (or later versions) if the application does not specify application-specific interface fonts.
Style Manager provides two fonts:
- system font
- Used by system areas such as labels, menus, and buttons
- user font
- Used for editable areas such as text fields
Each font is provided in seven sizes, labeled 1 through 7 in the Fonts dialog box. The Style Manager fonts are connected to actual fonts on the system through Style Manager resources set in
/usr/dt/app-defaults/language/Dtstyle.
If you want the application to use the Style Manager fonts, you should remove any application resources that interface specify fonts. The desktop will automatically set the application's resources appropriately:
- FontList
- Set to system font
- XmText*FontList
- Set to user font
- XmTextField*FontList
- Set to user font
Modifying Color Resources
Style Manager provides the ability to change application colors dynamically. The application must be an OSF/Motif 1.1 or 1.2 client. Clients written with other toolkits cannot change color dynamically; color changes take effect when the client is restarted.
The easiest way to use the dynamic colors provided by the desktop is to remove any application color resources for background and foreground color.
Note: For an example of creating the desktop application root directory for an application, see Step 2 of "Example of Creating a Registration Package".
The registration package files for the application are grouped beneath a directory called the application root, or app_root. The app_root directory used for the desktop configuration files can be the same directory as the application's installation app_root or some other location.
For example, suppose an application is installed under a directory /usr/BTE. This same directory could be used as the app_root for the desktop configuration files. However, if you are integrating an existing non-desktop smart application, it is recommended that you create a different desktop app_root directory. This will prevent the configuration files you create from being overwritten when you update the application.
For example, a system administrator might want to create a directory /etc/desktop_approots/BTE as the desktop app_root directory.
Note: For an example of creating the registration package directories for an application, see Step 3 of "Example of Creating a Registration Package".
The registration package is the group of desktop configuration files used by the desktop to provide a graphical interface for the application.
Registration Package Contents
The desktop configuration files include:
- Action and data type definition files
- Icon image files
- An application group directory and its contents
- Optionally: help data files and a Front Panel configuration file
The registration package is gathered under a top-level directory called the application root, or app_root.
Figure 4-4 A registration package beneath an application root directory
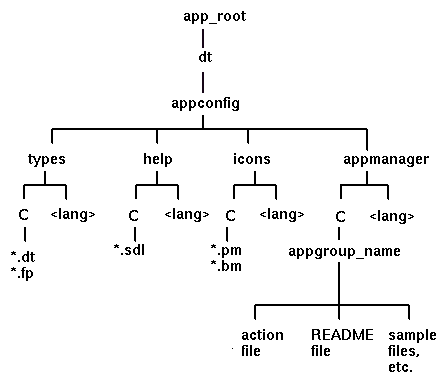
The major categories of configuration fields under the app_root/dt/appconfig directory are:
- Subdirectory
- Contents
- types
- Action and data type definition files
- help
- Desktop help files
- icons
- Bitmap and pixmap image files used by the application's actions and data types
- appmanager
- The directory and contents that create the application group
Each of the major categories has subdirectories for language-dependent files. Default-language files are placed in the C directory.
To Create the Registration Package
 Create these directories. If you are providing language-dependent configuration files, create a separate directory for each language. If you are supplying only one language, put the files in the C directory.
- app_root/dt/appconfig/types/language
- app_root/dt/appconfig/help/language
- app_root/dt/appconfig/icons/language
- app_root/dt/appconfig/appmanager/language/appgroup_name, where appgroup_name is the name of the application group.
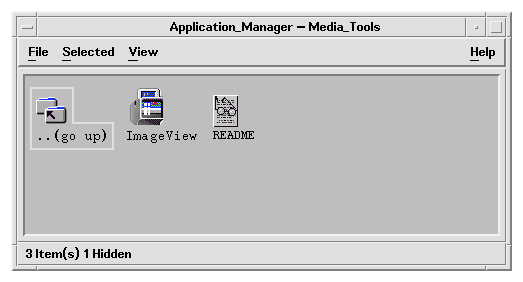
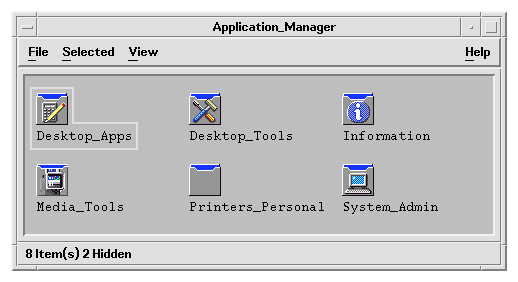
For example, Figure 4-5 shows Application Manager containing a group whose appgroup_name is "Media_Tools."
Figure 4-5 Application group at the top level of the Application Manager
The dtappintegrate tool operates only on the desktop configuration files in the types, help, icons, and appmanager directories. The application's binary executable, app-defaults, and message catalog files are administered separately.
Note: For an example of creating the actions and data types for an application, see Step 4 of "Example of Creating a Registration Package".
Actions and data types provide a user interface for the application.
- Actions provide a user interface for the command to launch the application.
- Data types provide customized appearance and behavior for the application's data files.
Actions and Data Types Required by an Application
Typical applications require the following action and data type definitions:
- An action that opens the application.
- A data type for the data files of your application. If you create a data
type, you will also want to create:
- An Open action for the data files of your application
- A Print action for the data files of your application
- A data type for the application group (see "Configuring the Application Group To Use a Unique Icon").
For an introduction to how actions and data types are used in the desktop, see Chapter 8, "Introduction to Actions and Data Types."
Location for Action and Data Type Definition Configuration Files
Actions and data types are defined in configuration files. The only naming requirement for files containing action and data type definitions is that they must have a .dt suffix. By convention, you may want to name the file action_name.dt or application_name.dt.
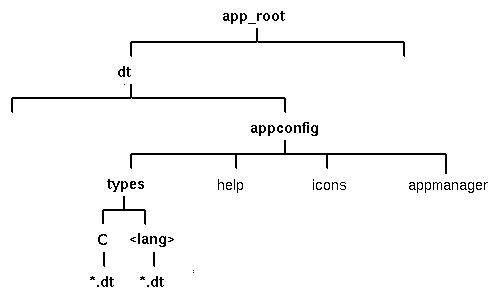
Place files containing actions and data types under the application root in the directory app_root/dt/appconfig/types/language. The default language is C.
Figure 4-6 Action and data type definition files
Ways to Create Actions and Data Types
You can create action and data type definitions for an application in either of two ways:
- Use the Create Action tool.
Create Action provides an easy-to-use interface with text fields that you fill in. However, the tool has certain limitations.
- Create the definitions manually.
This requires you to learn the syntax for creating the definitions, but provides access to the full range of functionality.
 To Create Actions and Data Types Using Create Action
This procedure uses the Create Action utility to create an action and data types for the application.
For more information about Create Action, use its online help or see Chapter 9, "Creating Actions and Data Types Using Create Action."
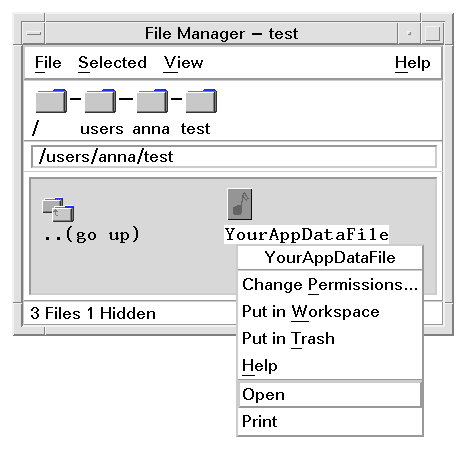
- Open the Desktop_Apps application group and double-click Create Action.
- Use Create Action to create the action and data type definitions for the application and its data type.
The configuration file created by Create Action will be written to HomeDirectory/.dt/type/action_name.dt. The action file (the executable file with the same name as the action) is placed in your home directory.
- Test the action using the action file created in your home directory.
- Copy the action definition file HomeDirectory/.dt/type/action_name.dt to the app_root/dt/appconfig/types/language directory.
- After the application group directory has been created (see "Step 7: Creating the Application Group"), copy the action file HomeDirectory/action_name to the app_root/dt/appconfig/appmanager/language/appgroup_name directory.
 To Create Actions and Data Types Manually
 Create a configuration file containing the action and data type definitions for the application.
Action and data type definition files must follow the naming convention name.dt.
You can place all your action and data type definitions in one file or distribute them among multiple files. For each file, use a file name that system administrators will easily connect with your application.
Action and data type names must be one word (no embedded spaces). You can use an underscore character. By convention, the first letter of the action or data type name is capitalized. Do not use an existing action name or file name. Use a name that advanced users and system administrators will easily connect with your application.
If you want the application's icon labeled with a different name than the action name, include a LABEL field in the action definition.
For more information about creating actions and data types, see:
Note: For an example of adding help files to a registration package, see Step 5 of "Example of Creating a Registration Package".
If the application includes a desktop help volume (a help volume created with the desktop Help Developer's Kit), the help volume master file (*.sdl) should be placed in the directory app_root/appconfig/help/language.
Graphics used by the help files are usually placed in a graphics subdirectory. The graphics must be located in the same directory relative to the master help volume (*.sdl) file as when the help volume was created.
If the application does not provide a help volume, you can create one if you have the Help Developer's Kit.
There are two levels of integration of a help volume:
- Full integration.
When desktop help is fully integrated, the help volume can be accessed from the application--for example, by on-item help and the Help menu. Full integration involves modification to the application's executables.
- Partial integration.
When desktop help is partially integrated, it is available from the top level of the Help Manager. However, you cannot access the help volume from the application's windows. You can also provide an action to access the help from the application group. The following example action displays the help volume located in the help master file MyApp.sdl:
ACTION OpenMyAppHelp
{
  LABEL           MyAppHelp
  ARG_COUNT       0
  TYPE            COMMAND
  WINDOW_TYPE     NO_STDIO
  EXEC_STRING     /usr/dt/bin/dthelpview -helpVolume MyApp
  DESCRIPTION     Displays help for the MyApp application.
}
Note: For an example of creating the icon files for an application, see Step 6 of "Example of Creating a Registration Package".
The desktop provides default icons for actions, data types, and application groups. However, you will probably want to create unique icons for the application.
Icons are placed in the directory app_root/dt/appconfig/icons/language.
Icons Required for the Desktop
The application uses these icon images on the desktop:
- Action icon. This is the icon the user double-clicks to start your application (actions). It is referenced in the ICON field of the action that launches the application.
Supply three sizes: tiny, medium, and large.
- Data type icon. This icon is used to represent the application's data files in File Manager. It is referenced in the ICON field of the data type definition.
If your application supports multiple data types, you should provide a different icon for each data type.
Supply two sizes: tiny and medium.
- Application group icon. This is the icon representing the directory at the top level of the Application Manager. It is referenced in the ICON field of the data type definition for the application group. (See "Step 7: Creating the Application Group".)
Supply two sizes: tiny and medium.
You may need to supply both pixmap and bitmap versions of each icon to support color (eight-bit and larger) and monochrome (fewer than eight bits) displays
.

If you do not provide bitmap files, the desktop maps the color specifications of the pixmap files into black and white. However, this mapping may not produce the appearance you want.
For more information about icons, see "Icon Image Files".
Note: For an example of creating the application group, see Step 7 of "Example of Creating a Registration Package".
Once you have created the action and data type definitions for the application, you must create the configuration files responsible for creating what the user actually sees--the application group and its contents.
The application group is a directory at the top level of the Application Manager (see Figure 4-1).
There are three steps to creating the application group:
- Create the application group directory in the registration package.
- Optional: configure the application group to use a unique icon. This involves creating the data type definition for the application group directory.
- Create the contents of the application group.
Creating the Application Group Directory
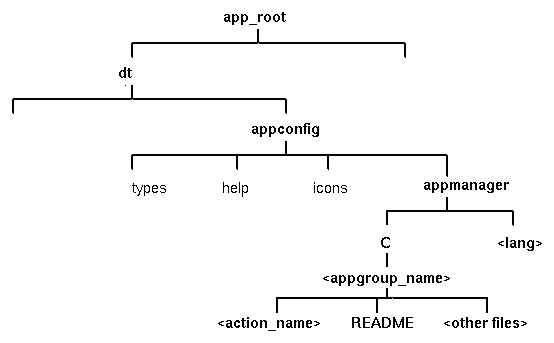
To create an application group, create the directories in the registration package under appmanager, as shown in Figure 4-7.
Figure 4-7 The appmanager directory
Application Group Name
The <appgroup_name> in Figure 4-7 is the name for the application group.
Figure 4-8 The application group name (<appgroup_name>)

The name can be any allowable file (directory) name. Use a name that describes the application.
The desktop provides a default application-group icon. However, you will probably want to provide a custom icon.
If you want to provide a unique icon for the application group, you must create:
- A data type for the directory that appears at the top level of Application Manager.
- Open and Print actions for the data type.
For example, suppose you want to create an application group named Media_Tools. The following data type definition, placed in a file app_root/dt/appconfig/types/language/name.dt, assigns a unique icon to the application group icon.
DATA_ATTRIBUTES  Media_ToolsAppgroup
{
   ACTIONS       OpenInPlace,OpenNewView
   ICON          MediaTools
   DESCRIPTION   Double-click to open the Media_Tools \
                 application group
}
DATA_CRITERIA           Media_ToolsAppgroupCriteria1
{
   DATA_ATTRIBUTES_NAME Media_ToolsAppgroup
   MODE                 d
   PATH_PATTERN         */appmanager/*/Media_Tools
}
The attributes section of the definition specifies the icon to be used. The criteria section of the definition specifies that the data type be defined to any directory named Media_Tools that is a subdirectory of a directory named appmanager.
Figure 4-9 shows the relationship between the application group name and the data type definition. The PATH_PATTERN field in the data type definition connects a unique icon to the application group.
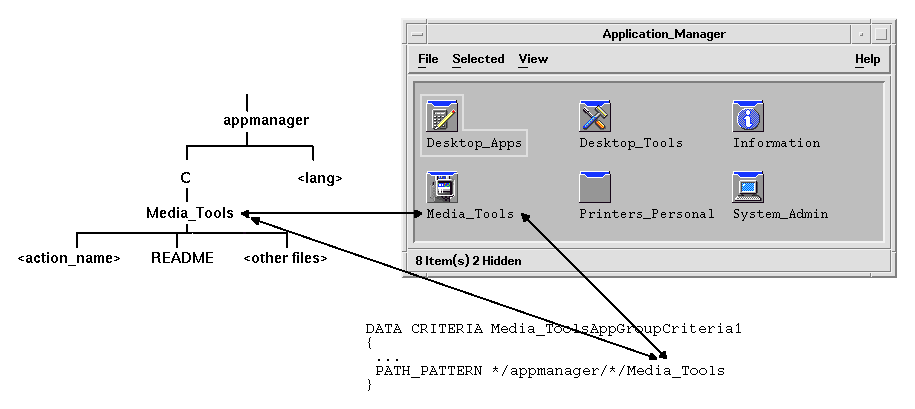
Figure 4-9 How an application group gets a unique icon
You should also create an Open and Print action for the application group data type:
ACTION Open
{
   ARG_TYPE     Media_ToolsAppGroup
   TYPE         MAP
   MAP_ACTION   OpenAppGroup
}
ACTION Print
{
   ARG_TYPE     Media_ToolsAppGroup
   TYPE         MAP
   MAP_ACTION   PrintAppGroup
}
OpenAppGroup and PrintAppGroup actions are built-in actions defined in /usr/dt/appconfig/types/language/dtappman.dt.
Creating the Contents of the Application Group
The most important item in the application group is an icon to start the application (an action icon). If the application group contains a suite of applications, there is usually an icon for each application.
In addition to one or more action icons, the application group may contain:
- One or more README files
- One or more sample data files
- Templates
- An icon the user can double-click to view help information
- A man page
- A specialized Front Panel control
The application group can contain subdirectories.
Creating the Action File (Application Icon)
The application group should contain an icon that launches the application. If the group supplies a suite of applications, there should be an icon for each one. These icons are called application icons, or action icons, since they represent an underlying action.
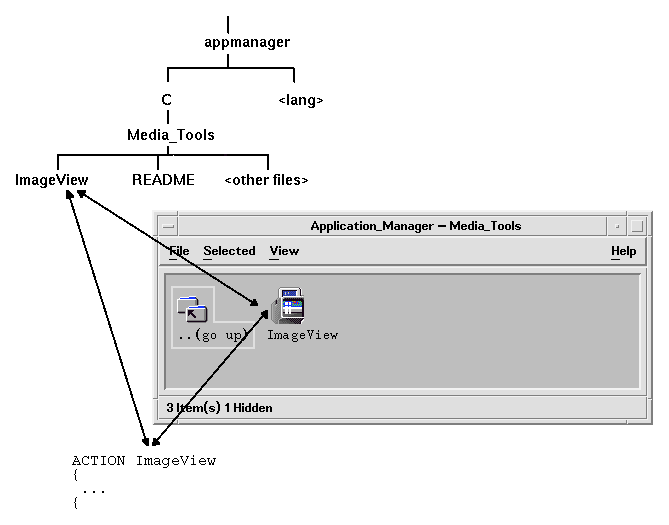
An action icon is created by creating an executable file with the same name as the action it will run:
app_root/dt/appconfig/appmanager/appgroup_name/action_name
The file is called an action file, because its purpose is to create a visual representation of the underlying action.
For example, if you've created an action named BestTextEditor that runs the BestTextEditor application, you would create an executable file named BestTextEditor. In File Manager and the Application Manager, the action file will use the icon image specified in the action definition.
Figure 4-10 illustrates the relationship between the action definition, action file, and actual entry in the Application Manager window.
Figure 4-10 The application icon is a file in the application group
Read Me Files
The desktop provides a README data type that you can use for your application's README files. Use one of these naming conventions:
- README
- readme
- README.*
- Read.*.Me
- read.*.me
- READ.*.ME
Creating a Specialized Front Panel Control
In most cases, you do not need to provide a Front Panel control definition; the user can add the application to the Front Panel by dropping the action icon on the Install Icon control in a subpanel.
You might want to create a Front Panel configuration file containing a control definition for your application if you want users to be able to install a control that behaves differently than the action icon--for example, if the control monitors a file and changes appearance when the monitored file changes.
Front Panel configuration files are placed in the app_root/dt/appconfig/types/language directory. The naming convention is name.fp.
If you supply a configuration file containing a control, the user can add the control to a subpanel by dropping the *.fp file on the Install Icon control in the subpanel.
For example, the following definition can be placed in a Front Panel configuration file in the application group. If the user drops this file on an Install Icon control in a subpanel, a control is created in the subpanel that runs a single instance of the BestTextEditor application. If BestTextEditor is already running, the window is moved to the top of the window stack in the current workspace.
CONTROL BestTextEditorControl
{
   TYPE          icon
   ICON          BTEFPanel
   PUSH_RECALL   True
   CLIENT_NAME   BTEd
   PUSH_ACTION   BTEditor
   DROP_ACTION   BTEditor
   HELP_STRING   Starts the BestTextEditor application.
}
For additional information about creating Front Panel configuration files,
see:
Note: For an example of registering an application, see Step 8 of "Example of Creating a Registration Package".
Once you've created a registration package under an application root, you are ready to perform the actual application registration.
Application registration creates links between the registration package and the directories located along the desktop search paths (see "How dtappintegrate Integrates Applications").
 To Register an Application with dtappintegrate
If the application is desktop-smart, dtappintegrate is usually run automatically as the final step in the installation process. If it is not run automatically, or if you have created the configuration files to integrate a non-desktop smart application, then you can run dtappintegrate manually.
- Log in as root.
- Run the command:
/usr/dt/bin/dtappintegrate -s app_root
where app_root is the desktop application root directory. For more information, see the dtappintegrate(1) man page.
- Open the Desktop_Tools application group and double-click Reload Applications.
- Verify that the application is properly registered:
a. Display the top level of the Application Manager. The new application group should appear in the Application Manager.
b. Open the application group and double-click the action icon.
dtappintegrate -s app_root [-t target_path ] [-l language ] [-u]
-s app_root Required parameter. Specifies the application root under which the appication has been installed.
-t target_path Optional parameter, defaults to the system location /etc/dt/appconfig. Specifies the location to which the desktop configuration files are linked. You must use a location on the application search path.
-l language Optional parameter, defaults to all languages. Specifies which language-dependent desktop configuration files to integrate.
- -u
- Optional parameter. Un-integrates the application, removing all the links set up during integration.
The function of dtappintegrate is to set up links between the installed files and the locations where the desktop looks for configuration files.
Actions and Data Types
dtappintegrate creates symbolic links from the action and data type definition files in the registration package to the system-wide directory along the action database help search path. This is done by creating links from
app_root/dt/appconfig/types/language/*.dt
to
/etc/dt/appconfig/types/language/*.dt
Help Information Files
dtappintegrate creates symbolic links from the help files in the registration package to the system-wide directory along the help search path. This is done by creating links from
app_root/dt/appconfig/help/language/help_file.sdl
to
/etc/dt/appconfig/help/language/help_file.sdl
Icon Files
dtappintegrate creates symbolic links from the icon files in the registration package to the system-wide directory along the icon search path. This is done by creating links from
app_root/dt/appconfig/icons/language/icon_files
to
/etc/dt/appconfig/icons/language/icon_files
Application Group
To place the application group for the application into the top level of Application Manager, dtappintegrate creates a link between the application group directory in the registration package and the system-wide location along the application search path. This is done by creating links from the directory
app_root/dt/appconfig/appmanager/language/appgroup_name
to
/etc/dt/appconfig/appmanager/language/appgroup_name
The following steps create a registration package for an existing, non-desktop smart application named BestTextEditor.
Information You Need to Know About ``BestTextEditor''
The example assumes the following facts about the BestTextEditor application:
Steps to Registering ``BestTextEditor''
The following step-wise procedure registers BestTextEditor.
- Modify font and color resources.
In BestTextEditor's app-defaults file, remove resources that set:
- Fonts for text.
- Colors for foreground and background.
- Create the application root.
Create the directory:
/desktop_approots/BTE
If you are integrating an existing application, you should create the application root directory elsewhere than in the installation location for the application; otherwise, the configuration files you create may be removed when you update the application.
- Create the registration package directories.
Create these directories:
/desktop_approots/BTE/dt/appconfig/types/C
/desktop_approots/BTE/dt/appconfig/help/C
/desktop_approots/BTE/dt/appconfig/icons/C
/desktop_approots/BTE/dt/appconfig/appmanager/C/BestTextEditor
- Create the actions and data types for the application.
a. Create the configuration file for the action and data type definitions:
/desktop_approots/BTE/dt/appconfig/types/C/BTE.dt
b. Create the action definition for running BestTextEditor:
ACTION BTEditor
{
   WINDOW_TYPE  NO_STDIO
   ICON         BTERun
   DESCRIPTION  Double-click this icon or drop a BTE data \
                file on it to run BestTextEditor.
   EXEC_STRING  /usr/BTE/BTEd %Arg_1%
}
c. Create the data type for *.bte files:
DATA_ATTRIBUTES BTEDataFile
{
   DESCRIPTION  BestTextEditor data file.
   ICON         BTEData
   ACTIONS      Open,Print
}

DATA_CRITERIA BTEDataFileCriteria1
{
   DATA_ATTRIBUTES_NAME  BTEDataFile
   NAME_PATTERN          *.bte
   MODE                  f
}
d. Create the data type for *.tpl files:
DATA_ATTRIBUTES BTETemplateFile
{
   DESCRIPTION  BestTextEditor template file.
   ICON         BTETempl
   ACTIONS      Open
}

DATA_CRITERIAL BTETemplateFileCriteria1
{
   DATA_ATTRIBUTES_NAME  BTETemplateFile
   NAME_PATTERN          *.tpl
   MODE                  f
}
e. Create the Open action for *.bte files.
ACTION Open
{
   ARG_TYPE     BTEDataFile
   TYPE         MAP
   MAP_ACTION   BTEditor
}
f. Create the Print action for *.bte files.
Here are simple Print actions that will print the data files. These actions require a value for the LPDEST environment variable and ignore the -s print option. (If LPDEST isn't set, the action may fail.)
ACTION Print
{
   ARG_TYPE     BTEDataFile
   TYPE         MAP
   MAP_ACTION   BTEPrintData
}
ACTION BTEPrintData
}
   WINDOW_TYPE  NO_STDIO
   EXEC_STRING  BTEPrint -d $LPDEST %Arg_1%
}
Here is another version of the BTEPrintData action and an accompanying script. Together, they handle situations where LPDEST is not set or if silent printing is requested.
ACTION BTEPrintData
{
   WINDOW_TYPE  NO_STDIO
   EXEC_STRING  /usr/BTE/bin/BTEenvprint %(File)Arg_1%
}
The contents of the /usr/BTE/bin/BTEenvprint script is:
# BTEenvprint
#!/bin/sh
DEST=""
SILENT=""
if [ $LPDEST ] ; then
   DEST="-d $LPDEST"
fi
BTEPrint $DEST SILENT $1
g. Create the Open action for *.tpl files:
ACTION Open
{
   ARG_TYPE    BTETemplateFile
   TYPE        MAP
   MAP_ACTION  BTEditor
}
h. Create the Print action for *.tpl files:
ACTION Print
{
   ARG_TYPES   BTETemplateFile
   TYPE        MAP
   MAP_ACTION  NoPrint
}
NoPrint is a built-in action that displays a dialog box telling the user the file cannot be printed.
- Put the help files into the registration package.
a. Place the help files in the following locations:
/desktop_approots/BTE/dt/appconfig/help/C/BTEHelp.sdl
/desktop_approots/BTE/dt/appconfig/help/C/graphics/BTE1.xwd
/desktop_approots/BTE/dt/appconfig/help/C/graphics/BTE2.xwd
b. Create the file:
/desktop_approots/BTE/dt/appconfig/types/C/BTEhelp.dt.
Put the following action definition in the file:
ACTION BTEHelp
{
   WINDOW_TYPE   NO_STDIO
   EXEC_STRING   /usr/dt/bin/dthelpview -helpVolume \
                 BTEHelp.sdl
   DESCRIPTION   Opens the BestTextEditor help volume.
}
- Create icons for the application.
Use Icon Editor to create the icons. Use these size guidelines:
- Name
- Size
- basename.t.pm
- 16 by 16
- basename.m.pm
- 32 by 32
- basename.l.pm
- 64 by 64
Create these icon files in the directory
/desktop_approots/BTE/dt/appconfig/icons/C:
- Icons to represent the action that runs the application: BTERun.t.pm, BTERun.m.pm, BTERun.l.pm
- Icons to represent *.bte files: BTEData.t.pm, BTEData.m.pm,
- Icons to represent *.tpl files: BTETempl.t.pm, BTETempl.m.pm
- Icons to represent the application group (used in step 7): BTEApp.t.pm, BTEApp.m.pm
- Create the application group.
a. If you haven't already done so, create the directory.
/desktop_approots/BTE/dt/appconfig/appmanager/C/BestTextEditor
b. This step is optional. It provides a unique icon for the application group icon by creating a data type and associated actions for the application group. If you omit this step, the application group will use the default icon.
Add the following data type and action definitions to the file /desktop_approots/BTE/dt/appconfig/types/C/BTE.dt.The data type specifies the icon to be used by the BestTextEditor application group. The actions provide the same Open and Print behavior as the built-in application groups.
DATA_ATTRIBUTES BestTextEditorAppGroup
{
   ACTIONS     OpenInPlace,OpenNewView
   ICON        BTEApp
{
DATA_CRITERIA BestTextEditorAppGroupCriterial
{
  DATA_ATTRIBUTES_NAME   BestTextEditorAppGroup
  MODE                   d
  PATH_PATTERN           */appmanager/*/BestTextEditor
}
ACTION Open
{
  ARG_TYPE     BestTextEditorAppGroup
  TYPE         MAP
  MAP_ACTION   OpenAppGroup
}
ACTION Print
{
  ARG_TYPE     BestTextEditorAppGroup
  TYPE         MAP
  MAP_ACTION   PrintAppGroup
}
c. Create an icon in the application group that will start the application. To do this, create the file:
/desktop_approots/BTE/dt/appconfig/appmanager/C/BestTextEditor/BTEditor
and make the file executable.
d. Create the action file in the application group that will open the help volume. To do this, create the file:
/desktop_approots/BTE/dt/appconfig/appmanager/C/BestTextEditor/BTEHelp
and make the file executable.
e. Put other files into the application group; for example, "read me" files, sample data and template files.
- Register the application.
In a terminal emulator window:
a. Log in as root.
b. Run the command:
/usr/dt/bin/dtappintegrate -s /desktop_approots/BTE
c. Open the Desktop_Tools application group and double-click Reload Applications.


Generated with CERN WebMaker
To Create Actions and Data Types Using Create Action
To Create Actions and Data Types Manually


