

Here's the first script:
#!/usr/dt/bin/dtksh
XtInitialize TOPLEVEL dttest1 Dtksh $0
XtSetValues $TOPLEVEL title:"dttest1"
XtCreateManagedWidget BBOARD bboard XmBulletinBoard $TOPLEVEL \
   resizePolicy:RESIZE_NONE height:150 width:250\
   background:SkyBlue
XtCreateManagedWidget BUTTON pushbutton XmPushButton $BBOARD \
   background:goldenrod \
   foreground:MidnightBlue \
   labelString:"Push Here" \
   height:30 width:100 x:75 y:60 shadowThickness:3
XtRealizeWidget $TOPLEVEL
XtMainLoop
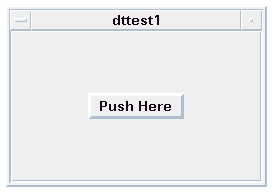
Figure 2-1 shows the window that the first script produces.Figure 2-1 Window from script dttest

The first line of the script:
#!/usr/dt/bin/dtksh
tells the operating system that this script should be executed using /usr/dt/bin/dtksh rather than the standard shell.The next line initializes the Xt Intrinsics.
XtInitialize TOPLEVEL dttest1 Dtksh $0
The name of the top-level widget is saved in the environment variable $TOPLEVEL, the shell widget name is dttest1, the application class name is Dtksh, and the application name is given by the dtksh variable $0.
The next line sets the title resource to the name of the script.
XtSetValues $TOPLEVEL title:"dttest1"
Notice that there is no space between the colon after the resource name (title) and its value. An error message appears if you have a space between them.The next four lines create a bulletin board widget and set some of its resources.
XtCreateManagedWidget BBOARD bboard XmBbulletinBoard $TOPLEVEL \
   resizePolicy:RESIZE_NONE \
   background:SkyBlue\
   height:150 width:250
The bulletin board widget's ID is saved in the environment variable $BBOARD. The widget's name is bboard. This name is used by the Xt Intrinsics to set the values of resources that might be named in an external resource file. The widget class is XmBulletinBoard. The bulletin board's parent widget is the widget ID contained in the environment variable $TOPLEVEL. This is the topl-evel widget created by the initializion command in the first line. The \ (backslash) at the end of the line tells dtksh that this command continues on the next line.The next six lines create a push button widget as a child of the bulletin board, and set some of the push button's resources.
This is basically the same procedure used to create the bulletin board, except that the variable, name, class, and parent are different.XtCreateManagedWidget BUTTON pushbutton XmPushButton $BBOARD \background:goldenrod \ foreground:MidnightBlue \ labelString:"Push Here"\ height:30 width:100 x:75 y:60\ shadowThickness:3
The next line causes the toplevel widget and all its children to be realized.
XtRealizeWidget $TOPLEVEL
Finally, the XtMainLoop command initiates a loop processing of events for the widgets.
XtMainLoop
In this script, all that happens is the window appears on the display. It stays there until you terminate the script, either by choosing Close on the Window Manager menu or by pressing CTRL C in the terminal window from which you executed the script.
The callback is the function activateCB(). You typically add the callback to the push button after it (the push button) has been created:#!/usr/dt/bin/dtkshactivateCB() { echo "Pushbutton activated; normal termination." exit 0 } XtInitialize TOPLEVEL dttest2 Dtksh $0 XtSetValues $TOPLEVEL title:"dttest2" XtCreateManagedWidget BBOARD bboard XmBulletinBoard $TOPLEVEL \ resizePolicy:RESIZE_NONE \ background:SkyBlue \ height:150 width:250 XtCreateManagedWidget BUTTON pushbutton XmPushButton $BBOARD \ background:goldenrod \ foreground:MidnightBlue \ labelString:"Push Here"\ height:30 width:100 x:75 y:60 shadowThickness:3 XtAddCallback $BUTTON activateCallback activateCB XtRealizeWidget $TOPLEVEL XtMainLoop
XtAddCallback $BUTTON activateCallback activateCB
Now the pushbutton knows about the callback. When you click the push button, the function activateCB() is executed, and the message "Pushbutton activated; normal termination." appears in the terminal window from which you executed the script. The script is terminated by the call to the function exit 0.


