This chapter discusses the features of the operating system that support this process including the following topics:
Reasons you may want to use OLAR (Section 4.2)
Getting component state information (Section 4.3)
Cautions and restrictions for OLAR operations (Section 4.4)
How to add components (Section 4.5)
How to remove components (Section 4.6)
Using SysMan Station to monitor and manage OLAR (Section 4.7)
This chapter describes how to add or replace components in a system while keeping an operating system instance and associated applications running.
Online Addition and Removal (OLAR) management is provided by the
hwmgr
command and the SysMan suite of System Management
applications.
Complete management is available from the operating system,
eliminating the need to use lower level hardware monitor interfaces such as
the System Reference Monitor (SRM) or System Control Monitor (SCM).
4.2 Reasons for Component OLAR
Online Addition and Removal (OLAR) management allows for the addition or removal of hardware while the operating system and applications continue to run. This provides the benefit of increased system up time and availability during both scheduled and unscheduled maintenance. OLAR is supported for CPUs on some symmetrical multiprocessing (SMP) platforms. Currently, the platforms which support CPU OLAR are the AlphaServer GS160, and GS320 series systems. Other SMP systems do not support physically adding or removing CPUs while the system is running, but do support placing a CPU in an offline state if it is not functioning properly.
The need for component OLAR may arise for one of the following reasons:
A system requires additional computational resource capacity. For example, a GS320 may have increased processing requirements. If the system has available CPU slots, the CPU capacity can be expanded by adding additional CPU modules to the system to improve system performance.
A system manager wants to upgrade specific system components to the latest model or revision. As an example, a GS160 with earlier model CPU modules can be upgraded to later model CPUs with higher clock rates, while the operating system continues to run. In this example for GS series systems, all CPUs in a Quad Building Block (QBB) must be running the same model and speed CPU.
A system component is indicating a high incidence of correctable errors and the system manager wants to perform a proactive replacement of the failing component before it results in a hard failure.
You can get information about components and their states using the
hwmgr
command, SysMan Station, or by viewing particular events.
The following sections discuss information pertaining to component states
during an Online Addition and Removal operation.
4.3.1 Component States and Status
There are three important attributes, which describe how a component is currently functioning:
Access State
State
Status
Indicted
These attributes can be displayed by using the
hwmgr -status
command or by viewing the properties of a component with the SysMan Station.
For information on how to view the properties using SysMan Station, see
Section 4.7.
Access State Attribute
The access state attribute of a component is an indication of the accessibility of a component to the operating system, as determined by a system administrator. The access state of a component is either on line or off line.
An online component is used actively by the operating system.
An offline
component is not used by the operating system.
For example, offline CPUs will
not have processes scheduled for execution by them.
State Attribute
The state attribute, in general, is an indication of the component's operational capabilities, as indicted by the controlling software for a given component. The following are the possible states of the components:
The component is fully functional and ready for use although it might not be currently on line.
The component is unavailable for use.
The component is turned off.
The controlling software is unable to
determine the status of the component.
Use other
hwmgr
command options and diagnostic or service tools to determine its status.
Status Attribute
The status attribute is a summary of the access state, state and indicted state attributes, to provide a quick indication of the component status. The component status is one of the following:
The component is behaving normally.
The status of the component is inactive because it is a component that is managed using the Compaq Capacity on Demand (CCoD) feature (typically a CPU). The component is physically present but off line and therefore available for spare capacity.
This status warns you that a component
is not in a normal state but may return to a normal state after a system reboot.
For example, when you take a CPU off line using the
-offline
nosave
option, its status changes to warning state.
It
is considered a warning status because this CPU automatically will become
on line and available after system reboot or initialization.
This status warns you that a component is not in a normal state and will not return automatically to a normal state. You must intervene to bring the component back to a normal state (on line and available). For example, when you take a CPU off line, its offline state persists across a reboot and its status changes to critical. You only can bring the CPU back on line by manual intervention. Other examples of components that will cause a critical status are components that are indicted (through the Component Indictment facility), and components with power off.
Indicted Attribute
The indicted attribute is an indication of whether a component has been
indicted by a fault analysis utility.
If a component has been indicted, the
additional attributes
indicted_probability
and
indicted_urgency
are also set.
For more information on these attributes,
see
Section 3.1.4.
4.3.2 OLAR Events
OLAR operations will cause a change in a component's state.
All changes
in a component state will result in the generation of an EVM event.
EVM events
that track changes in the state of a component begin with
sys.unix.hw.state_change.
Events that result from OLAR operations are hardware state change
events.
For a description of each type of state change event that can occur,
enter the following command:
# evmwatch -i -f '[name sys.unix.hw.state_change]' | evmshow -t "@name" -x | more
See
EVM(5)
or the
System Administration
manual for more information.
Applications can be programmed to subscribe to OLAR events.
Examples
showing how to write code that subscribes to OLAR specific EVM events is supplied
in
/usr/examples/evm/evm_ex_olar_mon.c.
You must have
the
OSFEXAMPLESnnn
subset installed
to get the /usr/examples directory.
4.3.3 Locating a CPU
If you are removing a CPU in an AlphaServer GS160/GS320, you may need
to locate the Quad Building Block (QBB) number for each installed CPU.
If
you are using SysMan Station, the Hardware View window shows the hierarchy
of the hardware graphically.
If you are using a command line interface, enter
the following command to get information on the hardware hierarchy.
hwmgr
-view
hierarchy
:
# hwmgr -view hierarchy
 HWID:   hardware hierarchy     (!)warning (X)critical (-)inactive (see -status)
 -------------------------------------------------------------------------------
    1:   platform Compaq AlphaServer GS160 6/731
    9:     bus wfqbb0
    10:       connection wfqbb0slot0
    11:         bus wfiop0
    12:           connection wfiop0slot0
    13:             bus pci0
    14:               connection pci0slot1


.
.
.
    57:       cpu qbb-0 CPU0  [1]
    58:       cpu qbb-0 CPU2
This line shows the hardware ID (57), the
component type (cpu), the hard Quad Building Block (QBB)
number where the CPU is located (qbb-0), and the CPU name
(CPU0).
Note that the hard QBB number does not change in
a partitioned system.
[Return to example]
To quickly identify which QBB a CPU is associated with, using the CPU hardware ID, enter the following command:
# hwmgr -view hier -id
HWID
  HWID:   hardware hierarchy
 -------------------------------------------------------------------------------
    58:   cpu qbb-0 CPU0
4.4 Cautions Before Performing CPU OLAR Operations
The following cautions must be considered before adding or removing CPUs:
Applications potentially may suspend if they bind threads to a particular CPU and that CPU is taken off line. If you are running such an application on a cluster member that is being serviced, you may want to temporarily relocate that application to another member. Also, any CPU with processes bound to a RAD of which this is the last running CPU should not be put off line unless it is acceptable to suspend processes that are bound to that RAD.
You must have root privileges or have the appropriate DOP
privileges to use the Manage CPUs application.
The DOP privilege for the Manage
CPU application for OLAR management is
HardwareManagement.
To use the
hwmgr
command, you must be logged in as the
root user.
Only one administrator (with root privileges) at a time can initiate
OLAR operations; other administrators will be prevented from initiating OLAR
operations momentarily.
If you are using program profiling utilities such as
dcpi,
kprofile, or
uprofile,
that are aware of the system's CPU configuration, unpredictable results may
occur when performing OLAR operations.
It is therefore recommended that these
profiling utilities be disabled prior to performing an OLAR operation.
Ensure
that all the processes including any associated daemons that are related to
these utilities have been stopped before performing OLAR operations on system
CPUs.
The device drivers used by these commands usually are configured
into the kernel dynamically, so the commands can be disabled before each OLAR
operation with the following commands:
sysconfig
-u pfm
sysconfig
-u pcount
You reenable the appropriate device driver by using the following commands:
sysconfig
-c pfm
sysconfig
-c pcount
The automatic deallocation of CPUs, enabled through the Automatic Deallocation
Facility, should be disabled whenever the
pfm
or
pcount
device drivers are configured into the kernel, or vice versa.
See
sysconfig(1)
and
dcpi(1)
for more information.
Documentation
for the Compaq Continuous Profiling Infrastructure (DCPI) applications
can be found at
http://www.tru64unix.compaq.com/dcpi/documentation.htm.
You cannot put a CPU off line if it is the only CPU in the
default processor set (0).
To verify which processor set a processor is in,
look at the
psed_id
field using the
pset_info(8) command.
See
pset_info(8)
for more information.
If you have CPUs installed in Quad Building Blocks that do not have memory installed, none of these CPUs can become the primary processor if you attempt to put the existing primary processor off line. The primary processor therefore cannot be put off line if the only active CPUs available are located in Quad-Building Blocks with no memory even if they are in the default processor set (0).
If a process has been specifically bound to execute on a CPU,
you must decide how to handle the process.
See
runon(1),
bind_to_cpu(3),
and
bind_to_cpu_id(3)
for more information.
If an OLAR operation is
attempted on that CPU, you will be notified by the OLAR utilities that processes
have been bound to the CPU prior to any operation being performed.
You may
choose to continue or cancel the OLAR operation.
By choosing to continue,
processes bound to a CPU will suspend their execution until such time that
the process is not bound, or the CPU is placed back on line.
Choosing to
put off line a CPU that has processes bound may cause detrimental consequences
to the application, depending upon the characteristics of the application.
If a process has been specifically bound to execute on a
Resource Affinity Domain (RAD) you must decide how to handle the process.
See
runon(1), and
rad_bind_pid(3)
for more information.
If an OLAR
operation is attempted on the last running CPU in the RAD, you will be notified
by the OLAR utilities that processes have been bound to the RAD and that
the last CPU in the RAD has been requested to be placed off line.
By choosing
to continue, processes bound to the RAD will suspend their execution until
such time that the process is unbound, or at least one CPU in the RAD is
placed on line.
Note that choosing to put off line the last CPU in a RAD
with processes bound may cause detrimental consequences to the application,
depending upon the characteristics of the application.
4.5 Component Removal Procedure
The process of removing a component consists of the following steps:
Use one of the appropriate management applications (the hwmgr
command or SysMan) to prepare for the removal of a component,
such as verifying the status of the CPU and ensuring that no user processes
are bound to it currently.
Any processes that are not specifically bound to
a CPU are migrated automatically to other running CPUs when the CPU is put
off line.
Also, any CPU with processes bound to a RAD of which this is the
last running CPU should not be put off line unless it is acceptable to suspend
processes that are bound to that RAD.
Use one of the appropriate management applications to take the component off line and remove power. See Section 4.5.1 for more information. When power is removed, the LED on the CPU module will illuminate yellow, indicating that the CPU module power is off and it is safe to remove.
Remove the component physically. The operating system automatically recognizes that the CPU module physically has been removed. There is no need to perform a scan operation to update the hardware configuration.
Before a CPU can be removed physically from the system, it must be placed off line and the power turned off, using any of the supported management applications described in the following sections. Processes queued for execution on a CPU that is to be placed off line simply are migrated to run-queues of other running (online) processors.
If another system administrator is actively managing the systems' processors,
you will get a warning message telling you to perform the operation at another
time.
4.5.1 Taking CPUs Off Line, Removing Power, or Both
You may want to take a CPU off line if it is suspected of potentially failing. Compaq Analyze proactively may indicate that a CPU is suspected of a potential failure by notifying the Component Indictment facility, which will create EVM events about the indictment. For information on component indictment, see Section 3.1.
A CPU that is placed off line will be persistently off line across reboots, by default. You optionally may set a CPU to be put on line at the next reboot.
On AlphaServer GS80, GS160, or GS320 systems or ES45 systems, any CPU can be placed off line as long as it is not the last CPU in the primary processor set. On other older SMP systems, any CPU except the primary CPU can be placed off line. If your system supports OLAR of CPUs, you also can turn the power off to allow for removal of the CPU.
If OLAR is not supported on your SMP system, the CPU may be placed off line, but may not have power turned off by the operating system. This will stop scheduling of processes on this processor and potentially avoid a kernel panic if the processor is experiencing uncorrectable errors.
If your SMP system does not support OLAR, the Manage CPUs application
will not offer you the opportunity to remove power from the CPU, and the
hwmgr
command will return an appropriate message if you attempt
to remove power from the CPU.
Attempts to use the
hwmgr
command to remove power from a CPU in a system that does not support OLAR
will not succeed and an error message will be displayed.
4.5.2 Taking CPUs Off Line, Removing Power, or Both Using SysMan Menu
For instructions on how to start the SysMan Menu, see the System Administration manual.
To take a CPU off line using the SysMan Menu, do the following:
Select Hardware.
Select Manage CPUs in the SysMan Menu application. Only one system administrator can put a CPU off line at any given time.
Select the CPU or the CPUs that you want to put off line. For instructions on selecting multiple CPUs, see the online help.
Select Modify ....
If the system does not support OLAR, select Off line. If the system supports OLAR, select one of the following:
Off line (powered off) - place the CPU off line and remove power
Off line (powered on) - place the CPU off line and keep the CPU supplied with power
By default, the CPU remains in the state you chose for subsequent system reboots. To have the CPU automatically go on line at the next system reboot, do the following:
Select Offline Options... in the Manage CPUs Modify dialog box.
Select the Bring selected CPUs on line at system reboot checkbox.
Select OK in the Offline Options dialog box.
Select OK to complete the offline operation.
See the Manage CPUs Online Help for additional information on performing
offline operations.
4.5.3 Taking CPUs Off Line, Removing Power, or Both Using SysMan Station
For instructions on how to start the SysMan Station, see the System Administration manual.
To take a CPU off line using the SysMan Station, do the following:
Select the Hardware View window.
Select a CPU icon and press MB1.
Select Manage CPUs from the Tools menu. Follow the steps in Section 4.5.2.
See the Manage CPUs Online Help for additional information on performing
offline operations.
4.5.4 Taking a CPU Off Line Using the hwmgr Command
To take a CPU Off line using the
hwmgr
command,
do the following:
Verify the status of the component. The access state of a CPU must be on line. Note the HWID number and name of the CPUs for use in later steps. Enter the following command:
# hwmgr -status component
                   STATUS   ACCESS                          INDICT
 HWID:  HOSTNAME   SUMMARY  STATE              STATE        LEVEL   NAME
------------------------------------------------------------------------------

.
.
.
   57:  wild-one            online             available            CPU0
   58:  wild-one   critical offline            available            CPU2
   59:  wild-one            online             available            CPU4
   60:  wild-one            online             available            CPU6
Enter either of the following commands to put the component off line:
# /usr/sbin/hwmgr
-offline
-name
cpu-name
# /usr/sbin/hwmgr
-offline
-id
HWID
If the component is unable to be put off line due to processes bound to the CPU, or if the processor is the last processor in the primary processor set, the command will notify you and suggest using the -force option after you assess the impact of putting the CPU off line.
Additional options of [-nosave] or [-force] can be used. The CPU [-nosave] option specifies that on the next system reboot the CPU will be brought back on line. The [-force] option forces a CPU off line if processes were identified as being bound to that CPU.
If you now want to remove power from the component, see Section 4.5.5.
4.5.5 Removing Power from CPUs Using the hwmgr Command
To remove power to an offline CPU using the
hwmgr
command, do the following:
Verify the status of the component. The access state of a CPU must be off line in order to remove power from it. If you need to take a CPU off line, see Section 4.5.4. Enter the following command to view the component status.
# hwmgr -status component
                   STATUS   ACCESS                          INDICT
 HWID:  HOSTNAME   SUMMARY  STATE              STATE        LEVEL   NAME
------------------------------------------------------------------------------

.
.
.
   57:  wild-one            online             available            CPU0
   58:  wild-one   critical offline            available            CPU2
   59:  wild-one            online             available            CPU4
   60:  wild-one            online             available            CPU6
To limit the view to only components that have a status summary value
other than
good, enter the command:
# hwmgr -status component -ngood
                   STATUS   ACCESS                          INDICT
 HWID:  HOSTNAME   SUMMARY  STATE              STATE        LEVEL   NAME
------------------------------------------------------------------------------

.
.
.
   58:  wild-one   critical offline            available            CPU2
Use the CPU's HWID value to verify if the CPU is able to have its power turned off. Enter the following command:
# hwmgr -get attribute -a capabilities -id 58
58:
  capabilities = 1
If the capabilities value is 1, the CPU is capable of having its power turned off. If the capabilities value is 0, the CPU cannot have its power turned off.
Enter either of the following commands to remove power to the component:
# /usr/sbin/hwmgr
-power off
-name
cpu-name
# /usr/sbin/hwmgr
-power off
-id
HWID
4.6 Component Addition Procedure
The process of inserting a CPU module component consists of the following steps:
Add the component physically. Select an available CPU slot in one of the configured Quad Building Blocks (QBB). If there are available slots in several QBBs, it is typically best to equally distribute the number of CPUs among the configured QBBs.
Insert the CPU module into the CPU slot. Ensure that you align the color-coded decal on the CPU module with the color-coded decal on the CPU slot. The LED on the CPU module will illuminate yellow, indicating that the CPU module's power is off. Note that the CPU will be recognized automatically by the operating system, even though it does not yet have power applied. There is no need to perform a scan operation for the operating system to identify the CPU module.
Warning
You should not add a component without referring to the component documentation, which contains important safety information and information on preventing static discharges that can destroy the component.
Use one of the appropriate management applications (the
hwmgr
command or SysMan) to apply power to the component and place
it on line.
See
Section 4.6.1
for more information.
When power is applied to the CPU, it will undergo a short self-test (7-10
seconds), after which the LED will illuminate green, indicating the CPU module
power is on and has passed its self-test.
When the CPU is placed on line,
the operating system will begin automatically to schedule and execute tasks
on this CPU.
Use one of the appropriate management applications to verify that the component is functioning properly. If the CPU is a replacement for one that has been indicted, be sure to clear the indictment after the component has been verified as functioning properly, as discussed in Section 3.1.5.
Newly inserted CPUs are recognized automatically by the operating system, even before their power is on. They cannot start scheduling and executing processes until the CPU has power on and is placed on line.
If another system administrator is actively managing the systems' processors, you will get an error message telling you to perform the operation at another time.
Warning
You must follow all safety procedures as documented in the hardware documentation accompanying the component. You also should consult the component replacement procedures in the service manual for your system. Failure to follow safety procedures could result in personal injury or could damage the component.
4.6.1 Putting CPUs On Line, Applying Power, or Both
You may place a CPU on line if its access state is off line
and its state is available.
This typically is done when a CPU is replaced
or newly installed.
4.6.2 Putting CPUs On Line, Applying Power, or Both Using SysMan Menu
For instructions on how to start the SysMan Menu, see the System Administration manual.
To put a CPU on line using the SysMan Menu, do the following:
Select Hardware.
Select Manage CPUs in the SysMan Menu application.
Select the CPU or the CPUs that you want to put on line.
Select Modify ....
If the system does not support OLAR, select On line. If the system supports OLAR, select one of the following:
On line - place the CPU on line and apply power if necessary
Off line (powered on) - apply power to the CPU but keep it off line
By default, the CPU will remain in the state you chose for subsequent system reboots.
Select OK to complete the operation.
See the Manage CPUs Online Help for additional information
on performing online operations.
4.6.3 Putting CPUs On Line, Applying Power, or Both Using SysMan Station
For instructions on how to start the SysMan Station, see the System Administration manual.
To put a CPU on line using the SysMan Station, do the following:
Select the Hardware View window.
Select a CPU icon and press MB1.
Select Manage CPUs from the Tools menu. Only one system administrator can place a CPU on line at any given time.
Follow the steps in Section 4.6.2.
See the Manage CPUs Online Help for additional information on performing
online operations.
4.6.4 Applying Power to CPUs with the hwmgr Command
To apply power to a CPU that is off line and has power off
using the
hwmgr
command, do the following:
Verify the status of the component. Note the ID number of the CPUs in the first column of the output. Enter the following command to view the status of the components:
# hwmgr -status component
                   STATUS   ACCESS                          INDICT
 HWID:  HOSTNAME   SUMMARY  STATE              STATE        LEVEL   NAME
------------------------------------------------------------------------------

.
.
.
   57:  wild-one            online             available            CPU0
   58:  wild-one   critical offline            available            CPU2
   59:  wild-one            online             available            CPU4
   60:  wild-one            online             available            CPU6
To limit the view to only components that have a status summary
value other than
good, enter the following command:
# hwmgr -status component -ngood
                   STATUS   ACCESS                          INDICT
 HWID:  HOSTNAME   SUMMARY  STATE              STATE        LEVEL   NAME
------------------------------------------------------------------------------

.
.
.
   58:  wild-one   critical offline            available            CPU2
Enter either of the following commands to apply power:
# /usr/sbin/hwmgr
-power on
-name
cpu-name
# /usr/sbin/hwmgr
-power on
-id
HWID
The CPU must be placed on line before the operating system
schedules processes to be run on the CPU.
If you want to bring the CPU on
line, see
Section 4.6.5
4.6.5 Putting a CPU On Line Using the hwmgr Command
To put a CPU on line using the
hwmgr
command, do the following:
Enter the following command to verify the status of the component:
# hwmgr -status component
                   STATUS   ACCESS                          INDICT
 HWID:  HOSTNAME   SUMMARY  STATE              STATE        LEVEL   NAME
------------------------------------------------------------------------------

.
.
.
   57:  wild-one            online             available            CPU0
   58:  wild-one   critical offline            available            CPU2
   59:  wild-one            online             available            CPU4
   60:  wild-one            online             available            CPU6
Enter either of the following commands to put the CPU on line:
# /usr/sbin/hwmgr
-online
-name
cpu-name
# /usr/sbin/hwmgr
-online
-id
HWID
4.7 Monitoring and Managing Components with SysMan Station
SysMan Station is a GUI based System Management application and is a central point from which to manage and monitor your system.
Use SysMan Station to monitor components such as CPUs. When viewing any system component, you can obtain detailed information on its properties or launch applications that enable you to perform administrative tasks on the component.
The SysMan Station cannot be used in a character cell user environment like the SysMan Menu. SysMan Station requires that your system support graphics capability.
The SysMan Station has extensive Online Help for using the application.
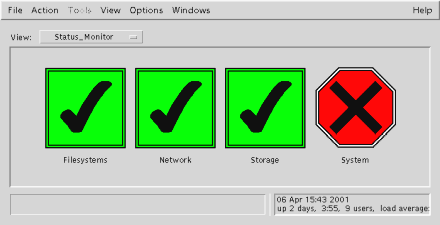
The Status view of the SysMan Station tells you the status of your system at a glance. The Status lights for each attention group can be green, yellow, or red. If an attention group has a green light, all is well for that part of the system. If an attention group has a yellow light, there has been an event indicating a warning for that group. A red light for one of the attention groups indicates a critical condition that requires attention. Figure 4-1 shows indicted components causing the System attention group to be red.
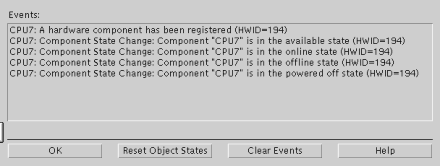
If a component is indicted, you can view recent events by double clicking on the System attention group. Figure 4-2 shows an example of state change events. You can double click on any of the events to see full information on the event.
To view the status of a component, in the Hardware View of SysMan Station, click on the component with MB3. A window will open. Select the Properties menu item to see the current status of the component, including all values discussed in Section 4.3.1 and indictment values. Figure 4-3 shows an example of the properties of a CPU.
