Tru64 UNIX offers several kernel-mode programming capabilities. This chapter describes the tasks that you can do in kernel mode:
Work with string routines (Section 5.1)
Use data copying routines (Section 5.2)
Use kernel-related routines (Section 5.3)
Manage system time (Section 5.4)
Use kernel threads (Section 5.5)
Use locks (Section 5.6)
This chapter discusses the routines most commonly used and provides
code fragments to illustrate how to call them in a kernel module.
These code fragments and associated descriptions
supplement the reference page descriptions for these and the other routines
presented in
Reference Pages, Section 9r, Device Drivers (Volume 1).
5.1 Using String Routines
String routines allow kernel modules to:
Compare two null-terminated strings (Section 5.1.1)
Compare two strings by using a specified number of characters (Section 5.1.2)
Copy a null-terminated character string (Section 5.1.3)
Copy a null-terminated character string with a specified limit (Section 5.1.4)
Return the number of characters in a null-terminated string (Section 5.1.5)
The following sections describe the routines that perform these tasks.
5.1.1 Comparing Two Null-Terminated Strings
To compare two null-terminated character strings, call the
strcmp
routine.
The following code fragment shows a call to
strcmp:
.
.
.
register struct device *device; struct controller *ctlr;
.
.
.
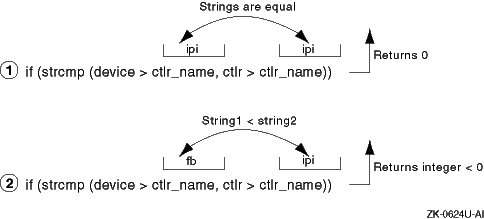
if (strcmp(device->ctlr_name, ctlr->ctlr_name)) { [1]
.
.
.
}
Shows that the
strcmp
routine takes two arguments:
The first argument specifies a pointer to a string (an array
of characters terminated by a null character).
In this example, this argument
is the controller name pointed to by the
ctlr_name
field
of the pointer to the
device
structure.
The second argument also specifies a pointer to a string.
In the example, this argument is the controller name pointed to by the
ctlr_name
field of the pointer to the
controller
structure.
The code fragment sets up a condition statement that performs tasks
that are based on the results of the comparison.
Figure 5-1
shows how
strcmp
compares two sample character-string values
in the code fragment.
In item 1,
strcmp
compares the two
controller names and returns the value 0 (zero) because the two strings were
identical.
In item 2,
strcmp
returns an integer that is less
than zero because the lexicographical comparison indicates that the characters
in the first controller name,
fb, come before the letters
in the second controller name,
ipi.
In other words, the
first pair of letters--in the same position in both strings--that
do not match are
f
and
i, and
f
is less than
i.
Figure 5-1: Results of the strcmp Routine
5.1.2 Comparing Two Strings by Using a Specified Number of Characters
To compare two strings by using a specified number of characters, call
the
strncmp
routine.
The following code fragment shows a call to
strncmp:
.
.
.
register struct device *device;
.
.
.
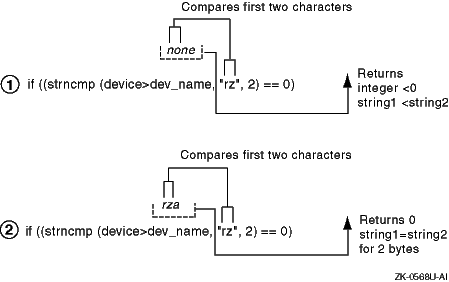
if( (strncmp(device->dev_name, "rz", 2) == 0)) [1]
.
.
.
Shows that the
strncmp
routine takes three arguments:
The first argument specifies a pointer to a string.
In the
example, this argument is the device name pointed to by the
dev_name
field of the pointer to the
device
structure.
The second argument also specifies a pointer to a string.
In the example, this argument is the character string
rz.
The third argument specifies the number of bytes to be compared. In the example, the number of bytes to compare is 2.
The code fragment sets up a condition statement that performs tasks
that are based on the results of the comparison.
Figure 5-2
shows how
strncmp
compares two sample character-string
values in the code fragment.
In item 1,
strncmp
compares
the first two characters of the device name
none
with the
string
rz.
It then returns an integer less than the value
0 (zero), because
strncmp
makes a lexicographical comparison
between the two strings and the string
no
comes before
the string
rz.
In item 2,
strncmp
compares
the first two characters of the device name
rza
with the
string
rz
and returns the value 0 (zero), because
strncmp
makes a lexicographical comparison between the two strings
and the string
rz
is equal to the string
rz.
Figure 5-2: Results of the strncmp Routine
5.1.3 Copying a Null-Terminated Character String
To copy a null-terminated character string, call the
strcpy
routine.
The following
code fragment shows a call to
strcpy:
.
.
.
struct tc_slot  tc_slot[TC_IOSLOTS]; [1]
char curr_module_name[TC_ROMNAMLEN + 1]; [2]

.
.
.
strcpy(tc_slot[i].modulename, curr_module_name); [3]

.
.
.
Declares an array of
tc_slot
structures
of size
TC_IOSLOTS.
[Return to example]
Declares a variable to store the module name from the ROM of a device on the TURBOchannel bus. [Return to example]
Shows that the
strcpy
routine takes two
arguments:
The first argument specifies a pointer to a buffer large enough
to hold the string to be copied.
In the example, this buffer is the
modulename
field of the
tc_slot
structure for
the specified bus.
The second argument specifies a pointer to a string. This is the string to be copied to the buffer that the first argument specifies. In the example, this is the module name from the ROM, which is stored in the curr_module_name variable.
Figure 5-3
shows how
strcpy
copies a sample value in the code fragment.
The routine copies
the string
CB
(the value that is contained in
curr_module_name) to the
modulename
field
of the
tc_slot
structure for the specified bus.
This field
is presumed large enough to store the character string.
The
strcpy
routine returns the pointer to the location following the end of
the destination buffer.
Figure 5-3: Results of the strcpy Routine

5.1.4 Copying a Null-Terminated Character String with a Specified Limit
To copy a null-terminated character string with a specified limit, call
the
strncpy
routine.
The following code fragment shows a call to
strncpy:
.
.
.
register struct device *device; char * buffer;
.
.
.
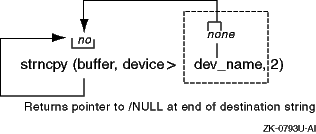
strncpy(buffer, device->dev_name, 2); [1] if (buffer == somevalue)
.
.
.
Shows that
strncpy
takes three arguments:
The first argument specifies a pointer to a buffer of at least the same number of bytes as specified in the third argument. In the example, this is the pointer to the buffer variable.
The second argument specifies a pointer to a string.
This
is the character string to be copied and in the example is the value pointed
to by the
dev_name
field of the pointer to the
device
structure.
The third argument specifies the number of characters to copy, which in the example is two characters.
The code fragment sets up a condition statement that performs some tasks that are based on the characters stored in the pointer to the buffer variable.
Figure 5-4
shows how
strncpy
copies a sample value in the code fragment.
The routine
copies the first two characters of the string
none
(the
value pointed to by the
dev_name
field of the pointer to
the
device
structure).
The
strncpy
routine
stops copying after it copies a null character or the number of characters
that are specified in the third argument, whichever comes first.
The figure also shows that
strncpy
returns a pointer
to the /NULL character at the end of the first string (or to the location
following the last copied character if there is no NULL).
The copied string
will not be null terminated if its length is greater than or equal to the
number of characters that are specified in the third argument.
Figure 5-4: Results of the strncpy Routine
5.1.5 Returning the Number of Characters in a Null-Terminated String
To return the number of characters in a null-terminated character string,
call the
strlen
routine.
The following code fragment shows a call to
strlen:
.
.
.
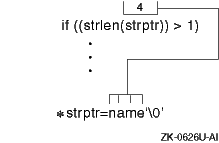
char *strptr;
.
.
.
if ((strlen(strptr)) > 1) [1]
Shows that the
strlen
routine takes one
argument: a pointer to a string.
In the example,
this pointer is the variable
strptr.
[Return to example]
The code fragment sets up a condition statement that performs some tasks
that are based on the length of the string.
Figure 5-5
shows how
strlen
determines the number of characters in
a sample string in the code fragment.
As the figure shows,
strlen
returns the number of characters that the
strptr
variable points to, which in the code fragment is four.
The
strlen
routine does not count the terminating null character.
Figure 5-5: Results of the strlen Routine
5.2 Using Data Copying Routines
The data copying routines allow kernel modules to:
Copy a series of bytes with a specified limit (Section 5.2.1)
Zero a block of kernel memory (Section 5.2.2)
Zero a block of memory in user space (Section 5.2.3)
Copy data from user address space to kernel address space (Section 5.2.4)
Copy data from kernel address space to user address space (Section 5.2.5)
Move data between user virtual space and system virtual space (Section 5.2.6)
The following sections describe the routines that perform these tasks.
5.2.1 Copying a Series of Bytes with a Specified Limit
To copy a series of bytes with a specified limit, call the
bcopy
routine.
The following code fragment shows
a call to
bcopy:
.
.
.
struct tc_slot tc_slot[TC_IOSLOTS]; [1]
.
.
.
char *cp; [2]
.
.
.
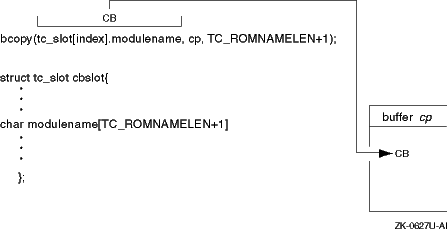
bcopy(tc_slot[index].modulename, cp, TC_ROMNAMLEN + 1); [3]
.
.
.
Declares an array of
tc_slot
structures
of size
TC_IOSLOTS.
[Return to example]
Declares a pointer to a buffer that stores the bytes of data that are copied from the first argument. [Return to example]
Shows that the
bcopy
routine takes three
arguments:
The first argument is a pointer to a byte string (array of
characters).
In the example, this array is the
modulename
field of the
tc_slot
structure for this bus.
The second argument is a pointer to a buffer that is at least the size that is specified in the third argument. In the example, this buffer is represented by the pointer to the cp variable.
The third argument is the number of bytes to be copied.
In
the example, the number of bytes is the value of the constant
TC_ROMNAMLEN
plus 1.
Figure 5-6
shows how
bcopy
copies a series of bytes by using a sample value in the code fragment.
As the figure shows,
bcopy
copies the characters
CB
to the buffer
cp
without searching
for null bytes.
The copy is nondestructive; that is, the address ranges of
the first two arguments can overlap.
Figure 5-6: Results of the bcopy Routine
5.2.2 Zeroing a Block of Memory in Kernel Address Space
To zero a block of memory in kernel address space, call the
bzero
routine.
The following code fragment shows a call
to
bzero.
.
.
.
struct bus *new_bus

.
.
.
bzero(new_bus, sizeof(struct bus)); [1]

.
.
.
Shows that the
bzero
routine takes two arguments:
The first argument is a kernel address at which the zeroing
operation starts.
In the example, the first argument is a pointer to a
bus
structure.
The second argument is the number of bytes to be zeroed.
In
the example, this size is expressed through the use of the
sizeof
operator, which returns the size of a
bus
structure.
In the example,
bzero
is used to zero the number
of bytes that are associated with the size of the
bus
structure,
starting at the address specified by
new_bus.
5.2.3 Zeroing a Block of Memory in User Address Space
To zero a block of memory in user address space, call the
uzero
routine.
The following code fragment shows a call
to
uzero.
.
.
.
void *user_addr
size_t cnt;

.
.
.
int err;

.
.
.
if (err = uzero(user_addr, cnt)) [1]

.
.
.
Shows that the
uzero
routine takes two arguments:
The first argument is a user address at which the zeroing operation starts.
The second argument is the number of bytes to be zeroed.
In the example,
uzero
is used to zero
cnt
bytes starting at address
user_addr.
It returns
the value 0 (zero) upon successful completion.
If the address in user address
space cannot be accessed,
uzero
returns the error
EFAULT.
5.2.4 Copying Data from User Address Space to Kernel Address Space
To copy data from the unprotected user address space to the protected
kernel address space, call the
copyin
routine.
The following code fragment shows
a call to
copyin:
.
.
.
struct buf *bp; int err; void* buff_addr; void* kern_addr;
.
.
.
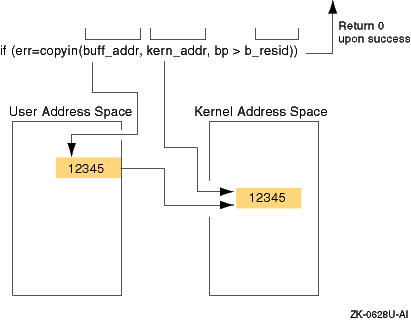
if (err = copyin(buff_addr, kern_addr, bp->b_resid)) { [1]
.
.
.
Shows that the
copyin
routine takes three
arguments:
The first argument specifies the address in user space of the data to be copied. In the example, this address is the user buffer's address.
The second argument specifies the address in kernel space to which to copy the data. In the example, this address is the address of the kernel buffer.
The third argument specifies the number of bytes to copy.
In the example, the number of bytes is contained in the
b_resid
field of the pointer to the
buf
structure.
The code fragment sets up a condition statement that performs tasks
that are based on whether
copyin
executes successfully.
Figure 5-7
shows how
copyin
copies data from user address space to kernel address space by using sample
data.
As
Figure 5-7
shows,
copyin
copies the data from the unprotected user address space (specified
by
buff_addr) to the protected kernel address space
(specified by
kern_addr).
The
b_resid
field indicates the number of bytes.
The figure also shows that
copyin
returns the value 0 (zero) upon successful completion.
If
the address in user address space cannot be accessed,
copyin
returns the error
EFAULT.
Figure 5-7: Results of the copyin Routine
5.2.5 Copying Data from Kernel Address Space to User Address Space
To copy data from the protected kernel address space to the unprotected
user address space, call the
copyout
routine.
The following
code fragment shows a call to
copyout:
.
.
.
register struct buf *bp; int err; void * buff_addr; void * kern_addr;
.
.
.
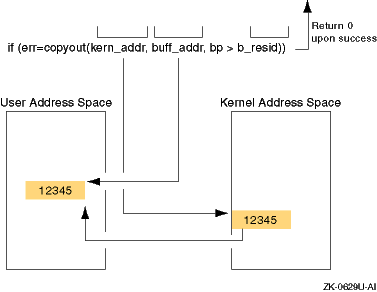
if (err = copyout(kern_addr,buff_addr,bp->b_resid)) { [1]
.
.
.
Shows that the
copyout
routine takes three
arguments:
The first argument specifies the address in kernel space of the data to be copied. In the example, this address is the kernel buffer's address, which is stored in the kern_addr argument.
The second argument specifies the address in user space to which to copy the data. In the example, this address is the user buffer's virtual address, which is stored in the buff_addr argument.
The third argument specifies the number of bytes to copy.
In the example, the number of bytes is contained in the
b_resid
field of the pointer to the
buf
structure.
Figure 5-8
shows the results of
copyout, based on the code fragment.
As the figure shows,
copyout
copies the data from the protected kernel address space
(specified by
kern_addr) to the unprotected user
address space (specified by
buff_addr).
The number
of bytes is indicated by the
b_resid
field.
The figure
also shows that
copyout
returns the value 0 (zero) upon
successful completion.
If the address in kernel address space cannot be accessed
or if the number of bytes to copy is invalid,
copyout
returns
the error
EFAULT.
Figure 5-8: Results of the copyout Routine
5.2.6 Moving Data Between User Virtual Space and System Virtual Space
To move data between user virtual space and system virtual space, call
the
uiomove
routine.
The following code fragment shows
a call to
uiomove:
.
.
.
struct uio *uio;
void * kern_addr;
int err;
long cnt;

.
.
.
err = uiomove(kern_addr,cnt,uio); [1]

.
.
.
Shows that the
uiomove
routine takes three
arguments:
The first argument specifies a pointer to the kernel buffer in system virtual space.
The second argument specifies the number of bytes of data to be moved. In this example, the number of bytes to be moved is stored in the cnt variable.
The third argument specifies a pointer to a
uio
structure.
This structure describes the current position within a logical
user buffer in user virtual space.
The kernel-related routines allow kernel modules to:
Print text to the console and error logger (Section 5.3.1)
Put a calling process to sleep (Section 5.3.2)
Wake up a sleeping process (Section 5.3.3)
Initialize a timer (callout) queue element (Section 5.3.4)
Remove the scheduled routine from the timer queues (Section 5.3.5)
Set the interrupt priority mask (Section 5.3.6)
Allocate memory (Section 5.3.7)
The following sections describe the routines that perform these tasks.
5.3.1 Printing Text to the Console and Error Logger
To print text to the console terminal and the error logger, call the
printf
routine.
The kernel
printf
routine is
a scaled-down version of the C library
printf
routine.
The
printf
routine prints diagnostic information directly
on the console terminal and writes ASCII text to the error logger.
Because
printf
is not interrupt driven, all system activities are suspended
when you call it.
Only a limited number of characters (currently 128) can
be sent to the console display during each call to
printf
because the characters are formatted into a fixed-size buffer whose address
may be handed off to the primary CPU for console output.
If more than 128
characters are generated in a single call to
printf, all
characters following the first 128 will be discarded.
If you need to see the results on the console terminal, limit the message
size to the maximum of 128 whenever you send a message from within the module.
However,
printf
also stores the messages in an error log
file.
You can use the
uerf
command to view the text of
this error log file.
See the
printf(9)
reference page for this command.
The
messages are easier to read if you use
uerf
with the
-o
terse
option.
The following code fragment shows a call to this routine:
.
.
.
printf("CBprobe ctlr = %8x\n",ctlr);

.
.
.
The code example shows a typical use for the
printf
routine in the debugging of kernel modules.
In
the example,
printf
takes two arguments:
The first argument specifies a pointer to a string that contains
two types of objects.
One object is ordinary characters such as, ``hello,
world,'' which are copied to the output stream.
The other object is a conversion
specification, such as %d.
(Supported conversion specifications include %c,
%d, %ld, %lx, %o, %s, and %x.
See
printf(9)
for explanations of these specifications.)
The second argument specifies the value to be formatted in
place of the
%8x
specifier in the format string.
In this
example, the argument is
ctlr.
The operating system also supports the
uprintf
routine.
The
uprintf
routine prints to the current user's terminal.
Never have interrupt service routines call
uprintf.
Do
not use this routine to print verbose messages.
The
uprintf
routine does not log messages to the error logger.
5.3.2 Putting a Calling Process to Sleep
To put a calling process to sleep in a symmetric multiprocessing (SMP)
environment, call the
mpsleep
routine.
The
mpsleep
routine blocks the current kernel thread until a wakeup is issued
(see
Section 5.3.3).
Generally, kernel modules call this routine to wait for the transfer
to complete an interrupt from the device.
That is, the
write
routine of the kernel module sleeps on the address of a known location, and
the device's interrupt service routine wakes the process when the device interrupts.
The wakened process determines whether the condition for which it was sleeping
has been removed.
The following code fragment shows a call to this routine:
.
.
.
mpsleep((vm_offset_t)&sc->error_recovery_flag, PCATCH,
         "ftaerr", 0, &sc->lk_fta_kern_str,
          MS_LOCK_SIMPLE | MS_LOCK_ON_ERROR))[1]

.
.
.
Calls the
mpsleep
routine to block the current
kernel thread.
The
mpsleep
routine takes several arguments:
The
channel
argument specifies an address
to associate with the calling kernel thread to be put to sleep.
In this example,
the address (or event) associated with the current kernel thread is stored
in the
error_recovery_flag
field.
The
pri
argument specifies whether the
sleep request is interruptible.
Setting this argument to the
PCATCH
flag causes the process to sleep in an interruptible state (that
is, the kernel thread can take asynchronous signals).
Not setting the
PCATCH
flag causes the process to sleep in an uninterruptible state
(that is, the kernel thread cannot take asynchronous signals).
The
wmesg
argument specifies the wait message.
In this call,
fta_error_recovery
passes the string
ftaerr.
The
timo
argument specifies the maximum
amount of time that the kernel thread should block.
If you pass the value
0 (zero),
mpsleep
assumes there is no timeout.
The
lockp
argument specifies a pointer
to a simple or complex lock.
You pass a simple or complex lock structure pointer
if you want to release the lock.
Pass the value 0 (zero) if you do not want
to release the lock.
The
flags
argument specifies the lock type.
You can pass the bitwise inclusive OR of the valid lock bits defined in
/usr/sys/include/sys/param.h.
.
5.3.3 Waking Up a Sleeping Process
To wake up all processes that are sleeping on a specified address, call
the
wakeup
routine.
The following code fragment shows a
call to this routine:
.
.
.
wakeup(&ctlr->bus_name); [1]

.
.
.
Shows that the
wakeup
routine takes one
argument:
the address on which the wakeup is to be
issued.
In the example, this address is the bus name for the bus to which
this controller is connected.
This address was specified in a previous call
to the
mpsleep
routine.
All processes that are sleeping
on this address are awakened.
[Return to example]
To initialize a timer queue element, call the
timeout
routine.
The following code fragment shows a call to this routine:
.
.
.
#define NONEIncSec  1

.
.
.
cb = &none_unit[unit];

.
.
.
timeout(noneincled, (caddr_t)none, NONEIncSec*hz); [1]

.
.
.
Shows that the
timeout
routine takes three
arguments:
The first argument specifies a pointer to the routine to be
called.
In the example,
timeout
will call the
noneincled
routine on the interrupt stack (not in processor context)
as dispatched from the
softclock
routine.
The second argument specifies a single argument to be passed
to the called routine.
In the example, this argument is the pointer to the
NONE
device's
none_unit
data structure.
This
argument is passed to the
noneincled
routine.
Because the
data types of the arguments are different, the code fragment performs a type-casting
operation that converts the argument type to be of type
caddr_t.
The third argument specifies the amount of time to delay before
calling the specified routine.
You express time as
ticks
of the system clock.
To obtain a particular time in seconds,
you multiply the number of ticks times
hz
(hz
contains the number of ticks per second).
In the example, the constant
NONEIncSec
is used
with the
hz
global variable to determine the amount
of time before
timeout
calls
noneincled.
The global variable
hz
contains the number of clock
ticks per second.
This variable is a second's worth of clock ticks.
The example
illustrates a 1-second delay.
To remove the scheduled routines from the timer queue, call the
untimeout
routine.
The following code fragment shows a call to this
routine:
.
.
.
untimeout(noneincled, (caddr_t)none); [1]

.
.
.
Shows that the
untimeout
routine takes two
arguments:
The first argument specifies a pointer to the routine to be
removed from the timer queue.
In the example,
untimeout
removes the
noneincled
routine from the timer queue.
This
routine was placed on the timer queue in a previous call to the
timeout
routine.
The second argument specifies a single argument to be passed
to the called routine.
In the example, this argument is the pointer to the
NONE
device's
none_unit
data structure.
It matches
the parameter that was passed in a previous call to
timeout.
Because the data types of the arguments are different, the code fragment performs
a type-casting operation that converts the argument type to be of type
caddr_t.
The two arguments uniquely identify which timeout entry to remove.
This
is useful if more than one thread has called
timeout
with
the same routine argument.
[Return to example]
To set the interrupt priority level (IPL) mask to a specified level,
call one of the
spl
routines.
Table 5-1
summarizes the uses for the different
spl
routines.
Table 5-1: Uses for spl Routines
| spl Routine | Meaning |
splextreme |
Highest priority; blocks everything except halt interrupts (for example, realtime devices, machine checks, and so forth). |
splrt |
Blocks realtime devices but allows machine checks and halt interrupts. |
splclock |
Masks all hardware clock and lower-level interrupts. |
splhigh |
Masks all interrupts except clock interrupts, realtime devices, machine checks, and halt interrupts. |
spldevhigh |
Masks all device and software interrupts. |
splbio |
Masks all disk and tape controller interrupts. |
splimp |
Masks all LAN hardware interrupts. |
splvm |
Masks all interrupts that affect virtual memory operations. |
splnet |
Masks all network software interrupts. |
splsoftclock |
Masks all software clock interrupts. |
splx |
Resets the CPU proirity to the level specified by the argument. |
splnone |
Unmasks (enables) all interrupts. |
The
spl
routines set the CPU priority to various
interrupt levels.
The current CPU priority level determines which types of
interrupts are masked (disabled) and which are unmasked (enabled).
Historically,
seven levels of interrupts were supported, with eight different
spl
routines to handle the possible cases.
For example, calling
spl0
unmasked all interrupts and calling
spl7
masked all interrupts.
Calling an
spl
routine between 0
and 7 masked all interrupts at that level and at all lower levels.
Specific interrupt levels were assigned for different device types. For example, before it handled a given interrupt, a kernel module set the CPU priority level to mask all other interrupts of the same level or lower. This setting meant that the kernel module could be interrupted only by interrupt requests from devices of a higher priority.
The operating system currently supports the naming of
spl
routines to indicate the associated device types.
Named
spl
routines make it easier to determine which routine to use to set the priority
level for a given device type.
The following code fragment shows the use of
spl
routines as part of a disk
strategy
routine:
.
.
.
int s;

.
.
.
s = splbio(); [1]

.
.
.
[Code to deal with data that can be modified by the disk interrupt
code]
splx(s); [2]

.
.
.
Calls the
splbio
routine to mask (disable)
all disk interrupts.
This routine does not take an argument.
[Return to example]
Calls the
splx
routine to reset the CPU
priority to the level that the
s
argument specifies.
The argument associated with
splx
is a CPU priority level,
which in the example is the value that
splbio
returns.
(The
splx
routine is the only one of the
spl
routines that takes an argument.) Upon successful completion, each
spl
routine returns an integer value that represents the CPU priority
level that existed before it was changed by a call to the specified
spl
routine.
[Return to example]
A kernel module may need to declare a significant number of data structures to contain a large amount of data. For example, a kernel module that is a device driver may need to support a large number of disks and controllers. Statically allocating the maximum number of data structures wastes space. Dynamically allocating memory for the required data structures is a better use of system resources, especially when working with temporary or transient data.
To dynamically allocate memory, you need to:
Use the
MALLOC
macro to allocate the data
structures
Use the
FREE
macro to free up the dynamically
allocated data structures
The following sections describe these steps.
5.3.7.1 Allocating Data Structures with MALLOC
Use the
MALLOC
macro to dynamically allocate a variable-size
section of kernel virtual memory.
The
MALLOC
macro maintains
a pool of preallocated memory for quick allocation and returns the address
of the allocated memory.
The
MALLOC
macro is actually a
wrapper that calls
malloc.
Do not allow a kernel module
to directly call the
malloc
routine.
The syntax for the
MALLOC
macro is as follows:
MALLOC(
       addr,
       cast,
       u_long size,
       int type,
       int flags );
Call the
MALLOC
macro with the following parameters:
addrSpecifies the memory location
that points to the allocated memory.
You specify the
addr
argument's data type in the
cast
argument.
castSpecifies the data type
of the
addr
argument and the type of the memory pointer
that
MALLOC
returns.
sizeSpecifies the size in bytes of the memory to allocate. Typically, you pass the size as a constant to speed up the memory allocation.
typeSpecifies the purpose
for which the memory is being allocated.
The memory types are defined in the
file
sys/malloc.h.
Typically, kernel modules use the constant
M_DEVBUF
to indicate that kernel module memory is being allocated
(or freed).
flagsSpecifies one of the
following flag constants that are defined in
/usr/sys/include/sys/malloc.h:
M_WAITOKAllocates memory from
the virtual memory subsystem if there is not enough memory in the preallocated
pool.
This constant signifies that
MALLOC
can block.
M_NOWAITDoes not allocate
memory from the virtual memory subsystem if there is not enough memory in
the preallocated pool.
This constant signifies that
MALLOC
cannot block.
M_NOWAIT
must be used when calling
MALLOC
from an interrupt context or if the caller is holding a simple
lock.
Otherwise, a system panic will occur.
M_ZEROAllocates zero-filled
memory.
You pass this bit value
OR'd with
M_WAITOK
or
M_NOWAIT.
The following example illustrates how to allocate memory using the
MALLOC
macro:
 struct foo *foo1;
 struct foo *foo2;
 struct bar *bar[];

.
.
.
MALLOC(foo1, struct foo *, sizeof(struct foo),
  M_DEVBUF, M_NOWAIT|M_ZERO);[1]

 if (!foo1) {

.
.
.
return;[2]
 }

.
.
.
MALLOC(foo2, struct foo *,
     nfoo * sizeof(struct foo), M_DEVBUF,
     M_WAITOK|M_ZERO);[3]

.
.
.
MALLOC(bar, struct bar **,
     nbar * sizeof(struct bar *), M_DEVBUF,
     M_WAITOK|M_ZERO);[4]

.
.
.
MALLOC(bar[1], struct bar *, sizeof(struct bar),
    M_DEVBUF, M_WAITOK|M_ZERO);[5]
Allocates a single data structure. [Return to example]
Because
M_NOWAIT
is specified, examines
the return value to determine whether the allocation failed.
[Return to example]
Allocates an array of structures with
nfoo
elements.
[Return to example]
Allocates an array of pointers to structures. [Return to example]
Allocates a structure to the second element of
bar.
[Return to example]
When a block of memory that is allocated through
MALLOC
is no longer needed it, free it back to the system using the
FREE
macro.
The
FREE
macro takes two arguments:
The first argument specifies the memory pointer that points
to the allocated memory to be freed.
You must have previously set this argument
in the call to
MALLOC.
The second argument specifies the purpose for which the memory
is being allocated.
The memory types are defined in the file
/usr/sys/include/sys/malloc.h.
Typically, kernel modules that are device drivers use the constant
M_DEVBUF
to indicate that memory is being allocated (or freed).
The following example shows how to use the
FREE
macro:
 FREE(foo1, M_DEVBUF);

 /*
  * Free the second element from the array of pointers
  */
 FREE(bar[1], M_DEVBUF);
 bar[1] = NULL;
This section describes considerations for working with system time. Information in this section explains the following concepts:
Understanding system time concepts (Section 5.4.1)
Fetching time (Section 5.4.2)
Modifying a timestamp (Section 5.4.3)
Enabling an application to convert time to a string (Section 5.4.4)
Delaying a routine a specified number of microseconds (Section 5.4.5)
5.4.1 Understanding System Time Concepts
This section discusses concepts for working with system time:
How a kernel module fetches or modifies time
How time is created
5.4.1.1 How a Kernel Module Uses Time
Kernel modules can save timestamps that can be passed to applications on request for many purposes. For example:
When a bus was last scanned
When the last error on a disk occurred
When the last interrupt for the some device (for example, a line printer) occurred
When the system booted
When the file system was mounted on a particular disk
The application then needs to print the date and time. Your kernel module code must determine several things for each timestamp that it wants to preserve:
When it needs to fetch time
Whether or not the time value that was fetched needs modification to reflect accurate time
How to pass the time value to the application
5.4.1.2 How Is System Time Created?
System time, which is platform-dependent, is defined as ticks of the system clock, measured as units of hertz (hz). The operating system makes system time available to kernel modules. The representation of system time is not based on the current calendar time of day because the actual time value does not become available to the operating system until you are partially through the boot sequence.
From the beginning of a boot sequence to dispatch point
CFG_PT_TOPOLOGY_CONF, the operating system time value is 0 (zero).
In Tru64 UNIX,
zero is equivalent to January 1, 1970, 00:00:00, UTC.
At dispatch point
CFG_PT_TOPOLOGY_CONF, the operating system begins incrementing system
time from zero.
Later, at the dispatch point
CFG_PT_ROOT_FS_AVAIL, system time is set to the actual time of day.
The time between
CFG_PT_TOPOLOGY_CONF
and
CFG_PT_ROOT_FS_AVAIL
is called the
boot delta.
Figure 5-9
illustrates these concepts.
Figure 5-9: When Time Becomes Available During a System Boot
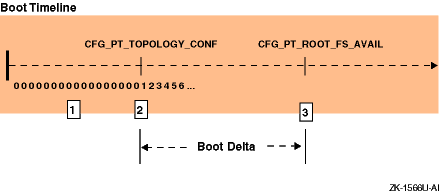
At the start of a boot sequence, the value is 0 (zero).
At
CFG_PT_TOPOLOGY_CONF, the kernel starts
incrementing time.
The initial date and time is recorded as 00:00:00 UTC 1
Jan 1970 (the Epoch).
At
CFG_PT_ROOT_FS_AVAIL, the kernel sets
the time to the correct calendar date and time.
If your kernel module fetches time before
CFG_PT_ROOT_FS_AVAIL
is reached, the time value it fetches is incorrect and you will
need to modify that timestamp later (see
Section 5.4.3).
5.4.2 Fetching System Time
A kernel module decides when to fetch system time.
When it performs
a fetch operation, it also needs a way to fetch system time.
The
TIME_READ
macro provides a way for your kernel module to fetch the
current time.
The following code fragment shows how to use this macro in your
kernel module:
#include <sys/time.h>[1]

.
.
.
extern struct timeval time;[2]

.
.
.
{   struct timeval my_time;[3]

.
.
.
TIME_READ(my_time);[4]
Includes the
time.h
header file.
[Return to example]
Declares the global time variable as external. [Return to example]
Declares your own storage for your timestamp. [Return to example]
Fetches the current time and stores it in your own time variable
using the
TIME_READ
macro.
TIME_READ
takes one parameter, which specifies the memory location to store the current
time.
Its type is
struct timeval.
[Return to example]
If your kernel module fetches time before the operating system sets
the current time at
CFG_PT_ROOT_FS_AVAIL, you must modify
the timestamp you fetched and stored.
For example, assume your kernel module
keeps track of when it last scanned the bus.
Because scanning the bus takes
place prior to
CFG_PT_ROOT_FS_AVAIL, the fetched time is
interpreted as approximately Jan.
1, 1970, 00:00:00.
(This is because time
was not set to the proper value when you fetched it.) The global variable
bootdelta
keeps track of how many seconds and microseconds have
been counted between the two configuration points.
To modify a timestamp, perform these steps:
Register a callback for
CFG_PT_ROOT_FS_AVAIL
in your kernel module.
Use the following algorithm to modify the timestamp:
Subtract the number of seconds (tv_sec)
and microseconds (tv_usec) that were counted before time
was set to the actual time.
Add the number of seconds and microseconds that were counted to the point where the kernel module fetched time.
The following code example subtracts
bootdelta
seconds
and adds
my_time
seconds:
#include <sys/time.h>

.
.
.
extern struct timeval bootdelta;

.
.
.
struct timeval temp_time;
  TIME_READ(temp_time);[1]

.
.
.
temp_time.tv_sec -= (bootdelta.tv_sec - my_time.tv_sec);[2]

   if (bootdelta.tv_usec > temp_time.tv_usec) {
    temp_time.tv_usec = 1000000 -
      (bootdelta.tv_usec - temp_time.tv_usec);
    temp_time.tv_sec--;
  } else {
    temp_time.tv_usec -= bootdelta.tv_usec;[3]
  }

.
.
.
temp_time.tv_usec += my_time.tv_usec;[4]

    if (temp_time.tv_usec >= 1000000) {
      temp_time.tv_usec -= 1000000;
      temp_time.tv_sec++;[5]
  }

.
.
.
my_time = temp_time;[6]
Obtains the current time, which is set to the actual time of day. [Return to example]
Subtracts
bootdelta
seconds from the current
time and adds the number of seconds in the timestamp.
[Return to example]
Subtracts
bootdelta
microseconds; make sure
its value is not negative.
[Return to example]
Adds
my_time
microseconds.
[Return to example]
Fixes any microseconds that may have wrapped. [Return to example]
Stores the results into the time variable. [Return to example]
A user application can receive a timestamp from a kernel module in a
variety of ways.
The standard way is for a kernel module to pass a timestamp
to the application as a
struct timeval.
For an application to convert the timestamp it received from the kernel
module, it uses the
ctime
function that is defined in
/usr/include/sys/time.h.
This function converts time values between
tm
structures,
time_t
type variables, and strings.
The
ctime
function expresses time in units by converting
the
time_t
variable, to which thetimer
parameter points, into a string with the 5-field format.
The
time_t
variable, which also defined in
/usr/include/sys/time.h, contains the number of seconds since the Epoch, 00:00:00 UTC
1 Jan 1970.
For example:
Tue Jul 11 15:37:29 2000
For more information on converting timestamps to strings, see the reference
page for
ctime(3) .
5.4.5 Delaying the Calling Routine a Specified Number of Microseconds
To delay the calling routine a specified number of microseconds, use
the
DELAY
macro.
The following code fragment shows how
to use this macro:
.
.
.
DELAY(10000) [1]

.
.
.
Shows that the
DELAY
macro takes one argument:
the number of microseconds for the calling thread to spin.
The
DELAY
macro delays the routine by a specified
number of microseconds.
DELAY
spins while it waits for
the specified number of microseconds to pass before continuing execution.
The example shows a 10000-microsecond (10-millisecond) delay.
The range of
delays is system dependent, due to its relation to the granularity of the
system clock.
The system defines the number of clock ticks per second in the
hz
variable.
Specifying any value smaller than 1/hz to the
DELAY
macro results in an unpredictable delay.
For any delay value,
the actual delay may vary by plus or minus one clock tick.
We do not recommend using the
DELAY
macro because
the processor will be consumed for the specified time interval and therefore
will be unavailable to service other threads.
In cases where kernel modules
need timing mechanisms, use the
sleep
and
timeout
routines instead of the
DELAY
macro.
The most
common usage of the
DELAY
macro is in the system boot path.
Using
DELAY
in the boot timeline is often acceptable because
there are no other threads in contention for the processor.
[Return to example]
A kernel thread is a single sequential flow of control within a kernel module or other systems-based program. The kernel module or other systems-based program makes use of the routines (instead of a threads library package such as Posix Threads Library) to start, terminate, and delete threads, and to perform other kernel thread operations.
Kernel threads execute within (and share) a single address space. Therefore, kernel threads read and write to the same memory locations.
You use kernel threads to improve the performance of a kernel module. Multiple kernel threads are useful in a multiprocessor environment, where kernel threads run concurrently on separate CPUs. However, multiple kernel threads also improve kernel module performance on single-processor systems by permitting the overlap of input, output, or other slow operations with computational operations.
Kernel threads allow kernel modules to perform other useful work while
waiting for a device to produce its next event, such as the completion of
a disk transfer or the receipt of a packet from the network.
For more information
on using kernel threads, see
Chapter 9.
5.6 Using Locks
In a single-processor environment, kernel modules need not protect the integrity of a resource from activities that result from the actions of another CPU. However, in a symmetric multiprocessing (SMP) environment, the kernel module must protect (lock) the resource from multiple CPU access to prevent corruption. A resource, from the kernel module's standpoint, is data that more than one kernel thread can manipulate. Locks are the mechanism for sharing resources in an SMP enviroment.
See Chapter 6 for an overview of symmetric multiprocessing and the two locking methods that you can use when your kernel modules execute in an SMP environment. Chapter 7 provides information for using simple locks in your kernel module. Chapter 8 provides information for using complex locks.