This chapter contains information specific to managing storage devices in a TruCluster Server system. The chapter discusses the following subjects:
Working with CDSLs (Section 9.1)
Managing devices (Section 9.2)
Managing the Cluster File System (Section 9.3)
Managing the device request dispatcher (Section 9.4)
Managing AdvFS in a cluster (Section 9.5)
Creating new file systems (Section 9.6)
Managing CDFS file systems (Section 9.7)
Backing up and restoring files (Section 9.8)
Managing swap space (Section 9.9)
Fixing problems with boot parameters (Section 9.10)
Using the
verify
command in a cluster
(Section 9.11)
You can find other information
on device management in the Tru64 UNIX Version 5.1A documentation
that is listed in
Table 9-1.
Table 9-1: Sources of Information of Storage Device Management
| Topic | Tru64 UNIX Manual |
| Administering devices | System Administration manual |
| Administering file systems | System Administration manual |
| Administering the archiving services | System Administration manual |
| Managing AdvFS | AdvFS Administration manual |
For information about Logical
Storage Manager (LSM) and clusters, see
Chapter 10.
9.1 Working with CDSLs
A context-dependent symbolic link (CDSL) is a link that contains a variable that identifies a cluster member. This variable is resolved at run time into a target.
A CDSL is structured as follows:
/etc/rc.config -> ../cluster/members/{memb}/etc/rc.config
When resolving a CDSL pathname, the kernel replaces the string
{memb}
with the string
membern,
where
n
is the member ID of the
current member.
For example, on a cluster member whose member ID is 2,
the pathname
/cluster/members/{memb}/etc/rc.config
resolves to
/cluster/members/member2/etc/rc.config.
CDSLs provide a way for a single file name to point to one of several
files.
Clusters use this to allow member-specific
files that can be addressed throughout the cluster by a single file name.
System data and configuration files tend to be CDSLs.
They are found
in the root (/),
/usr,
and
/var
directories.
9.1.1 Making CDSLs
The
mkcdsl
command provides a simple tool for
creating and populating CDSLs.
For example, to make a new CDSL for the
file
/usr/accounts/usage-history,
enter the following command:
# mkcdsl /usr/accounts/usage-history
When you list the results, you see the following output:
# ls -l /usr/accounts/usage-history

... /usr/accounts/usage-history -> cluster/members/{memb}/accounts/usage-history
The CDSL
usage-history
is created in
/usr/accounts.
No files are created in any member's
/usr/cluster/members/{memb}
directory.
To move a file into a CDSL, enter the following command:
# mkcdsl -c targetname
To replace an existing file when using the copy
(-c) option, you must also
use the force (-f) option.
The
-c
option copies the source file to the member-specific
area on the cluster member where the
mkcdsl
command
executes and then replaces the source file with a CDSL.
To copy a
source file to the member-specific area on all cluster members and
then replace the source file with a CDSL, use the
-a
option to the command as follows:
# mkcdsl -a filename
Remove a CDSL with the
rm
command,
as you would any symbolic link.
The file
/var/adm/cdsl_admin.inv
stores a record
of the cluster's CDSLs.
When you use
mkcdsl
to add
CDSLs, the command
updates
/var/adm/cdsl_admin.inv.
If you use the
ln -s
command to create CDSLs,
/var/adm/cdsl_admin.inv
is not updated.
To update
/var/adm/cdsl_admin.inv, enter the following:
# mkcdsl -i targetname
Update the inventory when you remove a CDSL, or if you use
the
ln -s
command to create a CDSL.
For more information, see
mkcdsl(8).
9.1.2 Maintaining CDSLs
The following tools can help you maintain CDSLs:
mkcdsl(8)
(with the
-i
option)
The following example shows
the output (and the pointer to a log file containing the errors) when
clu_check_config
finds a bad or missing CDSL:
# clu_check_config -s check_cdsl_config
Starting Cluster Configuration Check...
check_cdsl_config : Checking installed CDSLs
check_cdsl_config : CDSLs configuration errors : See /var/adm/cdsl_check_list
clu_check_config : detected one or more configuration errors
As a general rule, before you move a file, make sure that the destination
is not a CDSL.
If by mistake you do overwrite a CDSL on the
appropriate cluster member, use the
mkcdsl -c
filename
command
to copy the file and re-create the CDSL.
9.1.3 Kernel Builds and CDSLs
When you build a kernel in a cluster, use the
mv
command to move the new kernel from
/sys/HOSTNAME/vmunix
to
/cluster/members/membern/boot_partition/vmunix.
If you move the kernel to
/vmunix, you will
overwrite the
/vmunix
CDSL.
The result will be
that the next time that cluster member boots, it will use the old
vmunix
in
/sys/HOSTNAME/vmunix.
9.1.4 Exporting and Mounting CDSLs
CDSLs are intended for use when files of the same name must necessarily have different contents on different cluster members. Because of this, CDSLs are not intended for export.
Mounting CDSLs through the cluster alias is problematic, because the file contents differ depending on which cluster system gets the mount request. However, nothing prevents CDSLs from being exported. If the entire directory is a CDSL, then the node that gets the mount request provides a file handle corresponding to the directory for that node. If a CDSL is contained within an exported clusterwide directory, then the Network File System (NFS) server that gets the request will do the expansion. As with normal symbolic links, the client cannot read the file or directory unless that area is also mounted on the client.
Device management in a cluster is similar to that in a standalone system, with the following exceptions:
The
dsfmgr
command for managing device special
files takes special options for clusters.
Because of the mix of shared and private buses in a cluster, device topology can be more complex.
You can control which cluster members act as servers for the devices in the cluster, and which members act as access nodes.
The rest of this section describes these differences.
9.2.1 Managing the Device Special File
When using
dsfmgr, the
device special file management utility, in a cluster, keep the
following in mind:
The
-a
option requires that you
use
c
(cluster) as the
entry_type.
The
-o
and
-O
options,
which create device special files in the
old format, are not valid in a cluster.
In the output from the
-s
option, the
class scope
column in the first table uses a
c
(cluster) to indicate the scope of the device.
For more information, see
dsfmgr(8).
For information on devices, device naming, and device management, see
the chapter on hardware management in the Tru64 UNIX
System Administration
manual.
9.2.2 Determining Device Locations
The Tru64 UNIX
hwmgr
command can list all
hardware devices in the cluster, including those on private buses,
and correlate bus-target-LUN names with
/dev/disks/dsk*
names.
For example:
# hwmgr -view devices -cluster
HWID: Device Name         Mfg     Model            Hostname   Location
-------------------------------------------------------------------------------
  3: kevm                                         pepicelli
 28: /dev/disk/floppy0c          3.5in floppy     pepicelli  fdi0-unit-0
 40: /dev/disk/dsk0c     DEC     RZ28M    (C) DEC pepicelli  bus-0-targ-0-lun-0
 41: /dev/disk/dsk1c     DEC     RZ28L-AS (C) DEC pepicelli  bus-0-targ-1-lun-0
 42: /dev/disk/dsk2c     DEC     RZ28     (C) DEC pepicelli  bus-0-targ-2-lun-0
 43: /dev/disk/cdrom0c   DEC     RRD46    (C) DEC  pepicelli bus-0-targ-6-lun-0
 44: /dev/disk/dsk3c     DEC     RZ28M    (C) DEC pepicelli  bus-1-targ-1-lun-0
 44: /dev/disk/dsk3c     DEC     RZ28M    (C) DEC polishham  bus-1-targ-1-lun-0
 44: /dev/disk/dsk3c     DEC     RZ28M    (C) DEC provolone  bus-1-targ-1-lun-0
 45: /dev/disk/dsk4c     DEC     RZ28L-AS (C) DEC pepicelli  bus-1-targ-2-lun-0
 45: /dev/disk/dsk4c     DEC     RZ28L-AS (C) DEC polishham  bus-1-targ-2-lun-0
 45: /dev/disk/dsk4c     DEC     RZ28L-AS (C) DEC provolone  bus-1-targ-2-lun-0
 46: /dev/disk/dsk5c     DEC     RZ29B    (C) DEC pepicelli  bus-1-targ-3-lun-0
 46: /dev/disk/dsk5c     DEC     RZ29B    (C) DEC polishham  bus-1-targ-3-lun-0
 46: /dev/disk/dsk5c     DEC     RZ29B    (C) DEC provolone  bus-1-targ-3-lun-0
 47: /dev/disk/dsk6c     DEC     RZ28D    (C) DEC pepicelli  bus-1-targ-4-lun-0
 47: /dev/disk/dsk6c     DEC     RZ28D    (C) DEC polishham  bus-1-targ-4-lun-0
 47: /dev/disk/dsk6c     DEC     RZ28D    (C) DEC provolone  bus-1-targ-4-lun-0
 48: /dev/disk/dsk7c     DEC     RZ28L-AS (C) DEC pepicelli  bus-1-targ-5-lun-0
 48: /dev/disk/dsk7c     DEC     RZ28L-AS (C) DEC polishham  bus-1-targ-5-lun-0
 48: /dev/disk/dsk7c     DEC     RZ28L-AS (C) DEC provolone  bus-1-targ-5-lun-0
 49: /dev/disk/dsk8c     DEC     RZ1CF-CF (C) DEC pepicelli  bus-1-targ-8-lun-0
 49: /dev/disk/dsk8c     DEC     RZ1CF-CF (C) DEC polishham  bus-1-targ-8-lun-0
 49: /dev/disk/dsk8c     DEC     RZ1CF-CF (C) DEC provolone  bus-1-targ-8-lun-0
 50: /dev/disk/dsk9c     DEC     RZ1CB-CS (C) DEC pepicelli  bus-1-targ-9-lun-0
 50: /dev/disk/dsk9c     DEC     RZ1CB-CS (C) DEC polishham  bus-1-targ-9-lun-0
 50: /dev/disk/dsk9c     DEC     RZ1CB-CS (C) DEC provolone  bus-1-targ-9-lun-0
 51: /dev/disk/dsk10c    DEC     RZ1CF-CF (C) DEC pepicelli  bus-1-targ-10-lun-0
 51: /dev/disk/dsk10c    DEC     RZ1CF-CF (C) DEC polishham  bus-1-targ-10-lun-0
 51: /dev/disk/dsk10c    DEC     RZ1CF-CF (C) DEC provolone  bus-1-targ-10-lun-0
 52: /dev/disk/dsk11c    DEC     RZ1CF-CF (C) DEC pepicelli  bus-1-targ-11-lun-0
 52: /dev/disk/dsk11c    DEC     RZ1CF-CF (C) DEC polishham  bus-1-targ-11-lun-0
 52: /dev/disk/dsk11c    DEC     RZ1CF-CF (C) DEC provolone  bus-1-targ-11-lun-0
 53: /dev/disk/dsk12c    DEC     RZ1CF-CF (C) DEC pepicelli  bus-1-targ-12-lun-0
 53: /dev/disk/dsk12c    DEC     RZ1CF-CF (C) DEC polishham  bus-1-targ-12-lun-0
 53: /dev/disk/dsk12c    DEC     RZ1CF-CF (C) DEC provolone  bus-1-targ-12-lun-0
 54: /dev/disk/dsk13c    DEC     RZ1CF-CF (C) DEC pepicelli  bus-1-targ-13-lun-0
 54: /dev/disk/dsk13c    DEC     RZ1CF-CF (C) DEC polishham  bus-1-targ-13-lun-0
 54: /dev/disk/dsk13c    DEC     RZ1CF-CF (C) DEC provolone  bus-1-targ-13-lun-0
 59: kevm                                         polishham
 88: /dev/disk/floppy1c          3.5in floppy     polishham  fdi0-unit-0
 94: /dev/disk/dsk14c    DEC     RZ26L    (C) DEC polishham  bus-0-targ-0-lun-0
 95: /dev/disk/cdrom1c   DEC     RRD46   (C) DEC  polishham  bus-0-targ-4-lun-0
 96: /dev/disk/dsk15c    DEC     RZ1DF-CB (C) DEC polishham  bus-0-targ-8-lun-0
 99: /dev/kevm                                    provolone
127: /dev/disk/floppy2c          3.5in floppy     provolone  fdi0-unit-0
134: /dev/disk/dsk16c    DEC     RZ1DF-CB (C) DEC provolone  bus-0-targ-0-lun-0
135: /dev/disk/dsk17c    DEC     RZ1DF-CB (C) DEC provolone  bus-0-targ-1-lun-0
136: /dev/disk/cdrom2c   DEC     RRD47   (C) DEC  provolone  bus-0-targ-4-lun-0
The
drdmgr
devicename
command reports which members serve the device.
Disks with multiple servers are on a shared SCSI bus.
With very few exceptions, disks that have only one server
are private to that server.
For details on the exceptions,
see
Section 9.4.1.
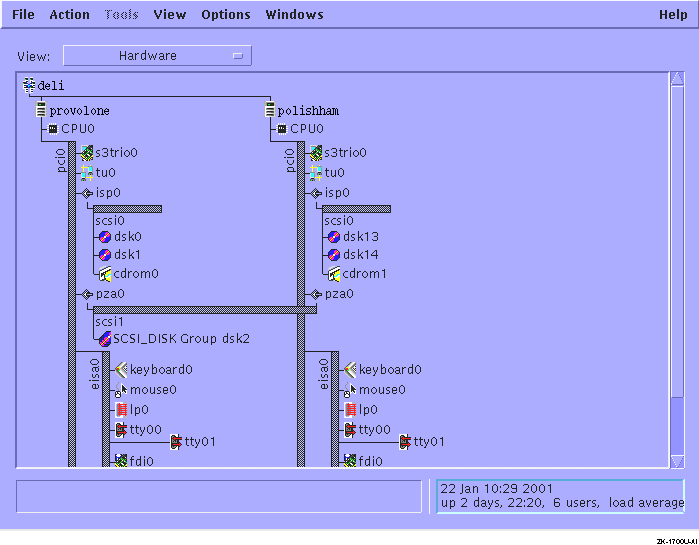
To learn the hardware configuration of a cluster member, enter the following command:
# hwmgr -view hierarchy -member membername
If the member is on a shared bus, the command reports devices on the shared bus. The command does not report on devices private to other members.
To get a graphical display of the cluster hardware configuration, including
active members, buses, both shared and private storage devices,
and their connections, use the
sms
command to invoke the graphical interface
for the SysMan Station, and then select Hardware
from the View menu.
Figure 9-1
shows the SysMan Station
representation of a two-member cluster.
Figure 9-1: SysMan Station Display of Hardware Configuration
9.2.3 Adding a Disk to the Cluster
For information on physically installing SCSI hardware devices, see the TruCluster Server Cluster Hardware Configuration manual. After the new disk has been installed, follow these steps:
So that all members recognize the new disk, run the following command on each member:
# hwmgr -scan comp -cat scsi_bus
Note
You must run the
hwmgr -scan comp -cat scsi_buscommand on every cluster member that needs access to the disk.
Wait a minute or so for all members to register the presence of the new disk.
If the disk that you are adding is an RZ26, RZ28, RZ29, or RZ1CB-CA model, run the following command on each cluster member:
# /usr/sbin/clu_disk_install
If the cluster has a large number of storage devices, this command can take several minutes to complete.
To learn the name of the new disk, enter the following command:
# hwmgr -view devices -cluster
You can also run the SysMan Station command and select Hardware from the Views menu to learn the new disk name.
For information about creating file systems on the disk,
see
Section 9.6.
9.2.4 Managing Third-party Storage
When a cluster member loses quorum, all of its I/O is suspended, and the remaining members erect I/O barriers against nodes that have been removed from the cluster. This I/O barrier operation inhibits non-cluster members from performing I/O with shared storage devices.
The method that is used to create the I/O barrier depends on the types of storage devices that the cluster members share. In certain cases, a Task Management function called a Target_Reset is sent to stop all I/O to and from the former member. This Task Management function is used in either of the following situations:
The shared SCSI device does not support the SCSI Persistent Reserve command set and uses the Fibre Channel interconnect.
The shared SCSI device does not
support the SCSI Persistent Reserve
command set, uses the SCSI Parallel interconnect, is a
multiported device, and does not propagate the SCSI
Target_Reset
signal.
In either of these situations, there is a delay between the
Target_Reset
and the clearing of all I/O
pending between the device and the former member.
The length of this interval depends on the device
and the cluster configuration.
During this
interval, some I/O with the former member might still occur.
This I/O, sent after the
Target_Reset,
completes in a normal way without interference from other nodes.
During an interval configurable with the
drd_target_reset_wait
kernel attribute,
the device request dispatcher suspends all new I/O to the shared
device.
This period allows time to clear those devices
of the pending I/O that originated with the former member
and were sent to the device after it received the
Target_Reset.
After this interval passes,
the I/O barrier is complete.
The default value for
drd_target_reset_wait
is
30 seconds, which should be sufficient.
However, if you
have doubts because of third-party devices in your cluster,
contact the device manufacturer and
ask for the specifications on how long it takes their device to clear
I/O after the receipt of a
Target_Reset.
You can set
drd_target_reset_wait
at boot time
and run time.
For more information about quorum loss and system partitioning,
see the chapter on the connection manager in the
TruCluster Server
Cluster Technical Overview.
9.2.5 Tape Devices
You can access a tape device in the cluster from any member, regardless of whether it is located on that member's private bus, on a shared bus, or on another member's private bus.
Certain operations, such as
mcutil,
can be performed only on a device that is directly connected to the member
where the operation is performed.
For this reason, it is advantageous
to place a tape device on a shared bus, where multiple members
have direct access to the device.
Performance considerations also argue for placing a tape device
on a shared bus.
Backing up storage connected to a system on a shared
bus with a tape drive is faster than having to go over the cluster
interconnect.
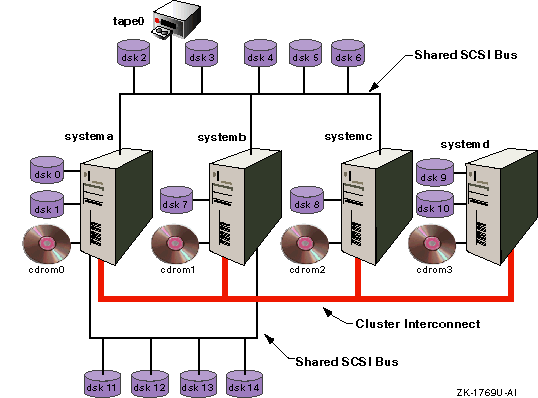
For example, in
Figure 9-2, the backup of
dsk9
and
dsk10
to the tape drive requires the data
to go over the cluster interconnect.
For the backup of any other
disk, including the semi-private disks
dsk11,
dsk12,
dsk13, and
dsk14,
the data transfer rate will be faster.
Figure 9-2: Cluster with Semi-private Storage
If the tape device is located on the shared bus, applications that access the device must be written to react appropriately to certain events on the shared SCSI bus, such as bus and device resets. Bus and device resets (such as those that result from cluster membership transitions) cause any tape device on the shared SCSI bus to rewind.
A
read()
or
write()
by
a tape server application causes an
errno
to be returned.
You must explicitly set up the tape
server application to retrieve error information that is returned from
its I/O call to
reposition the tape.
When a
read()
or
write()
operation fails, use
ioctl()
with the
MTIOCGET
command option
to return a structure that contains the
error information that is needed by the application to reposition the tape.
For a description of the structure, see
/usr/include/sys/mtio.h.
The commonly
used utilities
tar,
cpio,
dump, and
vdump
are not designed in
this way, so they may unexpectedly terminate when used on a
tape device that resides on a shared bus in a cluster.
Currently,
the only advantage to situating a tape device on a shared bus in
this release is that multiple systems are physically connected to
it, and any one of those systems can access it.
9.2.6 Formatting Floppy Disks in a Cluster
TruCluster Server Version 5.1A includes support for read/write UNIX File System (UFS) file systems, as described in Section 9.3.4, and you can use TruCluster Server Version 5.1A to format a floppy disk.
Versions of TruCluster Server prior to Version 5.1A do not support read/write UFS file systems. Because prior versions of TruCluster Server do not support read/write UFS file systems and AdvFS metadata overwhelms the capacity of a floppy disk, the typical methods to format a floppy cannot be used in a cluster.
If you must format a floppy disk in a cluster with a version of
TruCluster Server prior to Version 5.1A, use the
mtools
or
dxmtools
tool sets.
For more information, see
mtools(1)
and
dxmtools(1).
9.2.7 CD-ROM and DVD-ROM
CD-ROM drives and DVD-ROM drives are always served devices. This type of drive must be connected to a local bus; it cannot be connected to a shared bus.
For information about managing a CD-ROM File System (CDFS)
in a cluster, see
Section 9.7.
9.3 Managing the Cluster File System
The Cluster File System (CFS) provides transparent access to files that are located anywhere on the cluster. Users and applications enjoy a single-system image for file access. Access is the same regardless of the cluster member where the access request originates, and where in the cluster the disk containing the file is connected. CFS follows a server/client model, with each file system served by a cluster member. Any cluster member can serve file systems on devices anywhere in the cluster. If the member serving a file system becomes unavailable, the CFS server automatically fails over to an available cluster member.
The primary tool for managing the cluster file system
is the
cfsmgr
command.
A number of examples of using the command appear in
this section.
For more information about the
cfsmgr
command,
see
cfsmgr(8).
To gather statistics about the CFS file system, use the
cfsstat
command or the
cfsmgr -statistics
command.
An example
of using
cfsstat
to get information about
direct I/O appears in
Section 9.3.3.5.
For more information
on the command, see
cfsstat(8).
For file systems on devices on the shared bus, I/O performance depends on the load on the bus and the load on the member serving the file system. To simplify load balancing, CFS allows you to easily relocate the server to a different member. Access to file systems on devices that are private to a member is faster when the file systems are served by that member.
Use the
cfsmgr
command to learn
which files systems are served by which member.
For example, to learn the server of the clusterwide root file system
(/), enter the following command:
# cfsmgr /

 Domain or filesystem name = /
 Server Name = systemb
 Server Status : OK
To move the CFS server to a different member, enter the following
cfsmgr
command to change the value of the
SERVER
attribute:
# cfsmgr -a server=systema /
# cfsmgr /

 Domain or filesystem name = /
 Server Name = systema
 Server Status : OK
Although you can relocate the CFS server of the clusterwide root,
you cannot relocate the member root domain to a different member.
A
member always serves its own member root domain,
rootmemberID_domain#root.
When a cluster member boots, that member serves any file systems on the
devices that are on buses that are private to the member.
However, when you manually mount a file system or mount it via the
fstab
file, the server is chosen
based on connectivity to the device from available servers.
This can result in a file
system being served by a member that is not local to it.
In this case, you
might see a performance improvement if you manually relocate the CFS
server to the local member.
9.3.1 When File Systems Cannot Fail Over
In most instances, CFS provides seamless failover for the file systems in the cluster. If the cluster member serving a file system becomes unavailable, CFS fails over the server to an available member. However, in the following situations, no path to the file system exists and the file system cannot fail over:
The file system's storage is on a private bus that is connected directly to a member and that member becomes unavailable.
The storage is on a shared bus and all the members on the shared bus become unavailable.
In either case, the
cfsmgr
command returns the
following status for the file system (or domain):
Server Status : Not Served
Attempts to access the file system return the following message:
filename I/O error
When a cluster member that is connected to the storage becomes available,
the file system becomes served again and accesses to the file system
begin to work.
Other than making the member available, you do not
need to take any action.
9.3.2 Direct Access Cached Reads
TruCluster Server implements direct access cached reads, which is a performance enhancement for AdvFS file systems. Direct access cached reads allow CFS to read directly from storage simultaneously on behalf of multiple cluster members.
If the cluster member that issues the read is directly connected to the storage that makes up the file system, direct access cached reads access the storage directly and do not go through the cluster interconnect to the CFS server.
If a CFS client is not directly connected to the storage that makes up a file system (for example, if the storage is private to a cluster member), that client will still issue read requests directly to the devices, but the device request dispatcher layer sends the read request across the cluster interconnect to the device.
Direct access cached reads are consistent with the existing CFS served file-system model, and the CFS server continues to perform metadata and log updates for the read operation.
Direct access cached reads are implemented only for AdvFS file systems. In addition, direct access cached reads are performed only for files that are at least 64K in size. The served I/O method is more efficient when processing smaller files.
Direct access cached reads are enabled by default and are not user-settable or tunable. However, if an application uses direct I/O, as described in Section 9.3.3.5, that choice is given priority and direct access cached reads are not performed for that application.
Use the
cfsstat directio
command to
display direct I/O statistics.
The
direct i/o
reads
field includes direct access cached read
statistics.
See
Section 9.3.3.5.3
for a description of
these fields.
# cfsstat directio
Concurrent Directio Stats:
     941 direct i/o reads
       0 direct i/o writes
       0 aio raw reads
       0 aio raw writes
       0 unaligned block reads
      29 fragment reads
      73 zero-fill (hole) reads
       0 file-extending writes
       0 unaligned block  writes
       0 hole writes
       0 fragment writes
       0 truncates
9.3.3 Optimizing CFS Performance
You can tune CFS performance by doing the following:
Balancing the CFS load (Section 9.3.3.1)
Automatically distributing CFS server load (Section 9.3.3.2)
Adjusting I/O transfer size (Section 9.3.3.3)
Changing the number of read-ahead and write-behind threads (Section 9.3.3.4)
Taking advantage of direct I/O (Section 9.3.3.5)
Adjusting CFS memory usage (Section 9.3.3.6)
Using memory mapped files (Section 9.3.3.7)
Avoid full file systems (Section 9.3.3.8)
Other strategies (Section 9.3.3.9)
When a cluster boots, the TruCluster Server software ensures that each file system is directly connected to the member that serves it. This means that file systems on a device connected to a member's local bus are served by that member. A file system on a device on a shared SCSI bus is served by one of the members that is directly connected to that SCSI bus.
In the case of AdvFS, the first fileset that is assigned to a CFS server determines that all other filesets in that domain will have that same cluster member as their CFS server.
When a cluster boots, typically the first member up that is connected to a shared SCSI bus is the first member to see devices on the shared bus. This member then becomes the CFS server for all the file systems on all the devices on that shared bus. Because of this, most file systems are probably served by a single member. This situation can have negative consequences for performance. It is important to monitor file system activity on the cluster and load balance the CFS servers as necessary.
Use the
cfsmgr
command to determine good candidates
for relocating the CFS servers.
The
cfsmgr
command
displays statistics on file system usage on a per-member basis.
For example, suppose you want to determine whether to relocate the server for
/accounts
to improve performance.
First, confirm the current CFS server of
/accounts
as follows:
# cfsmgr /accounts

 Domain or filesystem name = /accounts
 Server Name = systemb
 Server Status : OK
Then, get the CFS statistics for the current server and the candidate servers by entering the following commands:
# cfsmgr -h systemb -a statistics /accounts

 Counters for the filesystem /accounts:
        read_ops = 4149
        write_ops = 7572
        lookup_ops = 82563
        getattr_ops = 408165
        readlink_ops = 18221
        access_ops = 62178
        other_ops = 123112

 Server Status : OK
# cfsmgr -h systema -a statistics /accounts

 Counters for the filesystem /accounts:
        read_ops = 26836
        write_ops = 3773
        lookup_ops = 701764
        getattr_ops = 561806
        readlink_ops = 28712
        access_ops = 81173
        other_ops = 146263

 Server Status : OK
# cfsmgr -h systemc -a statistics /accounts

 Counters for the filesystem /accounts:
        read_ops = 18746
        write_ops = 13553
        lookup_ops = 475015
        getattr_ops = 280905
        readlink_ops = 24306
        access_ops = 84283
        other_ops =  103671

 Server Status : OK
# cfsmgr -h systemd -a statistics /accounts

 Counters for the filesystem /accounts:
        read_ops = 98468
        write_ops = 63773
        lookup_ops = 994437
        getattr_ops = 785618
        readlink_ops = 44324
        access_ops = 101821
        other_ops = 212331

 Server Status : OK
In this example, most of the read and write activity
for
/accounts
is from member
systemd, not from the member that is currently serving it,
systemb.
Assuming that
systemd
is physically connected to the storage for
/accounts,
systemd
is
a good choice as the CFS server for
/accounts.
Determine whether
systemd
and
the storage for
/accounts
are physically
connected as follows:
Find out where
/accounts
is mounted.
You can
either look in
/etc/fstab
or use the
mount
command.
If there are a large number of
mounted file systems, you might want to use
grep
as follows:
# mount | grep accounts
accounts_dmn#accounts on /accounts type advfs (rw)
Look at the directory
/etc/fdmns/accounts_dmn
to
learn the device where the AdvFS domain
accounts_dmn
is mounted as follows:
# ls /etc/fdmns/accounts_dmn
dsk6c
Enter the
drdmgr
command to learn the servers of
dsk6
as follows:
# drdmgr -a server dsk6
                   Device Name: dsk6
                   Device Type: Direct Access IO Disk
                 Device Status: OK
             Number of Servers: 4
                   Server Name: membera
                  Server State: Server
                   Server Name: memberb
                  Server State: Server
                   Server Name: memberc
                  Server State: Server
                   Server Name: memberd
                  Server State: Server
Because
dsk6
has multiple servers, it is on a
shared bus.
Because
systemd
is one of the servers,
there is a physical connection.
Relocate the CFS server of
/accounts
to
systemd
as follows:
# cfsmgr -a server=systemd /accounts
Even in cases where the CFS statistics do not show an inordinate load
imbalance, we recommend that you distribute the CFS servers among the
available members that are connected to the shared bus.
Doing so can
improve overall cluster performance.
9.3.3.2 Automatically Distributing CFS Server Load
To automatically have a particular cluster member act as the CFS server
for a file system or domain, you can place a script in
/sbin/init.d
that calls the
cfsmgr
command to relocate the server for the file
system or domain to the desired cluster member.
For example, if you want cluster member
alpha
to
serve the domain
accounting, place the following
cfsmgr
command in a startup script:
# cfsmgr -a server=alpha -d accounting
Have the script look for successful relocation and retry the operation
if it fails.
The
cfsmgr
command returns a nonzero value
on failure; however, it is not sufficient for the script to
keep trying on a bad exit value.
The relocation might have failed because a failover or relocation is
already in progress.
On failure of the relocation, have the script search for one of the following messages:
	Server Status : Failover/Relocation in Progress

	Server Status : Cluster is busy, try later
If either of these messages occurs, have the script retry the
relocation.
On any other error, have the script print an appropriate
message and exit.
9.3.3.3 Tuning the Block Transfer Size
During client-side reads and writes, CFS passes data in a predetermined block size. Generally, the larger the block size, the better the I/O performance.
There are two ways to control the CFS I/O blocksize:
cfsiosize
kernel attribute
The
cfsiosize
kernel attribute
sets the CFS I/O blocksize for all file systems served by the cluster
member where the attribute is set.
If a file system relocates to another
cluster member, due to either a failover or a planned relocation, the
CFS transfer size stays the same.
Changing the
cfsiosize
kernel attribute
on a member after it is booted affects only file systems that are mounted
after the change.
To change the default size for CFS I/O blocks clusterwide, set the
cfsiosize
kernel attribute on each cluster member.
You can set
cfsiosize
at boot time and at run time.
The value must be between 8192 bytes
(8K) and 131072 bytes (128K), inclusive.
To change the transfer size of a mounted file system, use
cfsmgr
FSBSIZE
attribute,
which is described next.
FSBSIZE
CFS attribute
The
FSBSIZE
CFS attribute sets the I/O blocksize
on a per-filesystem basis.
To set
FSBSIZE,
use the
cfsmgr
command.
The attribute can be set only for mounted file systems.
You cannot set
FSBSIZE
on an AdvFS domain
(the
cfsmgr
-d
option).
When you set
FSBSIZE,
the value is automatically rounded to the nearest page.
For example:
# cfsmgr -a fsbsize=80000 /var

fsbsize for filesystem set to /var: 81920
For more information, see
cfsmgr(8).
Although a large block size generally yields better performance, there are special cases where doing CFS I/O in smaller block sizes can be advantageous. If reads and writes for a file system are small and random, then a large CFS I/O block size does not improve performance and the extra processing is wasted.
For example, if the I/O for a file system is 8K
or less and totally random, then a value of 8
for
FSBSIZE
is appropriate for that file system.
The default value for
FSBSIZE
is determined by the
value of the
cfsiosize
kernel attribute.
To learn the current value of
cfsiosize,
use the
sysconfig
command.
For example:
# sysconfig -q cfs cfsiosize
cfs:
cfsiosize = 65536
A file system where all the I/O is small in size but
multiple threads are reading or writing the file system sequentially
is not a candidate for a small value for
FSBSIZE.
Only when the I/O to a file system is both small and random does
it make sense to set
FSBSIZE
for that file system
to a small value.
9.3.3.4 Changing the Number of Read-Ahead and Write-Behind Threads
When CFS detects sequential accesses to a file, it
employs read-ahead threads to read the next I/O block size worth of data.
CFS also employs write-behind threads to buffer the next block of data
in anticipation that it too
will be written to disk.
Use the
cfs_async_biod_threads
kernel attribute to
set the number of I/O threads that perform asynchronous read ahead and
write behind.
Read-ahead and write-behind threads apply only to
reads and writes originating on CFS clients.
The default size for
cfs_async_biod_threads
is 32.
In an environment where at one time you have more than 32 large files
sequentially accessed, increasing
cfs_async_biod_threads
can improve CFS performance,
particularly if the applications using
the files can benefit from lower latencies.
The number of read-ahead and write-behind threads is tunable
from 0 through 128.
When not in use, the threads consume few system resources.
9.3.3.5 Taking Advantage of Direct I/O
When an application opens an AdvFS file with the
O_DIRECTIO
flag in the
open
system call, data I/O is direct to the
storage; the system software does no data caching for the file
at the file-system level.
In a cluster, this arrangement supports
concurrent direct I/O on the file from any member in the cluster.
That is,
regardless of which member originates the I/O request,
I/O to a file does not go through the cluster
interconnect to the CFS server.
Database applications frequently
use direct I/O in conjunction with raw asynchronous I/O (which is also supported in
a cluster) to improve I/O performance.
The best performance on a file that is opened for direct I/O is achieved under the following conditions:
A read from an existing location of the file
A write to an existing location of the file
When the size of the data being read or written is a multiple of the disk sector size, 512 bytes
The following conditions can result in less than optimal direct I/O performance:
Operations that cause a metadata change to a file. These operations go across the cluster interconnect to the CFS server of the file system when the application that is doing the direct I/O runs on a member other than the CFS server of the file system. Such operations include the following:
Any modification that fills a sparse hole in the file
Any modification that appends to the file
Any modification that truncates the file
Any read or write on a file that is less than 8K and consists solely of a fragment or any read/write to the fragment portion at the end of a larger file
Any unaligned block read or write that is not to an existing location of the file. If a request does not begin or end on a block boundary, multiple I/Os are performed.
When a file is open for direct I/O,
any AdvFS migrate operation (such as
migrate,
rmvol,
defragment, or
balance) on the domain will block until the I/O
that is in progress completes on all members.
Conversely, direct I/O will block until any AdvFS migrate
operation completes.
An application that uses direct I/O is responsible for managing its own caching. When performing multithreaded direct I/O on a single cluster member or multiple members, the application must also provide synchronization to ensure that, at any instant, only one thread is writing a sector while others are reading or writing.
For a discussion of direct I/O programming issues, see the chapter
on optimizing techniques in the Tru64 UNIX
Programmer's Guide.
9.3.3.5.1 Differences Between Cluster and Standalone AdvFS Direct I/O
The following list presents direct I/O behavior in a cluster that differs from that in a standalone system:
Performing any migrate operation on a file that is already opened for direct I/O blocks until the I/O that is in progress completes on all members. Subsequent I/O will block until the migrate operation completes.
AdvFS in a standalone system provides a guarantee at the sector level that, if multiple threads attempt to write to the same sector in a file, one will complete first and then the other. This guarantee is not provided in a cluster.
9.3.3.5.2 Cloning a Fileset With Files Open in Direct I/O Mode
As described in
Section 9.3.3.5, when an application
opens a file with the
O_DIRECTIO
flag in the
open
system call, I/O to the file does not go through the cluster
interconnect to the CFS server.
However, if you clone a fileset that
has files open in Direct I/O mode, the I/O does not follow this model and might cause
considerable performance degradation.
(Read performance is not impacted by the
cloning.)
The
clonefset
utility, which is described in the
clonefset(8)
reference page, creates a
read-only copy, called a
clone fileset, of an AdvFS
fileset.
A clone fileset
is a read-only snapshot of fileset data structures (metadata).
That
is, when you clone a fileset, the utility copies only the
structure of the original fileset, not its data.
If you then modify
files in the original fileset, every write to the fileset causes a
synchronous copy-on-write of the original data to the clone if the
original data has not already been copied.
In this way, the clone fileset contents
remain the same as when you first created it.
If the fileset has files open in Direct I/O mode, when you modify a file AdvFS copies the original data to the clone storage. AdvFS does not send this copy operation over the cluster interconnect. However, CFS does send the write operation for the changed data in the fileset over the interconnect to the CFS server unless the application using Direct I/O mode happens to be running on the CFS server. Sending the write operation over the cluster interconnect negates the advantages of opening the file in Direct I/O mode.
To retain the benefits of Direct I/O mode, remove the clone as
soon as the backup operation is complete so that writes are again written
directly to storage and are not sent over the cluster interconnect.
9.3.3.5.3 Gathering Statistics on Direct I/O
If the performance gain for an application that uses direct I/O
is less than you expected, you can use the
cfsstat
command
to examine per-node global direct I/O statistics.
Use
cfsstat
to look at the global direct I/O
statistics without the application running.
Then execute the
application and examine the statistics again to determine whether
the paths that do not optimize direct I/O behavior were being
executed.
The following example shows how to use the
cfsstat
command to get direct I/O statistics:
# cfsstat directio
Concurrent Directio Stats:
     160 direct i/o reads
     160 direct i/o writes
       0 aio raw reads
       0 aio raw writes
       0 unaligned block reads
       0 fragment reads
       0 zero-fill (hole) reads
     160 file-extending writes
       0 unaligned block  writes
       0 hole writes
       0 fragment writes
       0 truncates
The individual statistics have the following meanings:
direct i/o reads
The number of normal direct I/O read requests. These read requests were processed on the member that issued the request and were not sent to the AdvFS layer on the CFS server.
direct i/o writes
The number of normal direct I/O write requests processed. These write requests were processed on the member that issued the request and were not sent to the AdvFS layer on the CFS server.
aio raw reads
The number of normal direct I/O asynchronous read requests. These read requests were processed on the member that issued the request and were not sent to the AdvFS layer on the CFS server.
aio raw writes
The number of normal direct I/O asynchronous write requests. These read requests were processed on the member that issued the request and were not sent to the AdvFS layer on the CFS server.
unaligned block reads
The number of reads that were not a multiple of a disk sector size (currently 512 bytes). This count will be incremented for requests that do not start at a sector boundary or do not end on a sector boundary. An unaligned block read operation results in a read for the sector and a copyout of the user data requested from the proper location of the sector.
If the I/O request encompasses an existing location of the file and does not encompass a fragment, this operation does not get sent to the CFS server.
fragment reads
The number of read requests that needed to be sent to the CFS server because the request was for a portion of the file that contains a fragment.
A file that is less than 140K might contain a fragment at the end that is not a multiple of 8K. Also small files less than 8K in size may consist solely of a fragment.
To ensure that a file of less than 8K does not consist of a fragment, always open the file only for direct I/O. Otherwise, on the close of a normal open, a fragment will be created for the file.
zero-fill (hole) reads
The number of reads that occurred to sparse areas of the files that were opened by direct I/O. This request is not sent to the CFS server.
file-extending writes
The number of write requests that were sent to the CFS server because they appended data to the file.
unaligned block writes
The number of writes that were not a multiple of a disk sector size (currently 512 bytes). This count will be incremented for requests that do not start at a sector boundary or do not end on a sector boundary. An unaligned block write operation results in a read for the sector, a copyin of the user data that is destined for a portion of the block, and a subsequent write of the merged data. These operations do not get sent to the CFS server.
If the I/O request encompasses an existing location of the file and does not encompass a fragment, this operation does not get sent to the CFS server.
hole writes
The number of write requests to an area that encompasses a sparse hole in the file that needed to be sent to AdvFS on the CFS server.
fragment writes
The number of write requests that needed to be sent to the CFS server because the request was for a portion of the file that contains a fragment.
A file that is less than 140K might contain a fragment at the end that is not a multiple of 8K. Also small files less than 8K in size may consist solely of a fragment.
To ensure that a file of less than 8K does not consist of a fragment, always open the file only for direct I/O. Otherwise, on the close of a normal open, a fragment will be created for the file.
truncates
The number of truncate requests for direct I/O opened files. This request does get sent to the CFS server.
9.3.3.6 Adjusting CFS Memory Usage
In situations where one cluster member is the CFS server for a large number of file systems, the client members may cache a great many vnodes from the served file systems. For each cached vnode on a client, even vnodes that are not actively used, the CFS server must allocate 800 bytes of system memory for the CFS token structure that is needed to track the file at the CFS layer. In addition to this, the CFS token structures typically require corresponding AdvFS access structures and vnodes, resulting in a near-doubling of the amount of memory that is used.
By default, each client can use up to 4 percent of memory to cache vnodes. When multiple clients fill up their caches with vnodes from a CFS server, system memory on the server can become overtaxed, causing it to hang.
The
svrcfstok_max_percent
kernel attribute is designed to prevent such system hangs.
The attribute
sets an upper limit on the amount of memory that is allocated
by the CFS server to track vnode caching on clients.
The default value is 25 percent.
The memory is used only
if the server load requires it.
It is not allocated up front.
After the
svrcfstok_max_percent
limit
is reached on the server, an application accessing files that are served by
the member gets an
EMFILE
error.
Applications that use
perror()
to check
errno
will return the message
too many open files
to the
standard error stream,
stderr, the controlling
tty or log file used by the applications.
Although you see
EMFILE
error messages,
no cached data is lost.
If applications start getting
EMFILE
errors, follow these steps:
Determine whether the CFS client is out of vnodes, as follows:
Get the current value of the
max_vnodes
kernel
attribute:
# sysconfig -q vfs max_vnodes
Use
dbx
to get the values of
total_vnodes
and
free_vnodes:
# dbx -k /vmunix /dev/mem
dbx version 5.0
Type 'help' for help.
(dbx)pd total_vnodes
total_vnodes_value
Get the value for
max_vnodes:
(dbx)pd max_vnodes
max_vnodes_value
If
total_vnodes
equals
max_vnodes
and
free_vnodes
equals 0, then that member
is out of vnodes.
In this case, you can increase the value of
the
max_vnodes
kernel attribute.
You can use
the
sysconfig
command to change
max_vnodes
on a running member.
For example,
to set the maximum number of vnodes to 20000, enter the following:
# sysconfig -r vfs max_vnodes=20000
If the CFS client is not out of vnodes,
then determine whether the CFS server has used all the memory
that is available for token structures
(svrcfstok_max_percent), as follows:
Log on to the CFS server.
Start the
dbx
debugger and get the current value
for
svrtok_active_svrcfstok:
# dbx -k /vmunix /dev/mem
dbx version 5.0
Type 'help' for help.
(dbx)pd svrtok_active_svrcfstok
active_svrcfstok_value
Get the value for
cfs_max_svrcfstok:
(dbx)pd cfs_max_svrcfstok
max_svrcfstok_value
If
svrtok_active_svrcfstok
is
equal to or greater than
cfs_max_svrcfstok,
then the CFS server has used all the memory that is available for token
structures.
In this case, the best solution to make the file systems usable again is to relocate some of the file systems to other cluster members. If that is not possible, then the following solutions are acceptable:
Increase the value of
cfs_max_svrcfstok.
You cannot change
cfs_max_svrcfstok
with the
sysconfig
command.
However, you can use
the
dbx assign
command to change the value of
cfs_max_svrcfstok
in the running kernel.
For example, to set the maximum number of
CFS server token structures to 80000, enter the following command:
(dbx)assign cfs_max_svrcfstok=80000
Values you assign with the
dbx assign
command are lost when the system is rebooted.
Increase the amount of memory that is available for token structures on the CFS server.
This option is undesirable on systems with small amounts of memory.
To increase
svrcfstok_max_percent, log on to the
server and run the
dxkerneltuner
command.
On the main window, select
the
cfs
kernel subsystem.
On the
cfs
window, enter an appropriate value for
svrcfstok_max_percent.
This change will
not take effect until the cluster member is rebooted.
Typically, when a CFS server reaches the
svrcfstok_max_percent
limit,
relocate some of the CFS file systems so that the burden of
serving the file systems is shared among cluster members.
You can
use startup scripts to run the
cfsmgr
and
automatically relocate file systems around the cluster at member startup.
Setting
svrcfstok_max_percent
below the default
is recommended only on smaller memory systems
that run out of memory because 25 percent default value is too high.
9.3.3.7 Using Memory Mapped Files
Using memory mapping to share a file across the cluster
for anything other than read-only access can negatively affect performance.
CFS I/O to a file does not perform well if multiple members
are simultaneously modifying the data.
This situation
forces premature cache flushes to ensure that all nodes have the
same view of the data at all times.
9.3.3.8 Avoid Full File Systems
If free space in a file system is less than 50 MB or less
than 10 percent of the file system's size,
whichever is smaller, then write performance to the file system from
CFS clients suffers.
This is because all writes to nearly full file
systems are sent immediately to the
server to guarantee correct ENOSPC semantics.
9.3.3.9 Other Strategies
The following measures can improve CFS performance:
Ensure that the cluster members have sufficient system memory.
In general, sharing a file for read/write access across cluster members may negatively affect performance because of all of the cache invalidations. CFS I/O to a file does not perform well if multiple members are simultaneously modifying the data. This situation forces premature cache flushes to ensure that all nodes have the same view of the data at all times.
If a distributed application does reads and writes on separate members, try locating the CFS servers for the application to the member performing writes. Writes are more sensitive to remote I/O than reads.
If multiple applications access different sets of data in a single AdvFS domain, consider splitting the data into multiple domains. This arrangement allows you to spread the load to more than a single CFS server. It also presents the opportunity to colocate each application with the CFS server for that application's data without loading everything on a single member.
9.3.4 MFS and UFS File Systems Supported
TruCluster Server Version 5.1A includes read/write support for Memory File System (MFS) and UNIX File System (UFS) file systems.
When you mount a UFS file system in a cluster
for read/write access, or when you mount an MFS file system in a
cluster for read-only or read/write access,
the
mount
command
server_only
argument is used by default.
These
file systems are treated as partitioned file systems, as described in
Section 9.3.5.
That is, the file
system is accessible for both read-only and read/write access only by
the member that mounts it.
Other cluster members cannot read
from, or write to, the MFS or UFS file system.
There is no remote
access; there is no failover.
If you want to mount a UFS file system for read-only
access by all cluster members, you must explicitly mount it
read-only.
9.3.5 Partitioning File Systems
CFS makes all files accessible to all cluster members. Each cluster member has the same access to a file, whether the file is stored on a device that is connected to all cluster members or on a device that is private to a single member. However, CFS does make it possible to mount an AdvFS file system so that it is accessible to only a single cluster member. This is referred to as file system partitioning.
The Available Server Environment (ASE), which is an earlier version of the TruCluster Server product, offered functionality like that of file system partitioning. File partitioning is provided in TruCluster Server as of Version 5.1 to ease migration from ASE. File system partitioning in TruCluster Server is not intended as a general purpose method for restricting file system access to a single member.
To mount a partitioned file system, log on to the member that
you want to give exclusive access to the file system.
Run the
mount
command with the
server_only
option.
This mounts the file
system on the member where you execute the
mount
command and gives that member exclusive access to the file system.
Although only the mounting member has access to the file system,
all members, cluster-wide, can see the file system mount.
The
server_only
option can be applied only to
AdvFS, MFS, and UFS file systems.
Partitioned file systems are subject to the following limitations:
No file systems can be mounted under a partitioned file system
You cannot mount a file system, partitioned or otherwise, under a partitioned file system.
No failover via CFS
If the cluster member serving a partitioned file system fails, the file system is unmounted. You must remount the file system on another cluster member.
You can work around this by putting the application that uses the partitioned file system under the control of CAA. Because the application must run on the member where the partitioned file system is mounted, if the member fails, both the file system and application fail. An application that is under control of CAA will fail over to a running cluster member. You can write the application's CAA action script to mount the partitioned file system on the new member.
NFS export
The best way to export a partitioned file system is to create a single node
cluster alias for the node serving the partitioned file system and include
that alias in the
/etc/exports.aliases
file.
See
Section 3.13
for additional information on
how to best utilize the
/etc/exports.aliases
file.
If you use the default cluster alias to NFS-mount file systems that the cluster serves, some NFS requests will be directed to a member that does not have access to the file system and will fail.
Another way to export a partitioned file system is to assign
the member that serves the partitioned file system the
highest cluster-alias selection priority
(selp) in the cluster.
If you do this,
the member will serve all NFS connection requests.
However,
the member will also have to handle
all network traffic of any type that is directed to the cluster.
This is not likely to be acceptable in most environments.
For more information about distributing connection requests, see Section 3.9.
No mixing partitioned and conventional filesets in the same domain
The
server_only
option applies to
all file systems in a domain.
The type of the first fileset mounted determines the type for all
filesets in the domain:
If a fileset is mounted without the
server_only
option, then attempts to mount another fileset in the domain
server_only
will fail.
If a fileset in a domain is mounted
server_only,
then all subsequent fileset mounts in that domain must be
server_only.
No manual relocation
To move a partitioned file system to a different CFS server, you must unmount the file system and then remount it on the target member. At the same time, you will need to move applications that use the file system.
No mount updates with
server_only
option
After you mount a file system normally, you cannot use the
mount -u
command with the
server_only
option on the file system.
For example, if
file_system
has already been mounted
without use of the
server_only
flag,
the following command fails:
# mount -u -o server_only file_system
9.3.6 Block Devices and Cache Coherency
A single block device can have multiple aliases.
In this situation, multiple block device special files in the
file system namespace will contain the same
dev_t.
These aliases can potentially be located across multiple domains
or file systems in the namespace.
On a standalone system, cache coherency is guaranteed among all opens
of the common underlying block device regardless of which alias was
used on the
open()
call for the device.
In a cluster, however, cache coherency can be obtained only
among all block device file
aliases that reside on the same domain or file system.
For example, if cluster member
mutt
serves a
domain with a block device file and
member
jeff
serves a domain with another
block device file with the same
dev_t, then
cache coherency is not provided if I/O
is performed simultaneously through these two aliases.
9.4 Managing the Device Request Dispatcher
The device request dispatcher subsystem makes physical disk and tape storage transparently available to all cluster members, regardless of where the storage is physically located in the cluster. When an application requests access to a file, CFS passes the request to AdvFS, which then passes it to the device request dispatcher. In the file system hierarchy, the device request dispatcher sits right above the device drivers.
The primary tool for managing the device request dispatcher
is the
drdmgr
command.
A number of examples of using the command appear in
this section.
For more information, see
drdmgr(8).
9.4.1 Direct-Access I/O and Single-Server Devices
The device request dispatcher follows a client/server model; members serve devices, such as disks, tapes, and CD-ROM drives.
Devices in a cluster are either direct-access I/O devices or single-server devices. A direct-access I/O device supports simultaneous access from multiple cluster members. A single-server device supports access from only a single member.
Direct-access I/O devices on a shared bus are served by all
cluster members on that
bus.
A single-server device, whether on a shared bus or directly
connected to a cluster member, is served by a single member.
All other members access the served device through the serving
member.
Note that direct-access I/O devices are part of the device
request dispatcher subsystem, and have nothing to do with direct I/O
(opening a file with the
O_DIRECTIO
flag to the
open
system call),
which is handled by CFS.
See
Section 9.3.3.5
for
information about direct I/O and CFS.
Typically, disks on a shared bus are direct-access I/O devices, but in certain circumstances, some disks on a shared bus can be single-server. The exceptions occur when you add an RZ26, RZ28, RZ29, or RZ1CB-CA disk to an established cluster. Initially, such devices are single-server devices. See Section 9.4.1.1 for more information. Tape devices are always single-server devices.
Although single-server disks on a shared bus are supported, they are significantly slower when used as member boot disks or swap files, or for the retrieval of core dumps. We recommend that you use direct-access I/O disks in these situations.
Figure 9-3
shows a four-node cluster
with five disks and a tape drive on the shared bus.
Note that
SystemD
is not on the shared bus.
Its
access to cluster storage is routed through the Memory Channel cluster
interconnect.
Figure 9-3: Four Node Cluster
Disks on the shared bus are served by all the cluster members
on the bus.
You can confirm this by looking for the device
request dispatcher server of
dsk3
as follows:
# drdmgr -a server dsk3
                   Device Name: dsk3
                   Device Type: Direct Access IO Disk
                 Device Status: OK
             Number of Servers: 3
                   Server Name: systema
                  Server State: Server
                   Server Name: systemb
                  Server State: Server
                   Server Name: systemc
                  Server State: Server
From the
View
line in the preceding output, you can see that the
drdmgr
command was executed on
systemc.
Because
dsk3
is a direct-access I/O device on the
shared bus, all three systems on the bus serve it.
This means that,
when any member on the shared bus accesses the disk,
the access is directly from the member to the device.
Disks on private buses are served by the system that they are local to.
For example,
the server of
dsk7
is
systemb:
# drdmgr -a server dsk7
                   Device Name: dsk7
                   Device Type: Direct Access IO Disk
                 Device Status: OK
             Number of Servers: 1
                   Server Name: systemb
                  Server State: Server
Tape drives are
always single-server.
Because
tape0
is on a shared bus, any member on
that bus can act as its server.
When the cluster is started,
the first member up that has access to the tape drive becomes the
server for the tape drive.
The numbering of disks indicates that when the
cluster booted,
systema
came up first.
It detected
its private disks first and labeled them, then it detected the disks on
the shared bus and labeled them.
Because
systema
came up first, it is also the server for
tape0.
To confirm this, enter the following command:
# drdmgr -a server tape0
                   Device Name: tape0
                   Device Type: Served Tape
                 Device Status: OK
             Number of Servers: 1
                   Server Name: systema
                  Server State: Server
To change
tape0's server to
systemc,
enter the
drdmgr
command as follows:
# drdmgr -a server=systemc /dev/tape/tape0
For any single-server device, the serving member is also the access node. The following command confirms this:
# drdmgr -a accessnode tape0
                   Device Name: tape0
              Access Node Name: systemc
Unlike the device request dispatcher
SERVER
attribute,
which for a given device is the same on all cluster members, the value
of the
ACCESSNODE
attribute is specific to a
cluster member.
Any system on a shared bus is always its own access node for the direct-access I/O devices on the same shared bus.
Because
systemd
is not on the shared bus,
for each direct-access I/O device on the shared bus you can specify
the access node to be used by
systemd
when it
accesses the device.
The access node must be one of the members on the
shared bus.
The result of the following command is that
systemc
handles all device request dispatcher activity between
systemd
and
dsk3:
# drdmgr -h systemd -a accessnode=systemc dsk3
9.4.1.1 Devices Supporting Direct-Access I/O
RAID-fronted disks are direct-access I/O capable. The following are Redundant Array of Independent Disks (RAID) controllers:
HSZ40
HSZ50
HSZ70
HSZ80
HSG60
HSG80
Any RZ26, RZ28, RZ29, and RZ1CB-CA disks already
installed in a system at the time
the system becomes a cluster member, either through the
clu_create
or
clu_add_member
command, are automatically enabled as direct-access I/O disks.
To later add one of these disks as a direct-access I/O disk, you must
use the procedure in
Section 9.2.3.
9.4.1.2 Replacing RZ26, RZ28, RZ29, or RZ1CB-CA as Direct-Access I/O Disks
If you replace an RZ26, RZ28, RZ29, or RZ1CB-CA direct-access I/O disk with a disk of the same type (for example, replace an RZ28-VA with another RZ28-VA), follow these steps to make the new disk a direct-access I/O disk:
Physically install the disk in the bus.
On each cluster member, enter the
hwmgr
command to scan for the
new disk as follows:
# hwmgr -scan comp -cat scsi_bus
Allow a minute or two for the scans to complete.
If you want the new disk to have the same device name as the disk it
replaced, use the
hwmgr -redirect scsi
command.
For details, see
hwmgr(8)
and the section on replacing a failed SCSI device
in the Tru64 UNIX
System Administration
manual.
On each cluster member, enter the
clu_disk_install
command:
# clu_disk_install
Note
If the cluster has a large number of storage devices, the
clu_disk_installcommand can take several minutes to complete.
9.4.1.3 HSZ Hardware Supported on Shared Buses
For a list of hardware that is supported on shared buses, see the TruCluster Server Version 5.1A Software Product Description.
If you try to use an HSZ40A or an HSZ that does not have
the proper firmware revision on a shared bus, the cluster
might hang when there are multiple simultaneous attempts to access
the HSZ.
9.5 Managing AdvFS in a Cluster
For the most part, the Advanced File System (AdvFS) on a cluster is like that on a standalone system. However, there are some cluster-specific considerations, which are described in this section:
Integrating AdvFS files from a newly added member (Section 9.5.1)
Using the
addvol
and
rmvol
commands
(Section 9.5.4)
Using user and group file system quotas (Section 9.5.5)
Understanding storage connectivity and AdvFS volumes (Section 9.5.6)
9.5.1 Integrating AdvFS Files from a Newly Added Member
Suppose that you add a new member to the cluster and that new member has AdvFS volumes and filesets from when it ran as a standalone system. To integrate these volumes and filesets into the cluster, you need to do the following:
Modify the
/etc/fstab
file
listing the
domains#filesets
that you want to integrate into the cluster.
Make the new domains
known to the cluster, either by manually entering the domain information
into
/etc/fdmns
or by running the
advscan
command.
For information on the
advscan
command, see
advscan(8).
For examples of reconstructing
/etc/fdmns,
see the section on restoring an AdvFS file system in
the Tru64 UNIX
AdvFS Administration
manual.
9.5.2 Create Only One Fileset in Cluster Root Domain
The root domain,
cluster_root, must
contain only a single fileset.
If you create more than one fileset in
cluster_root
(you are not prevented from
doing so), it can lead to a panic if the
cluster_root
domain needs to fail over.
As an example of when this situation might occur, consider
cloned filesets.
As described in
advfs(4), a clone fileset is a read-only copy of an
existing fileset, which you can mount as you do other filesets.
If you create a clone of the clusterwide root (/) and mount it,
the cloned fileset is added to the
cluster_root
domain.
If the
cluster_root
domain has to fail
over while the cloned fileset is mounted, the cluster will
panic.
Note
If you make backups of the clusterwide root from a cloned fileset, minimize the amount of time during which the clone is mounted. Mount the cloned fileset, perform the backup, and unmount the clone as quickly as possible.
9.5.3 Do Not Add a Volume to a Member's Root Domain
You cannot use the
addvol
command to add volumes to a member's
root domain (rootmemberID_domain#root).
Instead, you must delete the member from the cluster, use
diskconfig
or SysMan to configure the disk
appropriately, and then add the member back
into the cluster.
For the configuration requirements for a member boot
disk, see the
Cluster Installation
manual.
9.5.4 Using the addvol and rmvol Commands in a Cluster
You can manage AdvFS domains from any
cluster member, regardless of
whether the domains are mounted on the local member or a remote member.
However, when you use the
addvol
or
rmvol
command from a member that is not the CFS
server for the domain you
are managing, the commands use
rsh
to execute
remotely on the member that is the CFS server for the domain.
This
has the following consequences:
If
addvol
or
rmvol
is entered
from a member that is not the server of the domain, and if member
that is serving the domain fails, the command can hang on the
system where it was executed until TCP times out, which can take as
long as an hour.
If this situation occurs, you can kill the command and its associated
rsh
processes and repeat the command as follows:
Get the process identifiers (PIDs) with the
ps
command and pipe
the output through
more, searching for
addvol
or
rmvol, whichever
is appropriate.
For example:
# ps -el | more +/addvol
80808001 I  + 0 16253977 16253835  0.0  44   0 451700 424K wait     pts/0
 0:00.09 addvol
80808001 I  + 0 16253980 16253977  0.0  44   0 1e6200 224K event    pts/0
 0:00.02 rsh
  808001 I  + 0 16253981 16253980  0.0  44   0 a82200  56K tty      pts/0
 0:00.00 rsh
Use the process IDs (in this example, PIDs
16253977,
16253980,
and
16253981) and parent process IDs
(PPIDs
16253977
and
16253980) to confirm
the association between the
addvol
or
rmvol
and the
rsh
processes.
Note that two
rsh
processes are associated with the
addvol
process.
All
three processes must be killed.
Kill the appropriate processes. In this example:
# kill -9 16253977 16253980 16253981
Reenter the
addvol
or
rmvol
command.
In the case of
addvol, you must use the
-F
option because the hung
addvol
command might have already changed the
disk label type to AdvFS.
Alternately, before using either the
addvol
or
rmvol
command on a domain,
you can do the following:
Use the
cfsmgr
command to learn the name of the CFS
server of the domain:
# cfsmgr -d domain_name
Or, enter only the command
cfsmgr
and get a list of
the servers of all CFS domains.
Log in to the serving member.
Use the
addvol
or
rmvol
command.
If the CFS
server for the volume fails over to another member
in the middle of an
addvol
or
rmvol
operation, you may need to reenter the command because the new server
undoes any partial operation.
The
command does
not return a message indicating that the server failed, and the
operation must be repeated.
We recommend that you enter a
showfdmn
command for the target domain of an
addvol
or
rmvol
command after the
command returns.
The
rmvol
and
addvol
commands
use
rsh
when the member where the commands are executed
is not the server of the domain.
For
rsh
to function, the default cluster alias must
appear in the
/.rhosts
file.
The entry for
the cluster alias in
/.rhosts
can take the form of
the fully-qualified hostname or the unqualified hostname.
Although the
plus sign (+) can appear in place of the hostname, allowing
all hosts access, this is not
recommended for security reasons.
The
clu_create
command automatically places
the cluster alias in
/.rhosts,
so
rsh
should work without your intervention.
If the
rmvol
or
addvol
command
fails because of
rsh
failure, the following
message is returned:
rsh failure, check that the /.rhosts file allows cluster alias access.
9.5.5 User and Group File System Quotas Are Supported
TruCluster Server Version 5.1A includes quota support that allows you to limit both the number of files and the total amount of disk space that are allocated in an AdvFS filesystem on behalf of a given user or group.
Quota support in a TruCluster Server environment is similar to quota support in the Tru64 UNIX base system, with the following exceptions:
Hard limits are not absolute because the Cluster File System (CFS) makes certain assumptions about how and when cached data is written.
Soft limits and grace periods are supported, but there is no guarantee that a user will get a message when the soft limit is exceeded from a client node, or that such a message will arrive in a timely manner.
The quota commands are effective clusterwide.
However, you must edit the
/sys/conf/NAME
system configuration file on each cluster
member to configure the system to include the quota subsystem.
If
you do not perform this step on a cluster member, quotas are
enabled on that member but you cannot enter quota
commands from that member.
TruCluster Server supports quotas only for AdvFS filesystems.
Users and groups are managed clusterwide. Therefore, user and group quotas are also managed clusterwide.
This section describes information that is unique to managing
disk quotas in a TruCluster Server environment.
For general
information about managing quotas, see the Tru64 UNIX
System Administration
guide.
9.5.5.1 Quota Hard Limits
In a Tru64 UNIX system, a hard limit places an absolute upper boundary on the number of files or amount of disk space that a given user or group can allocate on a given filesystem. When a hard limit is reached, disk space allocations or file creations are not allowed. System calls that would cause the hard limit to be exceeded fail with a quota violation.
In a TruCluster Server environment, hard limits for the number of files are enforced as they are in a standalone Tru64 UNIX system.
However, hard limits on the total amount of disk space are not as rigidly enforced. For performance reasons, CFS allows client nodes to cache a configurable amount of data for a given user or group without any communication with the member serving that data. After the data is cached on behalf of a given write operation and the write operation returns to the caller, CFS guarantees that, barring a failure of the client node, the cached data will eventually be written to disk at the server.
Writing the cached data takes precedence over strictly enforcing the disk quota. If and when a quota violation occurs, the data in the cache is written to disk regardless of the violation. Subsequent writes by this group or user are not cached until the quota violation is corrected.
Because additional data is not written
to the cache while quota violations are being generated, the hard
limit is never exceeded by more than the
sum of
quota_excess_blocks
on all cluster members.
The actual disk space quota for a user or group is therefore
determined by the hard limit plus the sum
quota_excess_blocks
on all cluster members.
The amount of data that a given user or group is allowed to cache is
determined by the
quota_excess_blocks
value, which is
located in the member-specific
etc/sysconfigtab
file.
The
quota_excess_blocks
value is
expressed in units of 1024-byte blocks and the default value of 1024
represents 1 MB of disk space.
The value of
quota_excess_blocks
does
not have to be the same on all cluster members.
You might use a
larger
quota_excess_blocks
value on cluster members
on which you expect most of the data to be generated, and accept the
default value for
quota_excess_blocks
on other
cluster members.
9.5.5.2 Setting the
quota_excess_blocks Value
The value for
quota_excess_blocks
is
maintained in the
/etc/sysconfigtab
file in the
cfs
stanza.
Avoid making manual changes to this
file.
Instead, use the
sysconfigdb
command to make
changes.
This utility automatically makes any changes available
to the kernel and preserves the structure of the file so that future
upgrades merge in correctly.
Performance for a given user or group can be
affected by
quota_excess_blocks.
If this value
is set too low, CFS cannot use the cache
efficiently.
Setting
quota_excess_blocks
to less
than 64K will have a severe performance impact.
Conversely, setting
quota_excess_blocks
too
high increases the actual
amount of disk space that a user or group can consume.
We recommend accepting the
quota_excess_blocks
default of 1 MB, or increasing it as much as is considered
practical given its effect of raising the potential upper limit on
disk block usage.
When determining
how to set this value, consider
that the worst-case upper boundary is determined as follows:
(admin specified hard limit) +
  (sum of "quota_excess_blocks" on each client node)
CFS makes a significant effort to minimize the amount by which the
hard quota limit is exceeded, and it is very unlikely that you would reach
the worst-case upper boundary.
9.5.6 Storage Connectivity and AdvFS Volumes
All volumes in an AdvFS domain must have the same connectivity if failover capability is desired. Volumes have the same connectivity when either one of the following conditions is true:
All volumes in the AdvFS domain are on the same shared SCSI bus.
Volumes in the AdvFS domain are on different shared SCSI buses, but all of those buses are connected to the same cluster members.
The
drdmgr
and
hwmgr
commands can give you information about which systems serve which disks.
To get a graphical display of the cluster hardware configuration, including
active members, buses, storage devices, and their connections, use the
sms
command to invoke the graphical interface
for the SysMan Station, and then select Hardware
from the Views menu.
9.6 Considerations When Creating New File Systems
Most aspects of creating new file systems are the same in a cluster and a standalone environment. The Tru64 UNIX AdvFS Administration manual presents an extensive description of how to create AdvFS file systems in a standalone environment.
For information about adding disks to the cluster, see Section 9.2.3.
The following are important cluster-specific considerations for creating new file systems:
To ensure the highest availability, all disks that are used for volumes in an AdvFS domain should have the same connectivity.
We recommend that all LSM volumes that are placed into an AdvFS domain share the same connectivity. See Section 10.2 for more on LSM volumes and connectivity.
When you determine whether a disk is in use, make sure it is not used as any of the following:
The cluster quorum disk
Do not use any of the partitions on a quorum disk for data.
The clusterwide root file system, the
clusterwide
/var
file system, or the
clusterwide
/usr
file system
A member's boot disk
Do not put any data on a member's boot disk. See Section 11.1.4 for a description of the member boot disk and how to configure one.
There is a single
/etc/fstab
file for all members
of a cluster.
9.6.1 Verifying Disk Connectivity
To ensure the highest availability, make sure that all disks that are used for volumes in an AdvFS domain have the same connectivity.
Disks have the same connectivity when either one of the following conditions is true:
All disks that are used for volumes in the AdvFS domain are on the same shared SCSI bus.
Disks that are used for volumes in the AdvFS domain are on different shared SCSI buses, but all of those buses are connected to the same cluster members.
The easiest way to verify disk connectivity is to
use the
sms
command to invoke the graphical
interface for the SysMan Station, and then select
Hardware from the Views menu.
For example, in
Figure 9-1, the SCSI bus
that is connected to the
pza0s is shared by all
three cluster members.
All disks
on that base have the same connectivity.
You can also use the
hwmgr
command to view all the
devices on the cluster and then pick out those disks that show up
multiple times because they are connected to several members.
For example:
# hwmgr -view devices -cluster

HWID: Device Name         Mfg     Model            Hostname   Location
-------------------------------------------------------------------------------
  3: kevm                                         pepicelli
 28: /dev/disk/floppy0c          3.5in floppy     pepicelli  fdi0-unit-0
 40: /dev/disk/dsk0c     DEC     RZ28M    (C) DEC pepicelli  bus-0-targ-0-lun-0
 41: /dev/disk/dsk1c     DEC     RZ28L-AS (C) DEC pepicelli  bus-0-targ-1-lun-0
 42: /dev/disk/dsk2c     DEC     RZ28     (C) DEC pepicelli  bus-0-targ-2-lun-0
 43: /dev/disk/cdrom0c   DEC     RRD46    (C) DEC pepicelli  bus-0-targ-6-lun-0
 44: /dev/disk/dsk13c    DEC     RZ28M    (C) DEC pepicelli  bus-1-targ-1-lun-0
 44: /dev/disk/dsk13c    DEC     RZ28M    (C) DEC polishham  bus-1-targ-1-lun-0
 44: /dev/disk/dsk13c    DEC     RZ28M    (C) DEC provolone  bus-1-targ-1-lun-0
 45: /dev/disk/dsk14c    DEC     RZ28L-AS (C) DEC pepicelli  bus-1-targ-2-lun-0
 45: /dev/disk/dsk14c    DEC     RZ28L-AS (C) DEC polishham  bus-1-targ-2-lun-0
 45: /dev/disk/dsk14c    DEC     RZ28L-AS (C) DEC provolone  bus-1-targ-2-lun-0
 46: /dev/disk/dsk15c    DEC     RZ29B    (C) DEC pepicelli  bus-1-targ-3-lun-0
 46: /dev/disk/dsk15c    DEC     RZ29B    (C) DEC polishham  bus-1-targ-3-lun-0
 46: /dev/disk/dsk15c    DEC     RZ29B    (C) DEC provolone  bus-1-targ-3-lun-0
        .
        .
        .
In this partial output,
dsk0,
dsk1, and
dsk2
are private disks that are connected to
pepicelli's local
bus.
None of these are appropriate for a file system that
needs failover capability, and they are not good choices
for Logical Storage Manager (LSM) volumes.
dsk13
(HWID 44),
dsk14
(HWID 45), and
dsk15
(HWID 46) are connected to
pepicelli,
polishham, and
provolone.
These three disks all have the same connectivity.
9.6.2 Looking for Available Disks
When you want to determine whether disks are already in use, look for the
quorum disk, disks containing the clusterwide file systems,
and member boot disks and swap areas.
9.6.2.1 Looking for the Location of the Quorum Disk
You can learn the location of the
quorum disk by using the
clu_quorum
command.
In the following example, the partial output for the command shows that
dsk10
is the cluster quorum disk:
# clu_quorum
 Cluster Quorum Data for: deli as of Wed Apr 25 09:27:36 EDT 2001

Cluster Common Quorum Data
Quorum disk:   dsk10h
        .
        .
        .
You can also use the
disklabel
command
to look for a quorum disk.
All partitions in a quorum
disk should be unused, except for the
h
partition, which has
fstype
cnx.
9.6.2.2 Looking for the Location of Member Boot Disks and Clusterwide AdvFS File Systems
To learn the locations of member boot disks and clusterwide
AdvFS file
systems, look for the file domain entries in
the
/etc/fdmns
directory.
You can use the
ls
command for this.
For example:
# ls /etc/fdmns/*

/etc/fdmns/cluster_root:
dsk3c

/etc/fdmns/cluster_usr:
dsk5c

/etc/fdmns/cluster_var:
dsk6c

/etc/fdmns/projects1_data:
dsk9c

/etc/fdmns/projects2_data:
dsk11c

/etc/fdmns/projects_tools:
dsk12c

/etc/fdmns/root1_domain:
dsk4a

/etc/fdmns/root2_domain:
dsk8a

/etc/fdmns/root3_domain:
dsk2a

/etc/fdmns/root_domain:
dsk0a

/etc/fdmns/usr_domain:
dsk0g
This output from the
ls
command
indicates the following:
Disk
dsk3
is used by the clusterwide
root file system (/).
You cannot use this disk.
Disk
dsk5
is used by the clusterwide
/usr
file system.
You cannot use this disk.
Disk
dsk6
is used by the clusterwide
/var
file system.
You cannot use this disk.
Disks
dsk4,
dsk8, and
dsk2
are member boot disks.
You cannot use these disks.
You can also use the
disklabel
command to identify
member boot disks.
They have three partitions:
the
a
partition has
fstype
AdvFS,
the
b
partition has
fstype
swap, and
the
h
partition has
fstype
cnx.
Disks
dsk9,
dsk11, and
dsk12
appear to be used for data and tools.
Disk
dsk0
is the boot disk for
the noncluster, base Tru64 UNIX operating system.
Keep this disk unchanged in case you need to boot the noncluster kernel to make repairs.
9.6.2.3 Looking for Member Swap Areas
A member's primary swap area is always the
b
partition of the member boot disk.
(For information about member boot disks, see
Section 11.1.4.)
However, a member might have additional swap areas.
If a member is down, be careful not to use the member's
swap area.
To learn whether a disk has swap areas on it, use
the
disklabel -r
command.
Look in the
fstype
column in the output for
partitions with
fstype
swap.
In the following
example, partition
b
on
dsk11
is a swap partition:
# disklabel -r dsk11
        .
        .
        .
8 partitions:
#         size     offset    fstype   [fsize bsize cpg] # NOTE: values not exact
 a:     262144          0     AdvFS                     # (Cyl.    0 - 165*)
 b:     401408     262144      swap                     # (Cyl.  165*- 418*)
 c:    4110480          0    unused        0     0      # (Cyl.    0 - 2594)
 d:    1148976     663552    unused        0     0      # (Cyl.  418*- 1144*)
 e:    1148976    1812528    unused        0     0      # (Cyl. 1144*- 1869*)
 f:    1148976    2961504    unused        0     0      # (Cyl. 1869*- 2594)
 g:    1433600     663552     AdvFS                     # (Cyl.  418*- 1323*)
 h:    2013328    2097152     AdvFS                     # (Cyl. 1323*- 2594)
You can use the SysMan Station graphical user interface (GUI) to
create and configure
an AdvFS volume.
However, if you choose to use the
command line, when it comes time to edit
/etc/fstab, you need do it only once, and
you can do it on any cluster member.
The
/etc/fstab
file is
not a CDSL.
A single file is used by all cluster members.
9.7 Managing CDFS File Systems
In a cluster, a CD-ROM drive is always a served device. The drive must be connected to a local bus; it cannot be connected to a shared bus. The following are restrictions on managing a CD-ROM File System (CDFS) in a cluster:
The
cddevsuppl
command is not supported in a
cluster.
The following commands work only when executed from the cluster member that is the CFS server of the CDFS file system:
Regardless of which member mounts the CD-ROM, the member that is connected to the drive is the CFS server for the CDFS file system.
To manage a CDFS file system, follow these steps:
Enter the
cfsmgr
command to learn which member
currently serves the CDFS:
# cfsmgr
Log in on the serving member.
Use the appropriate commands to perform the management tasks.
For information about using library functions that manipulate the
CDFS, see the TruCluster Server
Cluster Highly Available Applications
manual.
9.8 Backing Up and Restoring Files
Back up and restore
for user data in a cluster is similar to that in a standalone system.
You back up and restore CDSLs
like any other symbolic links.
To back up all the targets of CDSLs,
back up the
/cluster/members
area.
Make sure that all restore software that you plan to use
is available on the Tru64 UNIX disk of the system that
was the initial cluster member.
Treat this disk as the
emergency repair disk for the cluster.
If the cluster loses
the root domain,
cluster_root, you can
boot the initial cluster member from the Tru64 UNIX disk
and restore
cluster_root.
The
bttape
utility is not supported in clusters.
9.8.1 Suggestions for Files to Back Up
You should regularly back up data files and the following file systems:
The clusterwide root file system
Use the same backup/restore methods that you use for user data.
The clusterwide
/usr
file system
Use the same backup/restore methods that you use for user data.
The clusterwide
/var
file system
Use the same backup/restore methods that you use for user data.
If, before installing TruCluster Server, you were using AdvFS and
had
/var
located in
/usr,
the installation process moved
/var
into a separate fileset under
usr_domain.
Because of this move, you must back up
/var
as a
separate file system from
/usr.
Member boot disks
There are special considerations for backing up and restoring member boot disks. See Section 11.1.4.
Do not put swap entries in
/etc/fstab.
In Tru64 UNIX Version 5.0 the list of swap devices was moved from the
/etc/fstab
file to the
/etc/sysconfigtab
file.
Additionally, you no longer
use the
/sbin/swapdefault
file
to indicate the swap allocation; use the
/etc/sysconfigtab
file for this purpose as well.
The swap devices and swap allocation mode are automatically placed in the
/etc/sysconfigtab
file during installation of the base operating system.
For more
information, see the Tru64 UNIX
System Administration
manual
and
swapon(8)
.
Put each member's swap information in
that member's
sysconfigtab
file.
Do not put any swap
information in the clusterwide
/etc/fstab
file.
Swap information in
sysconfigtab
is identified
by the
swapdevice
attribute.
The format for swap information is as follows:
swapdevice=disk_partition,disk_partition,...
For example:
swapdevice=/dev/disk/dsk1b,/dev/disk/dsk3b
Specifying swap entries in
/etc/fstab
does not
work in a cluster because
/etc/fstab
is not
member-specific; it is a clusterwide file.
If swap were
specified in
/etc/fstab, the first member
to boot and form a cluster would read and mount all the file systems in
/etc/fstab.
The other members would never see that
swap space.
The file
/etc/sysconfigtab
is a context-dependent
symbolic link (CDSL), so that each member can
find and mount its specific swap partitions.
The installation script automatically
configures one swap device for each member, and puts a
swapdevice=
entry in that member's
sysconfigtab
file.
If you want to add additional swap space, specify the new partition
with
swapon, and then put an entry in
sysconfigtab
so the partition is available
following a reboot.
For example, to configure
dsk3b
for use as a secondary swap device for a member already
using
dsk1b
for swap, enter the following
command:
swapon -s /dev/disk/dsk3b
Then, edit that member's
/etc/sysconfigtab
and add
/dev/disk/dsk3b.
The final
entry in
/etc/sysconfigtab
will look like the
following:
swapdevice=/dev/disk/dsk1b,/dev/disk/dsk3b
9.9.1 Locating Swap Device for Improved Performance
Locating a member's swap space on a device on a shared bus results in additional I/O traffic on the bus. To avoid this, you can place swap on a disk on the member's local bus.
The only downside to locating swap local to the member is
the unlikely case where the member loses its path to the swap disk,
as can happen when an adapter fails.
In this situation, the
member will fail.
When the swap disk is on
a shared bus, the member can still use its swap partition as long
as at least one member still has a path to the disk.
9.10 Fixing Problems with Boot Parameters
If a cluster member fails to boot due to parameter problems in the
member's root domain
(rootN_domain),
you can mount that domain on a running
member and make the needed
changes to the parameters.
However, before booting the
down member, you must unmount the
newly updated member root
domain from the running cluster member.
Failure to do so can cause a crash and result in the display of the following message:
cfs_mountroot: CFS server already exists for node boot partition.
For more information, see
Section 11.1.9.
9.11 Using the verify Utility in a Cluster
The
verify
utility
examines the on-disk metadata structures of AdvFS file systems.
Before
using the utility, you must unmount all filesets in the file domain
to be verified.
If you are running the
verify
utility and the
cluster member on which it is running fails, extraneous mounts may be
left.
This can happen because the
verify
utility creates temporary mounts of the
filesets that are in the domain that is being verified.
On a single system these mounts go away if the system
fails while running the utility, but, in a cluster, the mounts
fail over to another cluster member.
The fact that these mounts
fail over also prevents you from mounting the filesets until
you remove the spurious mounts.
When
verify
runs, it creates a directory for
each fileset in the domain and then mounts each fileset on the
corresponding directory.
A directory is named as follows:
/etc/fdmns/domain/set_verify_XXXXXX,
where
XXXXXX
is a unique ID.
For example, if the domain name is
dom2
and the
filesets in
dom2
are
fset1,
fset2, and
fset3, enter the following command:
# ls -l /etc/fdmns/dom2
total 24
lrwxr-xr-x   1 root     system        15 Dec 31 13:55 dsk3a -> /dev/disk/dsk3a
lrwxr-x---   1 root     system        15 Dec 31 13:55 dsk3d -> /dev/disk/dsk3d
drwxr-xr-x   3 root     system      8192 Jan  7 10:36 fset1_verify_aacTxa
drwxr-xr-x   4 root     system      8192 Jan  7 10:36 fset2_verify_aacTxa
drwxr-xr-x   3 root     system      8192 Jan  7 10:36 fset3_verify_aacTxa
To clean up the failed-over mounts, follow these steps:
Unmount all the filesets in
/etc/fdmns:
# umount /etc/fdmns/*/*_verify_*
Delete all failed over mounts with the following command:
# rm -rf /etc/fdmns/*/*_verify_*
Remount the filesets as you would after a normal
completion of the
verify
utility.
For more information about
verify, see
verify(8).
9.11.1 Using the verify Utility on Cluster Root
The
verify
utility has been modified
to allow it to run on active domains.
Use the
-a
option to examine the cluster root file system,
cluster_root.
You must execute the
verify -a
utility
on the member that is serving the domain that you are examining.
Use the
cfsmgr
command to determine which
member serves the domain.
When
verify
runs with the
-a
option, it only examines the domain.
No fixes can be
done on the active domain.
The
-f
and
-d
options cannot be used with the
-a
option.