After preparing your subsets as described in Chapter 3 (and optionally creating subset control programs as described in Chapter 4), perform the following tasks to produce your subsets:
Run the
kits
utility to produce subsets
and control files (Section 5.1)
Test your subsets to make sure that they can be installed, that the product works, and that the kit can be deleted Section 5.2)
Optionally, update your kit inventory after producing subsets (Section 5.2)
After you create the master inventory and key files as described in
Chapter 3, run the
kits
utility to produce
subsets and control files.
The
kits
utility creates the
following files:
The compression flag file (Section 5.1.1)
The image data file (Section 5.1.2)
The subset control files (Section 5.1.3)
The subset inventory files (Section 5.1.4)
Caution
Do not create these files before you run the
kitsutility.
Use the following syntax for the
kits
command:
kits
key-file
input-path
output-path
[subset]...
This mandatory parameter is the pathname of the key file created in Section 3.3.
This mandatory parameter specifies the top of the file hierarchy that contains the source files.
This mandatory parameter specifies the directory used to store the subset images and data files produced.
This optional
parameter specifies the name of an individual subset to be built.
You may
specify multiple subsets in a space-separated list.
If you use the
subset
argument, the
kits
utility assumes
the following:
Only the subsets named as arguments to this parameter are to be built.
The key-file contains descriptors for each of the named subsets.
All other subsets in the product have been built already.
The output-path directory contains images of the previously built subsets.
If you do not use the
subset
argument, the
kits
utility builds all subsets listed in the key file.
See
kits(1)
for more information.
Note
The master inventory file (
*.mi) and the key file (*.k) are typically in the same directory. If they are not, theMI=attribute in the key file must contain the explicit relative path from the directory where you are running thekitsutility to the directory where the master inventory file resides. Thescpsdirectory that contains any subset control programs must be in the same directory where thekitsutility is invoked.
Example 5-1
shows a sample of using
the
kits
utility to build the subsets for the ODB product
kit:
Example 5-1: Using the kits Utility to Build ODB Subsets
# cd /mykit/data
# kits OAT100.k ../src ../output
%%
Creating 2 Orpheus Document Builder subsets.
1   Subset OATODB100  [1]
        Generating media creation information...done
        Creating OATODB100 control file...done.
        Making tar image...done.  [2]
        Compressing  [3]
           OATODB100: Compression: 92.64%
 -- replaced with OATODB100.Z

        *** Finished creating media image for OATODB100. ***

2   Subset OATODBTEMPS100  [1]
        Generating media creation information...done
        Creating OATODBTEMPS100 control file...done.
        Making tar image...done.
        Compressing  [3]
           OATODBTEMPS100: Compression: 98.39%
 -- replaced with OATODBTEMPS100.Z
        Null subset control program created for OATODBTEMPS100.

        *** Finished creating media image for OATODBTEMPS100. ***

Creating OAT.image  [4]

Creating INSTCTRL  [5]
a OAT.image 1 Blocks
a OAT100.comp 0 Blocks
a OATODB100.ctrl 1 Blocks
a OATODB100.inv 2 Blocks
a OATODB100.scp 7 Blocks
a OATODBTEMPS100.ctrl 1 Blocks
a OATODBTEMPS100.inv 0 Blocks
a OATODBTEMPS100.scp 0 Blocks

Media image production complete.
In
Example 5-1, the
kits
utility performs the following steps and reports its progress:
Creates the subsets. [Return to example]
If the subset is not in DCD format,
creates a
tar
image of the subset.
[Return to example]
Compresses each subset if you set
the key file's
COMPRESS
attribute to
1
[Return to example]
Creates
the image data file
OAT.image.
[Return to example]
Creates the
INSTCTRL
file, which contains a
tar
image of
all the following installation control files:
Compression flag file
product-id.comp
Image data file
product-code.image
Subset control file
subset-id.ctrl
Subset inventory file
subset-id.inv
Subset control program file
subset-id.scp
If you created an SCP, the
kits
utility copies it
from the kit's
data/scps
directory to the kit's
output/instctrl
directory.
If not, the
kits
utility
creates an empty
subset-id.scp
file in the kit's
output/instctrl
directory.
These files are described in Table 5-1.
The
INSTCTRL
file is placed in the output directory.
[Return to example]
Table 5-1
shows the installation control files
in the
instctrl
directory after you run the
kits
utility.
Table 5-1: Installation Control Files in the instctrl Directory
| File | Description |
product-id.comp |
Compression flag file.
This empty file is
created only if you set the key file's
COMPRESS
attribute
to
1.
The ODB kit's compression flag file is named
OAT100.comp.
The contents of the compression flag file are described
in
Section 5.1.1. |
product-code.image |
Image data file.
This file contains size
and checksum information for the subsets.
The ODB kit's image data file is
named
OAT.image.
The contents of the image data file are
described in
Section 5.1.2. |
subset-id.ctrl |
Subset control file.
This file contains the
setld
utility control information.
There is one subset control
file for each subset.
The ODB kit's subset control files are named
OATODB100.ctrl
and
OATODBTEMPS100.ctrl.
The contents
of the subset control file are described in
Section 5.1.3. |
subset-id.inv |
Subset inventory file.
This file contains
an inventory of the files in the subset.
Each record describes one file.
There is one subset inventory file for each subset.
The ODB kit's subset
inventory files are named
OATODB100.inv
and
OATODBTEMPS100.inv.
The contents of the subset inventory file are
described in
Section 5.1.4. |
subset-id.scp |
Subset control program (SCP) .
If you created
subset control programs for your kit, these files are copied from the
scps
directory to the
instctrl
directory.
There
is one subset control program for each subset; if you have not created a subset
control program for a subset, the
kits
utility creates
a blank file.
The ODB kit's subset control program files are named
OATODB100.scp
and
OATODBTEMPS100.scp.
Subset
control programs are described in
Chapter 4.
|
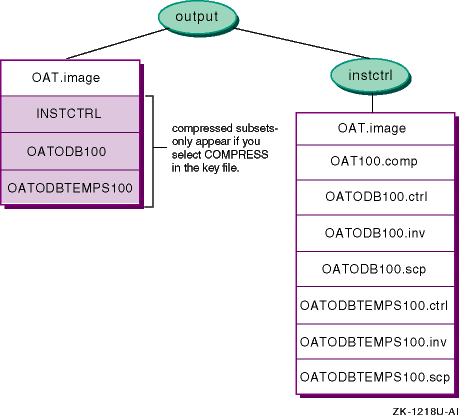
Figure 5-1
shows the contents of the
output
directory after you run the
kits
utility.
Figure 5-1: ODB output Directory
The subset files and the files in the
instctrl
directory
are constituents of the final kit.
The following sections describe the contents
of the installation control files created by the
kits
utility.
5.1.1 Compression Flag File
The
compression flag file
is an empty file whose name consists of the product code and the version
number with the string
.comp
as a suffix; for example,
OAT100.comp.
The
kits
utility creates a compression
flag file if the key file's
COMPRESS
attribute is set to
1.
5.1.2 Image Data File
The
image data file
is used
by the
setld
utility to verify subset image integrity before
starting the actual installation process.
The image data file name consists
of the product code with the string
.image
as a suffix.
The image data file contains one record for each subset in the kit, with three
fields in each record.
Table 5-2
describes the image data
file.
Table 5-2: Image Data File Field Descriptions
| Field | Description |
| Checksum | The modulo-65536 (16-bit) checksum of the
subset file, as provided by the
sum
utility.
If the file
is compressed, the checksum after compression.
[Footnote 10]
|
| Size | The size of the subset file in kilobytes. If the file is compressed, the size after compression. |
| Subset identifier | The product code, subset mnemonic, and version
number.
For example,
OATODB100. |
Example 5-2
shows the
OAT.image
image data file for the ODB kit:
Example 5-2: Sample Image Data File
13601    10 OATODB100
12890    10 OATODBTEMPS100
The
setld
utility uses the subset control files as
a source of descriptive information about subsets.
The subset control file's
name consists of the subset name followed by the suffix
.ctrl,
for example:
OATODB100.ctrl.
Note
Do not confuse subset control files with subset control programs (SCPs). Subset control programs are described in Chapter 4.
Subset control file fields are described in
Table 5-3.
Table 5-3: Subset Control File Field Descriptions
| Field | Description |
NAME |
Specifies the product name. This value is from the Name field in the Key File. |
DESC
|
Briefly describes the subset. This value is from the Subset Description field in the Subset Descriptor section of the Key File. |
ROOTSIZE |
Specifies (in bytes) the space the subset
requires in the
root
( / )
file system. |
USRSIZE |
Specifies (in bytes) the space the subset
requires in the
usr
file system.
This value is calculated
by the
kits
utility. |
VARSIZE
|
Specifies (in bytes) the space the subset
requires in the
var
file system.
This value is calculated
by the
kits
utility. |
NVOLS
|
Specifies disk volume identification information
as two colon-separated integers (the volume number of the disk that contains
the subset archive and the number of disks required to contain the subset
archive).
This value is calculated by the
kits
utility. |
MTLOC
|
Specifies the tape volume number and subset's
location on the tape as two colon-separated integers (the volume number of
the tape that contains the subset archive and the file offset at which the
subset archive begins).
On tape volumes, the first three files are reserved
for a bootable operating system image and are not used by the
setld
utility.
An offset of 0 (zero) indicates the fourth file on the
tape.
The fourth file is a
tar
archive named
INSTCTRL, which contains the kit's installation control files (listed
in
Table 5-1).
This value is calculated by the
kits
utility. |
DEPS
|
Specifies either a list of subsets
upon which this subset is dependent ( You may use the following wildcard characters when
you specify subset names in the
|
FLAGS
|
Specifies the value in the flags field of the subsets record in the key file. This value is from the Flags field in the Subset Descriptor section of the Key file. |
| Bit 0 indicates whether the subset can be removed (0=removable, 1=protected). | |
| Bit 1 indicates whether the subset is mandatory (0=mandatory, 1=optional). | |
| Bit 2 indicates whether the subset is compressed (0=compressed, 1=uncompressed). | |
| Bits 3 to 7 are reserved; bits 8 to 15 are undefined. |
Example 5-3
shows the
OATODB100.ctrl
subset control file for the ODB kit's
OATODB100
subset:
Example 5-3: Sample Subset Control File
NAME='Orpheus Document Builder OATODB100'
DESC='Document Builder Tools'
ROOTSIZE=16668
USRSIZE=16459
VARSIZE=16384
NVOLS=1:0
MTLOC=1:1
DEPS="."
FLAGS=0
The
subset inventory file
describes each file in the subset, listing its size, checksum, permissions,
and other information.
The subset inventory file's name consists of the subset
name followed by the suffix
.inv, for example:
OATODB100.inv.
The
kits
utility generates this
information, reflecting the exact state of the files in the source hierarchy
from which the kit was built.
The
setld
utility uses the
information to duplicate that state, thus transferring an exact copy of the
source hierarchy to the customer's system.
Table 5-4
describes subset inventory file fields.
Each record of the inventory is composed of 12 fields, each separated
by single
[Tab]
characters.
Table 5-4
describes the contents of these fields.
Table 5-4: Subset Inventory File Field Descriptions
Example 5-4
shows the
OATODB100.inv
inventory file for the ODB kit's
OATODB100
subset.
Example 5-4: Sample ODB Product Subset Inventory File
0	512	00000	0	0	040755	5/15/00	100	d\
	./cluster/members/member0/opt/OAT100	none	OATODB100
2	44	56771	0	0	100644	5/15/00	100	f\
	./cluster/members/member0/opt/OAT100/odb.conf	none	OATODB100
0	512	56771	0	0	040755	5/15/00	100	d\
	./opt/OAT100	none	OATODB100
2	51	00000	0	0	120777	5/15/00	100	s\
	./opt/OAT100/odb.conf\
	../../../cluster/members/{memb}/opt/OAT100/odb.conf	OATODB100
0	512	00000	0	0	040755	5/15/00	100	d\
	./opt/OAT100/sbin	none	OATODB100
0	28	06280	0	0	100644	5/15/00	100	f\
	./opt/OAT100/sbin/odb_recover	none	OATODB100
0	512	06280	0	0	040755	5/15/00	100	d\
	./usr/opt/OAT100	none	OATODB100
0	512	06280	0	0	040755	5/15/00	100	d\
	./usr/opt/OAT100/bin	none	OATODB100
0	27	33168	0	0	100644	5/15/00	100	f\
	./usr/opt/OAT100/bin/odb_start	none	OATODB100
0	512	33168	0	0	040755	5/15/00	100	d\
	./usr/var/cluster/members/member0/opt/OAT100	none	OATODB100
0	23	43390	0	0	100644	5/15/00	100	f\
	./usr/var/cluster/members/member0/opt/OAT100/odb_log	none	OATODB100
0	512	43390	0	0	040755	5/15/00	100	d\
	./usr/var/opt/OAT100	none	OATODB100
0	512	43390	0	0	040755	5/15/00	100	d\
	./usr/var/opt/OAT100/log_files	none	OATODB100
0	58	00000	0	0	120777	5/15/00	100	s\
	./usr/var/opt/OAT100/log_files/odb_log\
	../../../usr/var/cluster/members/{memb}/opt/OAT100/odb_log	OATODB100
Note
The backslashes (
\) in Example 5-4 indicate line continuation and are not present in the actual file.Fields are separated by single [Tab] characters.
You must test your subsets to ensure that they can be loaded onto a running system, that the product runs on the system, and that the subsets can be deleted. You must perform these tests in the following sequence::
Loading all of the subsets onto a running system. (Section 5.2.1)
Deleting all of the subsets from a running system. (Section 5.2.2)
If your kit includes optional subsets, loading only the mandatory subsets onto a running system. (Section 5.2.3)
If your kit can be run in a cluster environment, testing on a cluster. (Section 5.2.4)
See the
Installation Guide
for information about recovering from software
load and delete failures.
5.2.1 Loading All Subsets
The examples in this section assume that your kit consists of the mandatory
OATODB100
subset and the optional
OATODBTEMPS100
subset, and that it resides in the
/mykit/output
directory.
Follow these steps to load all subsets:
Log in to the system as
root
or use the
su
command to gain superuser privileges.
Use the
setld
utility to load
all of your subsets onto the system, as in the following example:
# setld -l /mykit/output
When prompted, select the option to install all subsets from
the
setld
installation menu.
Verify that all files in your subsets were loaded. If any files are missing, check the master inventory file. Subset inventory files are created from master inventory file entries.
Verify each file's installed location, permissions, owner,
and group.
The
setld
utility uses the information in the
subset inventory file to determine these attributes.
If any are incorrect,
modify the file in the source directory and rebuild the master inventory file
and the subsets.
If you supplied SCP files, verify any actions that should
have occurred in the
M,
PRE_L,
POST_L, and
C INSTALL
phases.
See
Section 4.6
for discussions of SCP tasks associated with these phases.
After successful installation, test all commands
or utilities included with your product.
Since file locations may have changed,
especially if you installed in the
/opt,
/usr/opt, or
/usr/var/opt
directories, it is important
that you test your product thoroughly to verify that everything works correctly.
Repeat the test to confirm that the SCP does not fail when it runs more than once.
Use the
setld -l
command to
reload all of your subsets onto the system.
Verify that all files in your subsets were loaded. If any files are missing, check the master inventory file.
Verify each file's installed location, permissions, owner, and group. If any are incorrect, modify the file in the source directory and rebuild the master inventory file and the subsets.
If you supplied SCP files, verify any actions that should
have occurred in the
M,
PRE_L,
POST_L, and
C INSTALL
phases.
See
Section 4.6
for discussions of SCP tasks associated with these phases.
After successful installation, test all commands or utilities included with your product.
The examples in this section assume that your kit consists of the mandatory
OATODB100
subset and the optional
OATODBTEMPS100
subset, and that it resides in the
/mykit/output
directory.
Follow these steps to remove all subsets:
Log in to the system as
root
or use the
su
command to gain superuser privileges.
Use the
setld
utility to delete all of
your subsets from the system, as in the following example:
# setld -d OATODB100 OATODBTEMPS100
Verify that all files loaded onto your system in Section 5.2.1 were deleted.
If you supplied SCP files, verify any actions that should
have occurred in the
C DELETE,
PRE_D,
and
POST_D
phases.
See
Section 4.6
for discussions of SCP tasks associated with these phases.
5.2.3 Loading Mandatory Subsets Only
The examples in this section assume that your kit consists of the mandatory
OATODB100
subset and the optional
OATODBTEMPS100
subset, and that it resides in the
/mykit/output
directory.
Follow these steps to load only the mandatory subsets:
Log in to the system as
root.
Use the
setld
utility to load all of your
subsets onto the system, as in the following example:
# setld -l /mykit/output
When prompted, select the option to install only mandatory
subsets from the
setld
installation menu.
Verify that all mandatory files in your subsets were loaded. If any files are missing, check the master inventory file. Subset inventory files are created from master inventory file entries.
Verify each file's installed location, permissions, owner,
and group.
The
setld
utility uses the information in the
subset inventory file to determine these attributes.
If any are incorrect,
modify the file in the source directory and rebuild the master inventory file
and the subsets.
If you supplied SCP files, verify any actions that should
have occurred in the
M,
PRE_L,
POST_L, and
C INSTALL
phases.
See
Section 4.6
for discussions of SCP tasks associated with these phases.
After successful installation, test all commands or utilities
included with your product.
Since file locations may have changed, especially
if you installed in the
/opt,
/usr/opt,
or
/usr/var/opt
directories, it is important that you test
your product thoroughly to verify that everything works correctly.
If your product does not work correctly, some of the files in your optional subsets may need to be moved to mandatory subsets.
To test your product kit in a cluster, you must ensure that your subsets can be loaded onto a running cluster, that the product runs on the cluster, and that the subsets can be deleted from the cluster. You must perform these tests in the following sequence:
Loading all of the subsets onto a cluster. (Section 5.2.4.1)
Deleting all of the subsets from a cluster. (Section 5.2.4.2)
The examples in this section assume that your kit consists of the mandatory
OATODB100
subset and the optional
OATODBTEMPS100
subset and that it resides in the
/mykit/output
directory.
5.2.4.1 Loading the Kit onto a Cluster
Follow these steps to load the product kit onto a cluster:
Log in to the cluster as
root.
Use the
setld
utility to load all of your
subsets onto the cluster, as in the following example:
# setld -l /mykit/output
When prompted, select the option to install all subsets from
the
setld
installation menu.
Verify that all files in your subsets were loaded. If any files are missing, check the master inventory file. Subset inventory files are created from master inventory file entries.
Verify each file's installed location, permissions, owner,
and group.
The
setld
utility uses the information in the
subset inventory file to determine these attributes.
If any are incorrect,
modify the file in the source directory and rebuild the master inventory file
and the subsets.
Perform the following checks on each cluster member:
Verify each member-specific file's location, permissions,
owner, and group.
The
setld
utility uses the information
in the subset inventory file to determine these attributes.
If any are incorrect,
modify the file in the source directory and rebuild the master inventory file
and the subsets.
Verify that each CDSL can be accessed and that it contains the correct information for each member.
If you supplied SCP files, verify any actions that should
have occurred in the
M,
PRE_L,
POST_L, and
C INSTALL
phases.
See
Section 4.6
for discussions of SCP tasks associated with these phases.
After successful installation, test all commands or utilities
included with your product.
Since file locations may have changed, especially
if you installed in the
/opt,
/usr/opt,
or
/usr/var/opt
directories, it is important that you test
your product thoroughly to verify that everything works correctly.
5.2.4.2 Deleting the Kit from a Cluster
Follow these steps to delete the kit from a cluster:
Log in to the cluster as
root
or use the
su
command to gain superuser privileges.
Use the
setld
utility to delete all of
your subsets from the cluster, as in the following example:
# setld -d OATODB100 OATODBTEMPS100
Verify that all files loaded onto your system in Section 5.2.1 were deleted.
Perform the following checks on each cluster member:
Verify that each member-specific file was removed.
If you supplied SCP files, verify any actions that should
have occurred in the
C DELETE,
PRE_D,
and
POST_D
phases.
See
Section 4.6
for discussions of SCP tasks associated with these phases.
Verify that all files not in the inventory are deleted. This includes any files created when your kit was installed.
5.3 Updating Inventory After Creating Subsets
You may have to update the master inventory file after you have created
subsets.
For example, kernel product kits require additional files, some of
which must be added to your kit's inventory.
If you create or modify a subset
control program after you run the
kits
utility, you also
must update the subset's master inventory file.
Run the
newinv
utility to update the master inventory
file, using the existing master inventory file as input.
The
newinv
utility performs the following additional steps:
Finds all the file and directory names in the source hierarchy.
Produces the following sorted groups of records:
Records that contain pathnames only, representing files now present that were not in the previous inventory (new records).
Records that represent files now present that were also present in the previous inventory. This list is empty the first time you create the inventory.
Records that were in the previous inventory but are no longer present (defunct records). This list is also empty the first time you create the inventory.
Lets you edit the group of defunct records, deleting records for files that no longer belong in the kit.
Lets you edit the group of new records by adding the flags and subset identification fields (see Table 3-1).
Merges the three groups of records and sorts the result to produce a finished master inventory file that matches the source hierarchy.
Run the
newinv
utility to update the master inventory
file any time that you add, modify, or remove files in the kit's source directory.
After you update the master inventory file, run the
kits
utility as described in
Section 5.1
to produce
updated subsets and control files.