3 Update Installation Procedure
The information in this chapter assumes that you are updating the operating
system on a single system from the CD-ROM
distribution media.
To invoke an
Update Installation
from a
RIS server, see the
Installation Guide -- Advanced Topics
for instructions on using a remote
server; then come back to this manual for the remainder of the procedure.
Note
If the Update Installation you are about to perform is part of the installation
stage of the
cluster
rolling upgrade
process, make sure you have performed the preparation and setup stages of
the rolling upgrade as described in the TruCluster Server
Cluster Installation
manual before performing the Update Installation on the lead cluster member.
The TruCluster Server
Cluster Installation
manual is part of the TruCluster Server
documentation kit, which is available on the World Wide Web at
http://www.tru64unix.compaq.com/docs/
Summary of the Update Installation Procedure:
Complete prerequisite tasks to prepare the system for an Update
Installation (Section 3.1).
Shut down the system to single-user mode to begin the Update
Installation (Section 3.2).
Start the Update Installation from CD-ROM (Section 3.3).
Choose Update Installation options (Section 3.4).
Monitor the analysis phase of the Update Installation (Section 3.5).
Confirm the start of the Update Installation process (Section 3.6).
Log in as the user
root
when the Update
Installation is complete (Section 3.7).
Review installation log files after the Update Installation
is complete (Section 3.8).
Manually merge file customizations if necessary (Section 3.9).
Optionally run the Update Installation Cleanup utility to
remove files left on the system as a result of the Update Installation (Section 3.10).
3.1 Step 1: Prepare for the Update Installation
Perform the following tasks before you begin
an Update Installation:
Back up the user data on the current operating system.
It is recommended that you back up user data before beginning an Update
Installation.
If there are any interruptions when the Update Installation
process is loading
software subsets, it
is unlikely that the Update Installation will complete successfully, which
will leave your system in an indeterminate state.
Should this happen, you
must restore the original version of the operating system before you can attempt
another Update Installation.
See the
System Administration
manual for information
about backing up your current operating system.
Read the current version of the
Release Notes, particularly
any information about Update Installations.
It is recommended that you read the
Release Notes
because it may contain
changes to software,
firmware, or hardware
that are not documented in this manual.
The
Release Notes
also contain a summary
of the enhancements made in the new version of the operating system.
Make sure you know the CD-ROM
device name
that you will use to boot the
distribution media
to invoke the Update Installation.
If you do not already know the device name, determine the CD-ROM device
name while the system is still in multiuser mode by entering the following
command:
$ ls /dev/disk/cdrom*c
/dev/disk/cdrom0c
If you have
AdvFS
file systems
on your system, perform the
following procedure to protect the data on AdvFS file domains.
Otherwise,
proceed to Step
6.
Log in
as
root
or use the
su
command to gain
superuser
privileges.
Use the
shutdown
command to put your system
into
single-user mode.
Use the
umount -A
command to
unmount
all local file systems.
Run the
verify
utility on each domain (remember
to use the
-a
flag if you are checking the root domain).
If you find any problems, correct them before continuing.
See
verify(8)
for more information.
Use the
mount
command to mount all of the verified local file systems.
Use the
quotacheck
command to fix the quotas
on the mounted local file systems.
If you have problems running the
quotacheck
command, you may have to edit your
/etc/fstab
file and try again.
See
quotacheck(8)
for more information.
For more information about administering AdvFS file systems, see
AdvFS Administration.
Look
at the context dependent symbolic links (CDSL)
inventory to make sure all links are intact.
If you have removed or broken a CDSL on a Version 5.0A or Version 5.1 system,
the Update Installation overwrites the old CDSL with the new version, and
you will lose customizations that you have made to the contents of the modified
CDSL.
Enter the following command to validate the CDSL inventory:
# /usr/sbin/cdslinvchk
Modified,
missing, or replaced CDSLs are logged by default in the
/var/adm/cdsl_check_list
file.
See the
System Administration
manual for information on how to
recreate missing or broken CDSLs.
See
cdslinvchk(8)
for more information.
Update
the system
firmware.
Firmware updates are located on the
Alpha Systems Firmware CD-ROM
that is included
in the Software Distribution Kit you received.
Follow this procedure to begin a
firmware update:
Shut down the system to
console mode:
# shutdown -h now
Determine the console device name of the CD-ROM device:
>>> show device
Depending upon your system type, a device information table similar
to the following is displayed:
dka0.0.0.0.0               DKA0                           RZ28
dkb0.0.0.1.0               DKB0                           RZ28
dkc0.0.0.2.0               DKC0                           RZ26
dkc100.1.0.2.0             DKC100                         RZ26
dkc200.2.0.2.0             DKC200                         RZ26
dkc300.3.0.2.0             DKC300                         RZ26
dke100.1.0.4.0             DKE100                         RRD43   <==
mka500.0.0.0.0             MKA500                         TLZ04
mke0.0.0.4.0               MKE0                           TZ85
ewa0.0.0.6.0               EWA0              08-00-2B-2C-CE-DE
In the third column to the right, look for the line with the characters
RRD
or
CD-ROM.
These characters denote a CD-ROM
device.
The second column in the table shows the console device name assigned
to each device on your system.
In this example, the
RRD43
CD-ROM console device
name is
DKE100.
You will enter this device
name with the
boot
command in the next step.
Insert the
firmware
CD-ROM into the drive and boot from it:
>>> boot cdrom_console_device_name
The firmware update utility automatically identifies your system type
and model and determines the correct firmware revision required for your system.
Follow the instructions on the screen.
There is an automatic
display of the
READ-ME-FIRST
file, which describes the
firmware changes included in the update.
Power off the processor for at least 10 seconds when the firmware
update is complete to initialize the new firmware.
The contents of the firmware CD-ROM are also available at the corporate
Internet site through anonymous file transfer protocol (FTP):
http://ftp.digital.com/pub/Digital/Alpha/firmware/readme.html
Firmware updates are also available through anonymous file FTP from
the
ftp.europe.digital.com
World Wide Web server.
3.2 Step 2: Shut Down the System to Single-User Mode
An Update Installation is performed from
single-user mode.
You can either
log in
as
root
or use
the
su
command to gain
superuser
privileges.
The following example
shows how to become superuser and then shut down the system to single-user
mode:
# su -
password:
# shutdown +10 Please log out--ready to update system
In the previous example,
+10
shuts
down the system in ten minutes and sends the message
Please log out--ready
to update system
to all logged in users.
Caution
If your system is at the
console
mode
prompt ( >>> ), you must boot
to multiuser mode and then shut down to
single-user mode.
It is important that you do not boot the system to
single-user mode.
The following messages are displayed when the system is in single-user
mode:
Halting processes ...

INIT: SINGLE-USER MODE
#
3.3 Step 3: Start the Update Installation
Before beginning the Update Installation, be aware
that the process can take from 45 to 120 minutes to complete.
Newer, faster
machines such as the DS and GS Series take significantly less time.
Actual
time depends on your processor type, the speed of your CD-ROM drive, and the
number of software subsets to be updated.
Mount the local
file systems:
# /sbin/bcheckrc
The
bcheckrc
command invokes the
mount -a
command
and
mounts
all file systems listed in the
/etc/fstab
file, not just the standard UNIX file systems (/,
usr, and
var).
The
bcheckrc
command also runs
fsck
on UNIX file systems (UFS) and starts the Logical Storage Manager (LSM) if necessary.
If
fsck
finds a problem with
the
/
(root) partition,
the system shuts down and
reboots
to correct
the problem.
Insert the
Operating System Volume 1
CD-ROM into the drive.
Enter the
/sbin/installupdate
command with
the following syntax to start the Update Installation:
/sbin/installupdate
[-u]
[-nogui]
{location}
The following describes each option:
The optional
-u
flag runs the Update Installation
in unattended mode.
Unattended means that barring any problems with the Update
Installation, there is no user interaction required.
The only exception to
this is the switching of CD-ROMs if
WLS
software
is being updated.
The
-u
flag builds a kernel with all
kernel components and does not provide the chance to
archive
obsolete files.
If no
file type conflicts
are found during the analysis phase, and your system has enough free disk
space to complete the Update Installation, your next involvement is to log
in to your updated system as described in
Section 3.7.
See
Section 3.11.1
if the Update Installation
does not complete successfully.
The optional
-nogui
flag runs the text-based
interface if your system has graphics capability.
The required
location
argument
specifies the source of the software.
The
location
can be:
A local disk or CD-ROM drive that contains the Version 5.1A
distribution media (for example,
/dev/disk/cdrom0c)
A local
mount point
where the operating system media is already mounted (for example,
/mnt)
The name of the
RIS server
(appended with a colon) that is serving Version 5.1A of the operating
system (for example,
server1:)
The following sample commands can be used to start an Update Installation.
Use the command that best suits your situation.
To start an unattended Update Installation from CD-ROM device
cdrom0c:
# /sbin/installupdate -u /dev/disk/cdrom0c
To start the Update Installation from a CD-ROM device that
is already mounted on the
/cdrom
mount point:
# /sbin/installupdate /cdrom
To start the Update Installation from CD-ROM using the text-based
rather than the graphical interface:
# /sbin/installupdate -nogui /dev/disk/cdrom0c
To start the Update Installation from a
RIS server
named
server1:
# /sbin/installupdate server1:
The Update Installation process continues as described in
Section 3.4.
3.4 Step 4: Choose Update Installation Options
What you see after you start the Update Installation depends upon whether
or not your system is capable of graphical displays:
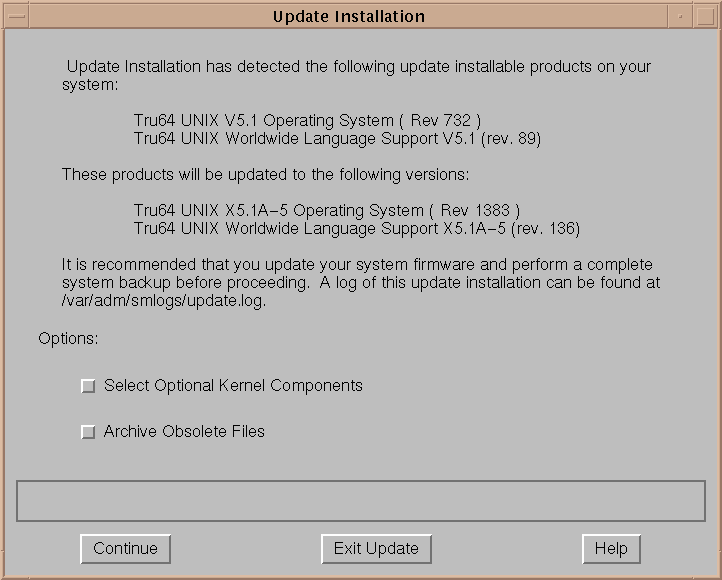
If your system has graphical display capabilities, the Update
Installation dialog box shown in
Figure 3-1
is displayed.
The graphical interface contains online help, which describes each dialog
box and field in the Update Installation process.
Figure 3-1: Update Installation Main Window
If your system does not have graphical capabilities or you
used the
-nogui
flag on the command line, a screen similar
to this is displayed:
Update Installation has detected the following update
installable products on your system:

        Tru64 UNIX Operating System ( Rev nnn)

These products will be updated to the following versions:

Tru64 UNIX Version 5.1A Operating System (Rev nnn)

It is recommended that you update your system firmware
and perform a complete system backup before proceeding.
A log of this update installation can be found at
/var/adm/smlogs/update.log.

Do you want to continue the Update Installation?  (y/n) []:

Do you want to select optional kernel components?  (y/n) [n]:

Do you want to archive obsolete files?  (y/n) [n]:
Table 3-1
describes the decisions
you have to make when you first invoke the Update Installation.
You can choose
one option, both options, or neither option.
Table 3-1: Update Installation Options on Initial Screen
| Option |
Description |
| Select Optional Kernel Components |
Select this option if your current
system is running a customized kernel that has been built with optional kernel
components or if you want to customize the new kernel.
If you select this
option, you will have the opportunity to select which
optional kernel components
you want to build into the kernel (if any).
If you do not select this option, the new kernel will be built
with only the mandatory kernel components required to run the installed software.
|
| Archive Obsolete Files |
Choose this option to
archive
obsolete files
before
they are removed automatically by the Update Installation.
Obsolete files
are files that were shipped in Version 5.0A or Version 5.1 but are no longer required
by Version 5.1A.
If you select this option, later in the analysis phase of
the Update Installation the list of obsolete files is presented, and you can
select one or more files to archive and the file name you want to use for
the archive.
You can delete the archive at a later date.
If you
do not select this option, you will not have the opportunity to archive obsolete
files before they are removed from the system. |
Note
The remainder of this chapter applies to the graphical and text-based
user interfaces.
Rather than showing examples from both interfaces, only the
screens from the graphical interface were used to show the update process
and user actions.
The same steps in the same order occur for the text-based
interface.
3.5 Step 5: Monitor the Analysis Phase
After you have selected the Update Installation options, the Update
Installation process begins to analyze the current system.
If your system has graphics capabilities, the analysis phase begins
with the dialog box shown in
Figure 3-2.
Figure 3-2: Update Installation Preload Analysis Dialog Box
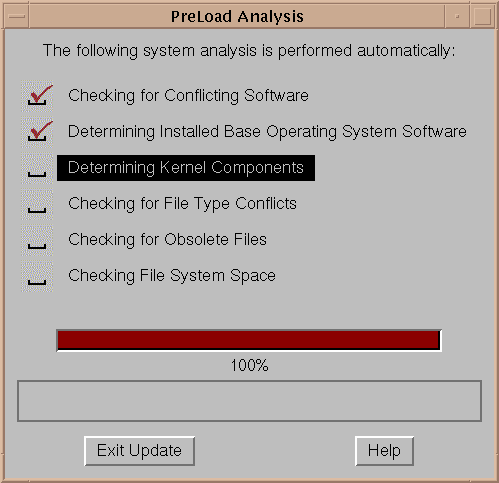
A check (tick) mark indicates when
an analysis step is complete.
The progress indicator at the bottom of the
dialog box applies to the currently highlighted analysis step.
The following sections describe each analysis step in detail and the
required user interaction if one or more conditions require your attention:
3.5.1 Search for Conflicting Software
There are two types of
layered products
that affect the Update
Installation: layered software products that
allow the Update Installation to proceed but may have to be reinstalled later, and
layered software products that must
be deleted before the Update Installation can continue.
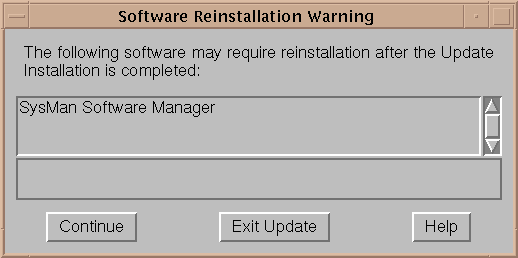
3.5.1.1 Software Reinstallation Warning
The dialog box shown in
Figure 3-3
is displayed
if the Update Installation detects a layered software product that may require
reinstallation after updating to the new version of the operating system.
You can choose to exit the Update Installation and manually remove this software
or you can continue the Update Installation.
If you decide to continue without removing the layered software product
or products, test the software when the Update Installation is finished.
It
is recommended that you reinstall any layered software products that are critical
to the use of the operating system with a version that is compatible with
and is supported on the new version of the operating system.
Figure 3-3: Software Reinstallation Warning Dialog Box
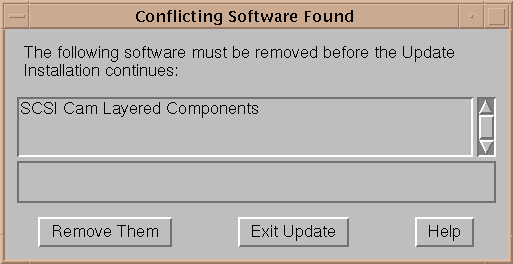
3.5.1.2 Conflicting Software Found: Update Installation Cannot Proceed
The dialog box shown in
Figure 3-4
is displayed
if the Update Installation detects a conflicting layered software product
that halts the Update Installation.
You can instruct the Update Installation
to delete the product and continue, or you can exit the Update Installation.
You cannot update your system to the new version of the operating system until
you remove this conflicting software.
If you choose to exit the Update Installation
at this point, no changes are made to your system.
If the conflicting software
is not supported under the new version of the operating system, and the software
is critical to your system, it is recommended that you do not continue with
the Update Installation.
Note
Delete operations take effect immediately.
Any software you remove
cannot be recovered even if the Update Installation is canceled later.
Figure 3-4: Conflicting Software Found Dialog Box
3.5.2 Determine Installed Software
During this part of the analysis, the Update Installation process determines
the software that is installed so that it knows what has to be updated.
If you have installed Worldwide Language Support (WLS) software, an additional analysis step, Determining Installed Worldwide
Language Support Software, is displayed as part of the Preload Analysis dialog
box shown in
Figure 3-2.
When you are performing the Update Installation from a CD-ROM and the
system has WLS software installed, you will be asked to provide the location
of the Version 5.1A WLS software media (either local disk, RIS server, or
CD-ROM device name).
The Update Installation knows when to prompt you to insert
the WLS media after the system reboots.
Note
If you are performing this Update Installation on the lead
cluster
member as part of the rolling upgrade process, there is no
need to have the TruCluster Server software in a
RIS area
or on a CD-ROM because the
clu_upgrade -preinstall
command already copied the kit to the
/var/adm/update/TruClusterKit
area on the lead member so the software is available to the Update
Installation process.
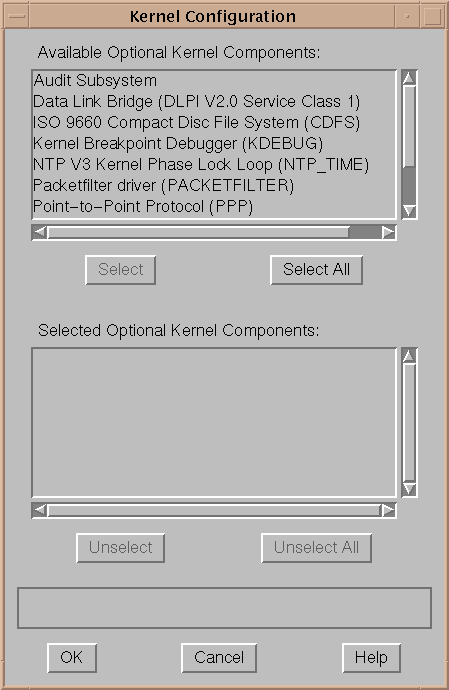
3.5.3 Select Kernel Components
If you chose the option to include
optional kernel components
in the kernel (as described in
Table 3-1,
use the Kernel Configuration dialog box shown in
Figure 3-5
to select the optional kernel components to build into the
kernel.
If you had previously built optional kernel components into
the kernel, you have to select them again here.
The Update Installation process
has no knowledge of the contents of the current kernel.
To select kernel components,
click on the components you want and click on Select.
After you have made
all selections, click on OK.
If you cancel kernel component selection at this time, the Update Installation
builds a kernel with only the
mandatory kernel components
that are associated with the installed
software subsets.
Figure 3-5: Kernel Configuration Dialog Box
3.5.4 Manually Adding Special Configuration Options to the Kernel
The Update Installation provides
a basic kernel configuration file that includes support for all
mandatory kernel components
plus any optional components you have just
selected.
The Update Installation does not propagate any special or custom
configuration options that you may have added into the kernel configuration
file.
If your kernel configuration file has been edited manually or edited
as a result of
layered product
installations to include nonstandard kernel options, psuedodevices, controllers,
or other changes, you will need to include those options, psuedodevices, controllers,
or other changes into your new kernel configuration file (/sys/conf/host_name).
If you are using the text-based interface, you will be given the option
to edit the kernel configuration file during the Update Installation.
Otherwise,
you can edit the file after the Update Installation is complete, and then
rebuild the
kernel
using the
doconfig(8)
command.
3.5.5 Search for File Type Conflicts
An Update Installation searches
for file types that will be incompatible with the updated version of the operating
system.
Files that are shipped with the operating system, also known as
system files, are classified into one of
several different file types.
A file can be classified as a
file, a
directory, a
hard link,
a
symbolic link,
a
block device,
or a
pipe.
The Update Installation procedure expects to
find system file types the same as when they were shipped with the previous
version of the
base operating
system.
When a file type has changed, it is known as a
file type conflict.
There are two types of
file
type conflicts:
This feature is intended to preserve the integrity of the software product
about to be installed.
In both cases, the Update Installation identifies the
conflict and informs you of the action required to resolve the conflict.
3.5.5.1 File Type Conflicts That Halt the Update
A serious file type conflict may require the Update Installation to
exit without updating the system.
If the Update Installation were to continue,
it would result in a corrupt system.
When a conflict of this severity is encountered,
you must resolve it manually before restarting the Update Installation.
The
following types of file type conflicts prevent the Update Installation from
continuing:
Files shipped originally as type
directory
are changed to type
file.
Files shipped originally as type
directory
are changed to type
symbolic link.
Files shipped originally as type
symbolic link
are changed to type
directory.
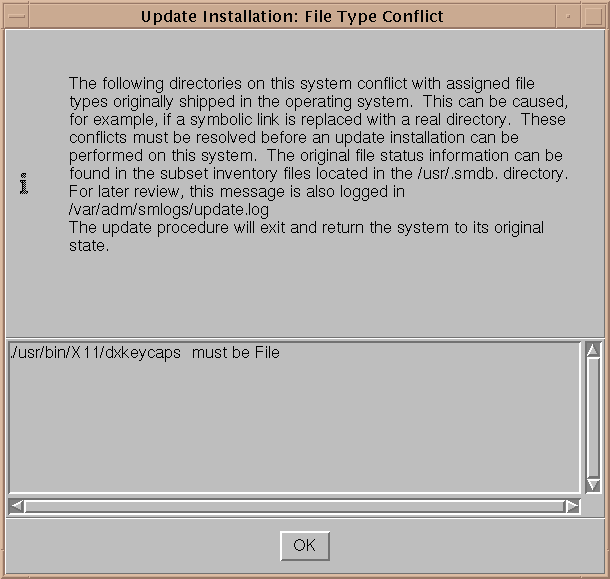
For example, if a file is shipped as a directory in Version 5.0A or Version 5.1
and you later change it to be a symbolic link, when the same file ships as
a directory in Version 5.1A, the Update Installation detects the difference
and the dialog box shown in
Figure 3-6
is displayed.
Figure 3-6: File Type Conflict Dialog Box
3.5.5.2 Less Serious File Type Conflicts
A less serious file type conflict is any file type conflict other than
the ones shown in
Section 3.5.5.1.
The Update Installation
automatically resolves these conflicts by saving a copy of the modified file
type to a file with a
.PreUPD
extension, for example
/etc/hosts.PreUPD.
When the new
version of the operating system is loaded, the original file (for example,
/etc/hosts) is replaced by the new version that is shipped with
the operating system.
This means that the file will change type to the file
type that is shipped with the new version of the operating system.
Any customizations
that were in the modified file type must be manually merged from the
.PreUPD
version into the new version of the file after the Update
Installation is complete.
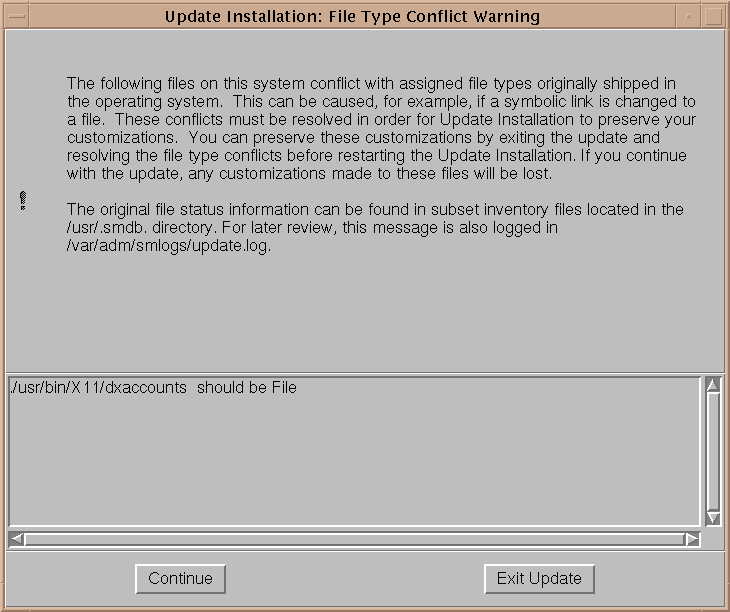
Figure 3-7
shows
the dialog box that is displayed when a less serious file type conflict is
detected.
Figure 3-7: File Type Conflict Warning Dialog Box
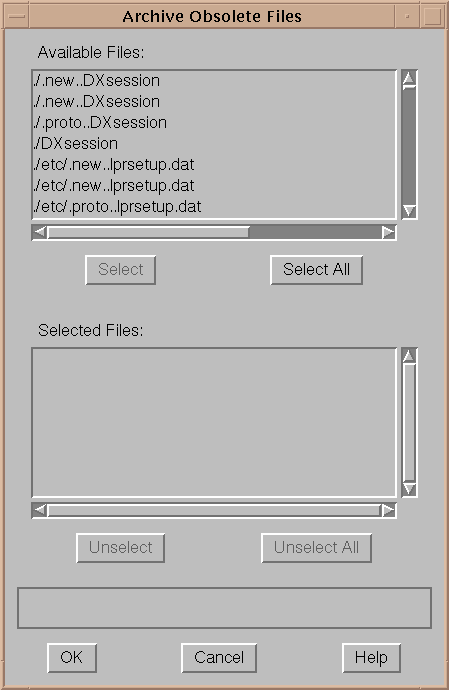
3.5.6 Search for Obsolete Files
Obsolete files are files
that were shipped in Version 5.0A or Version 5.1 of the operating system but are
no longer part of Version 5.1A.
The Update Installation automatically searches
for and removes obsolete files.
If you chose the option to
archive
obsolete files
as
described in
Table 3-1, you can save obsolete
files to a
.tar
file and have the option to compress the
tar
file with the
gzip
utility.
The
default
file name is
/var/adm/update/backup.tar.
Note
Whether or not you archive the files, the Update Installation deletes
obsolete files after the analysis phase is complete.
The dialog box that you
use to select and archive obsolete files is shown in
Figure 3-8.
.
Figure 3-8: Archive Obsolete Files Dialog Box
3.5.7 Determine File System Space
Version 5.1A of the
operating system requires more disk space than Version 5.0A or Version 5.1.
The Update
Installation determines whether or not there is enough space for the new version
of the software and that there is enough temporary space for processing.
If the Update Installation determines that there is not enough disk
space, disk space status and options for recovering disk space are presented.
The dialog box that you use to recover disk space is shown in
Figure 3-9.
Figure 3-9: Recover Disk Space Dialog Box

It is recommended that you pursue disk space recovery in this order:
Perform
System Cleanup
by removing
core files
and extra
kernel
files.
Whenever an application or the system crashes, a
crash file
named
core
is created.
These files tend
to be large, and if not removed after each crash, they can occupy a considerable
amount of disk space.
If you are not in the habit of cleaning up files after
system or application crashes, you may be able to recover the disk space from
this operation.
The Update Installation procedure looks for extra kernel files (files
named
vmunix.*) in the
/sys/HOST_NAME
and
/var/adm/crash
directories
and looks for
core
files in the
/,
/usr, and
/var
file systems.
Remove .PreUPD files
The Update Installation looks for customized
system files
and protects them by copying them into files with the
suffix
.PreUPD.
If removing
core
and extra
vmunix
files
do not recover enough disk space, remove the
.PreUPD
files
as necessary.
Clicking on
Remove .PreUPD Files
displays
a dialog box where you can select the files to remove.
Note
If you remove
.PreUPD
files here, they will be unavailable
for reference when you manually merge changes.
These
.PreUPD
files are the only backup copies of
unprotected system files
that have been modified.
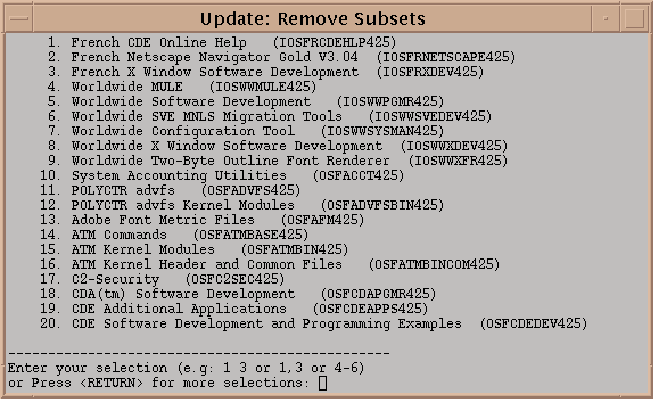
Remove software subsets
If there are
software subsets
that
are not being used, remove them.
Software subsets removed at this point will
not be updated.
Clicking on
Remove Software Subsets
displays
the dialog box shown in
Figure 3-10.
Note
Deleting individual files that are part of the installed
base operating system
or
WLS
software
by using a command other than the
setld
command will not
produce the additional free space needed because the Update Installation has
already taken into account that these old files will be replaced by new versions.
Figure 3-10: Remove Subsets Dialog Box
Use the various options until the disk space available in each
file system
is greater than the disk space
needed.
If these options do not produce the necessary free space, you may
need to change the file system layout or use
disk partitions
large enough to accommodate the installed software
by performing a
Full Installation
using the disk partition sizes recommended by the Full Installation
procedure.
3.6 Step 6: Confirm the Start of the Update Installation Process
When the Analysis Phase is complete, you must confirm the start of the
Update Installation.
If you are using the graphical user interface, the confirmation
is made using the dialog box shown in
Figure 3-11.
Figure 3-11: Ready to Begin Update Dialog Box
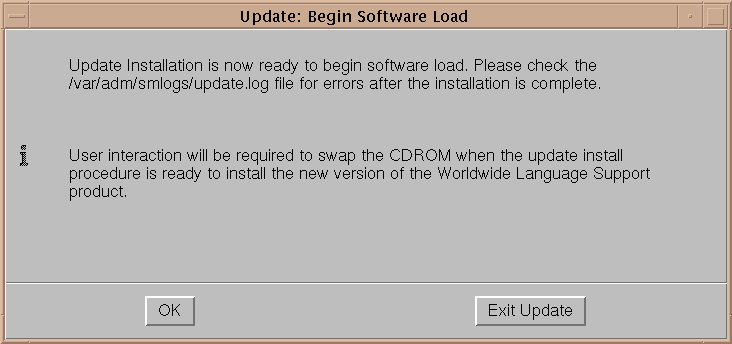
You have the following options:
If you are satisfied with all your selections and choices,
click on OK to save your choices and start the update of your system.
After
you confirm the start of the update, system modification begins that cannot
be reversed.
Caution
Stopping the Update Installation in any way (including pulling out the
power cord or pressing the halt button) while
software subsets
are loading can cause serious operating system corruption
that can render the operating system unusable.
You may have to restore the
backed-up version of the operating system before you can attempt another Update
Installation.
To protect against accidental halting of the Update Installation process,
the Ctrl/c key sequence, which is used to stop an operation, is disabled during
the software subset load phase.
If you do not want to proceed with the Update Installation
at this time, select Exit Update.
When you select Exit Update, you have the
option to transition the system back to multi-user mode.
Your system returns
to its preupdate state (except for files that you may have removed during
disk space recovery tasks).
An Update Installation typically completes in 45 to 120 minutes.
Newer,
faster machines such as the DS and GS Series take significantly less time.
Actual time depends on your processor type, the number of
software subsets
to be updated, the type of media used to perform the
Update Installation (CD-ROM or remote server), the speed of your CD-ROM
drive if you are using CD-ROM, and the volume of
network
traffic if you are using a remote server.
3.7 Step 7: Log in to the System
After the Update Installation is complete,
log in
to the system as the user
root
to perform the postinstallation tasks shown in
Section 3.8
and
Section 3.9, which can
be done only by the user
root.
What happens when you log in for the first time depends upon whether
you have a graphics workstation or a terminal without graphics capabilities:
If you have a graphics workstation, a Common Desktop Environment
(CDE) login window displays.
If you do not have a workstation with graphics capabilities,
log in as the user
root
at the
login
prompt and enter the
root
password at the
password
prompt.
Note
Starting with Version 5.0 of the operating system, naming conventions
for device special file names for disks and tapes are different from previous
versions of the operating system.
The unit numbers may be reordered as a result of
the Update Installation process.
If you want to review a mapping of old-to-new
device names for your system, review the
/etc/dfsl.dat
file.
For a description of device naming conventions and how the Update Installation
process operates with them, see
Section A.5.
3.8 Step 8: Review Update Installation Log Files
Information
about the Update Installation is stored in log files for your reference.
Installation
and configuration data is appended to any log files left over from previous
Update Installations.
It is recommended that you examine the log files when
the update is complete to ensure that there were no errors during the update
and that all files merged successfully.
Log files are located in the following
locations:
Table 3-2: Update Installation Log Files
| Description |
File Name |
| Log of the Update Installation |
/var/adm/smlogs/update.log |
| Information about the software configuration |
/var/adm/smlogs/it.log |
| List of customized files |
/var/adm/smlogs/upd_custom_files |
| List of failed merges |
/var/adm/smlogs/upd_mergefail_files |
Appendix F
describes the contents of all logs files
that are created as part of an Update Installation.
If no customized or failed
merge files
are detected during the Update
Installation, the relevant log files do not contain any data.
3.9 Step 9: Merge Customizations if Necessary
An
Update Installation may not be able to merge certain customizations automatically
and may require that file customizations be added to the new files manually.
Manual merging involves editing the new versions of
system files
with a text editor to include your own customizations.
The following information is saved so that you can merge your customizations
into the new versions:
Unprotected system
files
When the Update Installation is complete, look for any saved file names
in the
/var/adm/smlogs/upd_custom_files
file.
Edit the
new version of each logged file to include your customizations.
Previous versions
of each file are saved as
filename.PreUPD.
Kernel configuration file
Edit the kernel configuration file at
/sys/conf/HOSTNAME
if you customized this file in the previous
version of the operating system.
The saved version is located in
/sys/conf/HOSTNAME.bck.
You then will
need to rebuild a
tailored kernel
in order for the newly-made changes to take effect.
See
doconfig(8)
for more information
about building tailored kernels.
Failed merges
If any files failed to merge during the Update Installation, an error
message is displayed on your screen.
A log of failed merge files is located
in the
/var/adm/smlogs/upd_mergefail_files
file.
Look at
the
update.log
file and the
it.log
file
to identify any merge errors.
Manually edit any files that failed to merge
and add your customizations.
Your customized, preupdate version of these
files is always preserved for your reference with the file naming convention
filename.PreMRG.
When all manual merges are complete, your system is ready to use.
At
this time you can install additional
optional software subsets
provided on the Version 5.1A
distribution media.
See
Chapter 9
for information
about installing optional software subsets.
3.10 Optional Step 10: Run the Update Installation Cleanup Utility
Use the Update Installation Cleanup utility
to remove or
archive
the
.PreMRG
and
.PreUPD
backup files created by an Update Installation.
If there
were failed file merges during the Update process, you use these files as
a reference to merge your customizations into the new versions of the files.
When all manual merges are complete, the
.PreMRG
and
.PreUPD
files are no longer needed.
Running the Update Installation Cleanup utility is an optional step
after performing an Update Installation, but it is recommended to use this
utility if you want to recover disk space being consumed by these backup files.
If you decide to archive the files, the archive destination can be any archive
destination supported by the
tar
command (that is file,
tape device, or disk).
When you perform a
cluster
rolling
upgrade, you have the option to run the Update Administration Cleanup Utility
as part of the clean stage.
Do not run the Update Installation Cleanup utility
until all cluster members have rolled, and the rolling upgrade is complete.
The utility issues a message if you try to run the cleanup utility while a
rolling upgrade is still in progress.
Invoke the Update Installation Cleanup utility using any of the following
methods:
From the
SysMan
Menu
(/usr/sbin/sysman), select the
following:
Software
branch
Installation
branch
Cleanup after an OS update (updadmin)
task
From the
CDE front panel, select Software Management from the SysMan Applications icon.
Use
the online help provided with the graphical user interface if you need more
information.
From the command line, enter
/usr/sbin/updadmin.
See
updadmin(8)
for more information.
3.11 Error Recovery
There are certain types of error
conditions that cause the Update Installation process to stop and require
user intervention.
These errors may occur at the following points in the Update:
3.11.1 Analysis Phase Failure
You can recover if the Update Installation fails any time during the
preload analysis phase.
You can bring your system back to multiuser mode by
issuing the following command:
# init 3
Fix the errors reported by the error messages
and restart the Update Installation process.
3.11.2 Software Subset Load Failure
Individual
software subsets
can fail to load if a
network
interrupt, hardware problem, or file verification error occurs
during the load process:
If an
optional
software subset
fails to load, you can install it later by using the
setld
command after the Update
Installation is complete.
If a
mandatory
software subset
fails to load, the Update Installation procedure exits.
Your system may be rendered unusable and you may have to restore the backed
up version of the operating system before attempting another Update Installation.
If the
OSFBASE520
mandatory software subset
was installed successfully, you may be able to retry the Update Installation
without first restoring the backed up version of the operating system.
3.11.3 Kernel Build Failure
The
tailored
kernel
build can fail at the end of the Update Installation because
of an incompatibility of a kernel
layered
product
with the new version of the operating system.
In this case, the system will rebuild a kernel without layered product
support.
Follow this procedure to rebuild a kernel with layered product support:
Look at the
/var/adm/smlogs/it.log
file,
which contains the reasons for the kernel build failure.
Use the
setld
command to remove the layered product that caused the failure.
Use the
setld
command to reinstall the
most recent version of the layered product.
Use the
/usr/sbin/doconfig
command to
build a new customized kernel with support for the layered product.