
In a product kit, a
subset
is the
smallest installable entity compatible with the
setld
utility.
The kit developer specifies how many subsets are included in the kit and what
files each subset contains.
Note
A file's physical location is not necessarily a factor in determining the subset to which it belongs.
A kit developer must perform the following tasks to build subsets and associated control files:
Organize product files into subsets. (Section 3.1)
Create a master inventory file containing information about each file in the subset. (Section 3.2)
Create a key file to define product attributes such as the product name, product version, and subset definitions. (Section 3.3)
Optionally, create subset control programs (SCPs). (Section 3.4)
Use the
kits
utility to produce the subsets
and related control files.
(Section 3.5)
Test your subsets to ensure that they can be loaded onto a running system, that the product runs on the system, and that the subsets can be deleted. (Section 3.6)
Optionally, update the master inventory file after you have created subsets. (Section 3.7)
3.1 Grouping Files into Subsets
Files that are required for the product to work should be grouped together by function. For example, if the product has two parts such as a user interface and underlying functional code, you should group them into two subsets.
Optional files also should be grouped together by function, but should be grouped separately from mandatory files. This prevents unnecessary files from being loaded when you install the mandatory subsets.
The fictitious ODB user product requires two subsets:
OATODB100, a mandatory subset, contains
the files needed to run the product.
This includes all product files except
the
odb_template
file.
OATODBTEMPS100, an optional subset, contains
documentation templates in the
odb_template
file.
By placing the documentation templates in a separate subset, the customer's system administrator can choose not to install them if storage space is limited.
Figure 3-1
shows how the files that make up the
ODB product are grouped into subsets.
The physical location of a file is not
necessarily a factor in determining the subset to which it belongs.
Figure 3-1: ODB Kit Subsets and Files
3.2 Creating the Master Inventory File
After choosing subset names and deciding their contents, you have to specify in a master inventory file the subset names and the files that each subset contains.
You can create a master inventory file with any text editor you like,
or create the file with the
touch
command.
The master inventory
file name must consist of the product code and version, with the letters
mi
as a suffix.
The file should be located in the
data
directory of the kit.
For example:
%cd /mykit/data%touch OAT100.mi
The first time you process a kit, the master inventory file is empty.
You must enter one record for each file that belongs on the kit.
To get an
initial list of these files, use the
newinv
command with
the file name of the empty master inventory file and the pathname of the source
hierarchy's top-level directory.
For example, to invoke
newinv
on the master inventory file for the ODB product, specify the pathname to
the source hierarchy as a relative path from the current directory (data), similar to the following:
%newinv OAT100.mi ../srcScanning new baselevel files...done. Sorting inventories...done. Joining...done. Awking...done. *** THIS BUILD CONTAINS FILES THAT ARE NOT IN THE PREVIOUS BUILD *** You will be placed in the editor with the file containing the names of these new files. If you wish these new files to become part of the product, you must convert the line for the wanted files into an inventory record. Any records remaining in the file when you exit the editor will become part of the new inventory. Type <RETURN> when you are ready or CTRL/C to quit:
The
newinv
utility produces a list of files that
are present in the source hierarchy and opens a working copy of the master
inventory file in the
vi
editor (or the editor specified
by your
$EDITOR
environment variable) to make the required
changes.
Caution
Be extremely careful when you edit the master inventory file. Separate fields in this file with single [Tab] characters, not spaces. File names must not contain [Space] or [Tab] characters.
Use dot-relative pathnames for the files listed in the master inventory file; do not use absolute pathnames. By default, the
setldutility operates from the system'sroot(/) directory unless you specify an alternate root with the-Doption.
First, remove the entries for any files that should not appear on the kit. Second, add the flags and subset identifier to entry for each file that should appear in the kit.
Caution
The first time that you run the
newinvutility, the following files are created in the/mykit/datadirectory in addition to theOAT100.mifile:
OAT100.mi.bkpOAT100.mi.deadOAT100.mi.extraOAT100.mi.joinOAT100.mi.tmpDo not modify or delete these additional files. They are used during subsequent master inventory file updates with the
newinvutility.
Table 3-1
describes the fields in the
master inventory file.
Table 3-1: Master Inventory File
| Field | Description |
| Flags | 16-bit unsigned integer |
Bit 1 is the
v
(volatility)
bit.
When this bit is set, changes to an existing copy of the file can occur
during kit installation.
The remaining bits are reserved, so valid values
for this field are 0 (protected) or 2 (unprotected).
The volatility bit
usually is set for log files such as
/usr/spool/mqueue/syslog.
|
|
| Pathname | The dot-relative ( ./path ) path to the file. |
| Subset identifier | The name of the subset that contains the
file.
Subset names consist of the product code, subset mnemonic, and version
number.
You must not include standard system directories in your subsets.
In the ODB master inventory file, several records specify directories that
are part of the standard system hierarchy.
Instead of a subset identifier,
these records specify
RESERVED; this keyword prevents
setld
from overwriting existing directories. |
After you edit the file list and exit the editor, you see output similar to the following:
Merging...done.

Sorting...done.

Master inventory update complete.
Example 3-1 shows that the ODB kit has two subsets:
The
OATODB100
subset contains mandatory
commands and utilities.
The
OATODBTEMPS100
subset contains optional
document templates.
Example 3-1: Sample ODB Kit Master Inventory File
0	./opt	RESERVED [1]
0	./opt/OAT100	OATODB100
0	./opt/OAT100/README.odb	OATODB100
0	./opt/OAT100/sbin	OATODB100
0	./opt/OAT100/sbin/odb_recover	OATODB100
0	./usr	RESERVED [1]
0	./usr/opt	RESERVED [1]
0	./usr/opt/OAT100	OATODB100
0	./usr/opt/OAT100/bin	OATODB100
0	./usr/opt/OAT100/bin/odb_start	OATODB100
0	./usr/var	RESERVED [1]
0  ./usr/var/cluster/members/member0/op/OAT100/odb_log  OATODB100
0	./usr/var/opt	RESERVED [1]
0	./usr/var/opt/OAT100	OATODB100
0	./usr/var/opt/OAT100/log_files	OATODB100
2	./usr/var/opt/OAT100/log_files/odb_log	OATODB100 [2]
0	./usr/var/opt/OAT100/templates	OATODBTEMPS100
0	./usr/var/opt/OAT100/templates/odb_template	OATODBTEMPS100
In
Example 3-1, the
./opt,
./usr,
./usr/opt,
./usr/var,
and
./usr/var/opt
directories use the
RESERVED
subset identifier.
This indicates that the
setld
utility should not allow the directory to be overwritten if it already exists
on the customer's system.
Use the
RESERVED
subset identifier
for any file or directory that is shipped with another product and already
may be present on the customer's system.
The Flags field is set to
0
(zero), indicating that
this directory cannot be changed.
[Return to example]
The
./usr/var/opt/OAT100/log_files/odb_log
file has the
OATODB100
subset identifier, indicating
that the file belongs in that subset.
Set the Flags field to
2, indicating that the file
may change on the customer's system.
[Return to example]
The
key file
defines product attributes
such as the product name, product version, and subset definitions, as well
as the name of the kit's master inventory file.
It consists of a product
attributes section and a subset descriptor section.
The key file name must
consist of the product code and version followed by
.k,
so that
OAT100.k
is the key file for the ODB kit.
Example 3-2
shows the ODB product kit key file
with the two sections separated by two percent signs ( %% ):
Example 3-2: Sample ODB Kit Key File
#
# Product-level attributes [1]
#
NAME='Orpheus Document Builder'
CODE=OAT
VERS=100
MI=/mykit/data/OAT100.mi [2]
COMPRESS=1 [3]
#
# Subset definitions [4]
#
%%
OATODB100	.	0	'Document Builder Tools' [5]
OATODBTEMPS100	OATODB100|OSFDCMT???	2	'Document Builder Templates' [6]
The product attributes
portion of the file describes the naming conventions for the kit and provides
kit-level instructions for the
kits
command.
This section
of the key file consists of several lines of
attribute-value pairs
as described in
Table 3-2.
The order of these attribute-value pairs is not significant.
Each attribute
name is separated from its value by an equal sign ( = ).
You can include comment lines, which begin with a number sign ( # ).
[Return to example]
The value of the
MI
attribute contains the path to the master inventory file.
This may be either
an absolute path or a relative path from the directory where the
kits
command is executed.
[Return to example]
The
COMPRESS
attribute
has a value of
0
for uncompressed subsets or
1
for compressed
tar
format subsets.
User and
kernel product kit subsets may be compressed, but hardware product kit subsets
must be uncompressed.
[Return to example]
The subset descriptor
portion of the file describes each of the subsets in the kit and provides
subset-level instructions for the
kits
command.
This section
contains one line for each subset in the kit.
Each line consists of four fields,
each separated by a single
[Tab]
character.
You cannot include
comments in this section of the key file.
Table 3-3
describes the subset descriptor fields.
[Return to example]
In this entry, the Dependency list field
value for
OATODB100
is
.
(dot), meaning
that the subset has no dependencies.
The Flags field is set to 0 (zero), indicating that the subset is mandatory. [Return to example]
In this entry, the
OATODBTEMPS100
subset is optional; its FLAGS field is set to 2 (two).
This subset
is dependent on both the
OATODB100
subset, part of the
ODB
kit, and the
OSFDCMT???
subset, part of the
base operating system.
The
???
notation is a wildcard to
specify any version of the
OSFDCMT
subset.
The Subset Description field must be enclosed in single quotes. [Return to example]
The key file product attributes
section describes the naming conventions for the kit and provides kit-level
instructions for the
kits
command.
This section consists
of attribute-value pairs as described in
Table 3-2.
Each attribute name is separated from its value by an equal sign ( = ).
Comment lines in this section begin with a pound sign
( # ).
Table 3-2: Key File Product Attributes
| Attribute | Description |
NAME |
The product name; for example,
'Orpheus Document Builder'.
Enclose the product name in single quotation
marks ( ' ) if it contains spaces. |
CODE |
A unique three-character product code, for
example,
OAT.
The first character must be a letter.
The
first three letters of a subset name must be the same as the product code.
In this guide,
OAT
is the three character code assigned
to the fictional
Orpheus Authoring Tools, Inc.
company. |
| Several product codes are reserved, including (but not limited to) the following: DNP, DNU, EPI, FOR, LSP, ORT, OSF, SNA, UDT, UDW, UDX, ULC, ULT, ULX, and UWS. | |
Send mail to
Product@DSSR.enet.dec.com
to request a product code. |
|
VERS |
A three-digit version code; for example,
100.
The
setld
utility interprets this version
code as 1.0.0.
The first digit should reflect the product's major release
number, the second the minor release number, and the third the upgrade level,
if any.
The version number cannot be lower than 100.
The version number is
assigned by the kit developer. |
MI |
The name of the master inventory file.
If
the master inventory file is not in the same directory where the
kits
utility is run, you must specify the explicit relative path
from the directory where you are running the
kits
utility
to the directory where the master inventory file resides.
The file name of
the product's master inventory file consists of the product code and version
plus the
.mi
extension.
You create and maintain the master
inventory file with the
newinv
utility.
|
ROOT |
Not illustrated in the example, the operating
system has reserved this optional attribute for the base operating system.
ROOT
has a string value that names the root image file.
Do not use this attribute for a layered product. |
COMPRESS |
An optional flag that is set to 1 if you want to create compressed subset files. For kits in Direct CD-ROM (DCD) format, you must set this flag to 0 (zero). Do not compress subsets on hardware product kits. Compressed files require less space on the distribution media (sometimes as little as 40% of the space required by uncompressed files), but they take longer to install than uncompressed files. If missing, this flag defaults to 0 (zero). |
The key file subset descriptor section describes each
of the subsets in the kit and provides subset-level instructions for the
kits
command.
This section contains one line for each subset in
the kit and consists of four fields, each separated by a single
[Tab]
character.
You cannot include comments in this section of the key
file.
Table 3-3
describes the subset descriptor
fields.
Table 3-3: Key File Subset Descriptors
| Field | Description |
| Subset identifier | A character string up to 80 characters in
length, composed of the product code (for example,
OAT),
a mnemonic identifying the subset (for example,
ODB), and
the three-digit version code (for example,
100).
In this
example, the subset identifier is
OATODB100.
All letters
in the subset identifier must be uppercase. |
| Dependency list | Either a list of subsets upon which this
subset is dependent (OATODB100|OSFDCMT505),
or a single period ( . ) indicating that there are no subset
dependencies.
Separate multiple subset dependencies with a pipe character
( | ). |
| Flags | A 16-bit unsigned integer; the operating system defines the use of the lower 8 bits. |
| Set bit 0 to indicate whether the subset can be removed (0=removable, 1=protected). | |
| Set bit 1 to indicate whether the subset is optional (0=mandatory, 1=optional). | |
| Set bit 2 to indicate compression (0=compressed, 1=uncompressed). | |
| Bits 3-7 are reserved for future use. You can use bits 8-15 to relay special subset-related information to your subset control program. | |
| Subset description | A short description of the subset, delimited
by single quotation marks ( ' ), for example:
'Document Builder Tools'.
The percent sign character ( % ) is reserved in this field and must not be used for layered
products. |
3.4 Creating Subset Control Programs
This section describes common tasks required to write subset control programs for product kits. The following topics are discussed:
Creating SCP source files (Section 3.4.1)
Setting up initial SCP processing (Section 3.4.2)
Working in a cluster environment (Section 3.4.3)
Working in a DMS environment (Section 3.4.4)
Associating SCP tasks with
setld
processing
phases (Section 3.4.5)
Stopping the installation (Section 3.4.6)
Creating SCPs for different product types (Section 3.4.7)
A subset control program (SCP) performs special tasks beyond the basic
installation tasks managed by the
setld
utility.
The following
list includes some of the reasons why you might need to write a subset control
program:
Some of your kit's files have to be customized before the product will work properly.
You want to offer the user the option to install some of the files in a nonstandard location.
You want to register and statically or dynamically configure a device driver.
Your kit depends on the presence of other products.
You need to establish nonstandard permissions or ownership for certain files.
Your kit requires changes in system files such as
/etc/passwd.
A subset control program can perform all of these tasks.
Caution
Be aware of the following restrictions:
Use the
subset-id.lkfiles for subset dependencies. Use the library routines described in Section 3.4.2.1 to determine if a subset is installed.Effective with this version of the operating system,
subset-id.dwfiles are no longer created. Use the library routines described in Section 3.4.2.1 to determine if a subset is corrupt.
3.4.1 Creating SCP Source Files
Create one subset control program for each subset that requires special
handling during installation.
You can write the program in any programming
language, but your subset control program must be executable on all platforms
on which the kit can be installed.
If your product works on more than one
hardware platform, you cannot write your subset control program in a compiled
language.
For this reason, it is recommended that you write your subset control
program as a script for
/sbin/sh.
All of the examples in
this chapter are written in this way.
Keep your subset control programs short. If written as a shell script, a subset control program should be under 100 lines in length. If your subset control program is lengthy, it is likely that you are trying to make up for a deficiency in the architecture or configuration of the product itself.
Subset control programs should not require any interactive responses, and should not generate errors when run repeatedly.
Place all subset control programs that you write in the
scps
directory, a subdirectory of the
data
directory.
Each subset control program's file name must match the subset name to which
it belongs, and it must end with the
scp
suffix.
For example,
the ODB product defines two subsets, named
OATODB100
and
OATODBTEMPS100.
If each of these subsets required a subset control
program, the source file names would be
OATODB100.scp
and
OATODBTEMPS.scp.
When you create the subsets as described in
Section 3.5,
the
kits
utility copies the subset control programs from
the
./data/scps
directory to the
./output/instctrl
directory.
If a subset has no SCP, the
kits
utility creates an empty subset control program file for it in the
./output/instctrl
directory.
3.4.2 Setting Up Initial SCP Processing
Your subset control program should perform the following tasks within the program:
Including library routines (Section 3.4.2.1)
Setting global variables (Section 3.4.2.2)
The following sections describe the resources available to
perform these tasks.
3.4.2.1 Including Library Routines
The operating system provides a set of routines in the form of Bourne
shell script code located in the
/usr/share/lib/shell
directory.
Do not copy these routines into your subset control program.
This would prevent
your kit from receiving the benefit of enhancements or bug fixes made in future
releases.
Use the following syntax to include these library routines:
. /usr/share/lib/shell/lib_name
In the previous example, lib_name is one of the shell scripts specified in one or more of the following tables.
Table 3-4
lists the library routines available
in the
libscp
shell script.
Table 3-4: Available SCP Library Routines
| Purpose | Library Routine |
| Architecture checking | STL_ArchAssert |
| Dependency locking | STL_LockInit
[Footnote 1]
|
STL_DepLock
[Footnote 1] |
|
STL_DepUnLock
[Footnote 1] |
|
| Dataless environment checking | STL_IsDataless |
STL_NoDataless |
|
| Forward symbolic linking | STL_LinkCreate |
STL_LinkRemove |
|
| Backward symbolic linking | STL_LinkInit |
STL_LinkBack |
|
| SCP initialization | STL_ScpInit |
Table 3-5
lists the library installation routines
available in the
libinstall
shell script.
Table 3-5: Available Library Installation Routines
| Purpose | Library Routine |
| Cluster member identification | INST_GetMemberID |
Table 3-6
lists the library routines available
in the
libswdb
shell script.
Table 3-6: Available Installed Software Database Library Routines
| Purpose | Library Routine |
| Installed subsets list | SWDB_FindInstalledSubsets |
| 3-digit version number | SWDB_FindInstalledVersions |
SWDB_FindLatestVersions |
|
Product name in subset control file (subset_id.ctrl) |
SWDB_GetProductName |
| Subset installation status | SWDB_IsCorrupt |
SWDB_IsInstalled |
|
| Subset dependencies | SWDB_IsLocked |
SWDB_ListLockingSubsets |
3.4.2.2 Setting Global Variables
You can call the
STL_ScpInit
routine to define these
variables and initialize them to their values for the current subset.
This
routine eliminates the need to hard code subset information in your subset
control program.
Note
Use the
STL_ScpInitroutine at the beginning of all phases except theMphase to initialize global variables. The control file is not read before theMphase.All predefined global variable names begin with an underscore (
_) for easier identification.
Table 3-7
lists global variables that
the subset control program can use to access information about the current
subset.
Table 3-7: STL_ScpInit Global Variables
| Variable | Description |
_SUB |
Subset identifier, for example,
OATODB100 |
_DESC |
Subset description, for example,
Document Builder Tools |
_PCODE |
Product code, for example,
OAT |
_VCODE |
Version code, for example,
100 |
_PVCODE |
Concatenation of product code and version
code, for example,
OAT100 |
_PROD |
Product description, for example,
Orpheus Document Builder |
_ROOT |
The root directory of the installation |
_SMDB |
The location of the subset control files,
./usr/.smdb. |
_INV |
The inventory file, for example,
OATODB100.inv |
_CTRL |
The subset control file, for example,
OATODB100.ctrl |
_OPT |
The directory specifier
/opt/ |
_ORGEXT |
File extension for files saved by the
STL_LinkCreate
routine, set to
pre$_PVCODE |
_OOPS |
The NULL string, for dependency checking [Footnote 2] |
3.4.3 Working in a Cluster Environment
A cluster is a loosely-coupled collection of servers that share storage and other resources, providing high availability of applications and data. When you create your subset control programs, consider the following restrictions so that your SCP tasks do not cause operational problems:
Any
setld
utility phase of your SCP must
be able to run more than once without causing operational problems.
This does
not mean that you must repeat the SCP tasks, but that multiple executions
will not cause the SCP to fail or corrupt existing files.
In a cluster,
setld
utility phases can
run on each cluster member.
Any changes made by the SCP must first check to
see if the change already has been made to that cluster member.
If so, the
SCP should not attempt to make the change again.
The SCP should never change the file type of an existing CDSL.
Do not try to change a CDSL to a file or directory. This would create a shared file where the cluster expects to find a member-specific file and would cause cluster-wide problems.
The SCP should not decline a delete operation.
If a deconfiguration fails, report the error and continue the deletion, but do not exit with a nonzero status. The user must fix the problem after the software is removed.
Table 3-8
describes how
setld
utility phases behave when your SCP runs on a cluster.
Table 3-8: SCP Operations on a Cluster
| setld Phase | Cluster Behavior |
| all phases | All phases of
This does not mean that you must repeat the SCP tasks, but that multiple executions will not cause the SCP to fail. |
M |
Runs only on the cluster
member where the SCP is run, invoking the
setld
utility. |
PRE_L |
Runs only once for the entire cluster. If you must run member-specific operations, include SCP code that performs the operation on all cluster members. Do not decline software loading because of one cluster member. |
POST_L |
Runs only once for the entire cluster. If you must run member-specific operations, include SCP code that performs the operation on all cluster members. Do not decline software configuration because of one cluster member. |
C INSTALL |
Runs once on each cluster member. If your SCP needs to access member-specific files, perform those operations
during the
|
C DELETE |
Runs once on each cluster member. Always return a zero exit status from the
If the operation fails, report the error and continue processing. The user must fix the problem after the software is removed. [Footnote 3] |
PRE_D |
Runs only once for the entire cluster. If you must run member-specific operations, include SCP code that performs the operation on all cluster members. Always return a zero exit status
from the
If the operation fails, report the error and continue processing. The user must fix the problem after the software is removed. [Footnote 3] |
POST_D |
Runs only once for the entire cluster. If you must run member-specific operations, include SCP code that performs the operation on all cluster members. Always return a zero exit status
from the
|
V |
No cluster-specific restrictions. |
3.4.4 Working in a Dataless Environment
In a Dataless Management Services (DMS) environment, one computer acts as a server by storing the operating system software on its disk. Other computers, called clients, access this software across the Local Area Network (LAN) rather than from their local disks. Refer to Sharing Software on a Local Area Network for more information about DMS.
The
setld
utility uses an alternate root directory
in a Dataless Management Services (DMS) environment.
To make your subset control
program DMS compliant, use dot-relative pathnames for file names and full
absolute pathnames starting from
root
( / ) for commands in your subset control program.
This ensures
that the proper command is executed when running on either the server or the
client in the dataless environment.
The following example shows the default path for SCP processing commands to be run from the server in a DMS environment:
/sbin:/usr/lbin:/usr/sbin:/usr/bin:.
A subset control program may need to perform differently in a dataless environment or disallow installation of the subset on such a system. If the product will be installed onto a DMS server, use relative pathnames in your SCP. The dataless environment root is the DMS area rather than the DMS server's root file system.
Caution
When running on a dataless client, the
/usrarea is not writable. You cannot install the product kit if any files reside in the/usrdirectory. You must also make sure the subset control program does not attempt to write to any files located in the/usrdirectory.
You can use the following routines to perform SCP
processing in dataless environments:
The
Some tasks must take place during specific phases.
For example, checking
dependency relationships between subsets occurs during the
Figure 3-2
shows
The actions taken by the
When the
Do not include wildcard characters in your subset control program's
option-parsing routine.
Write code only for the cases the subset control program
actually handles.
For example, the subset control programs in this chapter
provide no code for several conditions under which they could be invoked,
for example, the
The following sections describe the tasks that a subset control program
may perform in each
Displaying the subset menu:
Before loading the subset:
After loading the subset:
After securing the subset:
Before deleting a subset:
Before deleting a subset:
After deleting a subset:
Verifying the subset:
Any
Refer to the
Whenever it performs an operation, the
In a cluster environment, the
Example 3-3
shows a sample
When it calls the subset control program during this phase, the
The
The
When
In the previous example, the SCP returns the following codes to
the
Installation for a dataless client uses the client's local copy of the
After presenting the menu and before loading the subset, the
In a cluster environment, the
Do not decline software loading because of one cluster member.
Use the
If you overwrite base operating system files, you may encounter the
following problems:
Your product can be corrupted during an Update Installation
of the operating system.
The Update Installation will overwrite any file that
was shipped as part of the old version of the operating system with the version
of the file currently shipped with the operating system.
An Update Installation may not complete successfully if you
overwrite a base operating system file.
This can make the system unusable.
Your product may have to be removed from the system to complete
an Update Installation.
Your product would have to be reinstalled after the
Update Installation is completed.
Removing your product corrupts the operating system.
If your subset control program is designed to overwrite existing files,
it first should make a backup copy of the original file during the
In
Example 3-5, the subset control program
checks a list of files to be backed up if they already exist on the system.
If it finds any, it creates a backup copy with an extension of
The
A backup copy is made if the specified
file exists and if a backup copy does not already exist.
This will be restored
in the
The
After loading the subset, the
In a cluster environment, the
Do not decline software configuration because of one cluster member.
Perform member-specific operations in the
When a kit is installed on a Network File System (NFS) server, the SCP
should make the backward links in the server's kit area.
When the server's
kit area is exported to clients, the links are already in place and you do
not need to create any backward links in the client area.
This is done so
that installation on an NFS client cannot overwrite any existing backward
links in the server's kit areas.
You do not run the subset control program
on an NFS client.
Your subset control program should create and remove backward
links in the
NFS clients importing products with backward links must have directory
hierarchies that exactly match those on the server.
Otherwise, the backward
links fail.
Use the
Example 3-6
uses
The
The SCP uses the
For example, the ODB kit requires that some version of the Orpheus Document
Builder base product must be installed for the ODB product to work properly.
Suppose that the
If the administrator removes the
The SCP uses the
After securing the subset, the
The
In a cluster environment, the
If your SCP needs to access member-specific files, perform those operations
during the
The subset control program cannot create a layered product's symbolic
links during the
Example 3-7
shows the
During the
The
The
When the user invokes the
In a cluster environment, the
The SCP always should return a zero exit status in the
If an operation fails, report the error and continue processing.
The
user must fix the problem after the software is removed.
The subset control program cannot remove a layered product's links during
the
Example 3-8
shows the
This phase should reverse any
changes made during the
When the user invokes the
In a cluster environment, the
The SCP always should return a zero exit status in the
If an operation fails, report the error and continue processing.
The
user must fix the problem after the software is removed.
Perform member-specific operations in the
You can call the following routines to remove links and unlock subsets:
The SCP uses the
In
Example 3-6, the SCP used
The SCP uses the
During the
In a cluster environment, the
The SCP always should return a zero exit status in the
If an operation fails, report the error and continue processing.
The
user must fix the problem after the software is removed.
In
Example 3-10, the subset control program checks
a list of files to be backed up if they already exist on the system.
If it
finds any, it restores the backup copy.
The
Restores any files backed up in
the
In the previous example, the SCP returns the following codes to the
When the user invokes the
The
Depending on the tests performed, your subset control program could
decide to stop the installation or deletion of its subset.
For example, if
it finds a later version of the product already installed, the subset control
program can stop the process.
To stop the installation or deletion of the subset, the subset control
program must return a nonzero status to the
This section provides examples of subset control programs for each of
the different product kit types.
The following topics are discussed:
Creating SCPs for user product kits (Section 3.4.7.1)
Creating SCPs for kernel product kits (Section 3.4.7.2)
Creating SCPs for hardware product kits (Section 3.4.7.3)
User product kits do not require subset control programs.
You may need
to provide one if your user product requires special installation tasks.
Example 3-11
shows a subset control program for the
ODB user product, illustrating the types of operations that can be performed
during different
This program illustrates one method of using the value of the
Example 3-11
is the source for the SCP file fragments
shown in
Section 3.4.5.
In addition to the optional processing described in
Section 3.4.5,
a subset control program for a kernel product such as a device driver must
also configure the driver into the kernel.
When building subset control programs
for a kernel product, you can choose one of the following configuration strategies:
Write one subset control program for a kit that contains the
software subset associated with the single binary module for a statically
configured driver.
Write one subset control program for a kit that contains the
software subset associated with the single binary module for a dynamically
configured driver.
Write one subset control program for a kit that contains the
software subsets associated with the device driver that can be statically
or dynamically configured.
Example 3-12
shows the subset control program for the
single binary module associated with the
In addition to the optional processing described in
Section 3.4.5,
a subset control program for a hardware product such as a device driver also
must configure the driver statically into the kernel.
Example 3-13
shows the subset control program for
the single binary module associated with the
After you create the master inventory and key files, run the
The compression flag file (Section 3.5.1)
The image data file (Section 3.5.2)
The subset control files (Section 3.5.3)
The subset inventory files (Section 3.5.4)
Do not create these files before you run the
Use the following syntax for the
This mandatory
parameter is the pathname of the key file created in
Section 3.3.
This mandatory
parameter specifies the top of the file hierarchy that contains the source
files.
This mandatory
parameter specifies the directory used to store the subset images and data
files produced.
This optional
parameter specifies the name of an individual subset to be built.
You may
specify multiple subsets in a space-separated list.
If you use the
subset
argument, the
Only the subsets named as arguments to this parameter are
to be built.
The
key-file
contains descriptors
for each of the named subsets.
All other subsets in the product have been built already.
The
output-path
directory contains
images of the previously built subsets.
If you do not use the
subset
argument, the
Refer to the
The master inventory file (
For example, the following commands build the subsets for the ODB product
kit:
The
Creates the subsets.
[Return to example] If the subset is not in DCD format,
creates a
Compresses each subset if you specify
the
Creates
the image data file
Creates the
Compression flag file
Image data file
Subset control file
Subset inventory file
Subset control program file
These files are described in
Table 3-9.
The
Table 3-9
shows the installation control files
in the
Figure 3-3
shows the contents of the
The subset files and the files in the
The
compression flag file
is an empty file whose name consists of the product code and the version
number with the string
The
image data file
is used
by the
Table 3-10
describes the image data
file.
Example 3-14
shows
The
Specifies either a list of subsets
upon which this subset is dependent ( You may use the following wildcard characters when
you specify subset names in the
An asterisk ( * ) represents any number of characters.
For example,
A question mark ( ? ) represents a single numeric
character.
For example,
Example 3-15
shows
The
subset inventory file
describes each file in the subset, listing its size, checksum, permissions,
and other information.
The
Each record of the inventory is composed of 12 fields, each separated
by single
[Tab]
characters.
Table 3-12
describes the contents of these fields.
Example 3-16
shows the
The backslashes ( Fields are separated by single
[Tab]
characters.
You must test your subsets to ensure that they can be loaded onto a
running system, that the product runs on the system, and that the subsets
can be deleted.
The following sections describe this testing:
Loading all of the subsets onto a running system.
(Section 3.6.1)
Repeating the subset loading test.
(Section 3.6.2)
Deleting all of the subsets from a running system.
(Section 3.6.3)
If your kit includes optional subsets, loading only the mandatory
subsets onto a running system.
(Section 3.6.4)
If your kit may run in a cluster environment, testing on a
cluster.
(Section 3.6.5)
It is important that you perform these tests in sequence.
The examples in this section assume that your kit consists of the mandatory
Follow these steps to load all subsets:
Log in to the system as
Use the
When prompted, select the option to install all subsets from
the
Verify that all files in your subsets were loaded.
If any
files are missing, check the master inventory file.
Subset inventory files
are created from master inventory file entries.
Verify each file's installed location, permissions, owner,
and group.
The
If you supplied SCP files, verify any actions that should
have occurred in the
After successful installation, test all commands
or utilities included with your product.
Since file locations may have changed,
especially if you installed in the
Repeat the test to confirm that the SCP does not fail when
it runs more than once.
Use the
Verify that all files in your subsets were loaded.
If any
files are missing, check the master inventory file.
Verify each file's installed location, permissions, owner,
and group.
If any are incorrect, modify the file in the source directory and
rebuild the master inventory file and the subsets.
If you supplied SCP files, verify any actions that should
have occurred in the
After successful installation, test all commands
or utilities included with your product.
Follow these steps to load all subsets:
Log in to the system as
Use the
When prompted, select the option to install all subsets from
the
Verify that all files in your subsets were loaded.
If any
files are missing, check the master inventory file.
Subset inventory files
are created from master inventory file entries.
Verify each file's installed location, permissions, owner,
and group.
The
If you supplied SCP files, verify any actions that should
have occurred in the
After successful
installation, test all commands or utilities included with your product.
Since
file locations may have changed, especially if you installed in the
The examples in this section assume that your kit consists of the mandatory
Follow these steps to remove all subsets:
Log in to the system as
Use the
Verify that all files loaded onto your system in
Section 3.6.1
were deleted.
If you supplied SCP files, verify any actions that should
have occurred in the
The examples in this section assume that your kit consists of the mandatory
Follow these steps to load only the mandatory subsets:
Log in to the system as
Use the
When prompted, select the option to install only mandatory
subsets from the
Verify that all mandatory files in your subsets were loaded.
If any files are missing, check the master inventory file.
Subset inventory
files are created from master inventory file entries.
Verify each file's installed location, permissions, owner,
and group.
The
If you supplied SCP files, verify any actions that should
have occurred in the
After successful installation, test all commands or utilities
included with your product.
Since file locations may have changed, especially
if you installed in the
If your product does not work correctly, some of the files in your optional
subsets may need to be moved to mandatory subsets.
To test your product kit in cluster, you must ensure that your subsets
can be loaded onto a running cluster, that the product runs on the cluster,
and that the subsets can be deleted from the cluster.
The following sections
describe this testing:
Loading all of the subsets onto a cluster.
(Section 3.6.5.1)
Deleting all of the subsets from a cluster.
(Section 3.6.5.2)
It is important that you perform these tests in sequence.
The examples in this section assume that your kit consists of the mandatory
Follow these steps to load the product kit onto a cluster:
Log in to the cluster as
Use the
When prompted, select the option to install all subsets from
the
Verify that all files in your subsets were loaded.
If any
files are missing, check the master inventory file.
Subset inventory files
are created from master inventory file entries.
Verify each file's installed location, permissions, owner,
and group.
The
Perform the following checks on each cluster member:
Verify each member-specific file's location, permissions,
owner, and group.
The
Verify that each CDSL can be accessed and that it contains
the correct information for each member.
If you supplied SCP files, verify any actions that should
have occurred in the
After successful installation, test all commands or utilities
included with your product.
Since file locations may have changed, especially
if you installed in the
Follow these steps to delete the kit from a cluster:
Log in to the cluster as
Use the
Verify that all files loaded onto your system in
Section 3.6.1
were deleted.
Perform the following checks on each cluster member:
Verify that each member-specific file was removed.
If you supplied SCP files, verify any actions that should
have occurred in the
Verify that all files not in the inventory are deleted.
This
includes any files created when your kit was installed.
You may have to update the master inventory file after you have created
subsets.
For example, kernel product kits and hardware product kits require
additional files, some of which must be added to your kit's inventory.
After you update the kit source directory, run the
Finds all the file and directory names in the source hierarchy.
Produces the following sorted groups of records:
Records that contain pathnames only, representing files now
present that were not in the previous inventory (new records).
Records that represent files now present that were also present
in the previous inventory.
This list is empty the first time you create the
inventory.
Records that were in the previous inventory but are no longer
present (defunct records).
This list is also empty the first time you create
the inventory.
Lets you edit the group of defunct records, deleting records
for files that no longer belong in the kit.
Lets you edit the group of new records by adding the flags
and subset identification fields (see
Table 3-1).
Merges the three groups of records and sorts the result to
produce a finished master inventory file that matches the source hierarchy.
Run the
STL_IsDataless
STL_NoDataless
3.4.5 Associating SCP Tasks with setld Utility Phases
setld
utility invokes the subset control program
during different phases of its processing.
The SCP can perform certain tasks
during any of these phases, such as creating or deleting a file or displaying
messages.
Other tasks that may be required, such as performing dependency
checks or creating links, should be performed only during specific phases.
PRE_L
phase; creating links between product files and the standard directory
structure occurs during the
POST_L
phase.
setld
utility time lines for the
-l,
-d, and
-v
options.
Figure 3-2: Time Lines for setld Utility Phases
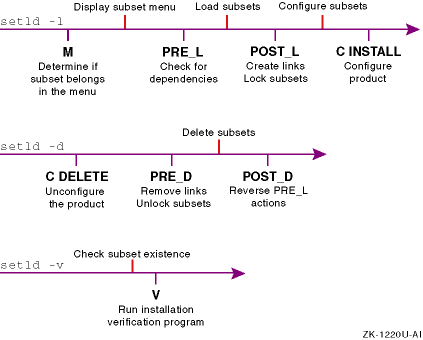
setld
utility are shown above the time lines.
The SCP actions taken
during each
setld
processing phase are shown below the
time lines.
setld
utility enters a new phase, it first
sets the
ACT
environment variable to a corresponding value,
then invokes the subset control program.
The SCP checks the value of the
ACT
environment variable and any command line arguments to determine
the required action.
Caution
V
phase.
setld
processing phase:
M
phase (Section 3.4.5.1)
PRE_L
phase
(Section 3.4.5.2)
POST_L
phase
(Section 3.4.5.3)
C INSTALL
phase
(Section 3.4.5.4)
C DELETE
phase
(Section 3.4.5.5)
PRE_D
phase (Section 3.4.5.6)
POST_D
phase (Section 3.4.5.7)
V
phase (Section 3.4.5.8)
Caution
setld
utility phase of your SCP must be able
to run more than once without causing operational problems.
This does not
mean that you must repeat the SCP tasks, but that multiple executions will
not cause the SCP to fail.
setld(8)
and
stl_scp(4)
reference pages for more information about the
setld
utility and conventions for subset control programs.
3.4.5.1 Displaying the Subset Menu (M Phase)
setld
utility
uses the
M
phase to determine if the subset should be included
in that operation.
Before displaying the menu,
setld
sets
the
ACT
environment variable to
M
and
calls the subset control program for each subset.
At this time, the subset
control program can determine whether to include its subset in the menu.
The
subset control program should return a value of 0 (zero) if the subset can
be included in the menu.
Note
M
phase is run only
on the member where the
setld
utility is invoked.
setld
installation menu, listing the subsets available for installation.
Example 3-3: Sample setld Installation Menu
     1) Kit One Name: Subset Description
     2) Kit Two Name: Subset Description
     3) Kit Three Name: Subset Description
     4) Kit Four Name: Subset Description
     5) ALL of the above
     6) CANCEL selections and redisplay menus
     7) EXIT without installing any subsets

Enter your choices or press RETURN to redisplay menus.

Choices (for example, 1 2 4-6):
setld
utility passes one argument, which can have one of two values:
-l
argument indicates that the
operation is a subset load.
-x
argument is reserved for extraction
of the subset into a RIS server's product area.
setld
extracts a subset into a RIS server's
product area, the server also executes the subset control program to make
use of the program's code for the
M
phase of installation.
You should code the
M
phase to detect the difference between
extraction of the subset into a RIS area and loading of the subset for use
of its contents.
To make this determination, check the value of the
$1
command argument (either
-x
for RIS
extraction or
-l
for loading).
For RIS extraction,
the subset control program should take no action during the
M
phase.
When loading subsets, the SCP should perform a
machine
test.
The following Bourne shell example illustrates one way to code the
M
phase.
In
Example 3-4, the subset control
program is checking to determine the type of processor on which it is running.
In this example, there is no special code for the RIS extract case.
Example 3-4: Sample Test for Alpha Processor During M Phase
#
# The ACT variable is set by setld and determines which
# phase of the SCP should be executed.
#
case $ACT in
#
# This is the menu phase of the SCP
#
M)
	#
	# Setld invokes the M phase with an argument and if
	# the argument is "-l" it means that a software load
	# is occurring.
	#
	case $1 in
	-l)
		#
		# Examine the machine architecture to be sure
		# that this software is being installed on an
		# alpha machine.  If it is not, exit with an
		# error status so that setld will not display
		# this subset on the menu of subsets to load.
		#
		ARCH=`./bin/machine`
		[ "$ARCH" = alpha ] || exit 1
		;;
	esac
	;;

.
.
.
setld
utility:
0
- offer the subset on the menu1
- do not offer the subset on the menu
Note
machine
shell script even though the installation is performed in
a DMS area on the server.
Refer to
Section 3.4.4
and
Sharing Software on a Local Area Network
for more information about DMS.
3.4.5.2 Before Loading the Subset (PRE_L Phase)
setld
utility sets the
ACT
environment variable
to
PRE_L
and calls the subset control program.
At this
time, the subset control program can take any action required to prepare the
system for subset installation, such as protecting existing files.
Note
PRE_L
phase is run
only once for the whole cluster.
If you must run member-specific operations
in the
PRE_L
phase, include code in your SCP that performs
the operation on all cluster members.
DEPS
field in the subset control file (subset_id.ctrl) for subset dependency processing.
PRE_L
phase and restore the copy in the
POST_D
phase described in
Section 3.4.5.7.
.OLD.
Example 3-5: Sample Backup of Existing Files During PRE_L Phase
.
.
.
#
# Here is a list of files to back up if found on
# the installed system.
#
BACKUP_FILES="\
	./usr/var/opt/$_PVCODE/templates/odb_template \ [1]
	./usr/var/opt/$_PVCODE/log_files/odb_log" [1]

.
.
.
#
# The ACT variable is set by setld and determines which
# phase of the SCP should be executed.
#
case $ACT in

.
.
.
#
# This is the pre-load phase of the SCP
#
PRE_L)
	#
	# Loop through the list of backup files and create
	# backup copies for any file that is found on the
	# system.
	#
	for FILE in $BACKUP_FILES
	do
		#
		# If the file to be backed up exists, create
		# a backup copy with a .OLD extention.
		#
		if [ -f $FILE -a ! -f $FILE.OLD ]
		then
			cp $FILE $FILE.OLD [2]
		fi
	done
	;;

.
.
.
STL_ScpInit
routine sets the value of the
$_PVCODE
global variable
to
OAT100.
Using this variable allows the SCP to be used
for the next version of the product,
OAT200, without changing
the pathnames.
[Return to example]POST_D
phase.
[Return to example]PRE_L
processing returns the following codes
to the
setld
utility:
0
- load the subset1
- do not load the subset3.4.5.3 After Loading the Subset (POST_L Phase)
setld
utility sets
the
ACT
environment variable to
POST_L
and calls the subset control program for each subset.
At this time the subset
control program can make any modifications required to subset files that usually
are protected from modification when the installation is complete.
The subset
control program should
create backward
links
and
perform dependency locking
at this time
Note
POST_L
phase is run
only once for the whole cluster.
If you must run member-specific operations
in the
POST_L
phase, include code in your SCP that performs
the operation on all cluster members.
C INSTALL
phase, not in the
POST_L
phase.
../ ) to include when you create your backward links.
For
example,
/var
is frequently a link to
/usr/var.
POST_L
and
PRE_D
phases,
respectively.
Caution
STL_LinkInit
and
STL_LinkBack
routines to create backward links as follows, and use the
rm
command to remove them:
STL_LinkInit
POST_L
phase to establish internal
variables for the
STL_LinkBack
routine.
Before you use
STL_LinkBack
to create a link, you must execute
STL_LinkInit
once.
This routine has no arguments and returns no status.STL_LinkBack
link_file file_path link_path
/usr/opt
or
/usr/var/opt) to a directory within
the standard UNIX directory structure.
In this example,
link_file
is the file to link,
file_path
is
the dot-relative path of the directory where the file actually resides, and
link_path
is the dot-relative path of the directory where you
should place the link.
You can use
STL_LinkBack
repeatedly
to create as many links as required.
This routine returns no status.
STL_LinkBack
in the
POST_L
phase to create a link named
/opt/OAT100/sbin/ls
that refers to the real file
/sbin/ls, and removes
the link in the
PRE_D
phase.
Example 3-6: Sample Backward Link Creation During POST_L Phase
case $ACT in

.
.
.
#
# This is the post-load phase of the SCP
#
POST_L)
	#
	# Initializes the variables so that the STL_LinkBack
	# routine can be executed
	#
	STL_LinkInit
	#
	# Create a symbolic link in the ./opt/$_PVCODE/sbin
	# directory that points to the ./sbin/ls file.
	#
		STL_LinkBack ls ./sbin ./opt/$_PVCODE/sbin [1]
	;;
PRE_D)
	#
	# Remove the links created in the POST_L phase
	#
		rm -f ./opt/$_PVCODE/sbin/ls [2]
	;;

.
.
.
In the previous example, the SCP returns the following codes
to the
STL_LinkBack
routine creates a backward link in the product-specific area.
If you used
the
STL_LinkCreate
routine, it would create an unacceptable
link in the
OSF
name space.
The
STL_ScpInit
routine sets the value of the
$_PVCODE
global variable
to
OAT100.
Using this variable allows the SCP to be used
for the next version of the product,
OAT200, without changing
the pathnames.
[Return to example]rm
command to remove the links created in the
POST_L
phase.
The
STL_LinkRemove
routine is used only to remove links
created by the
STL_LinkCreate
routine.
[Return to example]setld
utility:
0
- continue subset configuration1
- terminate subset configuration; leave the subset
corruptsetld
utility creates an empty
subsetID.lk
lock file when it installs a subset.
After successful installation, that subset is then available for dependency
checks and locking is performed when other subsets are installed later.
A
subset's lock file can then contain any number of records, each naming a single
dependent subset.
OATBASE200
subset is present.
When the
setld
utility installs the
OATODBTEMPS100
subset
from the ODB kit, it inserts a record that contains the subset identifier
OATODBTEMPS100
into the
OATBASE200.lk
file.
When
the system administrator uses the
setld
utility to remove
the
OATBASE200
subset, the
setld
utility
checks
OATBASE200.lk
and finds a record that indicates
that
OATODBTEMPS100
depends on
OATBASE200,
displays a warning message, and requires confirmation that the user really
intends to remove the
OATBASE200
subset.
OATODBTEMPS100
subset,
the
setld
utility removes the corresponding record from
the
OATBASE200.lk
file.
Thereafter, the administrator can
remove the
OATBASE200
subset without causing a dependency
warning.
DEPS
field in the subset control
file (subset-id.ctrl) to perform
dependency locking.
3.4.5.4 After Securing the Subset (C INSTALL Phase)
setld
utility sets
the
ACT
environment variable to
C
(configuration)
and calls the subset control program for each subset, passing
INSTALL
as an argument.
At this time, the subset control program can perform
any configuration operations required for product-specific tailoring.
For
example, a kernel kit can statically or dynamically configure a device driver
at this point.
setld
utility enters the
C INSTALL
phase when
setld
is invoked with the
-l
(load) option.
Note
C INSTALL
phase is
run on every cluster member.
You must be able to run any SCP operations in
the
C INSTALL
phase more than once without causing a problem.
C INSTALL
phase.
C INSTALL
phase.
C INSTALL
portion of the SCP that issues a message upon successful subset installation.
Example 3-7: Sample Message Output During C INSTALL Phase
# The ACT variable is set by setld and determines which
# phase of the SCP should be executed.
#
case $ACT in

.
.
.
#
# This is the configuration phase of the SCP
#
C)
	#
	# Setld invokes the C phase with an argument that is
	# either INSTALL or DELETE.  The INSTALL argument is
	# used on a setld load, while the DELETE argument is
	# used on a setld delete.
	#
	case $1 in
	INSTALL) [1]
		#
		# Output a message letting the user know
		# that they should read the README file
		# before using the product.
		#
				echo "
The installation of the $_DESC ($_SUB) [2]
software subset is complete.
Please read the /opt/$_PVCODE/README.odb file before [3]
using the $_DESC product." [2]
		;;

.
.
.
esac
	;;

.
.
.
In the previous example, the SCP returns the following codes
to the
C
phase, the SCP checks to see if the first argument passed by the
setld
utility has the value of
INSTALL.
If so,
the program displays a message indicating that the installation is complete.
[Return to example]STL_ScpInit
routine sets the value of the
$_DESC
global variable to
Orpheus Document Builder
and the
$_SUB
global
variable to
OATODB100, resulting in the following message:
The installation of the Orpheus Document Builder (OATODB100)
software subset is complete.
Please read the /opt/OAT100/README.odb file before
using the Orpheus Document Builder product."
STL_ScpInit
routine sets the value of the
$_PVCODE
global variable
to
OAT100.
Using this variable allows the SCP to be used
for the next version of the product,
OAT200, without changing
the pathnames.
[Return to example]setld
utility:
0
- successful load and configure1
- unsuccessful load and configure; leave the
subset corrupt3.4.5.5 Before Deleting a Subset (C DELETE Phase)
setld
utility with the
-d
option, the utility sets the
ACT
environment
variable to
C
and calls the subset control program for
each subset, passing
DELETE
as an argument.
At this time,
the subset control program can make configuration modifications to remove
evidence of the subset's existence from the system.
For example, a kernel
kit would deconfigure a statically or dynamically configured driver during
this phase.
The
C
DELETE
phase should reverse any changes
made during the
C INSTALL
phase.
Note
C DELETE
phase is run
only once for the whole cluster.
If you must run member-specific operations
in the
C DELETE
phase, include code in your SCP that performs
the operation on all cluster members.
C DELETE
phase.
A nonzero return status tells the
setld
utility not to delete the software, but if the SCP has run the
C
DELETE
phase on other cluster members the software already may be
marked as corrupt.
C DELETE
phase.
C DELETE
portion of the SCP that would reverse any changes made during the
C INSTALL
phase.
Example 3-8: Sample C DELETE Phase
#
# The ACT variable is set by setld and determines which
# phase of the SCP should be executed.
#
case $ACT in

.
.
.
#
# This is the configuration phase of the SCP
#
C)
	#
	# Setld invokes the C phase with an argument that is
	# either INSTALL or DELETE.  The INSTALL argument is
	# used on a setld load, while the DELETE argument is
	# used on a setld delete.
	#
	case $1 in
	INSTALL)
		#
		# Output a message letting the user know
		# that they should read the README file
		# before using the product.
		#
				echo "
The installation of the $_DESC ($_SUB)
software subset is complete.
Please read the /opt/$_PVCODE/README.odb file before
using the $_DESC product."
		;;
   DELETE)
       ;; [1]
   esac
	;;

.
.
.
In the previous example, the SCP returns the following codes
to the
C INSTALL
phase.
Since no changes
were made in
Example 3-7, no action is taken in the
C DELETE
phase.
[Return to example]setld
utility:
0
- continue with the deletion1
- terminate the deletion3.4.5.6 Before Deleting a Subset (PRE_D Phase)
setld
utility with the
-d
option, the utility sets the
ACT
environment
variable to
PRE_D
and calls the subset control program
for each subset.
At this time, the subset control program can reverse modifications
made during the
POST_L
phase of installation, such as removing
links and dependency locks.
Note
PRE_D
phase is run
on every cluster member.
You must be able to run any SCP operations in the
PRE_D
phase more than once without causing a problem.
PRE_D
phase.
A nonzero return status tells the
setld
utility not to delete the software, but since the SCP has run the
C DELETE
phase the software is already be marked as corrupt.
C INSTALL
phase, not in the
PRE_D
phase.
STL_LinkRemove
STL_LinkCreate
and restores
any original files that
STL_LinkCreate
saved.
Call
STL_ScpInit
first to initialize required global variables.
The
STL_LinkRemove
routine cannot remove modified links.DEPS
field in the subset control
file (subset-id.ctrl) to perform
dependency unlocking.
STL_LinkBack
in the
POST_L
phase to create the
/opt/OAT100/sbin/ls
link, referring to the
/sbin/ls
file.
Example 3-9
shows the SCP removing this link in the
PRE_D
phase.
Example 3-9: Sample PRE_D Phase Reversal of POST_L Phase Actions
case $ACT in

.
.
.
#
# This is the pre-deletion phase of the SCP
#
PRE_D)
	#
	# Remove the links created in the POST_L phase
	#
		rm -f ./opt/$_PVCODE/sbin/ls [1]
	;;

.
.
.
In the previous example, the SCP returns the following codes
to the
rm
command to remove the links created in the
POST_L
phase.
The
STL_LinkRemove
routine is used only to remove links
created by the
STL_LinkCreate
routine.
[Return to example]setld
utility:
0
- continue with the deletion1
- terminate the deletion3.4.5.7 After Deleting a Subset (POST_D Phase)
POST_D
phase, after deleting a subset,
the
setld
utility sets the
ACT
environment
variable to
POST_D
and calls the subset control program
for each subset.
At this time the subset control program can reverse any modifications
made during the
PRE_L
phase of installation.
Note
POST_D
phase is run
only once for the whole cluster.
If you must run member-specific operations
in the
POST_D
phase, include code in your SCP that performs
the operation on all cluster members.
POST_D
phase.
A nonzero return status tells the
setld
utility not to delete the software, but the subset already has been removed.
This causes cluster corruption.
Example 3-10: Sample File Restoration During POST_D Phase
.
.
.
#
# Here is a list of files to back up if found on
# the installed system.
#
BACKUP_FILES="\
	./usr/var/opt/$_PVCODE/templates/odb_template \ [1]
	./usr/var/opt/$_PVCODE/log_files/odb_log"
#
# The ACT variable is set by setld and determines which
# phase of the SCP should be executed.
#
case $ACT in

.
.
.
#
# This is the post-deletion phase of the SCP
#
POST_D)
	#
	# Restore the backup copies created during the PRE_L phase
	#
	for FILE in $BACKUP_FILES
	do
		 [ -f $FILE.OLD ] &&
		 mv $FILE.OLD $FILE [2]
	done
	;;

.
.
.
esac
STL_ScpInit
routine sets the value of the
$_PVCODE
global variable
to
OAT100.
Using this variable allows the SCP to be used
for the next version of the product,
OAT200, without changing
the pathnames.
[Return to example]PRE_L
phase, as shown in
Example 3-5.
[Return to example]setld
utility:
0
- continue with the deletion1
- terminate the deletion3.4.5.8 Verifying the Subset (V Phase)
setld
utility with the
-v
option, the utility sets the
ACT
environment
variable to
V
and calls the subset control program for
each subset.
Any
V
phase processing included in the subset
control program is executed at this time.
setld
utility checks for the existence of the
installed subset and if the subset exists, the
setld
utility
verifies the size and checksum information for each file in the subset.
The
setld
utility does not execute subset control program
V
phase processing during the installation process.
3.4.6 Stopping the Installation
setld
utility
upon exiting from the particular phase for which it was called.
If the subset
control program returns a status of 0 (zero), the
setld
utility assumes that the subset control program is satisfied that the
setld
process should continue.
3.4.7 Creating SCPs for Different Product Kit Types
setld
phases.
Example 3-11: Sample ODB User Product SCP
#!/sbin/sh

#
# Load all of the standard SCP library routines
#
. /usr/share/lib/shell/libscp

#
# Initialize the global variables, except in the M phase
#
if [ "$ACT" != "M" ]
then
	STL_ScpInit
fi

#
# Here is a list of files to back up if found on
# the installed system.
#
BACKUP_FILES="\
	./usr/var/opt/$_PVCODE/templates/odb_template \
	./usr/var/opt/$_PVCODE/log_files/odb_log"

#
# The ACT variable is set by setld and determines which
# phase of the SCP should be executed.
#
case $ACT in

#
# This is the menu phase of the SCP
#
M)
	#
	# Setld invokes the M phase with an argument and if
	# the argument is "-l" it means that a software load
	# is occurring.
	#
	case $1 in
	-l)
		#
		# Examine the machine architecture to be sure
		# that this software is being installed on an
		# alpha machine.  If it is not, exit with an
		# error status so that setld will not display
		# this subset on the menu of subsets to load.
		#
		ARCH=`./bin/machine`
		[ "$ARCH" = alpha ] || exit 1
		;;
	esac
	;;

PRE_L)
	#
	# Loop through the list of backup files and create
	# backup copies for any file that is found on the
	# system.
	#
	for FILE in $BACKUP_FILES
	do
		#
		# If the file to be backed up exists, create
		# a backup copy with a .OLD extention.
		#
		if [ -f $FILE ]
		then
			cp $FILE $FILE.OLD
		fi
	done
	;;

POST_L)
	#
	# Initializes the variables so that the STL_LinkBack
	# routine can be executed
	#
	STL_LinkInit

	#
	# Create a symbolic link in the ./opt/$_PVCODE/sbin
	# directory that points to the ./sbin/ls file.
	#
	STL_LinkBack ls ./sbin ./opt/$_PVCODE/sbin
	;;

PRE_D)
	#
	# Remove the links created in the POST_L phase
	#
	rm -f ./opt/$_PVCODE/sbin/ls
	;;

POST_D)
	#
	# Restore the backup copies created during the PRE_L phase
	#
	for FILE in $BACKUP_FILES
	do
		 [ -f $FILE.OLD ] &&
		 mv $FILE.OLD $FILE
	done
	;;

C)
	#
	# Setld invokes the C phase with an argument that is
	# either INSTALL or DELETE.  The INSTALL argument is
	# used on a setld load, while the DELETE argument is
	# used on a setld delete.
	#
	case $1 in
	INSTALL)
		#
		# Output a message letting the user know
		# that they should read the README file
		# before using the product.
		#
		echo "
The installation of the $_DESC ($_SUB)
software subset is complete.

Please read the /opt/$_PVCODE/README.odb file before
using the $_DESC product."
		;;

	DELETE)
		;;

	esac
	;;

esac

exit 0
ACT
environment variable to determine what actions to perform.
Note
3.4.7.2 Kernel Product Kit SCPs
odb_kernel
driver.
The user can choose to configure this single binary module into the kernel
either statically or dynamically.
The subset control program runs the
doconfig
utility to configure the driver into the kernel.
Example 3-12: Sample ODB Kernel Product SCP
#!/sbin/sh

#
# Load all of the standard SCP library routines
#
. /usr/share/lib/shell/libscp

#
# Load the standard Error library routines
# (location of the Error routine)
#
. /usr/share/lib/shell/Error

#
# Load the standard String library routines
# (location of the ToUpper routine)
#
. /usr/share/lib/shell/Strings

#
# This routine rebuilds the static kernel
#
Rebuild_Static_Kernel()
{
	HNAME=`/sbin/hostname -s`
	HOSTNAME=`ToUpper $HNAME`
	if doconfig -c $HOSTNAME
	then
		echo "\nThe /sys/${HOSTNAME}/vmunix kernel has been"
		echo "moved to /vmunix and the changes will take effect"
		echo "the next time the system is rebooted."
		return 0
	else
		Error "
An error occurred while building the static kernel."
		return 1
	fi
}

KERNEL=/cluster/members/{memb}/boot_partition/vmunix

#
# Initialize the global variables, except in M phase
#
if [ "$ACT" != "M" ]
then
	STL_ScpInit
fi

#
# The ACT variable is set by setld and determines which
# phase of the SCP should be executed.
#
case $ACT in

C)
	#
	# The kreg database file where all of the kernel
	# layered products are registered.
	#
	KREGFILE=./usr/sys/conf/.product.list

	case $1 in
	INSTALL)

		#
		# Merge the graphics support into the existing
		# /etc/sysconfigtab file
		#
		sysconfigdb -m -f ./opt/$_PVCODE/etc/sysconfigtab odb_graphics

		echo "*** $_DESC Product Installation Menu ***\n"
		echo "1. Statically configure the graphics support"
		echo "2. Dynamically configure the graphics support"
		echo "\nType the number of your choice []: \c"

		read answer
		case ${answer} in
		1)
			#
			# Determine if the product is already registered
			# with the kreg database, and if it is, skip
			# registering it.
			#
			grep -q $_SUB $KREGFILE
			if [ "$?" != "0" ]
			then
				#
				# Register the product with the
				# kernel using kreg
				#
				/sbin/kreg -l $_PCODE $_SUB \
					./opt/$_PVCODE/sys/BINARY
			fi

			#
			# Rebuild the static kernel
			#
			Rebuild_Static_Kernel

			#
			# Successful rebuild, so back up the existing
			# kernel and move the new one into place.
			#
			if [ "$?" = "0" ]
			then
				#
				# Make a backup copy of the kernel
				# as it existed prior to installing
				# this subset.  Since a subset can
				# be installed more than once (due to
				# load/configuration failures or even
				# because the user removed files) make
				# sure that the backup does not already
				# exist.
				#
				if [ ! -f $KERNEL.pre_${_SUB)
				then
					mv $KERNEL $KERNEL/pre_${_SUB)
				fi

				#
				# Move the new kernel into place
				#
				mv /sys/${HOSTNAME}/vmunix /vmunix

				#
				# Place a marker on the system so that
				# upon subset removal the SCP can
				# determine if it needs to remove a
				# static or dynamic configuration.
				#
				touch ./opt/$_PVCODE/sys/BINARY/odb_graphics_static
			fi
			;;

		2)
			#
			# Dynamically load the odb_graphics subsystem
			# into the kernel
			#
			sysconfig -c odb_graphics
			;;

		esac
		;;

	DELETE)
		#
		# If the marker is present then the kernel option
		# was added statically.
		#
		if [ -f ./opt/$_PVCODE/sys/BINARY/odb_graphics_static ]
		then
			#
			# Clean-up the marker
			#
			rm -f ./opt/$_PVCODE/sys/BINARY/odb_graphics_static

			#
			# Deregister the product using kreg
			#
			/sbin/kreg -d $_SUB

			#
			# Rebuild the static kernel
			#
			Rebuild_Static_Kernel

			#
			# Successful rebuild, remove the old backup
			# copy that was created when we installed.
			#
			if [ "$?" = "0" ]
			then
				mv /sys/${HOSTNAME}/vmunix /vmunix
				rm -f $KERNEL.pre_${_SUB}
			fi
		else
			#
			# Unload the dynamic kernel module
			#
			sysconfig -u odb_graphics
		fi

		#
		# Remove the entry from the /etc/sysconfigtab file
		#
		sysconfigdb -d odb_graphics
		;;
	esac
	;;

esac

exit 0
3.4.7.3 Hardware Product Kit SCPs
odb_kernel
driver.
The user can configure this single binary module statically into the
kernel.
Example 3-13: Sample ODB Hardware Product SCP
#!/sbin/sh

#
# Load all of the standard SCP library routines
#
. /usr/share/lib/shell/libscp

#
# Load the standard Error library routines
#
. /usr/share/lib/shell/Error

#
# Update the specified file with the latest entries from the sysconfigtab
# file fragment shipped with the harwdare subset.  Any new sysconfigtab
# subsystem entries will be added to the specified file, while any existing
# subsystem entries will be merged.
#
update_sysconfigtab()
{
	#
	# This is the system file to be modified
	#
	MODFILE=$1

	#
	# This is the location of the sysconfigtab file fragment
	# for the hardware subset.
	#
	STANZA=./opt/$_PVCODE/etc/sysconfigtab

	#
	# Merge the sysconfigtab file fragment (STANZA) with the
	# file to be modified from the system (MODFILE)
	#
	sysconfigdb -t $MODFILE -f $STANZA -m
	STATUS="$?"
	[ "$STATUS" -eq 255 ] && STATUS=0

	return $STATUS
}


#
# This is the main loop where the proper code for each phase of
# the SCP file is executed.
#
Main()
{
	#
	# Initialize the global variables, except in M phase
	#
	if [ "$ACT" != "M" ]
	then
		STL_ScpInit
	fi

	#
	# The ACT variable is set by setld and determines which
	# phase of the SCP should be executed.
	#
	case $ACT in

	M)
		;;

	POST_L)
		#
		# Update the ./etc/.proto..sysconfigtab file
		#
		update_sysconfigtab ./etc/.proto..sysconfigtab || {
			Error "
Error: Failed to add entries to ./etc/.proto..sysconfigtab file.\n"
			exit 1
		}

		#
		# Update the ./etc/sysconfigtab file
		#
		update_sysconfigtab ./etc/sysconfigtab || {
			Error "
Error: Failed to add entries to ./etc/sysconfigtab file.\n"
			exit 1
		}
		;;

	C)
		case $1 in
		INSTALL)
			#
			# Register the product with the kernel using kreg
			#
			/sbin/kreg -l $_PCODE $_SUB \
				/opt/$_PVCODE/sys/BINARY
			;;
		DELETE)
			#
			# Deregister the product using kreg
			#
			/sbin/kreg -d $_SUB
			;;
		esac
		;;

	esac

	exit 0
}

[ "$CHECK_SYNTAX" ] || Main $*
kits
utility to produce subsets and control files.
The
kits
utility creates the following files:
Caution
kits
utility.
kits
command:
kits
key-file
input-path
output-path
[subset]...
kits
utility assumes
the following:
kits
utility builds all subsets listed in the key file.
kits(1)
reference page for more information.
Caution
*.mi) and the key file
(*.k) are typically in the same directory.
If they are
not, the
MI=
attribute in the key file must contain the
explicit relative path from the directory where you are running the
kits
utility to the directory where the master inventory file resides.
The
scps
directory that contains any subset control programs
must be in the same directory where the
kits
utility is
invoked.
# cd /mykit/data
# kits OAT100.k ../src ../output
%%
Creating 2 Orpheus Document Builder subsets.
1   Subset OATODB100 [1]

        Generating media creation information...done
        Creating OATODB100 control file...done.
        Making tar image...done. [2]
        Compressing [3]
           OATODB100: Compression: 92.64%
 -- replaced with OATODB100.Z

        *** Finished creating media image for OATODB100. ***

2   Subset OATODBTEMPS100 [1]

        Generating media creation information...done
        Creating OATODBTEMPS100 control file...done.
        Making tar image...done.
        Compressing [3]
           OATODBTEMPS100: Compression: 98.39%
 -- replaced with OATODBTEMPS100.Z
        Null subset control program created for OATODBTEMPS100.

        *** Finished creating media image for OATODBTEMPS100. ***

Creating OAT.image [4]

Creating INSTCTRL [5]
a OAT.image 1 Blocks
a OAT100.comp 0 Blocks
a OATODB100.ctrl 1 Blocks
a OATODB100.inv 2 Blocks
a OATODB100.scp 7 Blocks
a OATODBTEMPS100.ctrl 1 Blocks
a OATODBTEMPS100.inv 0 Blocks
a OATODBTEMPS100.scp 0 Blocks

Media image production complete.
kits
utility performs the following steps and
reports its progress:
tar
image of the subset.
[Return to example]COMPRESS
attribute in the key file.
[Return to example]OAT.image.
[Return to example]INSTCTRL
file, which contains a
tar
image of
all the following installation control files:
product-id.comp
product-code.image
subset-id.ctrl
subset-id.inv
subset-id.scp
INSTCTRL
file is placed in the output directory.
[Return to example]instctrl
directory after you run the
kits
utility.
Table 3-9: Installation Control Files in the instctrl Directory
File
Description
product-id.compCompression flag file.
This empty file is
created only if you specified the COMPRESS attribute in the key file.
Its
presence signals to the
setld
utility that the subset files
are compressed.
The ODB kit's compression flag file is named
OAT100.comp.
product-code.imageImage data file.
This file contains size
and checksum information for the subsets.
The ODB kit's image data file is
named
OAT.image.
subset-id.ctrlSubset control file.
This file contains the
setld
utility control information.
There is one subset control
file for each subset.
The ODB kit's subset control files are named
OATODB100.ctrl
and
OATODBTEMPS100.ctrl.
subset-id.invSubset inventory file.
This file contains
an inventory of the files in the subset.
Each record describes one file.
There is one subset inventory file for each subset.
The ODB kit's subset
inventory files are named
OATODB100.inv
and
OATODBTEMPS100.inv.
subset-id.scpSubset control program.
If you created subset
control programs for your kit, these files are copied from the
scps
directory to the
instctrl
directory.
There is
one subset control program for each subset; if you have not created a subset
control program for a subset, the
kits
utility creates
a blank file.
The ODB kit's subset control program files are named
OATODB100.scp
and
OATODBTEMPS100.scp.output
directory after you run the
kits
utility.
Figure 3-3: ODB output Directory
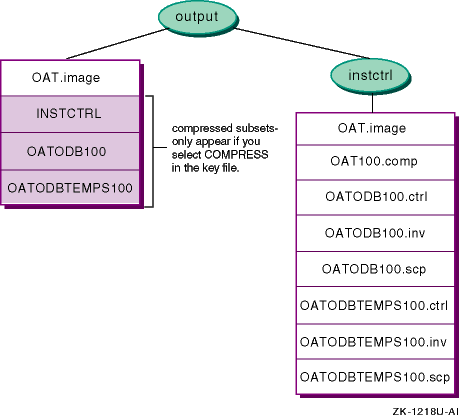
instctrl
directory
are constituents of the final kit.
The following sections describe the contents
of the installation files.
3.5.1 Compression Flag File
comp
as a suffix; for example,
OAT100.comp.
If the compression flag file exists, the
setld
utility knows that the subset files are compressed.
3.5.2 Image Data File
setld
utility to verify subset image integrity before
starting the actual installation process.
The image data file name consists
of the product code with the string
image
as a suffix.
The image data file contains one record for each subset in the kit, with three
fields in each record.
Table 3-10: Image Data File Field Descriptions
Field
Description
Checksum
The modulo-65536 (16-bit) checksum of the
subset file, as provided by the
sum
utility.
If the file
is compressed, the checksum after compression.
[Footnote 4]
Size
The size of the subset file in kilobytes.
If the file is compressed, the size after compression.
Subset identifier
The product code, subset mnemonic, and version
number.
For example,
OATODB100.OAT.image, the image data file for the ODB kit:
Example 3-14: Sample Image Data File
13601    10 OATODB100
12890    10 OATODBTEMPS100
setld
utility uses the subset control files as
a source of descriptive information about subsets.
Subset control file fields
are described in
Table 3-11.
Table 3-11: Subset Control File Field Descriptions
Field
Description
NAMESpecifies the product name.
This value is
from the Name field in the Key File.
DESC
Briefly describes the subset.
This value
is from the Subset Description field in the Subset Descriptor section of the
Key File.
ROOTSIZESpecifies (in bytes) the space the subset
requires in the
root
( / )
file system.
USRSIZESpecifies (in bytes) the space the subset
requires in the
usr
file system.
This value is calculated
by the
kits
utility.
VARSIZE
Specifies (in bytes) the space the subset
requires in the
var
file system.
This value is calculated
by the
kits
utility.
NVOLS
Specifies disk volume identification information
as two colon-separated integers (the volume number of the disk that contains
the subset archive and the number of disks required to contain the subset
archive).
This value is calculated by the
kits
utility.
MTLOC
Specifies the tape volume number and subset's
location on the tape as two colon-separated integers (the volume number of
the tape that contains the subset archive and the file offset at which the
subset archive begins).
On tape volumes, the first three files are reserved
for a bootable operating system image and are not used by the
setld
utility.
An offset of 0 (zero) indicates the fourth file on the
tape.
The fourth file is a
tar
archive named
INSTCTRL, which contains the kit's installation control files (listed
in
Table 3-9).
This value is calculated by the
kits
utility.
DEPS
DEPS="OATODB100OSFDCMT505"), or a single period (DEPS=".") indicating
that there are no subset dependencies.
If there is more than one subset dependency,
each subset name is separated by a
[Space]
character.
This
value is from the Dependency List field in the Subset Descriptor section of
the Key file.
DEPS
field:
OAT*100
will match
OAT100,
OATODB100,
OATODBTEMPS100, and so on.
OATODB1??
matches
OATODB100,
OATODB101, and so on up to
OATODB199.
FLAGS
Specifies the value in the flags field of
the subsets record in the key file.
This value is from the Flags field in
the Subset Descriptor section of the Key file.
Bit 0 indicates whether the subset can be removed (0=removable,
1=protected).
Bit 1 indicates whether the subset is mandatory (0=mandatory,
1=optional).
Bit 2 indicates whether the subset is compressed (0=uncompressed,
1=compressed).
Bits 3 to 7 are reserved; bits 8 to 15 are undefined.
OATODB100.ctrl, the control file for the ODB kit's
OATODB100
subset:
Example 3-15: Sample Subset Control File
NAME='Orpheus Document Builder OATODB100'
DESC='Document Builder Tools'
ROOTSIZE=16668
USRSIZE=16459
VARSIZE=16384
NVOLS=1:0
MTLOC=1:1
DEPS="."
FLAGS=0
kits
utility generates this
information, which reflects the exact state of the files in the source hierarchy
from which the kit was built.
The
setld
utility uses the
information to duplicate that state, thus transferring an exact copy of the
source hierarchy to the customer's system.
Table 3-12
describes subset inventory file fields.
Table 3-12: Subset Inventory File Field Descriptions
OATODB100.inv
inventory file for the ODB kit's
OATODB100
subset.
Example 3-16: Sample Subset Inventory File
0	8192	00000	0	0	040755	5/13/00	100	d\
	./opt/OAT100	none	OATODB100
0	133	21616	0	0	100644	5/11/00	100	f\
	./opt/OAT100/README.odb	none	OATODB100
0	8192	21616	0	0	040755	5/11/00	100	d\
	./opt/OAT100/sbin	 none	OATODB100
0	151	28636	3	4	100755	5/11/00	100	f\
	./opt/OAT100/sbin/odb_recover	none	OATODB100
0	8192	28636	0	0	040755	5/13/00	100	d\
	./usr/opt/OAT100	none	OATODB100
0	8192	28636	0	0	040755	5/11/00	100	d\
	./usr/opt/OAT100/bin	none	OATODB100
0	75	26280	0	0	100755	5/11/00	100	f\
	./usr/opt/OAT100/bin/odb_start	none	OATODB100
4  0     00000 0  0  100666   5/11/00  100  +\
   ./usr/var/cluster/members/member0/opt/OAT100/log_files/odb_log \
   none  OATODB100
0	8192	26280	0	0	040755	5/11/00	100	d\
	./usr/var/opt/OAT100	none	OATODB100
0	8192	26280	0	0	040755	5/11/00	100	d\
	./usr/var/opt/OAT100/log_files	none	OATODB100
0  5  00000 0  0  100666  5/11/00  100  s\
   ./usr/var/opt/OAT100/log_files/odb_log \
   ../../../cluster/members/{memb}/opt/OAT100/log_files/odb_log
   OATODB100
Note
\ ) in
Example 3-16
indicate line continuation and are not present in the actual file.
Caution
OATODB100
subset and the optional
OATODBTEMPS100
subset, and that it resides in the
/mykit/output
directory.
root
or use the
su
command to gain superuser privileges.
setld
utility to load
all of your subsets onto the system, as in the following example:
# setld -l /mykit/output
setld
installation menu.
setld
utility uses the information in the
subset inventory file to determine these attributes.
If any are incorrect,
modify the file in the source directory and rebuild the master inventory file
and the subsets.
M,
PRE_L,
POST_L, and
C INSTALL
phases.
Refer to
Section 3.4.5
for discussions of SCP tasks associated with these
phases.
/opt,
/usr/opt, or
/usr/var/opt
directories, it is important
that you test your product thoroughly to verify that everything works correctly.
setld -l
command to
reload all of your subsets onto the system.
M,
PRE_L,
POST_L, and
C INSTALL
phases.
Refer to
Section 3.4.5
for discussions of SCP tasks associated with these
phases.
root
or use the
su
command to gain superuser privileges.
setld
utility to load all of your subsets onto the system, as in
the following example:
# setld -l /mykit/output
setld
installation menu.
setld
utility uses the information in the
subset inventory file to determine these attributes.
If any are incorrect,
modify the file in the source directory and rebuild the master inventory file
and the subsets.
M,
PRE_L,
POST_L, and
C INSTALL
phases.
Refer to
Section 3.4.5
for discussions of SCP tasks associated with these
phases.
/opt,
/usr/opt, or
/usr/var/opt
directories, it is important that you test your product thoroughly to verify
that everything works correctly.
OATODB100
subset and the optional
OATODBTEMPS100
subset, and that it resides in the
/mykit/output
directory.
root
or use the
su
command to gain superuser privileges.
setld
utility to delete all of
your subsets from the system, as in the following example:
# setld -d OATODB100 OATODBTEMPS100
C DELETE,
PRE_D,
and
POST_D
phases.
Refer to
Section 3.4.5
for discussions of SCP tasks associated with these phases.
3.6.4 Loading Mandatory Subsets Only
OATODB100
subset and the optional
OATODBTEMPS100
subset, and that it resides in the
/mykit/output
directory.
root.
setld
utility to load all of your
subsets onto the system, as in the following example:
# setld -l /mykit/output
setld
installation menu.
setld
utility uses the information in the
subset inventory file to determine these attributes.
If any are incorrect,
modify the file in the source directory and rebuild the master inventory file
and the subsets.
M,
PRE_L,
POST_L, and
C INSTALL
phases.
Refer to
Section 3.4.5
for discussions of SCP tasks associated with these
phases.
/opt,
/usr/opt,
or
/usr/var/opt
directories, it is important that you test
your product thoroughly to verify that everything works correctly.
Caution
OATODB100
subset and the optional
OATODBTEMPS100
subset, and that it resides in the
/mykit/output
directory.
3.6.5.1 Loading the Kit onto a Cluster
root.
setld
utility to load all of your
subsets onto the cluster, as in the following example:
# setld -l /mykit/output
setld
installation menu.
setld
utility uses the information in the
subset inventory file to determine these attributes.
If any are incorrect,
modify the file in the source directory and rebuild the master inventory file
and the subsets.
setld
utility uses the information
in the subset inventory file to determine these attributes.
If any are incorrect,
modify the file in the source directory and rebuild the master inventory file
and the subsets.
M,
PRE_L,
POST_L, and
C INSTALL
phases.
Refer to
Section 3.4.5
for discussions of SCP tasks associated with these
phases.
/opt,
/usr/opt,
or
/usr/var/opt
directories, it is important that you test
your product thoroughly to verify that everything works correctly.
3.6.5.2 Deleting the Kit from a Cluster
root
or use the
su
command to gain superuser privileges.
setld
utility to delete all of
your subsets from the cluster, as in the following example:
# setld -d OATODB100 OATODBTEMPS100
C DELETE,
PRE_D,
and
POST_D
phases.
Refer to
Section 3.4.5
for discussions of SCP tasks associated with these phases.
3.7 Updating Inventory After Creating Subsets
newinv
utility to update the master inventory file, using the existing master inventory
file as input.
The
newinv
utility performs the following
additional steps:
newinv
utility to update the master inventory
file any time that you add, modify, or remove files in the kit's source directory.
After you update the master inventory file, run the
kits
utility as described in
Section 3.5
to produce updated
subsets and control files.