Asynchronous Transfer Mode (ATM) networks provide the following capabilities:
Speeds from 25 M/bps to 622 M/bps or greater through cell-switching
Multiple qualities of service.
Connection-oriented interconnection with resource reservation for individual connections. These connections might be for conversations between two applications or for a connection over which many conversations between many applications and protocols are multiplexed.
ATM networks provide the high speed and the low latency (switched, full duplex network infrastructure) that applications, particularly those running on local area networks, require.
This chapter describes:
The ATM network environment
How to configure the ATM subsystem
How to manage the ATM subsystem
See the
Asynchronous Transfer Mode
guide for information about writing device drivers
and kernel modules for ATM.
For troubleshooting information, see
Section 14.4.
3.1 ATM Environment
An ATM network consists of the following:
Switch
A specialized system that maintains a list of virtual channel identifiers (VCIs) and virtual path identifiers (VPIs), connects one end system to another, and forwards or switches ATM cells from one end system to another based on the VCI/VPI information contained in the cell.
End system
A system physically connected to a switch that communicates with other end systems through the switch.
In the operating system's ATM environment, the following configurations are possible:
Classical Internet Protocol (CLIP)
Local Area Network (LAN) emulation
IP switching
The following sections describe each of these configurations
and the roles of systems in each.
3.1.1 Classical IP Environment
The Classical IP environment, as described in RFC 1577, provides a basic means for carrying unicast IP traffic over ATM networks. In this environment, hosts that can communicate with each other are grouped into a Logical IP Subnetwork (LIS). An ATM network can contain multiple LISs. In a LIS, all hosts and routers have the following requirements:
Have the same IP network/subnetwork number and mask.
Are directly connected to the ATM network.
Access members outside the LIS through a router.
For switched virtual circuits (SVCs), use Address Resolution Protocol (ARP) to resolve IP protocol addresses to ATM hardware addresses. For SVCs and permanent virtual circuits (PVCs), use Inverse ARP to resolve ATM hardware addresses to IP protocol addresses.
Can communicate with all other members in the same LIS (mesh topology).
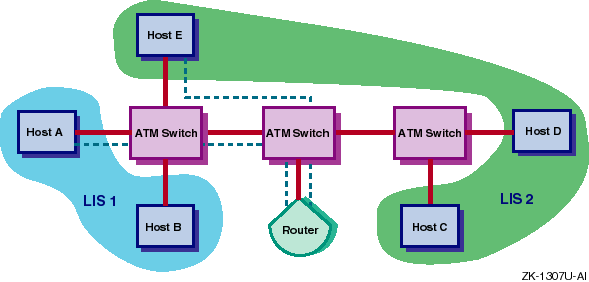
Figure 3-1
shows an ATM network with two LISs.
Host
A and Host B are members of LIS 1; Host C, Host D, and Host E are members
of LIS 2.
The figure also shows a virtual circuit (VC) between Host A and
the router and between Host E and the router.
Although these hosts are connected
to the same switch and might establish a VC for communications between each
other, they cannot because all communications to a member of another LIS must
go through a router.
Figure 3-1: Classical IP over an ATM Network
3.1.2 LAN Emulation Environment
The LAN Emulation (LANE) environment, as defined by the ATM Forum, groups hosts into an entity called an emulated LAN (ELAN). A LANE environment has the following characteristics:
Identifies hosts through their 48-bit media access control (MAC) addresses
Supports multicast and broadcast services either through point-to-multipoint connections or through a multicast server, unlike the Classical IP environment
Supports any protocol that uses an IEEE broadcast LAN
In addition, LANE interfaces (elan) are
supported by NetRAIN.
See
nr(7)
for more information.
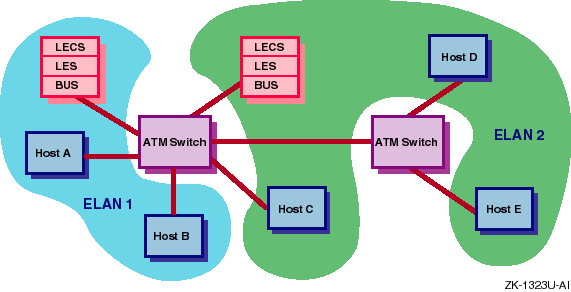
Figure 3-2
shows an ATM network with two emulated
LANs.
Host A and Host B are LAN Emulation Clients (LECs) on ELAN 1.
Host C,
Host D, and Host E are LECs on ELAN 2.
The LECS (LAN Emulation Configuration
Server), the LES (LAN Emulation Server), and the BUS (Broadcast and Utility
Server) are depicted as two separate systems, although these server functions
are typically resident on an ATM switch.
Figure 3-2: Emulated LAN over an ATM Network
The IP switching environment consists of one or more hosts connected to an IP switch. Each host is connected to the IP switch through a point-to-point physical connection, with each physical connection as a separate subnet. Communication between the host and the IP switch occurs over dynamically created PVCs.
The IP switch is a typical ATM switch with added IP controller software that performs IP routing and IP traffic classification functions. In this environment, a series of packets moving from one host to another with the same protocol type, type of service, and other characteristics indicated in the packet header is called a flow. When the IP controller identifies a flow that is of long duration, it instructs the ATM switch to make the appropriate hardware connections and to forward the ATM cells directly to the destination, bypassing the IP controller. This increases throughput at the switch and throughout the network.
The operating system's IP switching implementation is based on the Ipsilon Networks, Inc. reference model and has the following characteristics:
Supports IP traffic only
Supports multicast and broadcast services
Does not require systems to function as ARP servers or multicast servers
Uses the Ipsilon Flow Management Protocol (IFMP) to exchange control information with the IP switch
Does not require that ATM Forum signaling (options
UNI3X) be configured on the system
Requires fewer configuration steps than Classical IP and LAN emulation
IP switching over ATM has the following restrictions:
Only one IP switching interface (ips) per
host is supported.
If using a driver for IP switching, you may not use other ATM protocols on that driver.
The
tcpdump
and
packetfilter
utilities are not supported on an
ips
interface.
Figure 3-3
shows a simple ATM network with an IP
switch, IP switch gateway, some hosts, and a legacy LAN network.
Host A (16.1.1.5),
Host B (16.1.1.2), and the IP switch gateway (16.1.1.10) are on separate subnets
(16.1.1.4/30, 16.1.1.0/30, and 16.1.1.8/30).
The IP switch gateway runs a
routing protocol and advertises routes to other subnets to hosts on the legacy
LAN.
Figure 3-3: IP Switching over an ATM Network
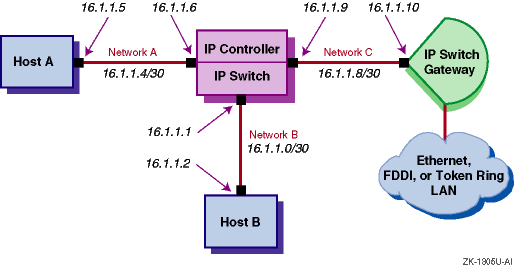
For the IP switching
subnetworks, you should use a network mask length of 30 bits.
This allows
for two bits for each host address, one bit for the subnetwork address, and
one bit for the broadcast address.
Using large netmasks helps to conserve
IP address space on subnetworks that have a few hosts attached.
3.2 Planning ATM
This section describes those tasks that you need to do before configuring
the ATM software.
3.2.1 Verifying That the ATM Subsets Are Installed
Verify that the ATM subsets are installed by entering the following command:
#setld -i | grep ATM
If all of the subsets are not installed,
install them by using the
setld
command.
For more information
on installing subsets, see
setld(8), the
Installation Guide, or the
System Administration
manual.
Note
You do not have to install the
OSFATMBINOBJECTsubset.
3.2.2 Configuring ATM into the Kernel
After you install the ATM subsets, verify that the ATM support you require is in the kernel by issuing the following command:
#sysconfig -q atm
If
atm:
is not displayed, log in as superuser and complete the following
steps:
Build a new kernel by issuing the
doconfig
command.
If you are unfamiliar with rebuilding the kernel, see the
System Administration
manual.
When prompted, select one or more of the kernel options described in Table 3-1.
Note
If the ATM hardware is already installed,
options ATMis automatically selected as a mandatory option.
Reboot your system with the new kernel by issuing the following command:
#shutdown -r now
This command immediately shuts down and automatically reboots the system.
| Option | Purpose |
options ATM
|
For base ATM support (required) |
options
UNI3X
|
For ATM Forum signaling with either LANE or Classical IP |
options ATMILMI3X
|
For ATM Forum Integrated Layer Management Interface (ILMI) support |
options ATMIP
|
For Classical IP services |
options LANE
|
For ATM Forum LAN Emulation (LANE) |
options ATMIFMP
|
For IP switching |
3.2.3 Preparing for the Configuration
After you verify ATM support in the kernel, you configure ATM. ATM configuration can consist of the following parts:
Configuring an ATM adapter
Configuring a Classical IP logical interface
Configuring a LAN Emulation logical interface
Configuring a IP switching logical interface
The type of information you need depends on the environment you want
to set up and use.
3.2.3.1 Adapter Information
Figure 3-4
shows the ATM Setup Worksheet.
The following
sections explain the information you need to record on this worksheet.
If
you are viewing this manual on line, you can use the print feature to print
a copy of the worksheet.
Figure 3-4: ATM Setup Worksheet
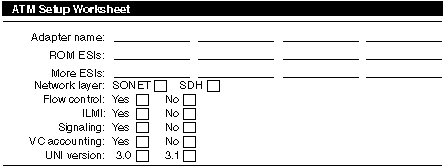
The device names of the ATM network interfaces.
For example,
the
lta
network interface.
The ROM end system identifier (ESI) addresses of the adapter that you want to register with the system and the local switch. If you want to register all of the adapter's ROM ESI addresses, leave this blank.
Depending on the number of address prefixes assigned by the switch, you can create one or more ATM addresses. The driver can control up to 64 ROM ESI addresses, though adapters generally have only a few ROM ESI addresses.
Additional ESI addresses that you want to register with the system and the local switch. An ESI address has twelve hexadecimal digits.
If you want to enable Synchronous Optical Network (SONET), on the adapter, check SONET. If you want to enable Synchronous Digital Hierarchy (SDH) mode on an ATM adapter that supports both SONET and SDH physical interfaces, check SDH.
If you want to enable vendor-specific flow control on the adapter, check Yes; otherwise, check No. The adapter must support this type of flow control. Compaq adapters and switches support FLOWmaster vendor flow control.
If you want to enable the Integrated Layer Management Interface (ILMI) on the adapter, check Yes; otherwise, check No. You must enable ILMI when using Classical IP over SVCs.
If you want to enable signaling on the adapter, check Yes; otherwise, check No. You must enable signaling when using Classical IP over SVCs.
If you want to enable logging of virtual circuit (VC) releases, check Yes; otherwise, check No.
The signaling version to use on the adapter. If you want to use User-Network Interface (UNI) Version 3.0, check 3.0. If you want to use UNI Version 3.1, check 3.1. The default is 3.0.
Figure 3-5
shows the ATM Classical IP Worksheet.
The following sections explain the information you need to record on this
worksheet.
If you are viewing this manual on line, you can use the print feature
to print a copy of the worksheet.
Figure 3-5: ATM Classical IP Worksheet
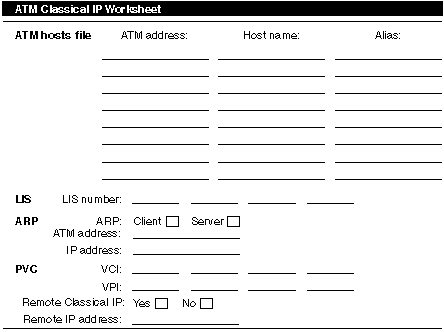
The ATM addresses of the ATM ARP servers on your ATM network
to add to the
/etc/atmhosts
file.
The names of ATM ARP servers on the ATM network to be added
to the
/etc/atmhosts
file.
The aliases, if any, of ATM ARP servers to be added to the
/etc/atmhosts
file.
A Logical IP Subnet (LIS) interface number. You can create multiple LIS interfaces on an ATM driver.
If you want your system to function as an ARP server, check Server; otherwise, check Client.
The ATM address of the ATM ARP server, either a host name
or alias that appears in the
/etc/atmhosts
file or a 40-digit
ATM End System Address (AESA) with selector byte.
The ARP server must also
be on the ATM network.
Note
The ATM Forum now calls an NSAP-style address an AESA.
The IP address of the ATM ARP server machine.
The virtual channel identifier (VCI) for the PVC.
The virtual path identifier (VPI) for the PVC.
If the remote host supports Classical IP as defined in RFC 1577, check Yes; otherwise, check No.
If the remote host does not support Classical IP, enter the remote host's IP address.
Figure 3-6
shows the ATM LAN Emulation Worksheet.
The following sections explain the information you need to record on this
worksheet.
If you are viewing this manual on line, you can use the print feature
to print a copy of the worksheet.
Figure 3-6: ATM LAN Emulation Worksheet
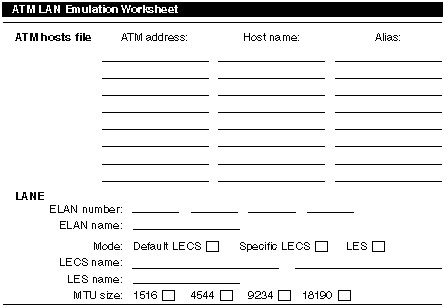
The ATM addresses of the LAN Emulation Servers (LES) on your
ATM network to add to the
/etc/atmhosts
file.
The names of the LES on the ATM network to be added to the
/etc/atmhosts
file.
The aliases, if any, of the LES to be added to the
/etc/atmhosts
file.
A LAN Emulation Client (LEC) interface unit number.
The name of the emulated LAN to join; this is optional. The emulated LAN name must already be configured on the ATM switch. If the name is not configured on the ATM switch, the LEC joins the default emulated LAN.
If you want to contact the default LAN Emulation Configuration Server (LECS), check Default LECS. The LEC contacts the LECS by using an ILMI MIB request to obtain the LECS address. If the request is unsuccessful, the LEC uses the well-known address for the LECS. If you want to contact a specific LECS, check Specific LECS. In either case, the LEC contacts a LECS to obtain a LES address.
If you want to contact the LAN Emulation Server (LES) directly, check LES.
The ATM address of the LECS, either a host name or alias that
appears in the
/etc/atmhosts
file or a 40-digit ATM AESA
address with selector byte.
If you want to contact a specific LECS, enter
the LECS address; you can specify up to four.
The ATM address of the LES, either a host name or alias that
appears in the
/etc/atmhosts
file or a 40-digit ATM AESA
address with selector byte.
If you want the LEC to go directly to the LES
and bypass the configuration phase, enter the LES address.
The maximum transmission unit (MTU) size. The following MTU sizes are supported: 1516, 4544, 9234, and 18190. When specified with a virtual LAN name, the emulated LAN must already be configured on the ATM switch to support the specified MTU size. If it is not configured for the specified MTU size, the request is ignored.
Figure 3-7
shows the ATM IP Switching Worksheet.
The following sections explain the information you need to record on this
worksheet.
If you are viewing this manual on line, you can use the print feature
to print a copy of the worksheet.
Figure 3-7: ATM IP Switching Worksheet
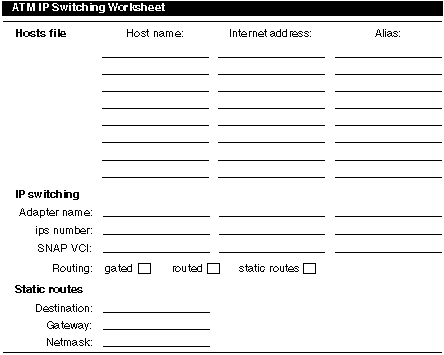
The names of hosts on the subnetwork to be added to the
/etc/hosts
file.
The IP addresses of hosts on the subnetwork to be added to
the
/etc/hosts
file.
The aliases, if any, of hosts on the subnetwork to be added
to the
/etc/hosts
file.
The device names of the network interfaces.
For example, the
lta
network interface.
The IP switching (ips) interface number.
If you are using multiple adapters, each adapter is assigned a separate interface
number.
The Virtual Channel Identifier (VCI) number that Ipsilon Flow Management Protocol (IFMP) uses as the default Subnetwork Attachment Point (SNAP) VCI. The default VCI is 15. This number must match the VCI number that IFMP uses on the destination host or switch associated with the point-to-point interface.
The method you use to update your internal routing tables.
If you use the
gated
daemon, check gated.
If you use the
routed
daemon, check routed.
If you use static routes, check static
routes.
The IP address of the destination subnetwork.
The IP address of the IP controller on the IP switch.
The netmask for the destination subnetwork.
After you complete the required ATM planning and you install the appropriate ATM hardware, you can configure the ATM software. Use the ATM Configuration application of the Common Desktop Environment (CDE) Application Manager to configure ATM. You can configure the following:
ATM adapter
Classical IP
LAN Emulation
IP Switching
To use the ATM Configuration application, invoke the SysMan Menu application as specified in Section 1.1.1, then see Section 3.3.1 for further instructions.
Optionally, you can use the old
atmsetup
script (atmsetup -old) to configure ATM.
See the online help and
atmsetup(8)
for more information.
3.3.1 Configuring an ATM Adapter
Before you can configure ATM logical interfaces, you must configure an adapter. To configure an ATM adapter, do the following:
From the SysMan Menu, select Networking-->Basic Network Services-->Set up Asynchronous Transfer Mode (ATM) to display the ATM Configuration main window.
Alternatively, enter the following command on a command line:
#/usr/sbin/sysman atm
Or, enter:
#atmsetup
The ATM Configuration main window displays the unconfigured adapters, configured adapters, and configured logical interfaces.
Select an adapter from the Unconfigured Adapters field.
Select Configure. The Configure/Modify Adapter dialog box is displayed.
If you do not want to register all ROM Endpoint System Identifiers (ESIs) for the adapter, select Register ROM ESI. By default, all of the adapter's ROM ESI addresses are registered.
If you want to register additional ESIs (called soft ESIs) for the adapter, select Register Soft ESI.
If you want to set transmit Constant Bit Rate (CBR) or pacing options for the adapter, select Set CBR/Pacing Options. The Set CBR/Pacing Options dialog box is displayed. When you are finished, select OK to close the dialog box and save the changes.
Indicate the type of network physical layer you want the adapter to support: SONET or SDH.
Indicate whether you want to enable flow control (FLOWmaster) on the adapter.
Indicate whether you want to enable Integrated Local Management Interface (ILMI) on the adapter.
Indicate whether you want to enable signaling on the adapter.
Indicate whether you want to enable the logging of all virtual circuit (VC) releases.
Select a User-Network Interface (UNI) version.
Select OK to accept the configuration and close the Configure/Modify Adapter dialog box. You can now configure an ATM logical interface.
You can also modify your adapter configuration.
See the online
help and
atmsetup(8)
for more information.
3.3.2 Configuring Classical IP
Before you configure Classical IP, you must configure an ATM adapter. Configuring Classical IP on your host consists of the following steps:
Creating PVC mappings on your ATM switch, if you are not going to use SVCs. You also use PVCs when directly connecting two hosts to each other without an ATM switch.
Editing the
/etc/atmhosts
file.
Adding hosts to the
hosts
database.
Running the ATM Configuration application.
Configuring the Classical IP logical interface.
Adding static routes (SVCs only).
Verifying the PVC Configuration (PVCs only).
The first step depends on the type of ATM switch you use.
See your
ATM switch documentation for this information.
The following sections describe
steps 2-7.
3.3.2.1 Editing the /etc/atmhosts File
You edit the
/etc/atmhosts
file to add the address
of the ATM ARP server on your ATM network.
The
/etc/atmhosts
file contains mappings of ATM host names to ATM hardware addresses.
This
file can also contain ATM ESIs and AESAs for specific services on the ATM
network.
Putting entries in this file enables you to specify the address or
service by name instead of specifying a long hexadecimal string.
Entries in the
/etc/atmhosts
file can be one of the
following:
A comment, denoted by a pound sign (#) as the first character
An address specification
The address specification is similar to that of IP addresses in the
/etc/hosts
file, and has the following format:
atm_addr hostname [ alias ... ]
The atm_addr parameter can consist of ESIs or AESAs.
The following table lists the address type and the number of hexadecimal address digits required for each type:
| Address Type | Number of Address Digits |
| ESI | Twelve hexadecimal digits |
| AESA | Thirty-eight hexadecimal digits |
| AESA with selector byte | Forty hexadecimal digits |
The hostname parameter can contain any printable character.
The following example shows entries in the
/etc/atmhosts
file:
08002b2fe740                            myhost.esi  [1]
47840f01020300002122313208002b2fe740    myhost   [2]
47840f01020300002122313208002b2fe7403a  myhost.ip  [3]
Specifies an ESI to use in registering
myhost
with the switch.
[Return to example]
Specifies the AESA of
myhost.
This is the
network prefix and the ESI, and is the address that the network recognizes.
[Return to example]
Specifies the AESA with selector byte of a service on
myhost
for the operating system's implementation of
RFC 1577,
Classical IP and ARP over ATM.
[Return to example]
Note
By default, the
atmhostsfile contains an entry for PVCs. Do not delete or modify this entry.
3.3.2.2 Adding Hosts to the hosts Database
You add the IP addresses for all ATM
hosts that will be on any Logical IP Subnet (LIS) to which the host will connect
to the
hosts
database.
Make sure you have the IP addresses
for the local host and the ATM ARP server.
Depending on your environment,
host names and addresses can be in the local
/etc/hosts
file or in one of the files distributed with DNS or NIS.
You can enter these IP addresses in the
/etc/hosts
file either by editing the file itself or by running the SysMan Menu application
of the CDE Application Manager.
See
Section 2.3.7
for
more information.
3.3.2.3 Running the ATM Configuration Application
To configure Classical IP on your system, do the following:
From the SysMan Menu, select Networking-->Basic Network Services-->Set up Asynchronous Transfer Mode (ATM) to display the ATM Configuration main window.
Alternatively, enter the following command on a command line:
#/usr/sbin/sysman atm
Or, enter:
#atmsetup
The ATM Configuration main window displays the unconfigured adapters, configured adapters, and configured logical interfaces.
Select Add. The Add Interfaces dialog box is displayed.
Select Classical IP. The Add Interfaces dialog box closes. The Add/Modify Classical IP Interface dialog box is displayed.
Choose the adapter on which you want to add a Classical IP logical interface.
If you do not want to use the default logical interface number, enter a different number.
Indicate whether your system is to act as an ARP client or an ARP server.
If the system is to be an ARP client, enter the ARP server's ATM address or alias. Then, enter the ARP server's IP address.
If you are going to specify PVCs for the logical interface, select PVCs. The Add/Modify PVC dialog box is displayed. Do the following:
Enter a virtual path identifier (VPI) for the virtual circuit.
Enter a virtual channel identifier (VCI) for the virtual circuit.
Indicate whether the remote host entity supports Classical IP as defined in RFC 1577.
If the remote host does not support Classical IP, enter the remote host's IP address.
Select OK to accept the configuration and close the Add/Modify PVC dialog box.
Select OK to close the Add/Modify Classical IP Interface dialog box.
Select OK in the ATM Configuration main window to save the changes. If no ATM interface exists on the system, the Start ATM Now dialog box is displayed. If you want to start ATM the ATM subsystem, select OK; otherwise, select No. If you select No, you must reboot the system to start the ATM subsystem.
If an ATM interface exists on the system, the Reboot Required dialog box is displayed. Select OK to acknowledge the message. You must reboot the system to start the ATM subsystem.
You can also modify your adapter configuration.
See the online help
and
atmsetup(8)
for more information.
3.3.2.4 Configuring the Classical IP Logical Interface
After you run the ATM Configuration application and start the ATM components
(either from within the application or by rebooting the system), you configure
the Classical IP (lis) interface.
To configure the
lis
interface, see
Section 2.3.1.
3.3.2.5 Adding Static Routes (SVC only)
Depending on your network topology and the number and configuration
of logical IP subnetworks (LISs) in your network, you might need to add static
routes to other hosts if you want a connection to a host that is on another
LIS subnet.
To add a static route to the routing tables, see
Section 2.3.6.
3.3.2.6 Verifying the PVC Configuration (PVCs only)
After the PVC is configured, verify the configuration by issuing the
atmarp -a
command.
Output similar to the following appears
if the PVC is configured:
#atmarp -aNumber of entries : 1 IP Address : atm66 (16.142.128.66) ATM Address : PVC Flags : Complete Permanent VCs : vpi vci VC Type --- --- ------- 0 999 PVC
3.3.3 Configuring LAN Emulation
Configuring LAN emulation on your host consists of the following steps:
Editing the
/etc/atmhosts
file
Adding hosts to the
hosts
database
Running the ATM Configuration application
Configuring the LAN Emulation logical interface
The following sections describe these steps.
3.3.3.1 Editing the /etc/atmhosts File
You edit
the
/etc/atmhosts
file only if you want to specify a LAN
Emulation Server (LES) address or LANE Emulation Configuration Server (LECS)
addresses on your ATM network.
The
/etc/atmhosts
file contains
mappings of ATM host names to ATM hardware addresses.
This file can also
contain ATM ESIs and AESAs for specific services on the ATM network.
See
Section 3.3.2.1
for more information on editing the
/etc/atmhosts
file.
3.3.3.2 Adding Hosts to the hosts Database
You add the IP addresses
for all ATM hosts that will be on any emulated LAN (ELAN) to which the host
will connect to the
hosts
database.
Make sure you have
the IP addresses for the local host.
Depending on your environment, host names
and addresses can be in the local
/etc/hosts
file or in
one of the files distributed with DNS or NIS.
You can enter these IP addresses in the
/etc/hosts
file either by editing the file itself or by running the SysMan Menu application
of the CDE Application Manager.
See
Section 2.3.7
for
more information.
3.3.3.3 Running the ATM Configuration Application
To configure LAN emulation on your system, do the following:
From the SysMan Menu, select Networking-->Basic Network Services-->Set up Asynchronous Transfer Mode (ATM) to display the ATM Configuration main window.
Alternatively, enter the following command on a command line:
#/usr/sbin/sysman atm
Or, enter:
#atmsetup
The ATM Configuration main window displays the unconfigured adapters, configured adapters, and configured logical interfaces.
Select Add. The Add Interfaces dialog box is displayed.
Select LAN Emulation. The Add Interfaces dialog box closes. The Add/Modify LAN Emulation Interface dialog box is displayed.
Choose the adapter on which you want to add a LAN Emulation logical interface.
If you do not want to use the default logical interface number, enter a different number.
If you want to join a specific emulated LAN, enter the name of the emulated LAN you want to join.
Choose the mode by which your system will be registered into the emulated LAN. If you choose to contact a specific LAN Emulation Configuration Server (LECS) (the second choice), also enter the LECS name or alias. If you choose to contact a LAN Emulation Server (LES) directly (the third choice), also enter the LES name or alias.
If you want to specify an MTU size other than the default 1516, choose another MTU size.
Select OK to close the Add/Modify LAN Emulation Interface dialog box.
Select OK in the ATM Configuration main window to save the changes. If no ATM interface exists on the system, the Start ATM Now dialog box is displayed. If you want to start ATM the ATM subsystem, select OK; otherwise, select No. If you select No, you must reboot the system to start the ATM subsystem.
If an ATM interface exists on the system, the Reboot Required dialog box is displayed. Select OK to acknowledge the message. You must reboot the system to start the ATM subsystem.
Note
You can join an ELAN on an ATM switch only once for each adapter; do not join the same ELAN multiple times from the same adapter. If you want to join the same ELAN on the same switch, you must install another adapter and join the ELAN from it.
You can also modify your adapter configuration.
See the online help
and
atmsetup(8)
for more information.
3.3.3.4 Configuring the LAN Emulation Logical Interfaces
After you run ATM Configuration and start the ATM components (either
from within the application or by rebooting the system), you configure the
LAN Emulation (elan) interface.
To configure the
elan
interface, see
Section 2.3.1.
3.3.4 Configuring IP Switching
Configuring IP switching on your host consists of the following steps:
Editing the
/etc/hosts
file
Running the ATM Configuration application to create the IP Switching logical interface
Configuring the IP Switching logical interface
Adding routes to the routing table
The following sections describe these steps.
3.3.4.1 Editing the /etc/hosts File
You edit the
/etc/hosts
file to add the IP addresses for each IP switching subnetwork to
which the host will connect.
For each subnet, add a pair of IP addresses for
each end of the point-to-point link (host side and IP controller side), the
IP address of the subnet, and the broadcast address of the subnet.
For example,
an
/etc/hosts
file for the configuration in
Figure 3-3
is as follows:
# IP Switching subnet A
16.1.1.4   networka-net
16.1.1.5   hosta.corp.com              hosta             atm5
16.1.1.6   ipsctrlhosta.corp.com       ipsctrlhosta      atm6
16.1.1.7   networka-broadcast
# IP Switching subnet B
16.1.1.0   networkb-net
16.1.1.1   ipsctrlhostb.corp.com       ipsctrlhostb      atm1
16.1.1.2   hostb.corp.com              hostb             atm2
16.1.1.3   networkb-broadcast
# IP Switching subnet C
16.1.1.8   networkc-net
16.1.1.9   ipsctrlhostc.corp.com       ipsctrlhostc      atm9
16.1.1.10  ipgwy.corp.com              ipgwy             atm10
16.1.1.11  networkc-broadcast
You can enter these IP addresses in the
/etc/hosts
file either by editing the file itself or by running the SysMan Menu application
of the CDE Application Manager.
See
Section 2.3.7
for
more information.
3.3.4.2 Running the ATM Configuration Application
Do the following to configure IP switching on your system:
From the SysMan Menu, select Networking-->Basic Network Services-->Set up Asynchronous Transfer Mode (ATM) to display the ATM Configuration main window.
Alternatively, enter the following command on a command line:
#/usr/sbin/sysman atm
Or, enter:
#atmsetup
The ATM Configuration main window displays the unconfigured adapters, configured adapters, and configured logical interfaces.
Select Add. The Add Interfaces dialog box is displayed.
Select IP Switching. The Add Interfaces dialog box closes. The Add/Modify IP Switching Interface dialog box is displayed.
Choose the adapter on which you want to add a IP Switching logical interface.
If you do not want to use the default logical interface number, enter a different number.
If you want to change the virtual channel identifier (VCI) information from the default, select Options. The Modify IP Switching Options dialog box is displayed. Do the following:
Enter a SNAP VCI value, if other than 15 (the default).
Note
This SNAP VCI number must match the VCI number that IFMP uses on the switch associated with the point-to-point interface.
Enter a range of VCIs to use for transmitting and receiving connections.
Select OK to save the changes and close the Modify IP Switching Options dialog box.
Select OK to close the Add/Modify IP Switching Interface dialog box.
Select OK in the ATM Configuration main window to save the changes. If no ATM interface exists on the system, the Start ATM Now dialog box is displayed. If you want to start ATM the ATM subsystem, select OK; otherwise, select No. If you select No, you must reboot the system to start the ATM subsystem.
If an ATM interface already exists on the system, the Reboot Required dialog box is displayed. Select OK to acknowledge the message. You must reboot the system to start the ATM subsystem.
You can also modify your adapter configuration.
See the online help
and
atmsetup(8)
for more information.
3.3.4.3 Configuring the IP Switching Logical Interfaces
After you run ATM Configuration and start the ATM components (either
from within the application or by rebooting the system), you configure the
IP Switching (ips) interface.
To configure the
ips
interface, see
Section 2.3.1.
3.3.4.4 Adding Routes
Depending on your network topology and the number of interfaces on your host, you might need to add routes to other hosts if your system has multiple interfaces and the default route is to another gateway on another network. Do either of the following:
Run either
gated
or
routed
to automatically update your system's routing tables.
Add a static route to the routing tables for the destination network. Select Networking-->Configuration-->Static Routes from the SysMan Menu. This opens the Static Routes File dialog box. You need to specify the IP address of the destination subnetwork and address of the IP controller on the IP switch. For example, if you were configuring IP switching on Host A in Figure 3-3 and you wanted to route all traffic on all 16.1.1 networks through the IP switch, you would specify 16.1.1/24 as the destination address in Classless Inter-Domain Routing (CIDR) format and 16.1.1.6 as the gateway address.
Add entries for each additional network with which your system needs to communicate. See Section 2.3.6 for more information.
3.4 Managing the ATM Environment
Managing the ATM environment consists of the following tasks:
Managing ATM networking and displaying information about ATM networks
Managing the signaling module
Managing the Classical IP environment
Managing the LAN Emulation environment
Managing IP switching
The following sections describe these tasks.
3.4.1 Managing ATM Networking and Displaying Information About ATM Networks
To manage ATM networking and to display information about the ATM networks,
you use the
atmconfig
command.
The command controls only
the base ATM modules and device drivers; it does not control specific convergence
modules or signaling protocols.
You can use the
atmconfig
command to do the following:
Enable and disable device drivers
Create and destroy PVCs
Destroy SVCs
Create and destroy ESIs
Display the currently active VCs and driver status
Process configuration batch files
See
atmconfig(8)
for more information.
3.4.2 Managing the Signaling Module
To manage ATM UNI signaling on the end system, you use the
atmsig
command.
The
atmsig
command allows you
to:
Display state information about the signaling module
Disable and enable the ILMI and signaling
Read and modify the various timer values and statistics for Q.SAAL and Q.93B (2931)
The signaling module is associated with a specified interface at all times, which is identified by the driver name. If the interface is disabled, the signaling module is also disabled. The signaling module must be enabled again when the interface is brought back on line.
See
atmsig(8)
for more information.
3.4.3 Managing the Classical IP Environment
To manage Classical IP on an end system, you use the
atmarp
command.
The
atmarp
command allows you to:
Create a logical IP subnet (LIS) interface
Create and delete entries in the ATM ARP table
Display entries in the ATM ARP table
Toggle the permanent flag for entries
Display the local host's ATM configuration status
Create and remove an association between an established VC and a remote IP entity that does not support Classical IP
See
atmarp(8)
for more information.
3.4.4 Managing the LAN Emulation Environment
Managing the LAN emulation environment consists of the following tasks:
Managing LAN Emulation Clients (LECs)
Displaying the LAN Emulation Address Resolution Protocol (LE-ARP) table
The following sections describe these tasks.
3.4.4.1 Managing LAN Emulation Clients
To manage LAN Emulation Clients (LECs), you use the
atmelan
command.
The
atmelan
command allows you to:
Create and configure LAN Emulation Clients (LEC) as network interfaces
Display counters, parameters, and the state of each LEC
See
atmelan(8)
for more information.
3.4.4.2 Displaying the LE-ARP Table
To display the LE-ARP table for each
elan
interface,
you use the
learp
command.
The command displays the address
mappings for the emulated LAN.
Each entry consists of the Media Access Control
(MAC) address, state, ATM address, and flags.
See
learp(8)
for more
information.
3.4.5 Managing IP Switching
To manage IP switching on an end system, you use the
atmifmp
command.
The
atmifmp
command allows you to:
Enable and disable IP switching
Display IP switching configuration
Display or clear IP switching statistics
Display IP switching flow information
See
atmifmp(8)
for more information.