The Tru64 UNIX mail system enables users to send mail to other users, whether on the same system, same network, or the other side of the world. This chapter describes:
The Tru64 UNIX mail system and its components
How to configure mail (the
sendmail
utility)
on a standalone system or across an enterprise
How to configure POP and IMAP mail
How to administer mail on server and client systems
For additional introductory information on mail, see
mail_intro(7),
the
sendmail
book by O'Reilly & Associates, and the
Sendmail Installation and Operation Guide
(provided in PDF format
on the Tru64 UNIX Documentation CD-ROM).
For troubleshooting information,
see
Section 14.17
for the
sendmail
utility and
Section 14.18
for POP and IMAP mail.
The implementation of mail in Tru64 UNIX is based on
sendmail
Version 8.8.8 from Sendmail, Inc.
12.1 Mail Environment
In the mail environment, systems can have the following roles:
Standalone -- A mail standalone system is one that processes, sends, and delivers mail locally. This is useful for configurations of from 1 to 6 systems. In small LAN configurations of two or more systems, one system serves the mailbox to the other systems using NFS. In this case, NFS must be configured on all systems.
Client -- A mail client system is a system that sends all of its mail to a mail server for processing and delivery. If the addressee is on the client system, the mail is delivered there. If not, the mail is forwarded to the destination system.
Server -- A mail server system is a system that receives mail from clients in a local domain for processing and delivery to other domains, the Internet, or other networks. In addition, the server also receives mail from other domains for delivery.
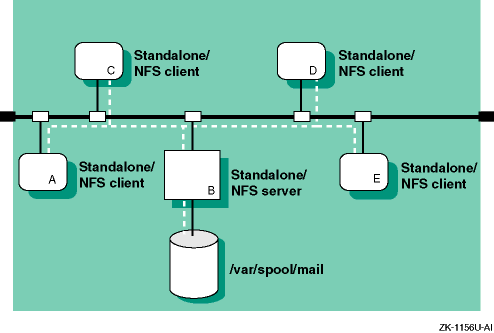
Figure 12-1
shows a sample standalone configuration
on a LAN in which all hosts are configured as mail standalone systems.
Host
B is also an NFS server, exporting the
/var/spool/mail
directory to hosts A, C, D, and E.
Hosts A, C, D, and E are also NFS clients,
importing the
/var/spool/mail
directory from host B.
The hosts must also have identical information in their
passwd
and
aliases
files.
This information can be
distributed either by using NIS or by manually editing the files on each system.
Figure 12-1: Sample Mail Standalone Configuration
Figure 12-2 shows a sample client/server configuration in which host B is configured as a mail server and hosts A, C, D, and E are configured as mail clients. This is useful in larger enterprise networks that consist of multiple domains and connections to the Internet or other networks.
This configuration also provides for the creation of a natural hierarachy of mail servers in large enterprise networks with multiple domains. Mail clients in each domain would direct all traffic to one or more mail servers, depending on the number of clients in the domain. Each domain's servers would then forward mail to the enterprise's top domain servers for forwarding to the Internet. Since almost all of your local domain's mail traffic goes through the servers, this simplifies administration and problem resolution in that you only have to manage the servers.
The
connection to the Internet in
Figure 12-2
could be
direct or through a local access provider.
Business configurations would
typically use firewalls and dedicated mail servers.
If using a firewall, ensure
the firewall and the mail server are configured to work with each other.
See
the documentation for your firewall product for more information.
Figure 12-2: Sample Mail Client/Server Configuration

If users need to send mail between systems that use different mail protocols, such as DECnet, SMTP, and UUCP, you should designate specific server systems in your network to perform those functions. These server systems are also known as mail relays.
Additional mail configurations are possible, but they require more effort to plan for and to configure. See the sendmail book by O'Reilly and Associates and the Sendmail Installation and Operation Guide for more information.
In implementing a client/server mail environment, you need to decide how to do the following:
Direct outgoing mail to the servers
Handle incoming mail to the domain
Deliver mail to clients
Handle DECnet mail
This section describes each of these topics.
12.1.1 Directing Outgoing Mail to Servers
To
direct outgoing mail to a server, you include the DNS mail exchanger (MX)
entry in the
/etc/namedb/hosts.db
file.
This entry specifies
a system in the local domain that can deliver mail to other systems, especially
those not directly connected to the local network.
Using MX to route mail
has the following benefits:
You can define an MX record to point to all of the mail servers in your local domain. If a mail server is inaccessible, mail can be delivered to another host listed in the MX record.
You can use MX records to define a system to be a mail exchanger for an inaccessible remote system. Then, if you send mail to the remote, inaccessible host, instead of being queued on your local system and periodically resent, the mail is sent to the mail exchanger and queued there until the host is restored.
For information on adding entries to the
/etc/namedb/hosts.db
file, see
Section 7.6,
Appendix H,
and
bind_manual_setup(7).
12.1.2 Handling Incoming Mail to the Domain
To simplify the handling of incoming mail to a domain and to ensure reliability, you should use domain-based addresses in your environment. Mail sent over the Internet is usually addressed in the following format:
username@hostname.domain
For example:joe@host1.nyc.big.com
Using domain-based addresses, this address appears as follows:
joe@nyc.big.com
Mail is sent to the local domain
nyc.big.com
instead
of to the specific host within that domain
host1.nyc.big.com;
the return address is also
@nyc.big.com.
Then, the mail
servers within the local domain decide how to deliver the mail to the user's
account.
Domain-based addresses make it easier to manage your mail environment.
You can change your mail system (that is, move user accounts and replace
or move systems) without disrupting your mail delivery.
These changes are
transparent to users sending mail to your systems.
12.1.3 Delivering Mail to Clients
Once mail is delivered to the domain, you can deliver it to clients using one of the following mechanisms:
Deliver the mail to the
/var/spool/mail
directory on each client, which is the default
Deliver the mail to the server and use NFS to serve the mail directory to each client
Deliver the mail from a server to a local client machine using POP (see Section 12.4)
Deliver the mail to a server using IMAP (see Section 12.5)
To deliver mail to each client, each server in the domain must have an aliases file that contains an entry for each user on the client. For example:
username1: username1@client1
username2: username2@client1
12.1.4 Distributing the aliases File
For standalone and server
systems, use the Network Information System (NIS) to distribute the mail aliases
file from one machine.
In a LAN environment with standalone systems, distribute
the mail aliases file from the NFS server system.
In a client/server environment,
distribute the
aliases
file to the servers in the domain.
In any case, sharing the
aliases
file among systems simplifies
administration in that you need to update only one aliases file, instead of
several.
See
aliases(4)
for more information about the database.
See
Section 12.9
and
Chapter 8
for information about
distributing the database with NIS.
12.1.5 Distributing the passwd File
If you have multiple server systems
in a domain, make sure that the information in the
passwd
file is identical on each system.
For security reasons and to ensure correct
mail delivery, you should do this by manually editing the
passwd
file on each server system.
12.1.6 Handling DECnet Mail
When you set up a mail server system, you must consider that the mail address formats for DECnet Phase IV and DECnet/OSI are different from those for TCP/IP. Therefore, you need to establish a mapping scheme to translate mail addresses when sending mail between a DECnet node and a TCP/IP node.
The mapping scheme used by the Tru64 UNIX version of the
sendmail
program for DECnet Phase IV encapsulates DECnet addresses
inside a pseudodomain.
For example, a typical DECnet Phase IV address has
the following format:
nodename::username
Mail addressed in this format is mapped to an address in the following format:
username@nodename.pseudodomain.top.domain
The variables represent the following:
The user name.
The DECnet node name.
An arbitrary string that specifies the DECnet pseudodomain. The pseudodomain can be an arbitrary string, but it must be used consistently throughout your organization. All of your mail systems must be configured to use the same string for the pseudodomain.
Usually,
your company's domain name; for example,
abc.com.
The mapping for DECnet/OSI uses a similar scheme. A typical DECnet/OSI address has the following format:
username@namespace:.site.nodename
Mail addressed in this format is mapped as follows:
username@nodename.site.namespace.pseudodomain.top.domain
As with DECnet Phase IV, the pseudodomain can be an arbitrary string. However, if you use both DECnet Phase IV and DECnet/OSI within your organization the pseudodomain names should be different.
Some environments that support both DECnet Phase IV and DECnet/OSI use the DECnet Phase IV syntax to handle DECnet-based mail. This simplifies the mail administration task. In order to implement this, all DECnet-OSI nodes must have a unique Phase IV Synonym and must be configured to use the Phase IV Synonym. You can reconfigure a DECnet/OSI host by typing the following command line:
#ncl set session control application mail11 Node Synonym=true
See the DECnet/OSI documentation for more information.
12.2 Planning Mail
This section describes those tasks you need to do
before configuring mail.
12.2.1 Verifying that Required Protocols are Installed
Depending on the protocols supported by your mail server, verify that the following required subsets are installed and configured:
DECnet
DECnet/OSI
X.25 (PSInet)
UUCP
See the documentation for each product for installation and configuration instructions. For UUCP, verify that the UUCP subset is installed by entering the following command:
#setld -i | grep OSFUUCP
If it is not installed, install it by using the
setld
command.
For more information on installing subsets, see
setld(8), the
Installation Guide,
or the
System Administration
manual.
12.2.2 Verifying that Required Services are Configured
The following table lists specific mail configurations and the network service required:
| If you want to: | Configure this service: |
| Distribute the aliases file | NIS |
| Use domain-based addressing | DNS/BIND |
If NIS is needed, enter the following command as root to verify that NIS is configured:
#rcmgr get NIS_CONF
If the command returns
NO, then NIS
is not configured.
See
Chapter 8
for instructions on how to
configure NIS and distribute the
aliases
file.
If DNS is needed, enter the following command as root to verify that DNS is configured:
#rcmgr get BIND_SERVERTYPE
If the command returns nothing, then DNS is not configured.
See
Chapter 7
for instructions on how to configure DNS.
12.2.3 Preparing for the Configuration
After you install and configure the required protocols and services, you configure mail using the Mail Configuration application.
Mail configuration consists of:
Defining the standalone, client, or server system
Defining the protocol information (server systems only)
The following sections contain worksheets that you can use to record
the information required to configure mail.
12.2.3.1 General System Information
Figure 12-3
shows the Basic Mail Setup Worksheet.
If you are viewing this manual online, you can use the print feature to print
a copy of this worksheet.
The following sections explain the information you
need to record on the worksheet.
Figure 12-3: Basic Mail Setup Worksheet
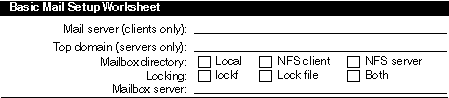
The fully qualified name of your mail server; for example,
foo.dec.com.
Or, the name of your domain; for example,
dec.com,
if you are using domain-based routing.
It is advantageous to specify the domain
name itself because your mail service cannot be interrupted by a single mail
server that becomes unavailable.
The name of the highest level domain in your organization that uniquely identifies
your organization.
For example, if the server domain name is
nyc.big.com, the top domain is
big.com.
If the server domain
name is
cs.big.univ.ac.uk, the top domain is
big.univ.ac.uk.
The location of the mailbox directory.
For standalone and client systems, if the mailbox directory is on the local system, check Local. If it is on a remote system and is to be mounted on the local system using NFS, check NFS Client. If the local system is to export mail boxes to NFS clients, check NFS Server.
For server systems, check Server to make the mailbox directories available
to other systems.
If you do not want to share the mailbox directories, check
Local.
In this case, use the
aliases
file to send each
user's mail to the appropriate system.
See
Section 12.9
and
aliases(4)
for more information.
The type of file locking to use on the mailbox.
For standalone and client systems, if the host with the mailbox directory is a Tru64 UNIX system, check lockf; this provides the best performance. If you are not sure what operating system the host with the mailbox directory is running, check Lock file. If you want to use both, check Both.
Note
The locking mechanism you select must match the mechanism used by the NFS server. If you are not sure how the locking mechanisms are set on the NFS server, ask the administrator of the NFS server.
For server systems, if you checked Local as the mailbox location, check lockf. If you checked Client as the mailbox location, check Lock file. If you checked Server as the mailbox location, check Both.
The name of the system that exports the mailbox to your local system.
Figure 12-4
shows the Mail Protocol Worksheet.
If you are viewing this manual online, you can use the print feature to print
a copy of this worksheet.
The following sections explain the information you
need to record on the worksheet.
Figure 12-4: Mail Protocol Worksheet
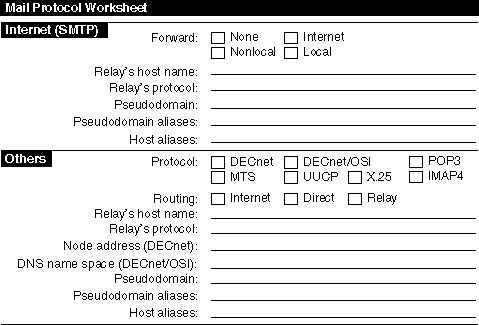
For SMTP only, the type of mail that must be forwarded to a relay. If the local host has direct access to the Internet and does not forward any mail, check None. If the local host must forward all mail addressed outside of the top domain, check Internet. If the local host must forward all messages addressed outside of the local Internet domain, check Nonlocal. If the local host must forward all mail, including local domain mail, check Local.
If your system will serve as a gateway for other mail protocols, you will need to collect the following information:
The type of mail protocols to use. Available protocols include the following:
DECnet (Phase IV)
DECnet/OSI (Phase V)
Internet Mail Protocol (SMTP) (required)
Internet Message Access Protocol (IMAP)
Message Transport System (MTS)
Post Office Protocol (POP)
UUCP
X.25 (PSInet)
For DECnet, DECnet/OSI, UUCP, MTS, and X.25 only. If mail for the particular protocol is to be forwarded over the Internet to an unspecified gateway, check Internet. The Internet depends on DNS to select an appropriate relay; therefore, do not specify a relay hostname for the Internet.
If the particular protocol is installed on this server, check Direct. If mail requiring the particular protocol is to be forwarded to another system for processing, check Relay. Complete the Relay's Hostname and Relay's Protocol fields.
The name of the host that will process mail for the protocol.
The name of the protocol the relay host uses to forward messages to the gateway.
The DECnet address for this machine (DECnet only).
The complete DNS name space name for this node (DECnet/OSI only). The syntax of the DNS name space is as follows:
namespace:.site.nodename
An arbitrary string that specifies the pseudodomain (DECnet, DECnet/OSI, and MTS only). The pseudodomain name must be unique for each protocol and must be used consistently throughout your enterprise.
Any synonyms for your pseudodomain (DECnet, DECnet/OSI, UUCP, and MTS only).
The alternative names that other systems might use to direct mail to your host.
Use the Mail Configuration application of the Common Desktop Environment (CDE) Application Manager to configure mail on systems with graphics capabilities.
Note
Alternatively, you can use the SysMan Menu (
/usr/sbin/sysman -accel
mail
) or themailsetuputility to configure mail on your system. See the online help andmailsetup(8) for more information.
You can configure the following systems:
Standalone systems
Client systems
Server systems
To start the Mail Configuration application, do the following:
Log in as root.
Click on the Application Manager icon on the CDE desktop.
Double-click on the System_Admin application group icon.
Double-click on the Configuration application group icon.
Double-click on the Mail Configuration application icon in the Configuration group. The Mail Configuration main window is displayed, showing available Mail service types and configured Mail service types.
To exit the Mail Configuration application, choose File then Exit.
See
mailconfig(8)
for more information.
The Mail Configuration application has an extensive online help system
that you can use, instead of the instructions in this section, to configure
mail on your system.
12.3.1 Configuring a Standalone Mail System
To configure mail for a standalone system, do the following:
Select Standalone from the Available Mail Service Types list box in the Mail Configuration window
Select Configure to display the Standalone Setup dialog box.
Select Mailbox Setup to display the Mailbox Setup dialog box
if your site uses NFS to import or export system mailbox directories (for
instance,
/var/spool/mail); otherwise, go to step 7, the
default settings are applicable for your mail configuration.
If your system imports its mailbox using NFS, select the NFS Client radio button and do the following:
Enter the server name in the Mailbox Server field.
Select a radio button for the appropriate Locking mechanism: lockf, Lock Files, or Both.
If your system distributes mailboxes to NFS clients, select the NFS Server radio button, then select the Both radio button for the Locking Mechanism setting.
Select OK to complete the mailbox setup and close the Mailbox Setup dialog box.
Select Commit to save the changes.
You are asked if you would
like to restart the
sendmail
daemon.
Select Restart to start the
sendmail
daemon
and apply your changes immediately.
Or, select No to apply the changes the
next time you reboot your system.
If you choose Restart, you are informed that the
sendmail
daemon has been started.
Select OK to dismiss the message.
Select Close to close the Standalone Setup dialog box.
12.3.2 Configuring a Mail Client
To configure a mail client, do the following:
Select Client from the Available Mail Service Types list box in the Mail Configuration window.
Select Configure to display the Client Setup dialog box.
Enter the name of a mail server for outgoing mail in the Mail Server field.
Select Mailbox Setup to display the Mailbox Setup dialog box.
Select the NFS Client radio button for the Mailbox Directory if your site uses NFS to share system mailbox directories; otherwise, select Local and go to step 7.
Enter the name of the server that exports the mailbox directory to your system in the Mailbox Server field.
Select a radio button for the appropriate Locking mechanism: lockf, Lock Files, or Both.
Select OK to complete the mailbox setup and to close the Mailbox Setup dialog box.
Select Commit to save the changes.
You are asked if you would
like to restart the
sendmail
daemon.
Select Restart to start the
sendmail
daemon
and apply your changes immediately.
Or, select No to apply the changes the
next time you reboot your system.
If you choose Restart, you are informed that the
sendmail
daemon has been started.
Select OK to dismiss the message.
Select Close to close the Client Setup dialog box.
12.3.3 Configuring a Mail Server
To configure a mail server, follow these steps. If you intend to implement the POP or IMAP daemons, configure SMTP and other necessary protocols first, then see Section 12.4 and Section 12.5.
Select Server from the Available Mail Service Types list box in the Mail Configuration window.
Select Configure to display the Server Setup dialog box.
Select the mail protocol you want to configure from the Available Protocols list box. The Internet Mail Protocol (SMTP) protocol is the only required protocol configuration. Configure additional protocols as necessary.
Select Configure to display the protocol setup dialog box for the protocol you selected.
For the SMTP protocol, select the type of forwarding for this server. If you select None, go to step 11; otherwise, go to step 7.
For the DECnet, DECnet/OSI, MTS, UUCP, and X.25 protocols, select a Routing type. If you select Internet or Direct, go to step 9. If you select Relay, go to step 7.
Enter a host name in the Relay's Hostname field if you will be forwarding mail to another system for processing; otherwise, continue with step 9.
Select the protocol used to communicate with the relay in the Relay's Protocol pulldown menu.
For the DECnet, DECnet/OSI, and MTS protocols, in the Pseudo Domain field, enter the domain name used to identify mail that requires the selected protocol.
For the DECnet, DECnet/OSI, MTS, UUCP, and X.25 protocols, to add aliases for the pseudodomain, select Pseudo Domain Aliases to display the Pseudo Domain Aliases dialog box, and do the following:
Enter the alias name in the Pseudo Domain Alias field and select Add.
Repeat the previous step as many times as necessary.
Select OK to close the Pseudo Domain Aliases dialog box.
To add aliases for this mail server, select Host Alias to display the Host Aliases dialog box, and do the following:
Enter the alias name in the Host Alias field and select Add.
Repeat the previous step as many times as necessary.
Select OK to close the Host Aliases dialog box.
For the DECnet protocol, enter the DECnet node address (area.node)
for this server in the Node Address field, for example,
32.958.
For the DECnet/OSI protocol, enter the name space of the node, which is usually the token before the colon (:) in a DECnet Phase V address, in the DNS Name Space field.
Select OK to close the Setup dialog box for the protocol you selected. The Server Setup dialog box is active.
Configure another protocol if necessary. Repeat steps 3 through 15 for each additional protocol.
Select Mailbox Setup to display the Mailbox Setup dialog box.
Select a radio button for Mailbox Directory.
If your site does not use NFS to distribute the system mailbox directories, select Local instead of NFS Server, and then go to step 19.
If you selected NFS Client as a Mailbox Directory, enter the
name of the mail server in the Mail Server field.
Be sure to include the domain.
For example, for a server named
mailhub, the server name
with domain might be
mailhub.nyc.dec.com.
Select a radio button for the appropriate Locking mechanism: lockf, Lock Files, or Both.
Select OK to complete the mailbox setup and close the Mailbox Setup dialog box.
Select Commit to save the changes.
You are prompted to restart
the
sendmail
daemon.
Select Restart to start the
sendmail
daemon
and apply your changes immediately.
Or, select No to apply the changes the
next time you reboot your system.
If you choose Restart, you are informed that the
sendmail
daemon has been started.
Select OK to dismiss the message.
Select Close to close the Server Setup dialog box.
Add DNS mail exchanger (MX) records to the
/etc/namedb/hosts.db
file for each host in your environment, if necessary.
See
Section 12.1.1
for more information.
To add a new mail host to your existing mail environment, do the following:
Configure the network and network services on the host. See Chapter 2 for more information.
If you are using DNS MX records in your environment, update the DNS data files. See Section 12.1.1 for more information.
The Post Office Protocol Version 3 (POP3 or POP) is a client/server
protocol that allows users to download their Email from a mail server to a
remote client.
It is intended for users that mainly access their Email in
an offline mode.
In offline mode, messages are delivered to a server and reside
there until the user connects to the server and downloads the incoming messages
to the client machine (a desktop or laptop computer running Windows, Macintosh,
UNIX, or another operating system).
Thereafter, all message processing is
local to the client machine and environment.
This is the mode used widely
today by Internet Service Providers (ISP) to provide Email services for their
consumers.
See
pop3d(8)
for further information.
12.4.1 Installing POP
The operating system provides a POP3 server (/usr/sbin/pop3d) from Qualcomm, Incorporated, which is fully installed and configured
for you when you install the OSFINET subset (check the installation log file
for any warnings or errors). The
pop3d
daemon is configured
to listen on port 110 for incoming connections, and allows any user of the
system to access their Email via a POP client.
During installation, the
/etc/passwd,
/etc/services, and
/etc/inetd.conf
configuration files are
updated.
If the lines displayed in the following examples are not present
in the configuration files, the POP3 service may not behave appropriately.
If a previous version of POP was detected, or if the OSFINET subset did not
install properly, the files might not have been updated and the changes must
be made manually.
The
/etc/passwd
file should contain the following
line; if it does not, add the line to the file:
pop:*:13:6:POP Mail Service Account:/:
If necessary, change the user identification number, 13, to a value that is appropriate for your system.
The
/etc/services
file should contain the following
line; if it does not, add the line to the file:
pop3 110/tcp
The
/etc/inetd.conf
file should contain the following
line; if it does not, add the line to the file:
pop3 stream tcp nowait root /usr/sbin/pop3d pop3d
12.4.2 Migrating to the New POP3 Implementation
The POP service has been upgraded in this release of the operating system. Migration paths are provided for systems that were running either the version of POP3 offered with the OSFMH (RAND Corp. Mail Handler) subset or the Qualcomm POP3 service (if your version came directly from Qualcomm).
If you use the MH POP3 service, you must migrate your POP user accounts
from the
/usr/spool/pop/POP
file to the
mailauth
database and convert your mailboxes to the new format.
If you use the Qualcomm POP3 service, you must migrate your POP user
accounts from the
popauth
database to the
mailauth
database; however, you do not need to convert your mailboxes.
The
only difference between Qualcomm POP3 and the Tru64 UNIX implementation
of Qualcomm POP3 is the mail authorization database, which has been enhanced
to store secondary POP and IMAP passwords.
The following sections describe the migration paths for each service.
See
popcv(8)
for further information.
12.4.2.1 Migrating from MH POP3
To transition from MH POP3 service to the new implementation, complete the following tasks:
Remove any startup scripts for the
/usr/lib/mh/popd
file in the
/sbin/rc
directories.
Make sure that the
/etc/inetd.conf
and
/etc/services
configuration files were updated with the correct
entries as described in
Section 12.4.1.
Initialize the
mailauth
database by entering
the following command:
#/usr/bin/mailauth -init
Use the
popcv
utility to move usernames
and passwords from the
/usr/spool/pop/POP
file to the
mailauth
database (/etc/pop.auth.pag
and
/etc/pop.auth.dir).
Enter the following command, where
filename
can be an alternate file used to store POP passwords:
#/usr/bin/popcv [filename]
Use the
mailcv
tool to convert existing
MH POP3 mail folders to the new POP3 format:
Change directory to the MH POP3 mail folder directory:
#cd /usr/spool/mail/POP
The directory might be
/usr/spool/pop
or another
directory depending on how you configured MH POP3.
For each mail user, enter the following command, where input is the file name of the user's MH POP3 folder:
#/usr/dt/bin/mailcv -Q -f input
Typically, the file name is the same as the POP user's username.
For
instance, for a user named Jake, you would convert the
/usr/spool/mail/POP/jake
file.
Optionally, you can change the name of a mail folder during the conversion process by appending the new file name to the end of the command, as in the following example:
#/usr/dt/bin/mailcv -Q -f charlie chuck
See
mailcv(1)
for more information.
12.4.2.2 Migrating from Qualcomm POP3
To transition from Qualcomm's POP3 service to the new implementation, complete the following tasks:
Ensure that the
/etc/inetd.conf
and
/etc/services
configuration files were updated with the correct
entries as described in
Section 12.4.1.
If a previous
popauth
database exists,
convert it to a
mailauth
database by using the following
command:
#/usr/bin/mailauth -convert
Note that you need to convert your mail folders only if you
previously ran the MH POP3 server.
12.4.3 Configuring a POP Mail Account
To configure a POP mail account, create a UNIX account for the user (if one does not already exist) as described in the System Administration guide. The user's mailbox is set up automatically.
Once the user's account is set up on the server, the user can configure a mail application compatible with POP3, for example, Netscape Communicator, which is bundled with the operating system software. At a minimum, you must provide the user with the following information about mail service in your facility:
POP username -- Specify if different from the UNIX username
POP-specific password -- Specify if different from the UNIX password
POP server name -- The mail application collects incoming mail from this server
SMTP server name -- The mail application delivers outgoing mail to this server
Domain name -- The mail application adds this domain name to all unqualified addresses for domain-based mail addressing
12.4.4 Changing Login Authentication
The POP service typically authenticates user accounts by verifying the
supplied user name and password against information in the UNIX password file
(usually the
/etc/passwd
file).
The Tru64 UNIX implementation
of POP has been enhanced to optionally support SIA interfaces for authentication
on a C2 secure system.
For increased security, the system administrator can have POP users use alternate passwords instead of their usual login passwords; therefore, if a POP password is compromised across the network, system access is not at risk.
There are two ways to enable alternate passwords for POP authentication:
Arrange for POP users to store alternate passwords in the
mailauth
database (/etc/pop.auth.dir
and
/etc/pop.auth.pag).
Add mail users to the same
mailauth
database
as Authenticated POP (APOP) users.
APOP uses an encrypted authentication mechanism,
also with alternate passwords, that is more secure than standard POP; however,
users need mail client applications compatible with APOP to take advantage
of it.
Use the SysMan Menu application of the Common Desktop Environment (CDE) Application Manager to enable either authentication option. To invoke the SysMan Menu application, follow the instructions in Chapter 1, then follow these steps:
Note
If users in your environment use one of the old POP3 implementations, you must migrate them to the new POP3 implementation as described in Section 12.4.2 prior to enabling alternate passwords.
From the SysMan Menu, select Mail-->Manage users' mail accounts. The Mail User Administration window is displayed. Optionally, you can invoke this utility by executing the following command:
#mailusradm &
Select the radio button for List Specific Users and select Complile List.
Enter the username or a wildcard in the dialog box and select OK.
Select the name of the user for whom you would like to require an alternate password.
Select the desired mail service type from the pulldown menu. To require that the user use an alternate password for POP mail, select POP with Mail Password. To switch the user's mail service to APOP, select APOP with Mail Password.
Select OK to save your changes.
Enter an alternate password for POP or APOP and select OK.
The user can later set a new password by issuing the
mailauth
command without any flags.
For example:
%/usr/bin/mailauth
Select OK to dismiss the message that indicates that the account has been modified successfully.
Select Exit to close the Mail User Administration window.
If you need to change authentication for multiple accounts, you can
select List All Local Mail Users in step 2.
Use the Control key in combination
with a right-mouseclick to select more than one user name from the list.
See
mailusradm(8)
for more information about the Mail User Administration utility.
Optionally, you can use the
mailauth
utility to set
up authentication.
See
mailauth(8).
12.4.5 Administrative Tools
You can use the following tools to administer the POP service:
mailauth
-- Utility used to manage
the secondary mail authorization database.
See
mailauth(8).
mailusradm
-- System administration
GUI utility used to configure mail users.
See
mailusradm(8).
The POP server sends log messages to the
syslog
utility.
The log information is stored in the
/var/adm/syslog.dated/date/mail.log
file.
You can use this data to solve
problems.
The severity levels are NOTICE for failed and successful authentications
and DEBUG for all debugging information.
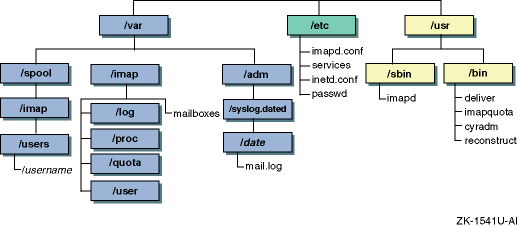
12.4.6 Directory Structure
The POP configuration and mail files are distributed across the file system as indicated in the following diagram:
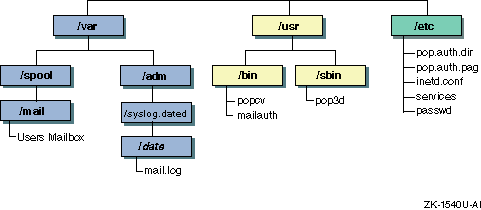
Table 12-1
describes the purpose of these
files and directories.
Table 12-1: POP3 Files and Directories
| File or Directory | Purpose |
|
Contains account information for each user on the system. Users configured in this file are able to use POP mail by default. |
|
Contain the encrypted mail authorization
database, which is used to authenticate POP and IMAP users.
See
|
|
Contains the mail folders for all POP and UNIX mail users on the system. Each folder is a file with a file name that is usually identical to the user's login name. |
12.5 Internet Message Access Protocol
The Internet Message Access Protocol Version 4 (IMAP4 or IMAP) is a client/server protocol that allows mail clients to access mail messages on a server. With it, the user can access mail folders and manipulate the contents remotely without having to log in to the server. The protocol allows clients to create, delete, and rename mail folders, to check for new messages and remove old messages, and to selectively retrieve messages for local viewing. In addition, the user can select messages by attributes and parse messages in the RFC822 and MIME formats.
This protocol can be used in the offline, online, or disconnected mode. The offline mode is the same as that described in Section 12.4. In online mode, messages are manipulated on the server remotely by mail client programs. In disconnected mode, a mail client connects to the mail server, makes a cache copy of selected messages, and then disconnects from the server, later to reconnect and resynchronize with the server. In both online and disconnected access modes, mail is stored on the server, which is often a necessity for people who use different computers at different times to access their messages.
See
imapd(8),
deliver(8), and
imapd.conf(4)
for further information.
12.5.1 Installing IMAP
The operating system software includes the Cyrus IMAP4 Revision 1 server
(/usr/sbin/imapd) by Carnegie Mellon University, which
is installed and configured when you install the OSFINET subset (check the
installation log file for any warnings or errors). The
imapd
daemon is configured to listen on port 143 for incoming connections.
During installation, the
/etc/passwd,
/etc/services, and
/etc/inetd.conf
configuration files are
updated.
If the lines specified in the following examples are not present
in the configuration files, the IMAP service may not behave appropriately.
The
/etc/passwd
file should contain the following
line; if it does not, add the line to the file:
imap:*:14:6:IMAP Mail Service Account:/:
If necessary, change the user identification number, 14, to a value that is appropriate for your system.
The
/etc/services
file should contain the following
line.
If it does not, add the line to the file:
imap 143/tcp
The
/etc/inetd.conf
file should contain the following
line.
If it does not, add the line to the file:
imap stream tcp nowait imap /usr/sbin/imapd imapd
12.5.2 Configuring IMAP Mail Accounts
To enable users to receive IMAP mail, you must complete two tasks.
First,
if the users do not have accounts on the system, you must create them.
See
the
System Administration
guide and
adduser(8)
for more information.
Second, you must change the properties of the users' accounts to indicate that their mail is to be processed by the IMAP server. Use the SysMan Menu application of the Common Desktop Environment (CDE) Application Manager to configure the user's mail service type. To invoke the SysMan Menu application, follow the instructions in Chapter 1.
To change the user's mail service type, do the following:
From the SysMan Menu, select Mail-->Manage users' mail accounts. The Mail User Administration window is displayed. Optionally, you can invoke this application by executing the following command:
#mailusradm &
Select the radio button for List Specific Users and select Compile List.
Enter the username or a wildcard in the dialog box and select OK.
Select the name of the user whose mail service type you would like to change from the list.
Select the desired mail service type from the pulldown menu. To require that the user use an alternate password for IMAP mail, select IMAP with Mail Password. Otherwise, select IMAP to use the same password.
If you enable this option, the alternate passwords are stored in the
mailauth
database, which is located in the
/etc/pop.auth.dir
and
/etc/pop.auth.pag
files.
See
mailauth(8)
for more information.
Select OK to save your changes.
Enter the mail administrator's password. In most cases, this password is the same as the root account password. Select OK.
Select the privileges to set on the user's mailbox. In most cases, you will select All to allow the user to read, modify, and delete messages in the mailbox. Select OK.
If you did not select IMAP with Mail Password in step 5, skip to step 10.
Enter an alternate password for IMAP and select OK.
The user can later select a new password by issuing the
mailauth
command without any flags.
For example:
%/usr/bin/mailauth
Select OK to dismiss the message that indicates that the account has been modified successfully.
Select Exit to close the Mail User Administration window.
If you need to set up multiple IMAP accounts, you can select List All Local Mail Users in step 2. Use the Control key in combination with a right-mouseclick to select more than one user name from the list.
See the online help and
mailusradm(8)
for more information.
Once a user's IMAP account is set up on the server side, the user can configure a mail application compatible with IMAP4, for example, Netscape Communicator, which is bundled with the operating system software. At a minimum, you must provide the user with the following information about mail service in your facility:
IMAP username -- Specify if different from the UNIX username
IMAP password -- Specify if different from the UNIX password
IMAP Mailbox location prefix --
user.username
IMAP server name -- The mail application collects incoming mail from this server
SMTP server name -- The mail application delivers outgoing mail to this server
Domain name -- The mail application adds this domain name to all unqualified addresses for domain-based mail addressing
12.5.3 Migrating Users from UNIX and POP3 Mail
To convert an existing UNIX or POP3 mail user to IMAP mail, you must
first set up the user's IMAP account as described in
Section 12.5.2.
Then, use the
mailcv
tool to convert the user's mail folder
to the IMAP format as follows:
Note
If you are using MH POP3 or a version of Qualcomm POP3 that did not come with the operating system software, follow the instructions in Section 12.4.2 to convert to the new POP3 implementation before converting to IMAP.
Change directory to the UNIX/POP3 mail folder directory:
#cd /usr/spool/mail
Assume the user's identity by using the
su
command, as follows:
#su username
You must be the user to convert the user's mail folder to IMAP format
with the
mailcv
command.
Enter the following command, where folder is the file name of the user's mail folder:
%/usr/dt/bin/mailcv -I -f folder
You need the user's IMAP password to use this command.
The mail folder file name is usually the same as the user's username.
For instance, for a user named Jake, you would convert the
jake
file.
Optionally, you can move the converted messages to an IMAP subfolder during the conversion process by appending a subfolder name to the end of the command, as in the following example:
#/usr/dt/bin/mailcv -I -f charlie business
IMAP subfolders are described in
Section 12.5.6.
See
mailcv(1)
for more information about the
mailcv
command.
Exit the
su
session to the user's account,
as follows:
%exit#
Note that mail received after the account is changed to IMAP but prior to the conversion process is not lost. The newly-converted messages are appended to the existing messages in the user's mailbox.
Once a user's UNIX or POP account is converted to an IMAP account on the server, the user must reconfigure the mail application. Ensure that the user has an mail application compatible with IMAP4, for example, Netscape Communicator, which is bundled with the operating system software.
You also need to provide the user with information about mail service
in your facility, as specified in
Section 12.5.2.
12.5.4 Administrative Tools
You can use the following tools to administer the IMAP server:
cyradm
-- Command line utility used
for configuring and managing users, folders, subfolders, and so on.
See
cyradm(1).
deliver
-- Utility used to deliver
mail to an IMAP mailbox.
See
deliver(8).
imapquota
-- Utility used to report
and fix IMAP mail quota usage.
See
imapquota(8).
mailauth
-- Utility used to manage
the secondary mail password database.
See
mailauth(8).
mailusradm
-- System administration
GUI utility used to configure mail users.
See
mailusradm(8).
reconstruct
-- Utility used to rebuild
IMAP mailboxes.
See
reconstruct(8)
for further information.
The IMAP server software sends log messages to the
syslog
utility.
The log information is stored in the
/var/adm/syslog.dated/date/mail.log
file.
You can use this data to solve
problems.
The severity levels are as follows:
Authentications, both successful and unsuccessful.
I/O errors, including failure to update quota usage. The message includes the specific file and UNIX error.
Protection mechanism failures, client inactivity timeouts.
Mailbox openings.
The IMAP configuration and mail files are distributed across the file system as indicated in the following diagram:
All of the runtime configuration information is stored in the
/etc/imapd.conf
file.
This file contains site configuration and
policy options, such as:
Location of the configuration directory
Partition names and their corresponding directory roots
Threshold for quota warning messages
Whether or not to allow anonymous logins
Whether or not to automatically create
INBOX
mailboxes for users
See
imapd.conf(4)
for further information.
The configuration directory specified in the
/etc/imapd.conf
file contains the items listed in
Table 12-2.
Table 12-2: Configuration Directory Contents
| File or Directory | Purpose |
|
Contains a sorted list of each IMAP
mailbox on the server along with mailboxes quota root and access control list
(ACL), described in
Section 12.5.8
and
Section 12.5.7,
respectively.
Because the ACL is security-critical information that cannot
be reconstructed from information stored elsewhere, there is no utility to
recover from a damaged
To protect
the contents of the mailboxes, you should make frequent (even hourly) backups
of the
|
|
Contains user subscriptions.
There
is one file per user, with a filename of the user ID followed by
There is no utility for recovering damaged subscription files. You can restore lost files from backups. |
|
Contains one file per active server process. The filename is the ASCII representation of the process id, and the file contains the following tab-separated fields:
The
|
|
Contains one file for each IMAP user with a restricted quota. Each file is named after a user and stores the user's quota usage and limits. The
|
|
Contains zero or more subdirectories, each named after a user. If a subdirectory exists for a user, the server keeps a telemetry log of protocol sessions authenticating as that user. The telemetry log is stored in the subdirectory with a filename that matches the server's process ID. Use this feature only for debugging purposes; the log files grow rapidly. |
The largest database in the IMAP server is the user's mailbox directory,
/var/spool/imap/user/username.
Each user's
directory contains the files listed in
Table 12-3.
Table 12-3: Mailbox Directory Contents
| File or Directory | Purpose |
message files |
Contain one message each in RFC 822 format. Lines in the message are separated by a carriage return and line feed, not just a line feed. The file name of each message is the message's UID followed by a dot (.). |
|
Contains a magic number and variable-length information about the mailbox itself. |
|
Contains fixed-length information about the mailbox itself and each message in the mailbox. |
|
Contains variable-length information about each message in the mailbox. |
|
Contains variable-length state information about each user who has permission to read the mailbox. |
The
reconstruct
utility can be used to recover from
corruption in mailbox directories.
If the
reconstruct
utility
finds existing header and index files, it attempts to preserve any data in
them that is not derivable from the message files themselves, including the
flag names, flag state, and internal date.
The utility derives all other information
from the message files.
You can recover from a damaged disk by restoring message files from
a backup and then running the
reconstruct
utility to regenerate
what it can of the other files.
The
reconstruct
program
does not adjust the quota usage recorded in any quota file.
After running
reconstruct, you should run
imapquota -f
to fix
the quota root files.
12.5.6 Mailbox Namespace
The IMAP server presents mailboxes using the
netnews
namespace convention.
Mailbox names have the following restrictions:
Are case-sensitive
Cannot start or end with a period (.) character
Cannot contain two period (..) characters in a row
Cannot contain non-ASCII characters, shell metacharacters, or a backslash (/) character
All personal mailboxes for a user begin with the
user.username.
string.
For example, mailboxes belonging
to a user named Hansen begin with the
user.hansen.
string.
If Hansen has a mailbox for work-related Email, it might be called
user.hansen.work.
In the user's mail application, the prefix
user.hansen.
normally appears as
INBOX..
The mailbox
user.hansen.work
would therefore appear as
INBOX.work.
However,
if the access control list (ACL) of the mailbox permitted other users to see
that mailbox, it would appear to them as
user.hansen.work.
You can create or delete a user's mailbox by creating or deleting the
user's
INBOX.
A user with an
INBOX
can
create and subscribe to personal mailboxes.
Users with dots in their user
names are able to log in, but cannot have an
INBOX
or receive
IMAP mail.
When you delete a user's
INBOX, all of the personal
mailboxes associated with it are deleted as well.
With the exception of
INBOX, all mailbox names are
system-wide; they refer to the same mailbox regardless of the user.
ACLs determine
which users can access or see certain mailboxes.
In contexts that permit relative mailbox names, the mailbox namespace works as follows:
Names that do not start with a period (.) are fully qualified.
Names that start with a period (.) are relative to the current context.
You might need to use this convention if you use the
telnet
command to connect to an IMAP port for troubleshooting purposes
or if you create an application that issues IMAP calls.
If you are working with folder names and the top of the hierarchy is
named
user.hansen, the name
.work.personnel.issues
resolves to
user.hansen.work.personnel.issues
and the name
work.personnel.issues
resolves to
work.personnel.issues.
12.5.7 Access Control Lists
Access to each mailbox is controlled by each mailbox's access control list (ACL). ACLs provide a mechanism for specifying the users or groups of users who have permission to access the mailboxes.
An ACL is a list of zero or more entries.
Each entry has an identifier
and a set of rights.
The identifier specifies the user or group of users to
which the entry applies.
The set of rights is one or more letters or digits,
each letter or digit conferring a particular privilege.
See
cyradm(1)
for further information.
Access rights are defined as follows:
l)The user can see that the mailbox exists.
r)The user can read the mailbox. The user can select the mailbox, retrieve data, perform searches, and copy messages from the mailbox.
s)The per-user seen state is preserved.
The server saves the
Seen
and
Recent
flags for the user.
w)The user can modify flags and keywords other than
Seen
and
Deleted
(which are controlled by other sets of rights).
i)The user can insert new messages into the mailbox.
p)The user can send mail to the submission address for the mailbox.
This
right differs from the
i
right in that the delivery system
inserts trace information into submitted messages.
c)The user can create new sub-mailboxes of the mailbox.
d)The user can store the
Deleted
flag, perform expunges,
and delete.
a)The user can change the ACL on the mailbox.
You can combine access rights in different ways. For example:
The user can read the mailbox.
The user can read
the mailbox and can post to it through the delivery system.
Most delivery
systems do not provide authentication, so the
p
right usually
has meaning only for the
anonymous
user.
The user can see the
mailbox and can read it, but the server does not preserve the
Seen
and
Recent
flags.
This set of rights is useful
primarily for
anonymous IMAP.
The user can read the
mailbox and the server preserves the
Seen
and
Recent
flags, but the mailbox is not visible to the user through
the various mailbox listing commands.
The user must know the name of the mailbox
to be able to access it.
The user can read and append to the mailbox either through IMAP or through the delivery system.
Any identifier may be prefixed with a dash (-) character. The associated rights are then removed from that identifier. These are referred to as negative rights.
To calculate the set of rights granted to a user, the server first calculates
the union of all rights granted to the user and to all groups of which the
user is a member.
The server then calculates and removes the union of all
negative rights granted to the user and to all groups of which the user is
a member.
For example, in the following ACL, the user named Fred is granted
the rights
lrswip
and the user anonymous is granted the
rights
lrp:
anyone        lrsp
fred          lwi
-anonymous    s
Regardless of the ACL on a mailbox, users who are listed in the
admins
configuration option of the
/etc/imapd.conf
file implicitly have the lookup and administer rights on all mailboxes.
Users
also implicitly have the lookup and administer rights on the
INBOX
and all of their personal mailboxes.
When a mailbox is created, its ACL starts with a copy of the ACL of
its closest parent mailbox.
When a user is created, the ACL on the user's
INBOX
starts with a single entry granting all rights to the user.
When a nonuser mailbox is created and does not have a parent, its ACL is initialized
to the value of the
defaultacl
option in the
/etc/imapd.conf
file.
12.5.8 Quotas
You can use quotas to limit the system resources available to a user. The IMAP server supports quotas on storage.
A quota on storage is defined as the number of kilobytes of disk space that a user's messages are permitted to consume. Each copy of a message is counted independently, even when the server can conserve disk space by making hard links to message files. The additional disk space overhead used by mailbox index and cache files is not charged against a quota.
You can assign one quota on the overall space permitted for a user's mailboxes or you can assign different quotas on selected branches of a user's mailbox hierarchy. In either case, you apply the quota to the root of the mailbox hierarchy that you want to limit. The quota root encompasses any number of mailboxes in that hierarchy. Quotas on a quota root apply to the sum of the usage by all mailboxes at that level and below that level that is not part of a quota root on lower level, hence, each mailbox is limited by at most one quota root.
Figure 12-5
shows an example of quota roots
for a user named Hansen.
Figure 12-5: Quota Roots
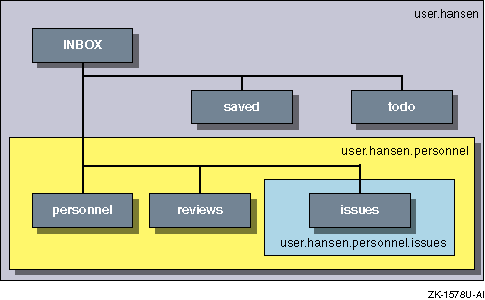
In Figure 12-5, the user Hansen has the following mail folders:
user.hansen
(INBOX)user.hansen.personneluser.hansen.personnel.reviewsuser.hansen.personnel.issuesuser.hansen.saveduser.hansen.todo
The following quota roots in the
quota
directory
restrict Hansen's disk usage:
user.hansenuser.hansen.personneluser.hansen.personnel.issues
The quota root
user.hansen
applies to the
INBOX,
saved, and
todo
mail
folders.
The quota root
user.hansen.personnel
applies to
the
personnel
and
reviews
mail folders.
The quota root
user.hansen.personnel.issues
applies only
to the
issues
mail folder.
If the
user.hansen.personnel
and
user.hansen.personnel.issues
quota roots
did not exist, the restrictions specified for the
user.hansen
root would apply to all mail folders in the
user.hansen
hierarchy (those mail folders with the
user.hansen
prefix).
You can create quota roots by using the
setquota
command in the
cyradm
utility; however, you cannot delete
quota roots with this utility.
To remove a quota root, you must remove the
associated quota file.
For a message to be inserted into a mailbox, the mailbox must have sufficent
storage so that inserting the message will not exceed the quota root.
This
is always true of manual transfers from one folder to another, but mail delivery
is a special exception.
If the limit is not exceeded when delivery starts,
then the message is delivered regardless of its size.
If delivery of the new
message exceeds the folder's quota, the
imapd
daemon informs
the user and permits him or her to correct the problem.
If mail delivery were
not permitted in this case, the user would not know that mail cannot be delivered.
When the quota root is exceeded, mail delivery fails with a temporary error. The system attempts delivery for a few days, providing the user time to notice and correct the problem.
When a user selects a mail folder that is near or exceeds the quota,
the server issues an alert to notify the user.
You can use the
quotawarn
configuration option to set the threshold of usage at which the
server issues quota warnings.
The server issues warnings only when the user
has rights to the folder because only users with rights can correct the problem.
12.5.9 Partitions
You can use partitions to store mailboxes in different parts of your
file system.
Hierarchies of mailboxes can be spread across multiple disks.
You must use the
cyradm
utility to specify these alternate
partitions; you cannot specify them from an IMAP mail application.
When creating a new mailbox, specify the name of the partition for the
mailbox as an argument to the
createmailbox
command in
the
cyradm
utility.
If the partition is not specified,
the mailbox inherits the partition of its parent mailbox.
If the mailbox has
no parent, it defaults to the partition specified in the
defaultpartition
configuration option.
You can also change the partition of an exisiting mailbox by using the
renamemailbox
command in the
cyradm
utility.
See
cyradm(8)
for more information.
Note that quota roots are independent of partitions.
A single quota
root can apply to a mailbox hierarchy that spans multiple partitions.
12.6 Mail Utilities
The operating system includes the following mail utilities:
The
mail,
binmail
utility
(the default) --
Used
by the
sendmail
utility to deliver mail locally.
Because the
mail
utility
has root setuid permission, it handles delivery of all mail to a user's local
mailbox located in the
/var/spool/mail
directory.
See
the
Command and Shell User's Guide
and
mail(1).
The
mailx,
Mail
utility --
A combination
of the Berkeley Software Distribution's (BSD) and UNIX System Laboratories,
Inc.'s System V Release 4 (SVIDI) mail utilities.
The
mailx
utility depends on the
binmail
utility for delivery to
a user's mailbox.
It has more user features than the
binmail
utility.
See the
Command and Shell User's Guide
and
mail(1).
The
dtmail
utility -- The default
mail program in
CDE.
This utility uses
sendmail
as the transport
and stores information in much the same way as the
mailx
utility.
It also allows you to read POP3 mail, and offers support for MIME-encoded
messages.
See the
Common Desktop Environment: User's Guide
and
dtmail(1).
The message handler utility
mh
--
It and its associated commands are included in the optional RAND
Corporation Mail Handler subset (OSFMH500).
The message handler is composed
of several shell commands where each command handles a specific function.
For example, the
inc
command reads new mail and the
comp
command creates a message.
Like the
mailx
utility,
mh
depends on the
mail
utility
for delivery to a user's mailbox.
The
mh
utility provides
a graphical interface with the
xmh
command.
It also provides
the Post Office Protocol (POP).
See
xmh(1X)
and
Section 12.4
for more information on
xmh
and POP, respectively
Netscape Messenger --
Part
of the Netscape Communicator product, which is bundled with the operating
system software.
Messenger allows you to read mail from POP3 and IMAP4 mail
servers.
It also enables you to create rich HTML Email with embedded images,
send MIME-encoded attachments, encrypt and decrypt your messages for privacy,
use filters to organize your incoming messages into folders, and look up email
addresses.
For more information on the Netscape Communicator product, see
netscape(1).
For more information on
sendmail, see
sendmail(8),
sendmail.cf(4),
and
sendmail.m4(8).
12.7 Monitoring the Mail Queue
Monitoring the mail queue enables you to determine the status of several types of networking operations, including jobs that have been queued on a local system for transfer to a remote system. General users and system administrators can monitor the mail queue.
To display the contents of the mail queue, use the
mailq
command.
This command lists the number of requests and the queue ID, the
message size, the date the message entered the queue, and the sender and recipient
for each request.
Alternatively, you can use the
sendmail -bp
command.
See
mailq(1)
for more information.
If a major host is off line for a period of time, the number of entries in the queue might be quite large, causing the performance of the mail environment to suffer. To remedy this, you must archive the queue. See Section 12.8 for information.
The following example shows two requests in the mail queue:
#mailqMail Queue (2 requests) --QID-- --Size-- -----Q-Time----- ------------Sender/Recipient------------ AA04956 1442 Tue Aug 24 10:12 <blaise> (Deferred) <corcoran@host1.corp.com> AA08618* (no control file)
When a major host is off line for a number of days,
the mail queue might grow to be quite large.
As a result, the
sendmail
utility spends a lot of time sorting the large queue, severely
affecting the mail environment performance.
Archiving the mail queue enables
your mail environment to function normally while the major host is off line.
To archive the mail queue, do the following:
Log in as root.
Change to the
/var/spool
directory by using
the
cd
command.
Stop the
sendmail
utility by entering the
following command:
#/sbin/init.d/sendmail stop
Verify that the
sendmail
utility is not
running by entering the following command:
#ps -e | grep sendmail
Verify that no
sendmail
child processes
are running by entering the following command:
#ps -e | grep queue
If any processes in the list are related to
sendmail,
for example, they include message queue IDs, you should wait until these processes
are finished before moving the queue; otherwise, you might corrupt the queue
data.
Move the
mqueue
directory to the
old.mqueue
directory by using the
mv
command.
Make a new
mqueue
directory by using the
mkdir
command.
Change the directory's permission code to 775 by using the
chmod
command.
Restart the
sendmail
utility by using the
following command:
#/sbin/init.d/sendmail restart
After the major host returns on line, process the old mail queue by using the following command:
#/usr/sbin/sendmail -oQ/var/spool/old.mqueue -q
When the queue is empty, remove it by using the following command:
#rm -r /var/spool/old.mqueue
12.9 Administering and Distributing Alias Information
Depending on how you choose to administer and distribute alias information on standalone or server systems, there are two ways to provide alias information for use in the mail environment:
/var/adm/sendmail/aliases
file
NIS aliases database
By default, the
/var/adm/sendmail/aliases
file permissions
code is 644.
This means that global users cannot change and write the changes
to the file.
While this creates a reasonably secure system, it leaves the
maintenance of the list of global users up to the system administrator.
You can distribute responsibility for maintenance by doing the following:
Create a local alias file for a global maintainer in a directory. Both the file and the directory must be accessible by another maintainer.
Create an entry in the
/var/adm/sendmail/aliases
file that includes the additional alias file.
The entry has the
following form:
alias_name: :include:filename
The filename is the full path name and file name of the alias file.
Build a new version of the alias file by using the
newaliases
command.
See
aliases(4)
for more information.
Optionally, you can use NIS to administer and distribute alias information for use in the mail environment. To use the NIS aliases database, do the following:
Install and configure NIS, if this is not already done, by
using the
nissetup
script.
Edit the
svc.conf
file by using the
svcsetup
script, and modify the aliases entry to include
yp
(NIS).
Edit the NIS aliases map to include the alias information you want.
See
Chapter 8
for information on configuring NIS and
Section 8.4.4
for information on updating an NIS map.
12.10 Displaying Mail Statistics
You can display statistics about mail traffic
on your system by using the
mailstats
command as follows:
#/usr/sbin/mailstats
At any time, you can initialize the statistics file by issuing the following commands:
#cp /dev/null /var/adm/sendmail/sendmail.st#chmod 666 /dev/null /var/adm/sendmail/sendmail.st