The Local Area Transport (LAT) protocol supports communications between host computer systems and terminal servers with terminals, PCs, printers, modems and other devices over local area networks (LANs). The Tru64 UNIX LAT implementation is a STREAMS-based driver.
This chapter describes:
The LAT implementation on Tru64 UNIX systems
The different configurations possible in a LAT environment
How to configure and maintain a LAT environment
For additional introductory information on LAT, see
lat_intro(7).
For troubleshooting
information, see
Section 14.16.
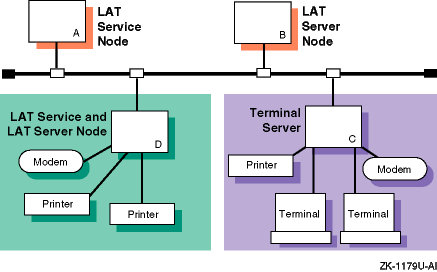
6.1 LAT Environment
In the LAT environment, systems can have the following roles:
Service node -- A system that offers LAT services to users on the LAN and accepts connections from server users.
Server node -- A terminal server or a system that is configured for outgoing connections. Server nodes enable users attached to the node to initiate LAT sessions through outgoing ports to LAT services offered by LAT service nodes.
Figure 6-1
shows a sample LAN with LAT server nodes
and LAT service nodes.
Figure 6-1: Sample LAT Network Configuration
The LAT software also permits host applications to initiate connections to server ports, designated as application ports, to access remote devices. The following sections describe:
Types of LAT connections
Access control in a LAT network
Password specification for remote servers
Load balancing
6.1.1 Types of LAT Connections
The following types of LAT connections are permitted:
Terminal-to-host connections -- The basic LAT connection in which a user at a terminal connected to a terminal server connects to a LAT service. For example, a user at a terminal connected to terminal server C and connecting to a service on host A in Figure 6-1 is using a terminal-to-host connection.
Host-initiated connections -- A connection in which a bit-serial, asynchronous device connected to a terminal server communicates with user-written applications on a LAT host. For example, a user who set up host A to use a printer on host D in Figure 6-1 is using a host-initiated connection.
Outgoing connections -- A connection in which a user
on a LAT server node can connect to a LAT service by using the
llogin
command.
For example, a user on host B who connects to a LAT service
on host A in
Figure 6-1
is using an outgoing connection.
Lattelnet gateway connections -- A connection in which a user at a terminal connected to a terminal server connects to a remote host through an intermediate Tru64 UNIX host. For example, a user at a terminal connected to terminal server C who is connecting to the lattelnet service on host D in Figure 6-1 is using a lattelnet connection.
6.1.2 Controlling Access in a LAT Network
Because LAT networks are local in nature, you have a high degree of control over the LAT environment and who has physical access to LAT devices. In addition to controlling physical access, the following features enable you to control LAT access:
LAT terminal server login password -- You can require that users enter a password to gain access to terminal servers. (Refer to your terminal server documentation for more information.)
LAT groups -- You can establish LAT groups and restrict host communication to particular groups in the following cases:
On a LAT service node, by issuing a
latcp -g -a
command
On a LAT server node, by issuing a
latcp -u
command
On a terminal server (refer to your terminal server documentation for more information)
In general, groups are set up by the network manager, system manager, and server managers to partition the LAT network into logical subdivisions and to restrict message traffic between servers and service nodes. In addition, using groups can help you manage the size of the servers' LAT databases by limiting the number of service nodes for which the server keeps information.
Note
You can use groups to restrict access, but they are not intended as a security mechanism.
To establish a connection with a LAT service node, the group enabled on a terminal server port or an outgoing port on a LAT server node must match at least one group on the service node. Similarly, for a terminal server or server node to process messages from service nodes, the group enabled on a terminal server port or an outgoing port on the server node must match at least one group on the service node. Otherwise, the messages from the service nodes are ignored.
For more information on enabling LAT service node groups and outgoing
port groups, refer to
latcp(8).
6.1.3 Specifying Passwords for Remote Services
The LAT protocol enables you to specify a password
for access to remote services that are protected by a password.
When password
checking is enabled on a terminal server that offers a service that is password
protected, you must specify the password when you map the application port;
if you do not, all attempts to connect to the service from the terminal server
are rejected.
See
latcp(8)
for more information.
6.1.4 Load Balancing
When more than one node on a LAN offers the same service, the terminal server connects to the node with the highest rating for the service desired. The rating is based on the current load on the nodes that offer the service. This process is called load balancing.
Load balancing works in a heterogeneous environment.
Therefore, service
nodes with the same names may be running different operating systems.
6.2 Planning LAT
This section describes the tasks you must complet
before configuring LAT.
6.2.1 Verifying That the LAT Subset Is Installed
Verify that the LAT subset is installed by entering the following command:
#setld -i | grep LAT
If the LAT subset is not installed, install it by using the
setld
command.
For more information on installing subsets see
setld(8),
the
Installation Guide, or the
System Administration
manual.
After the LAT subset is installed, your system is configured to load
the LAT module into the running kernel dynamically when the system boots.
6.2.2 Verifying DLB Support in the Kernel
After you install the LAT subset, verify that Data Link Bridge (DLB) support is in the kernel by issuing the following command:
#sysconfig -q dlb
If the
dlb:
prompt is not displayed, log in as superuser
and complete the following steps:
Edit the configuration file and add the following entry to it:
options DLB
The default
configuration file is
/sys/conf/HOSTNAME
where
HOSTNAME
is the name of your host processor,
in uppercase letters.
Build a new kernel by issuing the
doconfig
command.
If you are unfamiliar with rebuilding the kernel, see the
System Administration
manual.
Reboot your system with the new kernel by issuing the following command:
#shutdown -r now
This command immediately shuts down and automatically reboots the system.
6.2.3 Preparing for the Configuration
After you verify DLB support
in the kernel, you configure LAT by using the
latsetup
utility.
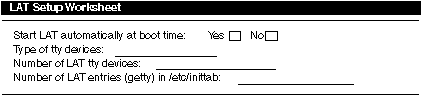
Figure 6-2
shows the LAT Setup Worksheet, which
you can use to record the information required to configure LAT.
If you are
viewing this manual online, you can use the print feature to print the worksheet.
The following sections explain the information you need to record on the worksheet.
Figure 6-2: LAT Setup Worksheet
By default, the
/sbin/init.d/lat
startup and shutdown script automatically starts LAT upon reaching
run level 3 and stops LAT when exiting run level 3.
If you do not want LAT
to be started automatically, check No; otherwise, check Yes.
The type of terminal device (tty) for each LAT connection. Tru64 UNIX supports SVR4 and BSD device types. It is best to use SVR4 devices because the SVR4 format allows you to create more devices.
SVR4 device special files have the following format:
/dev/lat/n
The value
n
is a number between 620 and approximately
5000.
For example,
/dev/lat/620,
/dev/lat/777, and
/dev/lat/4000
specify SVR4 devices.
The
SVR4 format allows you to create an unlimited number of devices.
BSD device special files have the following format:
/dev/ttyWX
The value
W
is a number from 0 to 9;
X
is an alphanumeric from 0 to 9, a lowercase a to z, or an
uppercase A to Z.
For example,
/dev/tty02,
/dev/tty0e, and
/dev/tty9f
specify BSD LAT terminal devices.
However, all BSD terminal device names are not case sensitive.
The device
special files
/dev/tty9f
and
/dev/tty9F
are both converted to
TTY9F.
This format enables you to specify up to 620 BSD terminal devices which are available to any serial devices (such as UUCP) running on the system. Therefore, fewer than 620 BSD devices may be available for LAT.
The total of the desired number of simultaneous incoming LAT connections, the number of application ports, and the number of outgoing connections needed.
The number of LAT
getty
entries to be added
to the
/etc/inittab
file.
This is the number of simultaneous
incoming LAT connections desired.
Use the
latsetup
utility to configure and administer
LAT on your system.
To use the
latsetup
utility, LAT and
DLB must be configured into the running kernel, your system must be at run
level 3 or 4, and you must be logged in as superuser.
See the
latsetup(8)
reference page for more information.
The
latsetup
utility allows you to do the following:
Create LAT device special files.
Add or remove
getty
entries to or from
the
/etc/inittab
file.
Execute the
init q
command.
Start or stop the LAT driver.
Enable or disable LAT automatic startup and shutdown. When enabled, LAT starts automatically upon reaching run level 3.
You cannot configure LAT over NetRAIN virtual interfaces or the adapters that compose NetRAIN sets. LAT is not supported over NetRAIN.
From the SysMan Menu, invoke the
latsetup
utility
by selecting Networking-->Additional Network Services-->Configure Local
Area Transport (LAT).
Alternatively, enter the following command on the command
line:
#/usr/sbin/latsetup
If your terminal does not support curses, you must specify the
-nocurses
flag.
This flag allows you to run
latsetup
in command-line mode.
Note
Do not run multiple
latsetupprocesses concurrently on the same machine. Thelatsetupuser might receive erroneous information and the/etc/inittabfile might become corrupted.
To manually start LAT, enter the following command:
#/sbin/init.d/lat start
To manually stop LAT, enter the following command:
#/sbin/init.d/lat stop
If you stop LAT from within a LAT session, the session will hang.
You
will have to reboot your system to clear up the problem.
6.5 Creating a LAT Startup File
If LAT automatic startup and shutdown are enabled,
when the system reaches run level 3, it loads LAT into the kernel and executes
the
/sbin/init.d/lat
script.
This script reads and executes
the
latcp
commands in the
/etc/latstartup.conf
file (if this file exists), then starts LAT.
See
latcp(8)
for more information on the
latcp
command.
If you do not have an
/etc/latstartup.conf
file,
LAT is started with the default values for its parameters.
Table 6-1
lists the LAT parameters and their default values.
Table 6-1: LAT Parameters
| Parameter | Default Value | |
| Node name | Host name | |
| Multicast timer | 60 seconds | |
| Network adapter | All network
adapters connected to broadcast media, except for NetRAIN virtual interfaces
(nr) and those adapters that compose NetRAIN sets. |
|
| Service name | From the LAT node name parameter. Each service has the following parameters: | |
| Parameter | Default Value | |
| Service description | "Compaq Tru64 UNIX Version X.X LAT SERVICE" | |
| Rating | Dynamic | |
| Group code | 0 | |
| Agent status | Disabled | |
| Outgoing port groups | Group 0 | |
| Maximum number of learned services | 100 | |
If you want to customize LAT on your system, you can create and modify
the
/etc/latstartup.conf
file to include
latcp
commands.
For example, you can define a particular node name or
add service names.
Note
If your system is a member of a cluster, you must create the
/etc/latstartup.conffile as a Context-Dependent Symbolic Link (CDSL). See the System Administration manual for more information.
Example 6-1
shows a sample
/etc/latstartup.conf
file.
Example 6-1: Sample /etc/latstartup.conf File
/usr/sbin/latcp -n testnode     [1]
/usr/sbin/latcp -A -a lattelnet14 -i "LAT/telnet" -o  [2]
/usr/sbin/latcp -A -a testservice     [3]
/usr/sbin/latcp -g 0,21,52 -a testservice     [4]
/usr/sbin/latcp -A -a boundservice -p 620,621     [5]
/usr/sbin/latcp -c200    [6]
/usr/sbin/latcp -A -p 630 -O -V finance     [7]
/usr/sbin/latcp -u 0,1,41,97    [8]
/usr/sbin/latcp -e ln0    [9]
Changes the LAT node name. [Return to example]
Adds an optional service that can be used for LAT/Telnet connections. (See Section 6.11 for more information on the LAT/Telnet gateway.) [Return to example]
Adds an unbound interactive
testservice
service.
[Return to example]
Adds groups 0, 21, and 52 to the
testservice
service.
[Return to example]
Adds a bound service and binds to it two LAT devices: 620 and 621, which are SVR4-style LAT devices. [Return to example]
Increases the number of learned services to 200. [Return to example]
Maps an outgoing port to
finance
service.
[Return to example]
Adds outgoing port groups 0, 1, 41, and 97. [Return to example]
Adds the
ln0
adapter.
[Return to example]
latcp
command that adds a service must
occur in the
latstartup.conf
file before a
latcp
command requiring the service name.
Lines 3 and 4 in
Example 6-1
illustrate this point.
You can
modify the
/etc/inittab
file to use a program other than
getty.
For example, you can add the following entry to
/etc/inittab
to configure LAT device 620 to use the user-defined
program
myownprogram:
lat620:34:respawn:/usr/sbin/myownprogram /dev/lat/620
The previous example uses an absolute pathname for the device
/dev/lat/620.
For more information on using user-defined programs with LAT, see
Section 6.12.
For more information on the
/etc/inittab
file and the
getty
utility, see
inittab(4)
and
getty(8).
You can also modify the
/etc/inittab
file to add
LAT devices created manually after the initial configuration by adding an
entry similar to the following:
lat621:34:respawn:/usr/sbin/getty lat/621 console vt100
The second field (34) specifies the run level in which the entries will
be processed.
In this example, the
getty
process is spawned
at either run level 3 or 4.
In addition, this example uses a relative pathname
lat/621.
6.7 Running LAT Over Specific Network Adapters
If your system is
configured with multiple network adapters, by default the
latcp
program attempts to start the LAT protocol on all adapters that can support
it (which excludes NetRAIN virtual interfaces and the adapters that compose
NetRAIN sets).
For adapters connected to different logical networks, this
is probably desirable.
However, for adapters connected to a single logical
network, you should specify that the LAT protocol run over only one adapter.
To specify the adapter, add the
latcp -e
adapter
command to the
/etc/latstartup.conf
file.
See
latcp(8)
for more information.
Use the
netstat -i
command to determine the
adapters defined on your system.
6.8 Setting Up Printers
Before you set
up a printer to print through LAT you should be familiar with setting up printers.
See the
System Administration
manual,
printconfig(8),
lprsetup.dat(4), and
lprsetup(8)
for information on setting up printers.
In addition, you need the following
information:
The name of the terminal server to which the printer will be attached
Either or both of the following:
The name of the port to which the printer will be attached
The name of the service assigned for the remote printer
Terminal server documentation
Printer documentation
This section provides information on how to set up a printer to print through LAT, using host-initiated connections.
Note
The examples in this section use the DECserver 700 server. Please refer to the documentation supplied for your terminal server.
6.8.1 Setting Up the Printer on a Terminal Server
To set up a printer, do the following:
Connect the printer to a serial interface on a terminal server.
Use the terminal server commands specified in the terminal server documentation to set up the server to allow access to the attached remote printer through host-initiated requests from the service node. (Service node refers to the local Tru64 UNIX LAT host.)
Use the printer documentation to determine your printer's character size, flow control, parity, and speed.
Compare the printer's characteristics to the terminal server's port settings. You can display the settings on the terminal server console by entering a command similar to the following:
Local>SHOW PORT 7 CHARACTERISTICS
This command displays the characteristics for port 7. Minimally, the terminal server should have settings for the port similar to the following:
| Character Size: | Printer's character size |
| Flow Control: | XON (or -CTS/RTS, for some printers) |
| Speed: | Printer's speed |
| Access: | Remote |
| Autobaud: | Disabled |
| Autoconnect: | Disabled |
If the terminal server's port settings do not match the printer's
characteristics, define the terminal server's port settings by using the
DEFINE
command.
For example:
Local>DEFINE PORT 7 SPEED 9600
After you define the settings for the port, log out of that port to initialize the new settings. For example:
Local>LOGOUT PORT 7
6.8.2 Testing the Port Configuration
To verify that the printer characteristics match in
the printer and in the terminal server port, use the
TEST PORT
command on the terminal server.
For example, if the configuration is correct,
the following command run on a DECserver 700 prints a test pattern of characters
on a printer attached to port 7:
Local>TEST PORT 7
The printer prints 24 lines of test data unless you press the Break
key at the terminal server console.
If data does not print or if it is incorrect,
the port or the printer is incorrectly set, or there is a hardware problem.
6.8.3 Setting Up a Service Node for the Printer
On the service node (local LAT host), use the
latcp
command to map an unused application port with the remote
port or remote service on the terminal server.
Use the terminal server name
and either the name of the port or the name of the service for the printer
from
Section 6.8.1.
For example, the following command maps the local application port 621 for the server LOCSER to the remote printer port port07.
#latcp -A -p 621 -H LOCSER -R port07
The following command specifies the remote printer service name instead of the remote print port:
#latcp -A -p 621 -H LOCSER -V REMprinter07
For more information, see
latcp(8).
6.8.4 Setting Up the Print Spooler on the Service Node
To set up the print spooler for the remote printer, use the
lprsetup
command.
The following symbols must be set in the
printcap
file for the service node (local LAT host) to access the
remote printer through host-initiated connections:
ct -- Connection type
lp -- Device name to open for output
The following example shows an
/etc/printcap
entry
for a LAT printer:
    lp25|lp0:\
            :af=/usr/adm/lpacct:\
            :ct=LAT:\   [1]
            :lf=/usr/adm/lperr:\
            :lp=/dev/lat/621:\    [2]
            :mx#0:\
            :of=/usr/lbin/lpf:\
            :sd=/usr/spool/lpd:
Specifies LAT for the ct symbol. [Return to example]
Specifies the LAT application port (tty
device) that was used in the
latcp
command to set up the
service node.
You must specify the full path name for the lp symbol.
[Return to example]
After you set up the printer, print a file to ensure
everything works properly.
For example, if the printer name is lp25 and
test
is a text file, you can test the printer by issuing the following
command:
#lpr -Plp25 test
If the printer does not work, verify that all the settings are correct.
If the
printcap
file entry has an lf symbol defined, you
can check the corresponding log file for error information.
6.9 Setting Up Host-Initiated Connections
A host-initiated connection is one in which any bit-serial, asynchronous device connected to a terminal server can communicate with user-developed applications on an appropriately configured system. Examples of such devices are terminals, modems, communications ports on other host computer systems, and printers. Printer connections are discussed in Section 6.8.
This section describes how you set up a system for host-initiated connections
and provides guidelines for developing applications to take advantage of these
connections.
6.9.1 Setting Up the System for Host-Initiated Connections
To set up your system for LAT host-initiated connections, do the following:
Use the
latcp -A -p
command
to map an application port (tty device) on the system with a remote port or
service on a terminal server.
In the following example, 623 is the application
port, T1301A is the terminal server name, and PORT_6 is the terminal port
name.
#/usr/sbin/latcp -A -p 623 -HT1301A -R PORT_6
Alternatively, you can specify a service name instead of a port name in the preceding example.
Make sure the protection bits, the owner, and the group of the tty device are set appropriately for the intended use of the connection. If ordinary users will open and read the tty device, you should make the device world readable.
Set up the server port characteristics to match the characteristics of the device connected to the port and to allow host-initiated connections. See your device and terminal server documentation for this information.
Applications that employ host-initiated connections are much like applications for any tty device, with the following exceptions:
The programs communicate with the LAT driver through the device
special file.
When the host program issues an
open
call
on the LAT tty device, the LAT driver attempts to establish a connection to
the target port or service on the target server.
The driver reports success
and failure codes in the
errno
variable.
When the
open
call is successful, the user
program issues
read
and
write
system
calls to handle data transfers, and normal
ioctl
processing
for the device control information.
A
close
system call on the device terminates
the LAT connection.
The
dial.c
application program in the
/usr/examples/lat
directory is an example of a program that can be used with host-initiated
connections.
To access this example, you must install the
OSFEXAMPLES500
optional subset.
The Tru64 UNIX LAT implementation is a STREAMS-based tty design.
When a LAT tty device is opened,
the POSIX line discipline module
ldterm
is pushed onto
the stream above the LAT driver.
If your application does not need the additional
processing provided by
ldterm, it must remove the module
from the stream.
The
lined.c
application program in the
/usr/examples/lat
directory demonstrates how terminal (tty) line
disciplines are changed in a Clist-based tty and a STREAMS tty environment.
To access this example, you must install the
OSFEXAMPLES500
optional subset.
Additionally, you can use the
strchg
command to change the STREAMS configuration of the user's standard input.
For more information, see
autopush(8)
and
strchg(1).
6.10 Setting Up Outgoing Connections
An outgoing connection is one in which a local user
can connect to a service on a remote host by using the
llogin
command.
To accomplish this, a named service on the remote host is associated
with a terminal device special file on the local host.
See
llogin(1)
and the
Command and Shell User's Guide
for information on the
llogin
command.
6.10.1 Setting Up the System for Outgoing Connections
To set up your system for LAT outgoing connections, do the following:
Map an outgoing port (tty device) on the system with a port
or service on a remote system by using the
latcp -A -p
command.
In the following example, 621 is the outgoing port and
REMOTE_SERVICE is the service name on the remote node.
#/usr/sbin/latcp -A -p 621 -O -V REMOTE_SERVICE
Alternatively, you can specify a remote node name and a port name in the preceding example.
Verify that the remote service is a learned service available to your system, by using the following command:
#/usr/sbin/latcp -d -l
If the service is not displayed, the maximum number of learned services has been reached; the service might still be available. When an outgoing connection is attempted, the local host determines whether the remote service is available. If it is available, the outgoing LAT connection is made.
To increase the maximum number of learned services, use the
latcp -c
command.
See
latcp8 and
lat_intro(7)
for more information on learned services.
Applications developed to employ outgoing connections adhere to the same guidelines as applications developed for host-initiated connections. See Section 6.9.2 for more information.
The
getdate.c
application program in the
/usr/examples/lat
directory is as an example of a program that can
be used with outgoing connections.
To access this example, you must install
the
OSFEXAMPLES500
optional subset.
6.11 Setting Up the LAT/Telnet Gateway
The
LAT/Telnet gateway service enables a user on a LAT terminal server to connect
to remote hosts running the Telnet protocol through an intermediate Tru64 UNIX
host.
The user does not have to log in to the local Tru64 UNIX system first.
Optionally, if configured, you can use the
rlogin
command
to connect directly to remote hosts.
To set up the LAT/Telnet gateway, perform the following steps:
Define the LAT/Telnet service by using the
latcp
command.
For example:
#/usr/sbin/latcp -A -a lattelnet -i "LAT/telnet gateway" -o
The
-o
flag specifies that
this is an optional service.
Optional services are used with specialized applications
that are written especially for LAT.
These services are bound to LAT tty
devices for the exclusive use of the specialized applications.
Edit the
/etc/inittab
file and modify the
LAT device entries that you want to spawn the
lattelnet
service you created in step 1.
The LAT terminals you select are dedicated
to the gateway.
The number of terminals selected determines the maximum number
of simultaneous LAT/Telnet gateway sessions the system can deliver.
For example,
the following example shows LAT/Telnet gateway entries for three devices,
which means that this system can deliver 3 simultaneous sessions:
lat624:34:respawn:/usr/sbin/lattelnet  lat/624  lattelnet
lat625:34:respawn:/usr/sbin/lattelnet  lat/625  lattelnet
lat626:34:respawn:/usr/sbin/lattelnet  lat/626  lattelnet
If you want to use the
rlogin
command instead of Telnet,
specify
/usr/bin/rlogin
as the third argument to the
lattelnet
program in the
/etc/inittab
entry.
For example:
lat624:34:respawn:/usr/sbin/lattelnet lat/624 lattelnet /usr/bin/rlogin
Use the
init
program to read the
inittab
file and start the gateway by using the
init
q
command.
Verify that the
lattelnet
process has started
by using the
ps
command.
The
lattelnet
program uses the
syslog
function to log messages to the
/var/adm/syslog.dated/daemon.log
file.
Check this file to verify that no error messages were generated.
Connect to the gateway from the LAT terminal server by entering
the
CONNECT
command.
For example, to connect to a remote
node named REMOTE by using a local node named LOCAL as a gateway, enter:
Local>CONNECT LATTELNET NODE LOCAL DEST REMOTE
You can use the preceding command line for either Telnet
or
rlogin.
Alternatively, if connecting for Telnet, you can enter the service name LATTELNET and wait to be prompted for the remote node desired. The following example shows what occurs when a user on a terminal server connects to the service LATTELNET and waits for a login prompt from remote node MYTRIX:
Local>CONNECT LATTELNETLAT to TELNET gateway on printftelnet>OPEN MYTRIXTrying... Connected to mytrix. Escape character is '^]'. mytrix login:
6.12 Creating Dedicated or Optional Services
Dedicated services can be used in combination with your own specialized
applications.
The following specialized application programs are provided
in the
/usr/examples/lat
directory:
latdate.c
-- Provides a user with
the date and time
latdlogin.c
-- Provides a LAT/DECnet
gateway for logging in over DECnet
Setting up a dedicated service is similar to setting up the LAT/Telnet gateway. (See Section 6.11.) To set up a dedicated service, complete the following steps:
Log in as root.
After you enter and compile the application code, copy the executable to the directory of your choice.
Add the service by using the
latcp -A -a
command.
For example:
#/usr/sbin/latcp -A -a showdate -i "LAT/date service" -o
The
-o
specifies that this
is a dedicated service.
Edit the
/etc/inittab
file and add the
dedicated tty device entries.
For example:
lat630:3:respawn:/usr/sbin/latdate lat/630 showdate
Note
You need an entry in the
/etc/inittabfile for every simultaneous service you want to run. The previous example only allows for one user of thelatdateservice at any one time.
Use the
init
program to read the
inittab
file and start the service by using the
init q
command.
To use the service at a LAT terminal, issue the
CONNECT
command.
For example:
Local>CONNECT SHOWDATE
A Tru64 UNIX host can also offer bound interactive and unbound interactive
services.
See
lat_intro(7)
for more information.
For information on the
commands used to create these services, see
latcp(8).
6.13 Providing a Dedicated tty Device on a Terminal
A terminal connected to a terminal
server port can offer a dedicated tty device on a given Tru64 UNIX LAT host.
The terminal will always be connected to the specified tty device on the
LAT host.
The user at the terminal cannot switch sessions or connect to different
hosts or different tty devices on that host.
6.13.1 Setting Up a Dedicated tty Device
To set up a dedicated tty device on a terminal, perform the following steps:
Determine the name of the terminal server and the port name on which the terminal is connected. The following terminal server commands display the name of the server and the port name, respectively:
Local>SHOW SERVERLocal>SHOW PORT number
The number variable is the number of the port on the terminal server.
On the LAT host, map an application port (tty device) to the
port on the terminal server by using the
latcp -A -p
command.
For example, the following command maps an SVR4 device
(application port 630 to port 2 on the terminal server LATTERM:
#latcp -A -p630 -H LATTERM -R PORT_2
For more information, see
latcp(8).
On the LAT host, add a
getty
entry to the
/etc/inittab
file for the tty device that was mapped as an application
port.
For example:
lat630:34:respawn:/usr/sbin/getty lat/630 console vt100
On the terminal server, define the port's access to be REMOTE and log out from the port. For example:
Local>DEFINE PORT 2 ACCESS REMOTELocal>LOGOUT PORT 2
Press Return on the terminal connected to the terminal server port that you just set up. When the system prompt is displayed, the terminal is connected to the dedicated tty device.
If you need to repeat the procedure, remove the
getty
entry from the
/etc/inittab
file, issue the
init
q
command, and start the procedure from the beginning.
6.13.2 Removing a Dedicated tty Device
To remove a dedicated tty device from a terminal port and allow the terminal connected to the port to connect to any host, do the following:
Log in to another terminal on the same server.
Set the port's access to LOCAL and log out from the port. For example:
Local>DEFINE PORT 2 ACCESS LOCALLocal>LOGOUT PORT 2
Unmap the application port and remove the
getty
entry from the
/etc/inittab
file.