The
Visual Administrator, also called
dxlsm, is the graphical
user interface for the LSM software.
This interface is designed primarily
for disk and volume operations, but also provides a limited set of file system
operations.
This appendix provides an overview of Visual Administrator features
and use.
B.1 Starting the Visual Administrator
To start the LSM Visual Administrator, you must be logged into an account that has root privileges.
To start
dxlsm, enter:
#dxlsm
The system displays the following message in a pop up window:
dxlsm is coming up, please wait.
When
dxlsm
starts, two LSM windows display:
The main LSM Visual Administrator window
The View of rootdg window
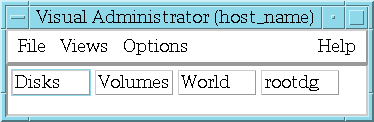
B.1.1 The Visual Administrator Main Window
The Visual Administrator main window contains a menu bar and a set of
buttons as shown in
Figure B-1.
If you have RAID subsystems
installed, the main window displays an additional Subsystems button.
Figure B-1: Visual Administrator Main Window
To display and manipulate different parts of the physical and logical storage systems, click on the View button. Each view window title includes the name of the machine on which the session is running. The main window contains a button for every view on the system.
The Visual Administrator has two types of views: default and user-created.
You cannot remove or rename default views.
B.1.1.1 Default Views
From the main window, click on the following view buttons to access the default view window:
| View Buttons | Window | Access |
| Disks | View of Disks | Displays all physical disks on the system |
| Volumes | View of Volumes | Displays all volumes, plexes, and associated subdisks on the system |
| World | View of World | Displays everything on the system including physical and LSM disks, volumes, and other objects |
| rootdg | View of rootdg | Displays everything in the default disk group,
rootdg, including LSM disks, volumes, and other objects |
A user-created view is a view window defined to focus on a part of a system. For example, you can create a view window for each disk group. Create a new view window with the Views menu on the main window. Creating this window will place a new button on the window. Once the view is created, you can add icons by selecting an icon from another view and either using the Icon menu Create Icons option or dragging and dropping the selected icon.
User-created views thus contain copies of icons from default views.
Operations performed on these icon copies are reflected in the default views
that display the affected icons.
However, icons that appear in user-created
views are not always updated when the icons are altered in the default view.
B.1.2 The View of rootdg Window
Immediately after the main window appears, the View of rootdg window
appears.
This view displays icons representing everything that is in the
rootdg
disk group.
Whenever possible, perform operations in the
View of rootdg window or in another disk group view.
Figure B-2
shows a view of a rootdg window that
contains two volumes.
Figure B-2: View of rootdg

A two- or three-button mouse is required to use the Visual Administrator.
Table B-1
describes the mouse buttons.
Unless otherwise stated,
all directions to select or click on an item refer to the left mouse button
(MB1).
Right-click refers to the right mouse button for both two- and three-
button access.
Table B-1: Default Mouse Buttons
| Virtual Mouse Button | 3-Button Access | 2-Button Access | Function |
| MB1 | Left | Left | Selects a single icon. |
| MB2 | Middle | Ctrl -Left | Selects either one or multiple icons simultaneously. |
| MB3 | Right | Right | Displays either the properties form or the analysis statistics form for that object, depending on whether the icon is undergoing analysis. |
| Shift -MB1 | Shift -Left | Shift -Left | Toggles between minimizing and maximizing an icon. |
| Shift -MB2 | Shift -Middle | Ctrl -Right | Toggles between starting and stopping projection on the selected icon. |
| Shift -MB3 | Shift -Right | Shift -Right | Displays the properties form for the object, regardless of whether analysis is in effect. |
An icon can be deselected by positioning the pointer over that icon and clicking MB2. This works regardless of which mouse button was used to select the icon.
Note
The examples in this document assume that you are using a three-button mouse, set up according to Table A-1. It is possible to redefine mouse buttons (using the
xmodmapcommand, for example). See your X Window System documentation for details.
The Visual Administrator interface uses icons to represent LSM objects (volumes, plexes, subdisks, and disks.)
Disk groups are represented as view windows rather than icons. The icons representing LSM disks, volumes, and other objects belonging to a particular disk group are all displayed within the view of the disk group.
Note
Icons representing all elements of the system are displayed in the View of World window accessed with the World button on the Visual Administrator window.
Figure B-3
shows how the Visual Administrator represents
LSM objects.
Figure B-3: Icons That Represent LSM Objects

With some operations, icons are
updated almost instantly to reflect the results of the operation just performed.
During other operations, it may take time for a particular icon to update
itself.
While being updated, icons are prevented from accepting input or undergoing
configuration changes.
Inaccessible icons are grayed out.
B.3.2 Manipulating Icons
There are two ways to manipulate icons:
Select-Operate. With this option you select an icon representing an LSM object (click on the icon or click MB2 on multiple icons) and perform the desired operation on that object by selecting from window menus.
Drag and Drop. With this option you drag the icon of the selected object (hold down MB1 and move the mouse until the outline of the icon reaches the desired location) and drop it (release the mouse) elsewhere, such as on another object in a view window.
When dropping an icon onto another icon, the dragged icon must be positioned
so that the pointer (in the image of a hand) is directly over an unobscured
portion of the icon on which it is to be dropped.
Table B-2
describes drag and drop operations:
Table B-2: Drag and Drop Operations
| Icon Type | Drop Location | Action |
| Free subdisk | View window | Creates a plex and associates the subdisk with the plex. |
| Free subdisk | LSM disk | Creates an identical subdisk on the disk. |
| Free subdisk | Plex | Associates the subdisk with the plex. |
| Associated subdisk | Free subdisk | Swaps the associated subdisk with the free subdisk. The free subdisk becomes associated and replaces the original subdisk, which is removed. |
| Associated subdisk | LSM disk | Creates an identical free subdisk on the LSM disk, then swaps the associated subdisk with the new free subdisk. The free subdisk becomes associated and replaces the original subdisk, which is removed. |
| Associated subdisk | View window | Dissociates the subdisk. |
| Associated plex | View window | Dissociates the plex. |
| Dissociated plex | User's view window | Copies the plex icon to the user's view. |
| Plex | Volume | Associates the plex to the volume. |
| Disk | User's view window | Copies the physical or LSM disk icon to the user's view. |
| Volume | User's view window | Copies the volume icon to the user's view. |
| LSM disk | Disk group view | Adds an LSM disk (corresponding to the slice, simple, or nopriv disk) to that disk group. |
The Visual Administrator provides pull-down menus that provide access to various Visual Administrator features.
Menus are located in the menu bar just below the window's title.
B.5 Forms
The Visual Administrator uses forms to present textual information. These forms also provide useful information about existing objects and configurations.
There are two types of forms:
General forms usually appear during menu-selected operations or setup requests and accept or require user input.
Properties forms display detailed information about a specific object's characteristics, some of which can be modified directly. Access properties forms by clicking MB3 on the chosen icon. (If the icon is undergoing analysis, use Shift-MB3).
Many forms require information in order to proceed with an operation.
If a required field in the form is either left blank or is incorrect, an error
will result.
Other fields already contain information (such as default values),
which you can either alter or accept.
Yet other fields are read-only; these
fields beep if you attempt to change them.
B.5.2 Form Error Messages
Error messages are displayed if you select Apply with incorrect fields
on a form.
A message is printed at the bottom of the form just above the buttons,
and you can correct the values for those fields.
If the error cannot be corrected
or the operation is no longer desired, select Cancel.
B.6 Error and Warning Messages
The Visual Administrator uses dialog boxes to present error or warning
messages.
When a message is displayed, you cannot proceed until you select
one of the buttons displayed in the error dialog box.
Some warning boxes announce
that a prerequisite is not met and require you to acknowledge this by clicking
the Continue button before reattempting the operation.
B.7 Help Windows
You can access online help text from the menu bar of the main window and from the view windows. Help text is also available through the Help option in submenus or through the Help button at the bottom of forms. The Help window contains information about the current window, menu, form, or operation.
At the bottom of each Help window is a SEE ALSO area that lists related Help topics. To access any of the listed Help topics, click on the appropriate words in the SEE ALSO list. The Help facility keeps track of the order in which Help topics are visited, so you can move between topics by selecting Previous or Next from the menu bar.
The Help menu in the menu bar of the Help window itself provides access to the following information:
| General Help | Accesses Help text that includes general information on the Visual Administrator Help facility and how it is used. |
| Help Index | Accesses a complete listing of the available Help topics arranged in logical groupings. Once a topic is identified from this list, that topic can be directly accessed from the SEE ALSO section of this Help window, which lists all topics alphabetically. |
To close the Help window, select the Close option from the File menu. The record of help topics visited is retained.