The Tru64 UNIX system provides several tools you can use to debug the kernel and kernel programs. The Ladebug debugger (available as an option) is also capable of debugging the kernel.
This chapter describes three debuggers and a utility for analyzing crash dumps:
The
dbx
debugger, which is described for
kernel debugging in
Section 2.1.
(For general
dbx
user information, see the
Programmer's Guide.)
You can use the
dbx
debugger to display the values
of kernel variables and kernel structures.
However, you must understand the
structures and be prepared to follow the address links to find the information
you need.
You cannot use
dbx
alone to control execution
of the running kernel, for example by setting breakpoints.
The
kdbx
debugger, which is described in
Section 2.2.
The
kdbx
debugger is an interface to
dbx
that is tailored specifically to debugging kernel code.
The
kdbx
debugger has knowledge of the structure of kernel data and
so displays kernel data in a readable format.
Also,
kdbx
is extensible, allowing you to create commands that are tailored to your kernel-debugging
needs.
(Chapter 3
describes how to tailor
the
kdbx
debugger.) However, you cannot use
dbx
command line editing features when you use the
kdbx
debugger.
The
kdebug
debugger, which is described
in
Section 2.3.
The
kdebug
debugger is a kernel-debugging program
that resides inside the kernel.
Working with a remote version of the
dbx
debugger, the
kdebug
debugger allows you
to set breakpoints in and control the execution of kernel programs and the
kernel.
The
crashdc
utility, which is described
in
Section 2.4.
The
crashdc
utility is a crash dump analysis tool.
This utility is useful when you need to determine why the system is hanging
or crashing.
The sections that follow describe how to use these tools to debug the kernel and kernel programs.
Note
Starting with Tru64 UNIX Version 5.0, all the previously mentioned tools can be used with compressed (
vmzcore.n) and uncompressed (vmcore.n) crash dump files. Older versions of these tools can read onlyvmcore.nfiles. If you are using an older version of a tool, use theexpand_dumputility to produce avmcore.nfile from avmzcore.nfile. For more information about compressed and uncompressed crash dump files, seeexpand_dump(8) and the System Administration manual.
The
dbx
debugger is a symbolic debugger that allows you to examine, modify, and display
the variables and data structures found in stripped or nonstripped kernel
images.
The following sections describe how to invoke the
dbx
debugger for kernel debugging (Section 2.1.1)
and how to use its commands to perform tasks such as the following:
Debugging stripped images (Section 2.1.2)
Specifying the location of loadable modules for crash dumps (Section 2.1.3)
Examining memory contents (Section 2.1.4)
Displaying the values of kernel variables, and the value and format of kernel data structures (Section 2.1.5)
Displaying the format of a data structure (Section 2.1.6)
Debugging multiple threads (Section 2.1.7)
Examining the exception frame (Section 2.1.8)
Examining the user program stack (Section 2.1.9)
Extracting the preserved message buffer (Section 2.1.10)
Debugging on SMP systems (Section 2.1.11)
For more information on
dbx, see the
Programmer's Guide.
2.1.1 Invoking the dbx Debugger for Kernel Debugging
To debug kernel code with the
dbx
debugger,
you use the
-k
flag.
This flag causes
dbx
to map memory addresses.
When you use the
dbx -k
command, the debugger operates on two separate files that reflect
the current state of the kernel that you want to examine.
These files are
as follows:
The disk version of the executable kernel image
The system core memory image
These files may be files from a running system, such as
/vmunix
and
/dev/mem, or dump files, such as
vmunix.n
and
vmzcore.n
(compressed) or
vmcore.n
(uncompressed).
By default, crash dump files are created in the
/var/adm/crash
directory (see the
System Administration
manual).
Note
You might need to be the superuser (
rootlogin) to examine the running system or crash dump files produced bysavecore. Whether you need to be the superuser depends on the directory and file protections for the files you attempt to examine with thedbxdebugger.
Use the following
dbx
command to examine the running
system:
#dbx -k /vmunix /dev/mem
Use a
dbx
command similar to the following to examine a compressed or uncompressed crash
dump file, respectively:
#dbx -k vmunix.1 vmzcore.1#dbx -k vmunix.1 vmcore.1
The version number (.1, in this example) is determined by the value
contained in the
bounds
file, which is located in the same
directory as the dump files.
2.1.2 Debugging Stripped Images
By default, the kernel is compiled with a debugging flag that does
not strip all of the symbol table information from the executable kernel image.
The kernel is also partially optimized during the compilation process by default.
If the kernel or any other file is fully optimized and stripped of all symbol
table information during compilation, your ability to debug the file is greatly
reduced.
However, the
dbx
debugger provides commands to
aid you in debugging stripped images.
When you attempt to display the contents of a symbol during a debugging session, you might encounter messages such as the following:
No local symbols.Undefined symbol.Inactive symbol.
These messages might indicate that you are debugging a stripped image.
To see the contents of all symbols during a debugging session, you can leave the debugging session, rebuild all stripped modules (but do not strip them), and reenter the debugging session. However, on certain occasions, you might want to add a symbol table to your current debugging session rather than end the session and start a new one. To add a symbol table to your current debugging session, follow these steps:
Go to a window other than the one in which the debugger is running, or put the debugger in the background, and rebuild the modules for which you need a symbol table.
Once the modules build correctly, use the
ostrip
command to strip a symbol table out of the resulting executable
file.
For example, if your executable file is named
kernel_program, issue a command such as the following one:
%/usr/ucb/ostrip -t kernel_program
The
-t
flag causes the
ostrip
command to produce
two files.
One, named
kernel_program, is the stripped executable
image.
The other, named
kernel_program.stb, contains the
symbol table information for the
kernel_program
module.
(For more information about the
ostrip
command, see
ostrip(1).)
Return to the debugging session and add the symbol table file
by issuing the
dbx
command
stbadd
as
follows:
dbx>stbadd kernel_program.stb
You can specify an absolute or relative pathname on the
stbadd
command line.
Once you issue this command, you can display the contents of symbols included in the symbol table just as if you had built the module you are debugging without stripping.
You can also delete symbol tables from a debugging session using the
dbx
command
stbdel.
For more information about
this command, see
dbx(1).
2.1.3 Specifying the Location of Loadable Modules for Crash Dumps
When a crash dump occurs, the location of any loadable modules used
by the kernel is recorded in the crash dump file, enabling
dbx
to find the modules.
If the version of a loadable module that was running
when the crash occurred is moved to a different location,
dbx
will not find it.
You can specify the directory path where
dbx
should look for loadable modules by using any one of the following methods
(see
dbx(1)
for complete details):
On the
dbx
command line, specify the directory
path with the
-module_path
option.
For example:
#dbx -k vmunix.1 vmzcore.1 -module_path /project4/mod_dir
Before invoking
dbx, set the environment
variable
DBX_MODULE_PATH.
For example:
#setenv DBX_MODULE_PATH /project4/mod_dir
During the
dbx
session, if you want to
load a module dynamically, first set the
$module_path
dbx
variable and then use
the
addobj
command to load the module, as in the following
example:
(dbx)set $module_path /project4/mod_dir(dbx)addobj kmodC
To verify that modules are being loaded from the correct location, turn on verbose module-loading using any one of the following methods:
Specify the
-module_verbose
dbx
command option.
Set the
DBX_MODULE_VERBOSE
environment
variable to any integer value.
Set the
$module_verbose
dbx
variable to a nonzero value.
2.1.4 Examining Memory Contents
To examine memory contents with
dbx, use the following
syntax:
address/count[mode]
The
count
argument specifies the number of
items that the debugger displays at the specified
address,
and the
mode
argument determines how
dbx
displays memory.
If you omit the
mode
argument, the debugger uses the previous mode.
The initial default mode is
X
(hexadecimal).
Table 2-1
lists the
dbx
address modes.
Table 2-1: The dbx Address Modes
| Mode | Description |
b |
Displays a byte in octal. |
c |
Displays a byte as a character. |
d |
Displays a short word in decimal. |
D |
Displays a long word in decimal. |
f |
Displays a single precision real number. |
g |
Displays a double precision real number. |
i |
Displays machine instructions. |
n |
Displays data in typed format. |
o |
Displays a short word in octal. |
O |
Displays a long word in octal. |
s |
Displays a string of characters that ends in a null. |
x |
Displays a short word in hexadecimal. |
X |
Displays a long word in hexadecimal. |
The following examples show how to use
dbx
to examine
kernel images:
(dbx)_realstart/Xfffffc00002a4008: c020000243c4153e(dbx)_realstart/i[_realstart:153, 0xfffffc00002a4008] subq sp, 0x20, sp(dbx)_realstart/10i[_realstart:153, 0xfffffc00002a4008] subq sp, 0x20, sp [_realstart:154, 0xfffffc00002a400c] br r1, 0xfffffc00002a4018 [_realstart:156, 0xfffffc00002a4010] call_pal 0x4994e0 [_realstart:157, 0xfffffc00002a4014] bgt r31, 0xfffffc00002a3018 [_realstart:171, 0xfffffc00002a4018] ldq gp, 0(r1) [_realstart:172, 0xfffffc00002a401c] stq r31, 24(sp) [_realstart:177, 0xfffffc00002a4020] bis r16, r31, r9 [_realstart:178, 0xfffffc00002a4024] bis r17, r31, r10 [_realstart:179, 0xfffffc00002a4028] bis r18, r31, r11 [_realstart:181, 0xfffffc00002a402c] bis r19, r31, r12
2.1.5 Printing the Values of Variables and Data Structures
You can use the
print
command to examine values of variables and data structures.
The
print
command has the following syntax:
print
expression
p
expression
For example:
(dbx)print utsnamestruct { sysname = "OSF1" nodename = "system.dec.com" release = "V5.0" version = "688.2" machine = "alpha" }
Note that
dbx
has a default alias of
p
for
print:
(dbx)p utsname
2.1.6 Displaying a Data Structure Format
You can use the
whatis
command to display the format for many of the kernel data structures.
The
whatis
command has the following syntax:
whatis
typename
The following example displays the
itimerval
data structure:
(dbx)whatis struct itimervalstruct itimerval { struct timeval { int tv_sec; int tv_usec; } it_interval; struct timeval { int tv_sec; int tv_usec; } it_value; };
2.1.7 Debugging Multiple Threads
You can use the
dbx
debugger to examine the state
of the kernel's threads with the querying and scoping commands described in
this section.
You use these commands to show process and thread lists and
to change the debugger's context (by setting its current process and thread
variables) so that a stack trace for a particular thread can be displayed.
Use these commands to examine the state of the kernel's threads:
print $tidDisplay the thread ID of the current thread
print $pidDisplay the process ID of the current process
whereDisplay a stack trace for the current thread
tlistDisplay a list of kernel threads for the current process
kpsDisplay a list of processes
(not available when used with
kdebug)
set $pid=process_idChange the context to another process (a process ID of 0 changes context to the kernel)
tset
thread_id
Change the context to another thread
tstack Displays the stack trace for all threads.
2.1.8 Examining the Exception Frame
When
you work with a crash dump file to debug your code, you can use
dbx
to examine the exception frame.
The exception frame is a stack
frame created during an exception.
It contains the registers that define the
state of the routine that was running at the time of the exception.
Refer
to the
/usr/include/machine/reg.h
header file to determine
where registers are stored in the exception frame.
The
savedefp
variable contains the location of the exception frame.
(Note that no exception frames are created when you force a system to dump,
as described in the
System Administration
manual.)
The following
example shows an example exception frame:
(dbx)print savedefp/33Xffffffff9618d940: 0000000000000000 fffffc000046f888 ffffffff9618d950: ffffffff86329ed0 0000000079cd612f ffffffff9618d960: 000000000000007d 0000000000000001 ffffffff9618d970: 0000000000000000 fffffc000046f4e0 ffffffff9618d980: 0000000000000000 ffffffff9618a2f8 ffffffff9618d990: 0000000140012b20 0000000000000000 ffffffff9618d9a0: 000000014002ee10 0000000000000000 ffffffff9618d9b0: 00000001400075e8 0000000140026240 ffffffff9618d9c0: ffffffff9618daf0 ffffffff8635af20 ffffffff9618d9d0: ffffffff9618dac0 00000000000001b0 ffffffff9618d9e0: fffffc00004941b8 0000000000000000 ffffffff9618d9f0: 0000000000000001 fffffc000028951c ffffffff9618da00: 0000000000000000 0000000000000fff ffffffff9618da10: 0000000140026240 0000000000000000 ffffffff9618da20: 0000000000000000 fffffc000047acd0 ffffffff9618da30: 0000000000901402 0000000000001001 ffffffff9618da40: 0000000000002000
2.1.9 Examining the User Program Stack
When debugging a crash dump with
dbx, you can examine
the call stack of the user program whose execution precipitated the kernel
crash.
To examine a crash dump and also view the user program stack, you must
invoke dbx using the following command syntax:
dbx -k vmunix.n vm[z]core.n path/user-program
The version number (n) is determined by the
value contained in the
bounds
file, which is located in
the same directory as the dump files.
The
user-program
parameter specifies the user program executable.
The crash dump file must contain a full crash dump.
For information
on setting system defaults for full or partial crash dumps, see the
System Administration
manual.
You can use the
assign
command in
dbx, as shown in the following example, to temporarily specify a full
crash dump.
This setting stays in effect until the system is rebooted.
#dbx -k vmunix.3dbx version 5.0 . . . (dbx)assign partial_dump=0
To specify a full crash dump permanently so that this setting remains
in effect after a reboot, use the
patch
command in
dbx, as shown in the following example:
(dbx)patch partial_dump=0
With either command, a
partial_dump
value of
1
specifies a partial dump.
The following example shows how to examine the state of a user program
named
test1
that purposely precipitated a kernel crash
with a
syscall
after several recursive calls:
#dbx -k vmunix.1 vmzcore.1 /usr/proj7/test1dbx version 5.0 Type 'help' for help. stopped at [boot:1890 ,0xfffffc000041ebe8] Source not available warning: Files compiled -g3: parameter values probably wrong (dbx)where[1]> 0 boot() ["../../../../src/kernel/arch/alpha/machdep.c":1890, 0xfffffc000041ebe8] 1 panic(0xfffffc000051e1e0, 0x8, 0x0, 0x0, 0xffffffff888c3a38)["../../../../src/kernel/bsd/subr_prf.c":824, 0xfffffc0000281974] 2 syscall(0x2d, 0x1, 0xffffffff888c3ce0, 0x9aa1e00000000, 0x0) ["../../../../src/kernel/arch/alpha/syscall_trap.c":593, 0xfffffc0000423be4] 3 _Xsyscall(0x8, 0x3ff8010f9f8, 0x140008130, 0xaa, 0x3ffc0097b70) ["../../../../src/kernel/arch/alpha/locore.s":1409, 0xfffffc000041b0f4] 4 __syscall(0x0, 0x0, 0x0, 0x0, 0x0) [0x3ff8010f9f4] 5 justtryme(scall = 170, cpu = 0, levels = 25) ["test1.c":14, 0x120001310]6 recurse(inbox = (...)) ["test1.c":28, 0x1200013c4] 7 recurse(inbox = (...)) ["test1.c":30, 0x120001400] 8 recurse(inbox = (...)) ["test1.c":30, 0x120001400] 9 recurse(inbox = (...)) ["test1.c":30, 0x120001400] . . . 30 recurse(inbox = (...)) ["test1.c":30, 0x120001400] 31 main(argc = 3, argv = 0x11ffffd08) ["test1.c":52, 0x120001518](dbx)up 8[2]recurse: 30 if (r.a[2] > 0) recurse(r);(dbx)print r[3]struct { a = { [0] 170 [1] 0 [2] 2 [3] 0 . . . (dbx)print r.a[511][4]25 (dbx)
The
where
command
displays the kernel stack followed by the user program stack at the time of
the crash.
In this case, the kernel stack has 4 activation levels; the user
program stack starts with the fifth level and includes several recursive calls.
[Return to example]
The
up 8
command moves
the debugging context 8 activation levels up the stack to one of the recursive
calls within the user program code.
[Return to example]
The
print r
command
displays the current value of the variable
r, which is
a structure of array elements.
Full symbolization is available for the user
program, assuming it was compiled with the
-g
option.
[Return to example]
The
print r.a[511]
command displays the current value of array element 511 of structure
r.
[Return to example]
The preserved message buffer (pmsgbuf) contains information such as the firmware version, operating
system version, pc value, and device configuration.
You can use
dbx
to extract the preserved message buffer from a running system
or dump files.
For example:
(dbx)print *pmsgbufstruct { msg_magic = 405601 msg_bufx = 1537 msg_bufr = 1537 msg_bufc = "Alpha boot: available memory from 0x7c6000 to 0x6000000 Tru64 UNIX V5.0; Sun Jan 03 11:20:36 EST 1999 physical memory = 96.00 megabytes. available memory = 84.57 megabytes. using 360 buffers containing 2.81 megabytes of memory tc0 at nexus scc0 at tc0 slot 7 asc0 at tc0 slot 6 rz1 at scsi0 target 1 lun 0 (LID=0) (DEC RZ25 (C) DEC 0700) rz2 at scsi0 target 2 lun 0 (LID=1) (DEC RZ25 (C) DEC 0700) rz3 at scsi0 target 3 lun 0 (LID=2) (DEC RZ26 (C) DEC T384) rz4 at scsi0 target 4 lun 0 (LID=3) (DEC RRD42 (C) DEC 4.5d) tz5 at scsi0 target 5 lun 0 (DEC TLZ06 (C)DEC 0374) scsi1 at tc0 slot 7 fb0 at tc0 slot 8 1280X1024 ln0: DEC LANCE Module Name: PMAD-BA ln0 at tc0 slot 7
.
.
.
2.1.11 Debugging on SMP Systems
Debugging in an SMP environment can be difficult because an SMP system optimized for performance keeps the minimum of lock debug information.
The Tru64 UNIX system supports a lock mode to facilitate debugging
SMP locking problems.
The lock mode is implemented in the
lockmode
boot time system attribute.
By default, the
lockmode
attribute is set to a value between 0 and 3, depending upon whether the system
is an SMP system and whether the
RT_PREEMPTION_OPT
attribute
is set.
(This attribute optimizes system performance.)
For debugging purposes, set the
lockmode
attribute
to 4.
Follow these steps to set the
lockmode
attribute
to 4:
Create a stanza-formatted file named, for example,
generic.stanza
that appears as follows:
generic:
    lockmode=4
The contents of this file indicate that you
are modifying the
lockmode
attribute of the
generic
subsystem.
Add the new definition of
lockmode
to the
/etc/sysconfigtab
database:
#sysconfigdb -a -f generic.stanza generic
Reboot your system.
Some of the debugging features provided with
lockmode
set to 4 are as follows:
Automatic lock hierarchy checking and minimum
spl
checking when any kernel lock is acquired (assuming a
lockinfo
structure exists for the lock class in question).
This
checking helps you find potential deadlock situations.
Lock initialization checking.
Additional debug information maintenance, including information about simple and complex locks.
For simple locks, the system records an array of the
last 32 simple locks which were acquired on the system (slock_debug).
The system creates a
slock_debug
array for
each CPU in the system.
For complex locks, the system records the locks owned by each thread in the thread structure (up to eight complex locks).
To get a list of the complex locks a thread is holding use these commands:
#dbx -k /vmunix(dbx)print thread->lock_addr{ [0] 0xe4000002a67e0030 [1] 0xc3e0005b47ff0411 [2] 0xb67e0030a6130048 [3] 0xa67e0030d34254e5 [4] 0x279f0200481e1617 [5] 0x4ae33738a7730040 [6] 0x477c0101471c0019 [7] 0xb453004047210402 }(dbx)print slock_debug{ [0] 0xfffffc000065c580 [1] 0xfffffc000065c780 }
Lock statistics are recorded to allow you to determine what
kind of contention you have on a particular lock.
Use the
kdbx
lockstats
extension as shown in the following example to display
lock statistics:
#kdbx /vmunix(kdbx)lockstatsLockstats li_name cpu count tries misses %misses waitsum waitmax waitmin trmax =========== ===================== === ====== ========== ======= ====== ============ ======= ======= ====== k0x00657d40 inode.i_io_lock 1 1784 74268 1936 2.61 110533 500 6 10 k0x00653400 nfs_daemon_lock 0 1 7 0 0.00 0 0 0 0 k0x00657d80 nfs_daemon_lock 1 1 0 0 0.00 0 0 0 0 k0x00653440 lk_lmf 0 1 0 0 0.00 0 0 0 0 k0x00657dc0 lk_lmf 1 1 2 0 0.00 0 0 0 0 k0x00653480 procfs_global_lock 0 1 3 0 0.00 0 0 0 0 k0x00657e00 procfs_global_lock 1 1 5 0 0.00 0 0 0 0 k0x006534c0 procfs.pr_trace_lock 0 40 0 0 0.00 0 0 0 0 k0x00657e40 procfs.pr_trace_lock 1 40 0 0 0.00 0 0 0
The
kdbx
debugger is a crash analysis and kernel debugging tool; it
serves as a front end to the
dbx
debugger.
The
kdbx
debugger is extensible, customizable, and insensitive to changes
to offsets and field sizes in structures.
The only dependencies on kernel
header files are for bit definitions in flag fields.
The
kdbx
debugger has facilities for interpreting
various symbols and kernel data structures.
It can format and display these
symbols and data structures in the following ways:
In a predefined form as specified in the source code modules
that currently accompany the
kdbx
debugger
As defined in user-written source code modules according to
a standardized format for the contents of the
kdbx
modules
All
dbx
commands (except signals such as
Ctrl/P) are available when you use the
kdbx
debugger.
In
general,
kdbx
assumes hexadecimal addresses for commands
that perform input and output.
As with
dbx, you can use
kdbx
to examine the call stack of the user program whose execution precipitated
a kernel crash (see
Section 2.1.9).
The sections that follow explain using
kdbx
to debug
kernel programs.
2.2.1 Beginning a kdbx Session
Using the
kdbx
debugger,
you can examine the running kernel or dump files created by the
savecore
utility.
In either case, you examine an object file and
a core file.
For running systems, these files are usually
/vmunix
and
/dev/mem, respectively.
By default, crash
dump files are created in the
/var/adm/crash
directory
(see the
System Administration
manual).
Use the following
kdbx
command to examine a running
system:
#kdbx -k /vmunix /dev/mem
Use a
kdbx
command similar to the following to examine a compressed or uncompressed crash
dump file, respectively:
#kdbx -k vmunix.1 vmzcore.1#kdbx -k vmunix.1 vmcore.1
The version number (.1 in this example) is determined
by the value contained in the
bounds
file, which is located
in the same directory as the dump files.
To examine a crash dump file and also view the call stack of the user program whose execution precipitated the kernel crash, you must invoke kdbx using the following command syntax:
kdbx -k vmunix.n vm[z]core.n path/user-program
For more information, see Section 2.1.9.
When you begin a debugging session,
kdbx
reads and
executes the commands in the system initialization file
/var/kdbx/system.kdbxrc.
The initialization file contains setup commands and alias definitions.
(For a list of
kdbx
aliases, see the
kdbx(1)
reference page.)
You can further customize the
kdbx
environment by adding
commands and aliases to:
The
/var/kdbx/site.kdbxrc
file
This file contains customized commands and alias definitions for a particular system.
The
~/.kdbxrc
file
This file contains customized commands and alias definitions for a specific user.
The
./.kdbxrc
file
This file contains customized commands and alias definitions for a specific
project.
This file must reside in the current working directory when
kdbx
is invoked.
2.2.2 The kdbx Debugger Commands
The
kdbx
debugger provides the following commands:
alias [name] [command-string]
Sets or displays aliases.
If you omit all arguments,
alias
displays all aliases.
If you specify the variable
name,
alias
displays the alias for
name, if one exists.
If you specify
name
and
command-string,
alias
establishes
name
as an alias for
command-string.
context proc | user
Sets context to the user's aliases or the extension's aliases. This command is used only by the extensions.
coredata
start_address end_address
Dumps, in hexadecimal, the contents of the core file starting at start_address and ending before end_address.
dbx
command-string
Passes
the
command-string
to
dbx.
Specifying
dbx
is optional; if
kdbx
does not recognize a
command, it automatically passes that command to
dbx.
See
the
dbx(1)
reference page for a complete description of
dbx
commands.
help [-long] [args]pr [flags] [extensions] [arguments]
Executes an extension and gives it control of the
kdbx
session until it quits.
You specify the name of the extension
in
extension
and pass arguments to it in
arguments.
-debugCauses
kdbx
to display input to and output from the extension on the screen.
-pipe
in_pipe out_pipeUsed in conjunction with the
dbx
debugger
for debugging extensions.
See
Chapter 3
for
information on using the
-pipe
flag.
-print_outputCauses
the output of the extension to be sent to the invoker of the extension without
interpretation as
kdbx
commands.
-redirect_outputUsed by extensions that execute other extensions to redirect the output from the called extensions; otherwise, the user receives the output.
-ttyCauses
kdbx
to communicate with the subprocess through a terminal line
instead of pipes.
If you specify the
-pipe
flag,
proc
ignores it.
print
string
Displays string on the terminal. If this command is used by an extension, the terminal receives no output.
quitsource [-x] [file(s)]
Reads and interprets files as
kdbx
commands in the context of the current aliases.
If the you
specify the
-x
flag, the debugger displays commands
as they are executed.
unalias
name
The
kdbx
debugger contains
many predefined aliases, which are defined in the
kdbx
startup file
/var/kdbx/system.kdbxrc.
2.2.3 Using kdbx Debugger Extensions
In addition to its commands, the
kdbx
debugger provides extensions.
You execute extensions using the
kdbx
command
pr.
For example, to execute the
arp
extension, you enter this command:
kdbx>pr arp
Some extensions
are provided with your Tru64 UNIX system and reside in the
/var/kdbx
directory.
Aliases for each of these extensions are also provided
that let you omit the
pr
command from an extension command
line.
Thus, another way to execute the
arp
extension is
to enter the following command:
kdbx>arp
This command has the
same effect as the
pr arp
command.
You can create your own
kdbx
extensions as described
in
Chapter 3.
For extensions that display addresses as part of their output, some use a shorthand notation for the upper 32-bits of an address to keep the output readable. The following table lists the notation for each address type.
| Notation | Address Type | Replaces | Example |
v |
virtual | ffffffff |
v0x902416f0 |
e |
virtual | fffffffe |
e0x12340000 |
k |
kseg | fffffc00 |
k0x00487c48 |
u |
user space | 00000000 |
u0x86406200 |
? |
Unrecognized or random type | |
?0x3782cc33 |
The sections that follow describe the
kdbx
extensions
that are supplied with your system.
2.2.3.1 Displaying the Address Resolution Protocol Table
The
arp
extension displays the contents of the address resolution protocol
(arp) table.
The
arp
extension has the
following form:
arp
[-]
If you specify the optional hyphen (-),
arp
displays the entire
arp
table; otherwise,
it displays those entries that have nonzero values in the
iaddr.s_addr
and
at_flags
fields.
For example:
(kdbx)arpNAME BUCK SLOT IPADDR ETHERADDR MHOLD TIMER FLAGS =================== ==== ==== ============ =============== ===== ===== ===== sys1.zk3.dec.com 11 0 16.140.128.4 170.0.4.0.91.8 0 450 3 sys2.zk3.dec.com 18 0 16.140.128.1 0.0.c.1.8.e8 0 194 3 sys3.zk3.dec.com 31 0 16.140.128.6 8.0.2b.24.23.64 0 539 103
2.2.3.2 Performing Commands on Array Elements
The
array_action
extension performs a command action on each element
of an array.
This extension allows you to step through any array in the operating
system kernel and display specific components or values as described in the
list of command flags.
This extension has the following format:
array_action
"type"
length
start_address
[ flags
]
command
The arguments to the
array_action
extension
are as follows:
"type
"The type of address of an element in the specified array.
The number of elements in the specified array.
The address
of an array.
The address can be specified as a variable name or a number.
The more common syntax or notation used to refer to the
start_address
is usually of the form
&arrayname[0].
If the you specify
the
-head
flag, the next argument appears as the
table header.
If the you specify the
-size
flag, the next
argument is used as the array element size; otherwise, the size is calculated
from the element type.
If the you specify the
-cond
flag, the next
argument is used as a filter.
It is evaluated by
dbx
for
each array element, and if it evaluates to TRUE, the action is taken on the
element.
The same substitutions that are applied to the command are applied
to the condition.
The
kdbx
or
dbx
command to perform on each element
of the specified array.
Note
The
kdbxdebugger includes several aliases, such asfile_action, that may be easier to use than using thearray_actionextension directly.
Substitutions similar to
printf
can be performed
on the command for each array element.
The possible substitutions are as follows:
| Conversion Character | Description |
%a |
Address of element |
%c |
Cast of address to pointer to array element |
%i |
Index of element within the array |
%s |
Size of element |
%t |
Type of pointer to element |
For example:
(kdbx)array_action "struct kernargs *" 11 &kernargs[0] p %c.name0xfffffc00004737f8 = "askme" 0xfffffc0000473800 = "bufpages" 0xfffffc0000473810 = "nbuf" 0xfffffc0000473818 = "memlimit" 0xfffffc0000473828 = "pmap_debug" 0xfffffc0000473838 = "syscalltrace" 0xfffffc0000473848 = "boothowto" 0xfffffc0000473858 = "do_virtual_tables" 0xfffffc0000473870 = "netblk" 0xfffffc0000473878 = "zalloc_physical" 0xfffffc0000473888 = "trap_debug" (kdbx)
2.2.3.3 Displaying the Buffer Table
The
buf
extension displays the
buffer
table.
This
extension has the following format:
buf
[ addresses
-free
| -all
]
If you omit arguments, the debugger displays the buffers on the hash list.
If you specify addresses, the debugger displays the buffers at those
addresses.
Use the
-free
flag to display buffers
on the free list.
Use the
-all
flag to display first
buffers on the hash list, followed by buffers on the free list.
For example:
(kdbx)bufBUF MAJ MIN BLOCK COUNT SIZE RESID VNO FWD BACK FLAGS =========== === ===== ====== ===== ===== ===== =========== =========== =========== =========== Bufs on hash lists: v0x904e1b30 8 2 54016 8192 8192 0 v0x902220d0 v0x904f23a8 v0x904e1d20 write cache v0x904e21f8 8 1025 131722 1024 8192 0 v0x90279800 v0x904e3748 v0x904e22f0 write cache v0x904e46c8 8 1025 107952 2048 8192 0 v0x90220fa8 v0x904e22f0 v0x904e23e8 read cache v0x904e9ef0 8 2050 199216 8192 8192 0 v0x90221560 v0x904f2b68 v0x904e66c0 read cache v0x904df758 8 1025 107968 8192 8192 0 v0x90220fa8 v0x904eac80 v0x904df378 write cache v0x904eb538 8 2050 223840 8192 8192 0 v0x90221560 v0x904ec990 v0x904eb440 read v0x904e5930 8 2050 379600 8192 8192 0 v0x90221560 v0x904f3fc0 v0x904ec5b0 read cache v0x904eae70 8 2050 625392 2048 8192 0 v0x90221560 v0x904df378 v0x904e08c8 write cache v0x904f3ec8 8 1025 18048 8192 8192 0 v0x90220fa8 v0x904dff18 v0x904e1560 write cache
.
.
.
(kdbx)
2.2.3.4 Displaying the Callout Table and Absolute Callout Table
The
callout
extension displays the callout table.
This extension has
the following format:
callout
For example:
(kdbx)calloutProcessor: 0 Current time (in ticks): 615421360 FUNCTION ARGUMENT TICKS(delta) ============================= ============ ============ realitexpire k0x008ab220 30772 wakeup k0x005d98e0 36541 wakeup k0x0187a220 374923 thread_timeout k0x010ee950 376286 thread_timeout k0x0132f220 40724481 realitexpire k0x01069950 80436086 thread_timeout k0x01bba950 82582849
The
abscallout
extension displays the absolute callout
table.
This table contains callout entries with the absolute time in fractions
of seconds.
This extension has the following format:
abscallout
For example:
(kdbx)abscalloutProcessor: 0 FUNCTION ARGUMENT SECONDS ============================= =========== ============= psx4_tod_expire k0x01580808 86386.734375 psx4_tod_expire k0x01580840 172786.734375 psx4_tod_expire k0x01580878 259186.734375 psx4_tod_expire k0x015808b0 345586.718750 psx4_tod_expire k0x015808e8 431986.718750 psx4_tod_expire k0x01580920 518386.718750 psx4_tod_expire k0x01580958 604786.750000 psx4_tod_expire k0x01580990 691186.750000 psx4_tod_expire k0x015809c8 777586.750000 psx4_tod_expire k0x01580a00 863986.750000
2.2.3.5 Casting Information Stored in a Specific Address
The
cast
extension forces
dbx
to display part of
memory as the specified type and is equivalent to the following command:
dbx print *((type
)
address
)
The
cast
extension has the following format:
cast
address
type
For example:
(kdbx)cast 0xffffffff903e3828 char'^@'
2.2.3.6 Displaying Machine Configuration
The
config
extension displays the configuration of the machine.
This
extension has the following format:
config
For example:
(kdbx)configBus #0 (0xfffffc000048c6a0): Name - "tc" Connected to - "nexus" Config 1 - tcconfl1 Config 2 - tcconfl2 Controller "scc" (0xfffffc000048c970) (kdbx)
2.2.3.7 Converting the Base of Numbers
The
convert
extension converts numbers from one base to another.
This
extension has the following format:
convert
[-in [ 8 | 10 | 16 ] ]
[-out [ 2 | 8 | 10 | 16 ] ]
[args]
The
-in
and
-out
flags specify the input and output bases, respectively.
If you omit
-in, the input base is inferred from the arguments.
The arguments
can be numbers or variables.
For example:
(kdbx)convert -in 16 -out 10 864c2a142253138452 (kdbx)
2.2.3.8 Displaying CPU Use Statistics
The
cpustat
extension displays statistics about CPU use.
Statistics
displayed include percentages of time the CPU spends in the following states:
Running user level code
Running system level code
Running at a priority set with the
nice()
function
Idle
Waiting (idle with input or output pending)
This extension has the following format:
cpustat
[
-update n
]
[
-cpu n
]
The
-update
flag specifies that
kdbx
update the output every
n
seconds.
The
-cpu
flag controls the CPU for which
kdbx
displays statistics.
By default,
kdbx
displays
statistics for all CPUs in the system.
For example:
(kdbx)cpustatCpu User (%) Nice (%) System (%) Idle (%) Wait (%) ===== ========== ========== ========== ========== ========== 0 0.23 0.00 0.08 99.64 0.05 1 0.21 0.00 0.06 99.68 0.05
2.2.3.9 Disassembling Instructions
The
dis
extension disassembles
some number of instructions.
This extension has the following format:
dis
start-address
[num-instructions]
The num-instructions, argument specifies the number of instructions to be disassembled. The start-address argument specifies the starting address of the instructions. If you omit the num-instructions argument, 1 is assumed.
For example:
(kdbx)dis 0xffffffff864c2a08 5[., 0xffffffff864c2a08] call_pal 0x20001 [., 0xffffffff864c2a0c] call_pal 0x800000 [., 0xffffffff864c2a10] ldg $f18, -13304(r3) [., 0xffffffff864c2a14] bgt r31, 0xffffffff864c2a14 [., 0xffffffff864c2a18] call_pal 0x4573d0 (kdbx)
2.2.3.10 Displaying Remote Exported Entries
The
export
extension displays the exported entries that are mounted
remotely.
This extension has the following format:
export
For example:
(kdbx)exportADDR EXPORT MAJ MIN INUM GEN MAP FLAGS PATH ================== === ===== ===== ========== ==== ===== ================= 0xffffffff863bfe40 8 4098 2 1308854383 -2 0 /cdrom 0xffffffff863bfdc0 8 2050 67619 736519799 -2 0 /usr/users/user2 0xffffffff863bfe00 8 2050 15263 731712009 -2 0 /usr/staff/user 0xffffffff863bfe80 8 1024 6528 731270099 -2 0 /mnt
2.2.3.11 Displaying the File Table
The
file
extension displays the file table.
This extension has the
following format:
file
[addresses]
If you omit the arguments, the extension displays file entries with nonzero reference counts; otherwise, it displays the file entries located at the specified addresses.
For example:
(kdbx)fileAddr Type Ref Msg Fileops f_data Cred Offset Flags =========== ==== === === ======= =========== =========== ====== ===== v0x90406000 file 4 0 vnops v0x90259550 v0x863d5540 68 r w v0x90406058 file 1 0 vnops v0x9025b5b8 v0x863d5e00 4096 r v0x904060b0 file 1 0 vnops v0x90233908 v0x863d5d60 0 r v0x90406108 file 2 0 vnops v0x90233908 v0x863d5d60 602 w v0x90406160 file 2 0 vnops v0x90228d78 v0x863d5b80 904 r v0x904061b8 sock 2 0 sockops v0x863b5c08 v0x863d5c20 0 r w v0x90406210 file 1 0 vnops v0x90239e10 v0x863d5c20 2038 r v0x90406268 file 1 0 vnops v0x90245140 v0x863d5c20 301 w a v0x904062c0 file 3 0 vnops v0x90227880 v0x863d5900 23 r w v0x90406318 file 2 0 vnops v0x90228b90 v0x863d5c20 856 r v0x90406370 sock 2 0 sockops v0x863b5a08 v0x863d5c20 0 r w
.
.
.
2.2.3.12 Displaying the udb and tcb Tables
The
inpcb
extension displays the
udb
and
tcb
tables.
This extension has the following format:
inpcb
[-udp]
[-tcp]
[addresses]
If you omit the arguments,
kdbx
displays
both tables.
If you specify the
-udp
flag or the
-tcp
flag, the debugger displays the corresponding table.
If you specify the
address
argument, the
inpcb
extension ignores the
-udp
and
-tcp
flags and displays entries located at the specified address.
For example:
(kdbx)inpcb -tcpTCP: Foreign Host FPort Local Host LPort Socket PCB Options 0.0.0.0 0 0.0.0.0 47621 u0x00000000 u0x00000000 system.dec.com 6000 comput.dec.com 1451 v0x8643f408 v0x863da408 system.dec.com 998 comput.dec.com 1020 v0x8643fc08 v0x863da208 system.dec.com 999 comput.dec.com 514 v0x8643ac08 v0x8643d008 system.dec.com 6000 comput.dec.com 1450 v0x863fba08 v0x863dad08 system.dec.com 1008 comput.dec.com 1021 v0x86431e08 v0x86414708 system.dec.com 1009 comput.dec.com 514 v0x86412808 v0x8643ce08 system.dec.com 6000 comput.dec.com 1449 v0x86436608 v0x86415e08 system.dec.com 6000 comput.dec.com 1448 v0x86431808 v0x863daa08
.
.
.
0.0.0.0 0 0.0.0.0 806 v0x863e3e08 v0x863dbe08 0.0.0.0 0 0.0.0.0 793 v0x863d1808 v0x8635a708 0.0.0.0 0 0.0.0.0 0 v0x86394408 v0x8635b008 0.0.0.0 0 0.0.0.0 1024 v0x86394208 v0x8635b108 0.0.0.0 0 0.0.0.0 111 v0x863d1e08 v0x8635b208
2.2.3.13 Performing Commands on Lists
The
list_action
extension performs some command on each element of a
linked list.
This extension provides the capability to step through any linked
list in the operating system kernel and display particular components.
This
extension has the following format:
list_action
"type"
next-field
end-addr
start-addr
[flags]
command
The arguments to the
list_action
extension
are as follows:
"type
"The type of an element in the specified list.
The name of the field that points to the next element.
The value of the next field that terminates the list. If the list is NULL-terminated, the value of the end-addr argument is zero (0). If the list is circular, the value of the end-addr argument is equal to the start-addr argument.
The address of the list. This argument can be a variable name or a number address.
Use the
-head
header
flag to display the
header
argument as the table header.
Use the
-cond
arg
flag to filter input as specified by
arg.
The debugger
evaluates the condition for each array element, and if it evaluates to true,
the action is taken on the element.
The same substitutions that are applied
to the command are applied to the condition.
The debugger command to perform on each element of the list.
The
kdbx
debugger includes several aliases, such
as
procaddr, that might be easier than using the
list_action
extension directly.
The
kdbx
debugger applies substitutions in the same
style as
printf
substitutions for each command element.
The possible substitutions are as follows:
| Conversion Character | Description |
%a |
Address of an element |
%c |
Cast of an address to a pointer to a list element |
%i |
Index of an element within the list |
%n |
Name of the next field |
%t |
Type of pointer to an element |
For example:
(kdbx)list_action "struct proc *" p_nxt 0 allproc p \ %c.task.u_address.uu_comm %c.p_pid"list_action" 1382 "dbx" 1380 "kdbx" 1379 "dbx" 1301 "kdbx" 1300 "sh" 1296 "ksh" 1294 "csh" 1288 "rlogind" 1287
.
.
.
2.2.3.14 Displaying the lockstats Structures
The
lockstats
extension displays the lock statistics contained in the
lockstats
structures.
Statistics are kept for each lock class on
each CPU in the system.
These structures provide the following information:
The address of the structure
The class of lock for which lock statistics are being recorded
The CPU for which the lock statistics are being recorded
The number of instances of the lock
The number of times processes have tried to get the lock
The number of times processes have tried to get the lock and missed
The percentage of time processes miss the lock
The total time processes have spent waiting for the lock
The maximum amount of time a single process has waited for the lock
The minimum amount of time a single process has waited for the lock
The lock statistics recorded in the
lockstats
structures are dynamic.
This extension is available only when the
lockmode
system attribute is set to 4.
This extension has the following format:
lockstats
-class
name
| -cpu number
| -read
| -sum
| -total
| -updaten
If you omit all flags,
lockstats
displays
statistics for all lock classes on all CPUs.
The following describes the flags
you can use:
-class
nameDisplays the
lockstats
structures for the
specified lock class.
(Use the
lockinfo
command to display
information about the names of lock classes.)
-cpu
number
Displays the
lockstats
structures for the
specified CPU.
-readDisplays the reads, sleeps attributes, and waitsums or misses.
-sumDisplays summary data for all CPUs and all lock types.
-totalDisplays summary data for all CPUs.
-update
n
Updates the display every n seconds.
For example:
(kdbx)lockstatsLockstats li_name cpu count tries misses %misses waitsum waitmax waitmin trmax =========== ==================== === ====== ========== ======= ======= ============ ======= ======= ======== k0x00657d40 inode.i_io_lock 1 1784 74268 1936 2.61 110533 500 6 10 k0x00653400 nfs_daemon_lock 0 1 7 0 0.00 0 0 0 0 k0x00657d80 nfs_daemon_lock 1 1 0 0 0.00 0 0 0 0 k0x00653440 lk_lmf 0 1 0 0 0.00 0 0 0 0 k0x00657dc0 lk_lmf 1 1 2 0 0.00 0 0 0 0 k0x00653480 procfs_global_lock 0 1 3 0 0.00 0 0 0 0 k0x00657e00 procfs_global_lock 1 1 5 0 0.00 0 0 0 0 k0x006534c0 procfs.pr_trace_lock 0 40 0 0 0.00 0 0 0 0 k0x00657e40 procfs.pr_trace_lock 1 40 0 0 0.00 0 0 0 0
.
.
.
2.2.3.15 Displaying lockinfo Structures
The
lockinfo
extension displays static lock class information contained
in the
lockinfo
structures.
Each lock class is recorded
in one
lockinfo
structure, which contains the following
information:
The address of the structure
The index into the array of
lockinfo
structures
The class of lock for which information is provided
The number of instances of the lock
The lock flag, as defined in the
/sys/include/sys/lock.h
header file
This extension is available only when the
lockmode
system attribute is set to 4.
This extension has the following format:
lockinfo
[-class name]
The
-class
flag allows you to display the
lockinfo
structure for a particular class of locks.
If you omit
the flag,
lockinfo
displays the
lockinfo
structures for all classes of locks.
For example:
(kdbx)lockinfoLockinfo Index li_name li_count li_flgspl ================== ===== =========================== ========== ========= xfffffc0000652030 3 cfg_subsys_lock 21 0xd0 0xfffffc0000652040 4 subsys_tbl_lock 1 0xc0 0xfffffc0000652050 5 inode.i_io_lock 4348 0x90 0xfffffc0000652060 6 nfs_daemon_lock 1 0xc0 0xfffffc0000652070 7 lk_lmf 1 0xc0 0xfffffc0000652080 8 procfs_global_lock 1 0xc0 0xfffffc0000652090 9 procfs.pr_trace_lock 40 0xc0 0xfffffc00006520a0 10 procnode.prc_ioctl_lock 0 0xc0 0xfffffc00006520b0 11 semidq_lock 1 0xc0 0xfffffc00006520c0 12 semid_lock 16 0xc0 0xfffffc00006520d0 13 undo_lock 1 0xc0 0xfffffc00006520e0 14 msgidq_lock 1 0xc0 0xfffffc00006520f0 15 msgid_lock 64 0xc0 0xfffffc0000652100 16 pgrphash_lock 1 0xc0 0xfffffc0000652110 17 proc_relation_lock 1 0xc0 0xfffffc0000652120 18 pgrp.pg_lock 20 0xd0
2.2.3.16 Displaying the Mount Table
The
mount
extension displays the mount table, and has the following
format:
mount
[-s]
[address]
The
-s
flag displays a short form
of the table.
If you specify one or more addresses,
kdbx
displays the mount entries named by the addresses.
For example:
(kdbx)mountMOUNT MAJ MIN VNODE ROOTVP TYPE PATH FLAGS =========== ===== ===== ============ =========== ==== ======================== ===== v0x8196bb30 8 0 NULL v0x8a75f600 ufs / loc v0x8196a910 v0x8a62de00 v0x8a684e00 nfs /share/cia/build/alpha.dsk5 ro v0x8196aae0 v0x8a646800 v0x8a625400 nfs /share/xor/build/agosminor.dsk1 ro v0x8196acb0 v0x8a684800 v0x8a649400 nfs /share/buffer/build/submits.dsk2 ro v0x8196ae80 v0x8a67ea00 v0x8a774800 nfs /share/cia/build/goldos.dsk6 ro v0x8196b050 v0x8a67c400 v0x8a767800 nfs /usr/staff/alpha1/user v0x8196b220 v0x8a651800 v0x8a781000 nfs /usr/sde ro v0x8196b3f0 8 2050 v0x8a61ca00 v0x8a77fe00 ufs /usr3 loc v0x8196b5c0 8 7 v0x8a61c000 v0x8a79c200 ufs /usr2 loc v0x8196b790 8 6 v0x8a5c4800 v0x8a760600 ufs /usr loc v0x8196b960 0 0 v0x8a5c5000 NULL procfs /proc
2.2.3.17 Displaying the Namecache Structures
The
namecache
extension displays the namecache structures on the system,
and has the following format:
namecache
For example:
(kdbx)namecachenamecache nc_vp nc_vpid nc_nlen nc_dvp nc_name =========== =========== ======= ======= ============ ============= v0x9047b2c0 v0x9021f4f8 24 4 v0x9021e5b8 sbin v0x9047b310 v0x9021e988 0 11 v0x9021e7a0 swapdefault v0x9047b360 v0x9021e5b8 0 2 v0x9021e7a0 .. v0x9047b3b0 v0x9021e7a0 199 3 v0x9021e5b8 dev v0x9047b400 v0x9021ed58 0 4 v0x9021eb70 rz1g v0x9047b4a0 v0x9021f128 0 4 v0x9021e7a0 init v0x9047b4f0 v0x9021f310 0 7 v0x9021e5b8 upgrade v0x9047b540 v0x9021fab0 20 3 v0x9021e5b8 etc v0x9047b590 v0x9021f6e0 0 7 v0x9021f4f8 inittab v0x9047b5e0 v0x9021eb70 28 3 v0x9021e5b8 var v0x9047b630 v0x9021f310 34 3 v0x9021e5b8 usr v0x9047b6d0 v0x9021fc98 0 7 v0x9021eb70 console v0x9047b720 v0x9021fe80 0 2 v0x9021e7a0 sh v0x9047b770 v0x90220068 0 3 v0x9021f4f8 nls v0x9047b810 v0x90220250 0 8 v0x9021e7a0 bcheckrc v0x9047b8b0 v0x90220438 0 4 v0x9021e7a0 fsck v0x9047b900 v0x90220620 0 5 v0x9021f4f8 fstab v0x9047b950 v0x90220808 0 8 v0x9021e7a0 ufs_fsck v0x9047b9a0 v0x902209f0 0 4 v0x9021eb70 rz1a v0x9047b9f0 v0x90220bd8 0 5 v0x9021eb70 rrz1a
.
.
.
2.2.3.18 Displaying Processes' Open Files
The
ofile
extension displays the open files of processes and has the
following format.
ofile
[
-proc
address
| -pid pid
| -v
]
If you omit arguments,
ofile
displays the
files opened by each process.
If you specify
-proc
address
or
-pid
pid
the extension displays the open files owned by the
specified process.
The
-v
flag displays more information
about the open files.
For example:
(kdbx)ofile -pid 1136 -vProc=0xffffffff9041e980 pid= 1136 ADDR_FILE f_cnt ADDR_VNODE V_TYPE V_TAG USECNT V_MOUNT INO# QSIZE =========== ===== =========== ====== ====== ====== =========== ====== ===== v0x90408520 27 v0x902c1390 VCHR VT_UFS 3 v0x863abab8 1103 0 v0x90408520 27 v0x902c1390 VCHR VT_UFS 3 v0x863abab8 1103 0 v0x90408520 27 v0x902c1390 VCHR VT_UFS 3 v0x863abab8 1103 0 v0x90408368 1 v0x9026e6b8 VDIR VT_UFS 18 v0x863ab728 64253 512
2.2.3.19 Converting the Contents of Memory to Symbols
The
paddr
extension converts a range of memory to
symbolic references and has the following format:
paddr
address
number-of-longwords
The arguments to the
paddr
extension are
as follows:
The starting address.
The number of longwords to display.
For example:
(kdbx)paddr 0xffffffff90be36d8 20[., 0xffffffff90be36d8]: [h_kmem_free_memory_:824, 0xfffffc000037f47c] 0x0000000000000000 [., 0xffffffff90be36e8]: [., 0xffffffff8b300d30] [hardclock:394, 0xfffffc00002a7d5c] [., 0xffffffff90be36f8]: 0x0000000000000000 [., 0xffffffff863828a0] [., 0xffffffff90be3708]: [setconf:133, 0xfffffc00004949b0] [., 0xffffffff90be39f4] [., 0xffffffff90be3718]: 0x00000000000004e0 [thread_wakeup_prim:858, 0xfffffc0000328454] [., 0xffffffff90be3728]: 0x0000000000000001 0xffffffff0000000c [., 0xffffffff90be3738]: [., 0xffffffff9024e518] [hardclock:394, 0xfffffc00002a7d5c] [., 0xffffffff90be3748]: 0x00000000004d5ff8 0xffffffffffffffd4 [., 0xffffffff90be3758]: 0x00000000000bc688 [setconf:133, 0xfffffc00004946f0] [., 0xffffffff90be3768]: [thread_wakeup_prim:901, 0xfffffc00003284d0] 0x000003ff85ef4ca0
2.2.3.20 Displaying the Process Control Block for a Thread
The
pcb
extension displays the process control block for a given thread
structure located at
thread_address.
The extension
also displays the contents of integer and floating-point registers (if nonzero).
This extension has the following format:
pcb
thread_address
For example:
(kdbx)pcb 0xffffffff863a5bc0Addr pcb ksp usp pc ps v0x90e8c000 v0x90e8fb88 0x0 0xfffffc00002dc110 0x5 sp ptbr pcb_physaddr 0xffffffff90e8fb88 0x2ad4 0x55aa000 r9 0xffffffff863a5bc0 r10 0xffffffff863867a0 r11 0xffffffff86386790 r13 0x5
2.2.3.21 Formatting Command Arguments
The
printf
extension formats one argument at a time to work around the
dbx
debugger's command length limitation.
It also supports the
%s
string substitution, which the
dbx
debugger's
printf
command does not.
This extension has the following format:
printf
format-string
[args]
The arguments to the
printf
extension are
as follows:
A character string combining literal characters with conversion specifications.
The arguments
for which you want
kdbx
to display values.
For example:
(kdbx)printf "allproc = 0x%lx" allprocallproc = 0xffffffff902356b0
2.2.3.22 Displaying the Process Table
The
proc
extension displays the process table.
This extension has the
following format:
proc
[address]
If you specify an address, the
proc
extension displays
only the
proc
structures at that address; otherwise, the
extension displays all
proc
structures.
For example:
(kdbx)proc
.
.
.
Addr PID PPID PGRP UID NICE SIGCATCH P_SIG Event Flags =========== ===== ===== ===== ===== ==== ======== ======== =========== ============ v0x8191e210 0 0 0 0 0 00000000 00000000 NULL in sys v0x8197cd80 1 0 1 0 0 207a7eff 00000000 NULL in pagv exec v0x8198a210 13 1 13 0 0 00002000 00000000 NULL in pagv v0x819a8d80 120 1 120 0 0 00086001 00000000 NULL in pagv v0x819a8210 122 1 122 0 0 00004001 00000000 NULL in pagv v0x81a14210 5249 1 5267 1138 0 00081000 00000000 NULL in pagv exec v0x819b6210 131 1 131 0 0 20006003 00000000 NULL in pagv v0x81a18d80 5266 5267 5267 1138 0 00080000 00000000 NULL in pagv exec v0x81a2ed80 5267 4938 5267 1138 0 00007efb 00000000 NULL in pagv exec v0x81a42d80 5268 5266 5267 1138 0 00004007 00000000 NULL in pagv exec v0x81a18210 5270 5273 5267 1138 0 00000000 00000000 NULL in pagv exec v0x8198ed80 5273 5266 5267 1138 0 00000000 00000000 NULL in pagv exec v0x81a0ad80 5276 5279 5276 1138 0 01880003 00000000 NULL in pagv ctty exec v0x81a26d80 5278 5249 5278 1138 0 00080002 00000000 NULL in pagv ctty exec v0x819f2d80 5279 1 5267 1138 0 00081000 00000000 NULL in pagv exec v0x81a14d80 5281 1 5267 1138 0 00081000 00000000 NULL in pagv exec v0x81a3cd80 5287 5281 5287 1138 0 01880003 00000000 NULL in pagv ctty exec v0x81a28210 5301 5276 5301 1138 0 00080002 00000000 NULL in pagv ctty exec v0x819aad80 195 1 195 0 0 00080628 00000000 NULL in pagv v0x8197c210 6346 1 6346 0 0 00004006 00000000 NULL in pagv exec v0x819c4210 204 1 0 0 0 00086efe 00000000 NULL in pagv :
2.2.3.23 Converting an Address to a Procedure name
The
procaddr
extension converts the specified address to a procedure
name.
This extension has the following format:
procaddr
[address ]
For example:
(kdbx)procaddr callout.c_funcxpt_pool_free
2.2.3.24 Displaying Sockets from the File Table
The
socket
extension displays those files from the file table that are
sockets with nonzero reference counts.
This extension has the following format:
socket
For example:
(kdbx)socketFileaddr Sockaddr Type PCB Qlen Qlim Scc Rcc =========== =========== ===== =========== ==== ==== === ==== v0x904061b8 v0x863b5c08 DGRAM v0x8632dc88 0 0 0 0 v0x90406370 v0x863b5a08 DGRAM v0x8632db08 0 0 0 0 v0x90406478 v0x863b5808 DGRAM v0x8632da88 0 0 0 0 v0x904064d0 v0x863b5608 DGRAM v0x8632d688 0 0 0 0 v0x904065d8 v0x863b5408 DGRAM v0x8632dc08 0 0 0 0 v0x90406630 v0x863b5208 DGRAM v0x8632d588 0 0 0 0 v0x904067e8 v0x863b4208 DGRAM v0x8632d608 0 0 0 0 v0x90406840 v0x863b4008 DGRAM v0x8632d788 0 0 0 0 v0x904069a0 v0x8641f008 STRM v0x8632c808 0 0 0 0 v0x90406aa8 v0x863b4c08 STRM v0x8632d508 0 2 0 0 v0x90406bb0 v0x863b4e08 STRM v0x8632da08 0 0 0 0
.
.
.
2.2.3.25 Displaying a Summary of the System Information
The
sum
extension displays
a summary of system information and has the following format:
sum
For example:
(kdbx)sumHostname : system.dec.com cpu: DEC3000 - M500 avail: 1 Boot-time: Tue Nov 3 15:01:37 1992 Time: Fri Nov 6 09:59:00 1998 Kernel : OSF1 release 1.2 version 1.2 (alpha) (kdbx)
2.2.3.26 Displaying a Summary of Swap Space
The
swap
extension displays a summary of swap
space and has the following format:
swap
For example:
(kdbx)swapSwap device name Size In Use Free -------------------------------- ---------- ---------- ---------- /dev/rz3b 131072k 32424k 98648k Dumpdev 16384p 4053p 12331p /dev/rz2b 131072k 8k 131064k 16384p 1p 16383p -------------------------------- ---------- ---------- ---------- Total swap partitions: 2 262144k 32432k 229712k 32768p 4054p 28714p (kdbx)
2.2.3.27 Displaying the Task Table
The
task
extension displays the task table.
This extension has the following
format:
task
[proc_address ]
If you specify addresses, the extension displays the task structures named by the argument addresses; otherwise, the debugger displays all tasks.
For example:
(kdbx)task
.
.
.
Task Addr Ref Threads Map Swap_state Utask Addr Proc Addr Pid =========== === ======= =========== ========== =========== =========== ====== v0x8191e000 17 15 v0x808f7ef0 INSWAPPED v0x8191e3b0 v0x8191e210 0 v0x8197cb70 3 1 v0x808f7760 INSWAPPED v0x8197cf20 v0x8197cd80 1 v0x8198a000 3 1 v0x808f7550 INSWAPPED v0x8198a3b0 v0x8198a210 13 v0x819a8b70 3 1 v0x808f7340 INSWAPPED v0x819a8f20 v0x819a8d80 120 v0x819a8000 3 1 v0x808f7290 INSWAPPED v0x819a83b0 v0x819a8210 122 v0x81a14000 3 1 v0x819f1ad0 INSWAPPED v0x81a143b0 v0x81a14210 5249 v0x819b6000 3 1 v0x808f6fd0 INSWAPPED v0x819b63b0 v0x819b6210 131 v0x81a18b70 3 1 v0x819f1a20 INSWAPPED v0x81a18f20 v0x81a18d80 5266 v0x81a2eb70 3 1 v0x819f1340 INSWAPPED v0x81a2ef20 v0x81a2ed80 5267 v0x81a42b70 3 1 v0x819f1080 INSWAPPED v0x81a42f20 v0x81a42d80 5268 v0x81a18000 3 1 v0x819f1970 INSWAPPED v0x81a183b0 v0x81a18210 5270 v0x8198eb70 3 1 v0x808f74a0 INSWAPPED v0x8198ef20 v0x8198ed80 5273 v0x81a0ab70 3 1 v0x819f1ce0 INSWAPPED v0x81a0af20 v0x81a0ad80 5276 v0x81a26b70 3 1 v0x819f1760 INSWAPPED v0x81a26f20 v0x81a26d80 5278 v0x819f2b70 3 1 v0x819f1e40 INSWAPPED v0x819f2f20 v0x819f2d80 5279 v0x81a14b70 3 1 v0x819f1b80 INSWAPPED v0x81a14f20 v0x81a14d80 5281 v0x81a3cb70 3 1 v0x819f11e0 INSWAPPED v0x81a3cf20 v0x81a3cd80 5287 v0x81a28000 3 1 v0x819f1550 INSWAPPED v0x81a283b0 v0x81a28210 5301 v0x819aab70 3 1 v0x808f71e0 INSWAPPED v0x819aaf20 v0x819aad80 195 v0x8197c000 3 1 v0x808f76b0 INSWAPPED v0x8197c3b0 v0x8197c210 6346 v0x819c4000 3 1 v0x808f6e70 INSWAPPED v0x819c43b0 v0x819c4210 204
.
.
.
2.2.3.28 Displaying Information About Threads
The
thread
extension displays information about threads and has the
following format:
thread
[proc_address ]
If you specify addresses, the
thread
extensions
displays thread structures named by the addresses; otherwise, information
about all threads is displayed.
For example:
(kdbx)threadThread Addr Task Addr Proc Addr Event pcb state =========== =========== =========== =========== =========== ===== v0x8644d690 v0x8637e440 v0x9041e830 v0x86420668 v0x90f50000 wait v0x8644d480 v0x8637e1a0 v0x9041eec0 v0x86421068 v0x90f48000 wait v0x863a17b0 v0x86380ba0 v0x9041db10 v0x8640e468 v0x90f30000 wait v0x863a19c0 v0x86380e40 v0x9041d9c0 v0x8641f268 v0x90f2c000 wait v0x8644dcc0 v0x8637ec20 v0x9041e6e0 v0x8641fc00 v0x90f38000 wait v0x863a0520 v0x8637f400 v0x9041ed70 v0x8640ea00 v0x90f3c000 wait v0x863a0310 v0x8637f160 v0x9041e980 u0x00000000 v0x90f44000 run v0x863a2410 v0x863818c0 v0x9041dc60 v0x8640f268 v0x90f18000 wait v0x863a15a0 v0x86380900 v0x9041d480 v0x8641ec00 v0x90f24000 wait
.
.
.
2.2.3.29 Displaying a Stack Trace of Threads
The
trace
extension displays the stack of one or more threads.
This
extension has the following format:
trace
[
thread_address...
| -k
| -u
| -a
]
If you omit arguments,
trace
displays the stack trace
of all threads.
If you specify a list of thread addresses, the debugger displays
the stack trace of the specified threads.
The following table explains the
trace
flags:
-aDisplays the stack trace of the active thread on each CPU
-kDisplays the stack trace of all kernel threads
-uDisplays the stack trace of all user threads
For example:
(kdbx)trace*** stack trace of thread 0xffffffff819af590 pid=0 *** > 0 thread_run(new_thread = 0xffffffff819af928) ["../../../../src/kernel/kern/sched_prim.c":1637, 0xfffffc00002f9368] 1 idle_thread() ["../../../../src/kernel/kern/sched_prim.c":2717, 0xfffffc00002fa32c] *** stack trace of thread 0xffffffff819af1f8 pid=0 *** > 0 thread_block() ["../../../../src/kernel/kern/sched_prim.c":1455, 0xfffffc00002f9084] 1 softclock_main() ["../../../../src/kernel/bsd/kern_clock.c":810, 0xfffffc000023a6d4]
.
.
.
*** stack trace of thread 0xffffffff819fc398 pid=0 *** > 0 thread_block() ["../../../../src/kernel/kern/sched_prim.c":1471, 0xfffffc00002f9118] 1 vm_pageout_loop() ["../../../../src/kernel/vm/vm_pagelru.c":375, 0xfffffc0000395664] 2 vm_pageout() ["../../../../src/kernel/vm/vm_pagelru.c":834, 0xfffffc00003961e0]
.
.
.
*** stack trace of thread 0xffffffff819fce60 pid=2 *** > 0 thread_block() ["../../../../src/kernel/kern/sched_prim.c":1471, 0xfffffc00002f9118] 1 msg_dequeue(message_queue = 0xffffffff819a5970, max_size = 8192, option = 0, tout = 0, kmsgptr = 0xffffffff916e3980) ["../../../../src/kernel/kern/ipc_basics.c":884, 0xfffffc00002e8b54] 2 msg_receive_trap(header = 0xfffffc00005bc150, option = 0, size = 8192, name = 0, tout = 0) ["../../../../src/kernel/kern/ipc_basics.c":1245, 0xfffffc00002e92a4] 3 msg_receive(header = 0xfffffc00005be150, option = 6186352, tout = 0) ["../../../../src/kernel/kern/ipc_basics.c":1107, 0xfffffc00002e904c] 4 ux_handler() ["../../../../src/kernel/builtin/ux_exception.c":221, 0xfffffc000027269c] *** stack trace of thread 0xffffffff81a10730 pid=13 *** > 0 thread_block() ["../../../../src/kernel/kern/sched_prim.c":1471, 0xfffffc00002f9118] 1 mpsleep(chan = 0xffffffff819f3270 = "H4\237\201\377\377\377\377^X0\237\201\377\377\377\377^ ^YR", pri = 296, wmesg = 0xfffffc000042f5e0 = "\200B\260\300B\244KA\340\3038F]\244\377, timo = 0, lockp = (nil), flags = 0) ["../../../../src/kernel/bsd/kern_synch.c":341, 0xfffffc0000250250] 2 sigsuspend(p = 0xffffffff81a04278, args = 0xffffffff9170b8a8, retval = 0xffffffff9170b898)
.
.
.
2.2.3.30 Displaying a u Structure
The
u
extension displays a
u
structure.
This extension
has the following format:
u
[proc-addr]
If you omit arguments, the extension displays the
u
structure of the currently running process.
For example:
(kdbx)u ffffffff9027ff38procp 0x9027ff38 ar0 0x90c85ef8 comm cfgmgr args g B* ü u_ofile_of: 0x86344e30 u_pofile_of: 0x86345030 0 0xffffffff902322d0 1 0xffffffff90232278 2 0xffffffff90232278 3 0xffffffff90232328 4 0xffffffff90232380 Auto-close 5 0xffffffff902324e0 sizes 29 45 2 (clicks) u_outime 0 sigs 40 40 40 40 40 40 40 40 40 40 40 40 40 40 40 40 40 40 40 40 40 40 40 40 40 40 40 40 40 40 40 40 sigmask 0 fffefeff fffefeff fffefeff 0 0 0 0 0 0 0 0 0 fffefeff 0 fffefeff 0 0 0 0 0 0 0 0 0 0 0 0 0 0 0 0 sigonstack 0 oldmask 2000 sigstack 0 0 cdir rdir 901885b8 0 timers start 0 723497702 acflag 193248 (kdbx)
2.2.3.31 Displaying References to the ucred Structure
The
ucred
extension displays all instances of references to
ucred
structures.
This extension has the following format:
ucred
[
-proc
| -uthread
| -file
| -buf
| -refaddr
| -checkaddr
| checkall
]
If you omit all flags,
ucred
displays all
references to
ucred
structures.
The following describes
the flags you can specify:
-procDisplays all
ucreds
referenced by the
proc
structures
-uthreadDisplays all
ucreds
referenced by the
uthread
structures
-fileDisplays all
ucreds
referenced by the file structures
-bufDisplays all
ucreds
referenced by the
buf
structures
-ref
address
Displays all references to a given
ucred
-check
address
Checks the reference count of a particular
ucred
-checkallChecks the reference
count of all
ucreds, with mismatches marked by an asterisk
( * )
For example:
(kdbx)ucredADDR OF UCRED ADDR OF Ref Ref Type cr_ref cr_uid cr_gid cr_ruid =================== ================== ======== ====== ====== ====== ======= 0xffffffff863d4960 0xffffffff90420f90 proc 3 0 1 0 0xffffffff8651fb80 0xffffffff9041e050 proc 18 0 1 0 0xffffffff86525c20 0xffffffff90420270 proc 2 0 1 0 0xffffffff86457ea0 0xffffffff90421380 proc 4 1139 15 1139 0xffffffff86457ea0 0xffffffff9041f6a0 proc 4 1139 15 1139 0xffffffff8651b5e0 0xffffffff9041f010 proc 2 0 1 0 0xffffffff8651efa0 0xffffffff9041e1a0 proc 2 1138 10 1138
.
.
.
0xffffffff863d4960 0xffffffff90fb82e0 uthread 3 0 1 0 0xffffffff8651fb80 0xffffffff90fbc2e0 uthread 18 0 1 0 0xffffffff86525c20 0xffffffff90fb02e0 uthread 2 0 1 0 0xffffffff86457ea0 0xffffffff90f882e0 uthread 4 1139 15 1139 0xffffffff86457ea0 0xffffffff90f902e0 uthread 4 1139 15 1139 0xffffffff8651b5e0 0xffffffff90fc02e0 uthread 2 0 1 0 0xffffffff8651efa0 0xffffffff90fac2e0 uthread 2 1138 10 1138
.
.
.
0xffffffff863d5c20 0xffffffff90406790 file 16 0 0 0 0xffffffff863d5b80 0xffffffff904067e8 file 7 0 0 0 0xffffffff863d5c20 0xffffffff90406840 file 16 0 0 0 0xffffffff863d5b80 0xffffffff90406898 file 7 0 0 0 0xffffffff86456000 0xffffffff904068f0 file 15 1139 15 1139 0xffffffff863d5c20 0xffffffff90406948 file 16 0 0 0
.
.
.(kdbx)ucred -ref 0xffffffff863d5a40ADDR OF UCRED ADDR OF Ref Ref Type cr_ref cr_uid cr_gid cr_ruid =================== ================== ======== ====== ====== ====== ======= 0xffffffff863d5a40 0xffffffff9041c0d0 proc 4 0 0 0 0xffffffff863d5a40 0xffffffff90ebc2e0 uthread 4 0 0 0 0xffffffff863d5a40 0xffffffff90406f78 file 4 0 0 0 0xffffffff863d5a40 0xffffffff90408730 file 4 0 0 0(kdbx)ucred -check 0xffffffff863d5a40ADDR OF UCRED cr_ref Found =================== ====== ======= 0xffffffff863d5a40 4 4
The
unaliasall
extension removes all aliases, including the predefined
aliases.
This extension has the following format:
unaliasall
For example:
(kdbx)unaliasall
2.2.3.33 Displaying the vnode Table
The
vnode
extension displays the
vnode
table and
has the following format:
vnode
[
-free
| -all
| -ufs
| -nfs
| -cdfs
| -advfs
| -fs address
| -u uid
| -g gid
| -v
]
If you omit flags,
vnode
displays ACTIVE
entries in the
vnode
table.
(ACTIVE means that
usecount
is nonzero.) The following describes the flags you can
specify:
-freeDisplays INACTIVE entries
in the
vnode
table
-allPrints ALL (both ACTIVE
and INACTIVE) entries in the
vnode
table
-ufsDisplays all UFS entries
in the
vnode
table
-nfsDisplays all NFS entries
in the
vnode
table
-cdfsDisplays all CDFS entries
in the
vnode
table
-advfsDisplays all ADVFS entries
in the
vnode
table
-fs
address
Displays the
vnode
entries of a mounted file system
-u
uid
Displays
vnode
entries of a particular user
-g
gid
Displays
vnode
entries of a particular group
-vDisplays related
inode,
rnode, or
cdnode
information
(used with
-ufs,
-nfs, or
-cdfs
only)
For example:
(kdbx)vnodeADDR_VNODE V_TYPE V_TAG USECNT V_MOUNT =========== ====== ====== ====== =========== v0x9021e000 VBLK VT_NON 1 k0x00467ee8 v0x9021e1e8 VBLK VT_NON 83 v0x863abab8 v0x9021e3d0 VBLK VT_NON 1 k0x00467ee8 v0x9021e5b8 VDIR VT_UFS 34 v0x863abab8 v0x9021e7a0 VDIR VT_UFS 1 v0x863abab8 v0x9021ed58 VBLK VT_UFS 1 v0x863abab8 v0x9021ef40 VBLK VT_NON 1 k0x00467ee8 v0x9021f128 VREG VT_UFS 3 v0x863abab8 v0x9021f310 VDIR VT_UFS 1 v0x863abab8 v0x9021f8c8 VREG VT_UFS 1 v0x863abab8 v0x9021fe80 VREG VT_UFS 1 v0x863abab8 v0x902209f0 VDIR VT_UFS 1 v0x863abab8 v0x90220fa8 VBLK VT_UFS 9 v0x863abab8 v0x90221190 VBLK VT_NON 1 k0x00467ee8 v0x90221560 VREG VT_UFS 1 v0x863abab8 v0x90221748 VBLK VT_UFS 3153 v0x863abab8
.
.
.(kdbx)vnode -nfs -vADDR_VNODE V_TYPE V_TAG USECNT V_MOUNT FILEID MODE UID GID QSIZE =========== ====== ====== ====== =========== ====== ====== ==== ==== ====== v0x90246820 VDIR VT_NFS 1 v0x863ab560 205732 40751 1138 23 2048 v0x902471a8 VDIR VT_NFS 1 v0x863ab398 378880 40755 1138 10 5120 v0x90247578 VDIR VT_NFS 1 v0x863ab1d0 2 40755 0 0 1024 v0x90247948 VDIR VT_NFS 1 v0x863ab008 116736 40755 1114 0 512 v0x9026d1c0 VDIR VT_NFS 1 v0x863ab1d0 14347 40755 0 10 512 v0x9026e8a0 VDIR VT_NFS 1 v0x863aae40 2 40755 0 10 512 v0x9026ea88 VDIR VT_NFS 1 v0x863ab1d0 36874 40755 0 10 512 v0x90272788 VDIR VT_NFS 1 v0x863ab1d0 67594 40755 0 10 512 v0x902fd080 VREG VT_NFS 1 v0x863ab1d0 49368 100755 8887 177 455168 v0x902ff888 VREG VT_NFS 1 v0x863ab1d0 49289 100755 8887 177 538200 v0x90326410 VREG VT_NFS 1 v0x863aae40 294959 100755 3 4 196608
.
.
.(kdbx)vnode -ufs -vADDR_VNODE V_TYPE V_TAG USECNT V_MOUNT INODE# MODE UID GID QSIZE =========== ====== ====== ====== =========== ====== ====== ==== ==== ====== v0x9021e5b8 VDIR VT_UFS 34 v0x863abab8 2 40755 0 0 1024 v0x9021e7a0 VDIR VT_UFS 1 v0x863abab8 1088 40755 0 0 2560 v0x9021ed58 VBLK VT_UFS 1 v0x863abab8 1175 60600 0 0 0 v0x9021f128 VREG VT_UFS 3 v0x863abab8 7637 100755 3 4 147456 v0x9021f310 VDIR VT_UFS 1 v0x863abab8 8704 40755 3 4 512 v0x9021f8c8 VREG VT_UFS 1 v0x863abab8 7638 100755 3 4 90112 v0x9021fe80 VREG VT_UFS 1 v0x863abab8 7617 100755 3 4 196608 v0x902209f0 VDIR VT_UFS 1 v0x863abab8 9792 41777 0 10 512 v0x90220fa8 VBLK VT_UFS 9 v0x863abab8 1165 60600 0 0 0 v0x90221560 VREG VT_UFS 1 v0x863abab8 7635 100755 3 4 245760 v0x90221748 VBLK VT_UFS 3151 v0x863abab8 1184 60600 0 0 0
.
.
.
The
kdebug
debugger allows you to
debug running kernel programs.
You can start and stop kernel execution, examine
variable and register values, and perform other debugging tasks, just as you
would when debugging user space programs.
The ability to debug a running kernel is provided through remote debugging.
The kernel code you are debugging runs on a test system.
The
dbx
debugger runs on a remote build system.
The debugger communicates
with the kernel code you are debugging over a serial communication line or
through a gateway system.
You use a gateway system when you cannot physically
connect the test and build systems.
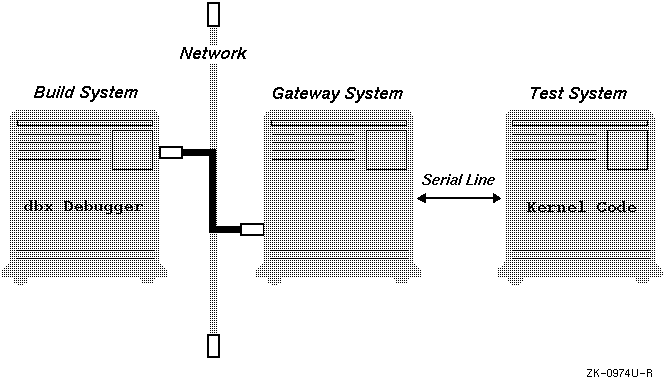
Figure 2-1
shows the
connections needed when you use a gateway system.
Figure 2-1: Using a Gateway System During Remote Debugging
As shown in Figure 2-1, when you use a gateway system, the build system is connected to it using a network line. The gateway system is connected to the test system using a serial communication line.
Prior to running the
kdebug
debugger, the test, build, and gateway systems must meet the following
requirements:
The test system must be running Tru64 UNIX Version 2.0 or higher, must have the Kernel Debugging Tools subset loaded, and must have the Kernel Breakpoint Debugger kernel option configured.
The build system must be running Tru64 UNIX Version 2.0 or higher and must have the Kernel Debugging Tools subset loaded. Also, this system must contain a copy of the kernel code you are testing and, preferably, the source used to build that kernel code.
The gateway system must be running Tru64 UNIX Version 2.0 or higher and must have the Kernel Debugging Tools subset loaded.
To use the
kdebug
debugger, you must set up your
build, gateway, and test systems as described in
Section 2.3.1.
Once you complete the setup, you invoke
dbx
as described
in
Section 2.3.2
and enter commands as you normally
would.
Refer to
Section 2.3.3
if you have problems
with the setup of your remote
kdebug
debugging session.
2.3.1 Getting Ready to Use the kdebug Debugger
To use the
kdebug
debugger,
you must do the following:
Attach the test system and the build (or gateway) system.
To attach the serial line between the test and build (or gateway) systems,
locate the serial line used for kernel debugging.
In general, the correct
serial line is either
/dev/tty00
or
/dev/tty01.
For example, if you have a DEC 3000 family workstation,
kdebug
debugger input and output is always to the RS232C port on
the back of the system.
By default, this port is identified as
/dev/tty00
at installation time.
If your system is an AlphaStation or AlphaServer system with an
ace
console serial interface, the system uses one of two serial
ports for
kdebug
input and output.
By default, these systems
use the COMM1 serial port (identified as
/dev/tty00) when
operating as a build or gateway system.
These systems use the COMM2 serial
port (identified as
/dev/tty01) when operating as the test
system.
To make it easier to connect the build or gateway system and the test system for kernel debugging, you can modify your system setup. You can change the system setup so that the COMM2 serial port is always used for kernel debugging whether the system is operating as a build system, a gateway system, or a test system.
To make COMM2 the serial port used for kernel debugging on AlphaStations
and AlphaServers, modify your
/etc/remote
file.
On these
systems, the default
kdebug
debugger definition in the
/etc/remote
file appears as follows:
kdebug:dv=/dev/tty00:br#9600:pa=none:
Modify this definition so that the device is
/dev/tty01
(COMM2), as follows:
kdebug:dv=/dev/tty01/br#9600:pa=none:
On the build system, install the Product Authorization Key (PAK) for the Developer's kit (OSF-DEV), if it is not already installed. For the gateway and tests systems, the OSF-BASE license PAK is all that is needed. For information about installing PAKs, see the Software License Management guide.
On the build system, modify the setting of the
$kdebug_host,
$kdebug_line, or
$kdebug_dbgtty
as needed.
The
$kdebug_host
variable is the name of the gateway
system.
By default,
$kdebug_host
is set to
localhost, assuming no gateway system is being used.
The
$kdebug_line
variable selects the serial line
definition to use in the
/etc/remote
file of the build
system (or the gateway system, if one is being used).
By default,
$kdebug_line
is set to
kdebug.
The
$kdebug_dbgtty
variable sets the terminal on
the gateway system to display the communication between the build and test
systems, which is useful in debugging your setup.
To determine the terminal
name to supply to the
$kdebug_dbgtty
variable, enter the
tty
command in the correct window on the gateway system.
By default,
$kdebug_dbgtty
is null.
For example, the following
$HOME/.dbxinit
file sets
the
$kdebug_host
variable to a system named
gatewy:
set $kdebug_host="gatewy"
Recompile kernel files, if necessary.
By default, the kernel is compiled with only partial debugging information.
Occasionally, this partial information causes
kdebug
to
display erroneous arguments or mismatched source lines.
To correct this, recompile
selected source files on the test system specifying the
CDEBUGOPTS=-g
argument.
Make a backup copy of the kernel running on the test system so that you can restore that kernel after testing:
#mv /vmunix /vmunix.save
Copy the kernel to be tested to
/vmunix
on the test system and reboot the system:
#cp vmunix.test /vmunix#shutdown -r now
If you are debugging on an SMP system, set the
lockmode
system attribute to 4 on the test system, as follows:
Create a stanza-formatted file named, for example
generic.stanza, that appears as follows:
generic:
      lockmode = 4
This file indicates that you are modifying
the
lockmode
attribute in the
generic
subsystem.
Use the
sysconfigdb
command to add the
contents of the file to the
/etc/sysconfigtab
database:
#sysconfigdb -a -f generic.stanza generic
Reboot your system.
Setting this system attribute makes debugging on an SMP system easier. For information about the advantages provided see Section 2.1.11.
Set the OPTIONS KDEBUG configuration file option in your test
kernel.
To set this option, run the
doconfig
command without
flags, as shown:
#doconfig
Choose KERNEL BREAKPOINT DEBUGGING from the kernel options
menu when it is displayed by
doconfig.
Once
doconfig
finishes building a new kernel, copy that kernel to the
/vmunix
file and reboot your system.
For more information about
using the kernel options menu to modify the kernel, see the
System Administration
manual.
2.3.2 Invoking the kdebug Debugger
You invoke the
kdebug
debugger
as follows:
Invoke the
dbx
debugger on the build system,
supplying the pathname of the test kernel.
Set a breakpoint and start running
dbx
as follows:
#dbx -remote vmunixdbx version 5.0 Type 'help' for help. main: 602 p = &proc[0];(dbx)stop in main[2] stop in main(dbx)run
Note that you can set a breakpoint anytime after the execution of the
kdebug_bootstrap()
routine.
Setting a breakpoint prior to the execution
of this routine can result in unpredictable behavior.
You can use all valid
dbx
flags with the
-remote
flag and define entries in your
$HOME/.dbxinit
file as usual.
For example, suppose you start the
dbx
session in a directory other than the one that contains the source
and object files used to build the
vmunix
kernel you are
running on the test system.
In this case, use the
-I
command
flag or the
use
command in your
$HOME/.dbxinit
file to point
dbx
to the appropriate source
and object files.
For more information, see
dbx(1) and
the
Programmer's Guide.
Halt the test system and, at the console prompt (three right
angle brackets), set the
boot_osflags
console variable
to contain the
k
option, and then boot the system.
For
example:
>>>set boot_osflags "k">>>boot
Once you boot the kernel, it begins executing.
The
dbx
debugger will halt execution at the breakpoint you specified, and you can
begin issuing
dbx
debugging commands.
See
Section 2.1,
the
dbx(1)
reference page, or the
Programmer's Guide
for information on
dbx
debugging commands.
If you are unable to bring your test kernel up to a fully operational mode, you can reboot the halted system running the generic kernel, as follows:
>>>set boot_osflags "S">>>set boot_file "/genvmunix">>>boot
Once the system is running, you can run the
bcheckrc
script manually to check and mount your local file systems.
Then, copy the
appropriate kernel to the
root
(/) directory.
When you are ready to resume debugging, copy the test kernel to
/vmunix
and reset the console variables and boot the system, as
follows:
>>>set boot_osflags "k">>>set boot_file "/vmunix">>>boot
When you have completed your debugging session, reset the console variables on the test system to their normal values, as follows:
>>>set boot_osflags "A">>>set boot_file "/vmunix">>>set auto_action boot
You might also need to replace the test kernel with a more reliable
kernel.
For example, you should have saved a copy of the
vmunix
file that is normally used to run the test system.
You can copy that file
to
/vmunix
and shut down and reboot the system:
#mv /vmunix.save /vmunix#shutdown -r now
2.3.3 Diagnosing kdebug Setup Problems
If you have completed the
kdebug
setup as described in
Section 2.3.2
and it fails to work, refer to the following list for help in diagnosing and
fixing the setup problem:
Determine whether the serial line is attached properly and
then use the
tip
command to test the connection.
Once you determine that the serial line is attached properly, log on
to the build system (or the gateway system if one is being used) as
root
and enter the following command:
#tip kdebug
If the command does not return the message
connected,
another process, such as a print daemon, might be using the serial line port
that you have dedicated to the
kdebug
debugger.
To remedy
this condition, do the following:
Check the
/etc/inittab
file to see if any
processes are using that line.
If so, disable these lines until you finish
with the
kdebug
session.
See the
inittab(4)
reference page
for information on disabling lines.
Examine your
/etc/remote
file to determine
which serial line is associated with the
kdebug
label.
Then, use the
ps
command to see if any processes are using
the line.
For example, if you are using the
/dev/tty00
serial port for your
kdebug
session, check for other processes
using the serial line with the following command:
#ps agxt00
If a process is using
tty00, either kill that process
or modify the
kdebug
label so that a different serial line
is used.
If the serial line specified in your
/etc/remote
file is used as the system's serial console, do not kill the process.
In
this case, use another serial line for the
kdebug
debugger.
Determine whether any unused
kdebugd
gateway
daemons are running with the following command:
#ps agx | grep kdebugd
After ensuring the daemons are unused, kill the daemon processes.
If the test system boots to single user or beyond, then
kdebug
has not been configured into the kernel as specified in
Section 2.3.1.
Ensure that the
boot_osflags
console environment variable specifies the
k
flag and try
booting the system again:
>>>set boot_osflags k>>>boot
Be sure you defined the
dbx
variables in
your
$HOME/.dbxinit
file correctly.
Determine which terminal line you ran
tip
from by
issuing the
/usr/bin/tty
command.
For example:
#/usr/bin/tty/dev/ttyp2
This example shows that
you are using terminal
/dev/ttyp2.
Edit your
$HOME/.dbxinit
file on the build system as follows:
Set the
$kdebug_dbgtty
variable to
/dev/ttyp2
as follows:
set $kdebug_dbgtty="/dev/ttyp2"
Set the
$kdebug_host
variable to the host
name of the system from which you entered the
tip
command.
For example, if the host name is MYSYS, the entry in the
$HOME/.dbxinit
file will be as follows:
set $kdebug_host="mysys"
Remove any settings of the
$kdebug_line
variable as follows:
set $kdebug_line=
Start
dbx
on the build system.
You should
see informational messages on the terminal line
/dev/ttyp2
that
kdebug
is starting.
If you are using a gateway system, ensure that the
inetd
daemon is running on the gateway system.
Also, check the TCP/IP
connection between the build and gateway systems using one of the following
commands:
rlogin,
rsh, or
rcp.
2.3.4 Notes on Using the kdebug Debugger
The following list contains information that can help you use the
kdebug
debugger effectively:
Breakpoint behavior on SMP systems
If you set breakpoints in code that is executed on an SMP system, the breakpoints are handled serially. When a breakpoint is encountered on a particular CPU, the state of all the other processors in the system is saved and those processors spin. This behavior is similar to how execution stops when a simple lock is obtained on a particular CPU.
Processing resumes on all processors when the breakpoint is dismissed;
for example, when you enter a
step
or
cont
command to the debugger.
Reading instructions from disk
By default, the
dbx
debugger reads instructions from
the remote kernel's memory.
Reading instructions from memory allows the debugger
to help you examine self-modifying code, such as
spl
routines.
You can force the debugger to look at instructions in the on-disk copy
of the kernel by adding the following line to your
$HOME/.dbxinit
file:
set $readtextfile = 1
Setting the
$readtextfile
variable might improve
the speed of the debugger while it is reading instructions.
Be aware that the instructions the debugger reads from the on-disk copy of the kernel might be made obsolete by self-modifying code. The on-disk copy of the kernel does not contain any modifications made to the code as it is running. Obsolete instructions that the debugger reads from the on-disk copy can cause the kernel to fail in an unpredictable way.
The
crashdc
utility collects critical data
from operating system crash dump files (vmzcore.n
or
vmcore.n) or from a running
kernel.
You can use the data it collects to analyze the cause of a system
crash.
The
crashdc
utility uses existing system tools
and utilities to extract information from crash dumps.
The information garnered
from crash dump files or from the running kernel includes the hardware and
software configuration, current processes, the panic string (if any), and
swap information.
The
crashdc
utility is invoked each time the system
is booted.
If it finds a current crash dump,
crashdc
creates
a data collection file with the same numerical file name extension as the
crash dump (see
Section 2.1.1
for information
about crash dump names).
You can also invoke
crashdc
manually.
The syntax
for compressed and uncompressed crash dump files, respectively, is as follows:
/bin/crashdc
vmunix.n
vmzcore.n
/bin/crashdc
vmunix.n
vmcore.n
See
Appendix A
for an example of the output from the
crashdc
command.