This chapter explains how to administer the Prestoserve software.
It
explains how to select file systems to accelerate and how to use the
presto
and
dxpresto
commands to perform the administrative
procedures for the day-to-day operation of Prestoserve.
It also describes
how to check to determine if Prestoserve is working properly.
3.1 Prestoserve Operation
The following sections explain how Prestoserve operates.
It describes
the Prestoserve buffers and states.
3.1.1 Prestoserve Buffer Management
Prestoserve is implemented as a pseudodevice driver and uses nonvolatile memory to cache synchronous write requests. Write requests are written synchronously to the Prestoserve cache buffers; as the cache fills, old data is written asynchronously to the appropriate disks.
Prestoserve is interposed between other disk drivers and the rest of the Tru64 UNIX kernel. Stubs replace the original driver's entry points in the device switch tables. Whenever Prestoserve needs to perform actual I/O (for example, when the data in the cache needs to be written to disk), it uses the real device driver routines.
Buffers in the Prestoserve cache undergo several phases or states. The buffer transition diagram is roughly as follows:
inval --> dirty --> active --> clean --> dirty
The following list describes the buffer states:
inval |
An invalid buffer does not presently contain a disk block image. |
dirty |
A dirty buffer contains a valid disk block image that has not yet been written to disk. |
active |
An active buffer is currently in transition to the disk, which means that a write operation has started, but it has not been completed on that buffer. |
clean |
A clean buffer contains a valid disk block image that has been written to disk. |
The Prestoserve buffer cache is similar to a disk because it contains data. At appropriate times, the data is written to the actual disks. The Prestoserve driver tries to ensure that data is not lost. When a failure occurs, the driver does not discard cache data unless explicitly requested to do so by the system administrator.
Prestoserve
is always in one of three states:
UP
(enabled),
DOWN
(disabled), or
ERROR
(error).
When the
Prestoserve state is
UP, Prestoserve improves I/O performance
to accelerated file systems by caching synchronous disk write operations
to nonvolatile memory.
When the Prestoserve state is
DOWN,
all I/O requests are passed to the actual devices.
Whenever Prestoserve makes a state transition from
UP
to
DOWN, all Prestoserve buffers are successfully flushed
(that is, the data is written to disk) and invalidated.
If there are dirty
buffers in the Prestoserve cache when the system is rebooted, they are flushed,
and Prestoserve enters the
DOWN
state unless an error occurred
during the flushing.
Some possible disk errors are: the disk drive is write
protected or off line, a cable problem exists, or a bad disk block exists.
Note
Because the Prestoserve state is
DOWNafter a reboot, you may want to set up Prestoserve so that file systems are automatically enabled when the system starts up. Refer to Chapter 2 for information about automatically acclerating file systems.
If
an error occurs, Prestoserve enters the
ERROR
state.
When
in the
ERROR
state, the Prestoserve cache is effectively
read-only until the error condition is cleared; then, Prestoserve enters the
DOWN
state.
After you fix the disk error, use the
presto
-u
or the
presto
-U
command to verify that the error is corrected.
If there are no disk errors,
the remaining cached data is written to disk and Prestoserve is reenabled.
Refer to
Section 3.2.1
for more information about the
presto
-u
and
presto
-U
commands.
The commands that use the
reboot()
system call cause Prestoserve to enter the
DOWN
state if all dirty buffers can be successfully flushed.
If the buffers cannot
be successfully flushed, Prestoserve enters the
ERROR
state.
Commands that are used to reboot the system include the
halt,
shutdown, and
reboot
commands.
Refer to
Chapter 4
for more information on recovering from the
ERROR
state.
3.2 Managing Prestoserve
The following sections describe how to manage the Prestoserve software. They describe how to select file systems to accelerate, display status, and manage the Prestoserve buffer cache.
The
presto
command is used to administer Prestoserve.
The
dxpresto
command is used to perform some administrative
tasks and also to monitor Prestoserve.
The
presto
command can perform the following administrative
tasks:
Enable and disable file system acceleration
Display information about the accelerated file systems
Display information about Prestoserve state and buffer status
Reset Prestoserve
Write the contents of the Prestoserve cache to disk
Change the size of the Prestoserve cache
Display Prestoserve troubleshooting information
Refer to
presto(8),
dxpresto(8X), and the following sections for more
information.
3.2.1 Accelerating File Systems
Prestoserve can accelerate all mounted file systems on a server, regardless of how many disks or controllers are involved. It is recommended that you accelerate file systems that receive many synchronous write requests. Read-only file systems do not generate synchronous write requests; therefore they are usually not accelerated.
The following list describes some of the types of file systems that may derive benefits from Prestoserve:
File systems that are accessed through the NFS (because many requests for such files are synchronous)
File systems that are used heavily for synchronous I/O
Local file systems (because some operations, such as creating or removing a file, generate synchronous writes)
Remote swapping done to NFS files may benefit from Prestoserve
Prestoserve maintains full block and raw disk semantics. The performance benefits of Prestoserve are not available to raw character device disk partitions. Raw character device reads and writes will flush blocks that are in the Prestoserve cache to disk.
You
can use the
presto
command with the
-u
or
-U
option to set the Prestoserve state to
UP
and enable acceleration on the specified file systems.
The
-U
option sets the Prestoserve state to
UP
only if the specified
directory is the root of a mounted file system.
Otherwise, the following message
is displayed:
presto: directory is not a file system root
Note that you can set up Prestoserve to automatically accelerate
mounted file systems when the system starts up by specifying the appropriate
run-time variables in the
/etc/rc.config
file and including
the file systems in the
/etc/prestotab
file.
Otherwise,
you will have to manually accelerate the file systems each time you reboot.
Refer to
Chapter 2
for more information.
The
presto
command with the
-u
or
-U
option has the following syntax:
presto
-u
| -U
[filesystem]...
Only those file systems specified by the
filesystem
variable will have Prestoserve enabled.
You specify
filesystem
as a directory mount point (for example,
/usr).
Do not specify a block device because some functional subsystems, such as
the Advanced File System (AdvFS), can map more than one block device to a
mount point.
If
filesystem
is not specified, all
local writable file systems that are mounted will have Prestoserve enabled.
File systems that are presently accelerated will remain accelerated.
If the Prestoserve state was
DOWN, the
-u
and
-U
options also reset the Prestoserve statistics
and buffers to their initial values.
If Prestoserve was in the
ERROR
state, Prestoserve attempts to write to disk any blocks that
are still in its cache to make sure that the error has been corrected.
If you mount a local file system using the
mount
command after the system is running in multiuser mode, you must use the
presto
-u
or
presto
-U
command and specify the mount point to accelerate the file system.
The following examples enable Prestoserve on all mounted read/write local file systems, on a specific mounted file system, and on a directory mount point that is the root of a mounted file system, respectively:
#presto -u#presto -u /dsk1g#presto -U /usr
3.2.2 Disabling File System Acceleration
You
can use the
presto
command with the
-d
or
-D
option to stop Prestoserve acceleration and write any
Prestoserve cache data to disk.
The
-D
option is similar to the
-d
option,
but it sets the Prestoserve state to
DOWN
only if the specified
directory is the root of a mounted file system.
Otherwise, the following
message is displayed:
presto: directory is not a file system root
The
presto
command with the
-d
or
-D
option has the following syntax:
presto
-d
| -D
[filesystem]...
Only those file systems specified by the
filesystem
variable are disabled.
You specify
filesystem
as a directory mount point (for example,
/usr).
If
filesystem
is not specified, all accelerated file systems are
disabled, and the Prestoserve state is set to
DOWN.
Note that the -d and -D options do not reset Prestoserve statistics, and they take effect before the -u, -U, or -R option.
The following command disables the mounted file system
/usr:
#presto -d /usr
3.2.3 Displaying the Status of File Systems
You can use the
presto
command with the
-l
and
-L
options to display information about the
accelerated file systems.
The
-l
option lists the accelerated file systems and
their mount points in a format that is similar to the
mount
command.
For example:
#presto -l/dev/disk/dsk0a on / /dev/disk/dsk1g on /usr/staff /dev/disk/dsk2a on /dsk2a /dev/disk/dsk2g on /dsk2g
The -L option displays any unusual Prestoserve state for the file systems. The unusual states include the following:
bounceio |
Instead of directly accessing the Prestoserve cache, the disk device receives the data only after it is first copied to main memory. |
disabled |
The file system is not accelerated. |
error |
An error occurred using the file system, and the data has still not been written successfully. |
For example:
#presto -L/dev/disk/dsk0a on / /dev/disk/dsk0g on /usr (disabled) /dev/disk/dsk1a on /dsk1a /dev/disk/dsk1g on /usr/staff /dev/disk/dsk2a on /dsk2a /dev/disk/dsk2g on /dsk2g
3.2.4 Displaying the Prestoserve State and Buffer Status
If
invoked with no options, the
presto
command displays the
Prestoserve state (either
UP,
DOWN,
or
ERROR), the number of bytes of nonvolatile memory the
Prestoserve cache is using, the length of time the cache has been enabled,
the write cache efficiency, and the current condition of the batteries.
The following is an example of the
presto
command
with no options specified:
#prestostate = DOWN, size = 0x7e000 bytes statistics interval: 00:00:00 (0 seconds) write cache efficiency: 0% All batteries are ok
You can use the
presto
command with the
-p
option to display additional information about the current Prestoserve
state and the statistics for write, read, and total operations.
The information
displayed by the
-p
option is similar to the information displayed
by the
dxpresto
command.
Example 3-1
shows an example of the
presto
-p
command and its output.
A description of the
output follows the example.
Example 3-1: Prestoserve Status
#presto -pdirty = 0, clean = 61, inval = 0, active = 0 [1] [2] [3] [4] [5] [6] count hit rate clean hits dirty hits allocations passes write: 1188 65% 595 182 93 318 read: 6 0% 0 0 0 6 total: 1194 65% 595 182 93 324 state = UP, size = 0x7e000 bytes statistics interval: 00:00:35 (35 seconds) write cache efficiency: 21% [7] All batteries are ok [8]
For each cache read or write operation, Prestoserve increments a counter. A hit occurs when a requested block is matched to a block in a buffer. The previous example shows the following information:
The
count
specifies the sum of the
clean hits,
dirty hits,
allocations, and
passes
counters.
[Return to example]
The
hit rate
percentage is the ratio of
the
clean hits
and
dirty hits
counters
to the
count.
Note
The
hit ratepercentage for Prestoserve cache writes indicates the effectiveness of the Prestoserve cache. If the number of read operations is high in proportion to the total count of read and write operations (75% or more), you may improve system performance by increasing the amount of main memory allocated to the file system buffer cache.
The
clean hits
counter specifies the number
of hits on the clean buffers.
[Return to example]
The
dirty hits
counter specifies the number
of hits on the dirty buffers.
Each dirty hit represents a physical disk write
that was avoided entirely.
[Return to example]
The
allocations
counter specifies the number
of new buffers that had to be allocated for disk block images.
[Return to example]
The
passes
counter specifies the number
of I/O operations that Prestoserve passed directly to the real device driver.
[Return to example]
The
write cache efficiency
percentage is
computed from the ratio of write dirty hits to the number of writes copied
into the Prestoserve cache (write count - write passes).
[Return to example]
The battery state indicates the condition of the batteries.
In general, the battery state can be
OK,
low,
or
disabled, but some processors support chargeable batteries
and use self-tests to determine if a battery needs charging.
If your processor
supports chargeable batteries, the battery state can also be specified as
in self-test
or
is charging.
[Return to example]
The following is an example of the
presto
command
with the
-l
and the
-p
options specified:
#presto -lpdirty = 54, clean = 3, inval = 0, active = 4 count hit rate clean hits dirty hits allocations passes write: 1236 65% 0 808 421 6 read: 2 0% 0 0 0 2 total: 1238 65% 0 808 421 8 state = UP, size = 0x7e000 bytes statistics interval: 00:00:10 (10 seconds) write cache efficiency: 66% All batteries are ok /dev/disk/dsk0a on / /dev/disk/dsk0g on /usr /dev/disk/dsk1a on /dsk1a /dev/disk/dsk1g on /usr/staff /dev/disk/dsk2c on /dsk2c
3.2.5 Using dxpresto to Administer and Monitor Prestoserve
The
dxpresto
command starts the
worksystem software application that graphically displays information about
Prestoserve in a window.
You can invoke the
dxpresto
command
on a machine running Prestoserve to obtain that machine's Prestoserve information.
Note
Because
dxprestois a worksystem software application, theDISPLAYenvironment variable must be set to a machine that is running the worksystem software. Seeputenv(3) for information on setting environment variables.
The
dxpresto
command displays the following information:
Prestoserve state
Number of kilobytes of nonvolatile memory that the Prestoserve cache is utilizing
Amount of time that Prestoserve has been enabled
Battery condition
Current state of all the Prestoserve buffers
History of Prestoserve writes per second
History of Prestoserve cache hits per second
Prestoserve statistics for write, read, and total operations
Prestoserve and
dxpresto
command error
messages
The
dxpresto
command also allows you to modify the
displayed information by:
Changing the Prestoserve state to
Enabled
(UP) or
Disabled
(DOWN)
Changing the interval of time between Prestoserve queries
Displaying the Prestoserve statistics for write, read, and total operations since Prestoserve was last enabled
Displaying Prestoserve statistics for write, read, and total operations since Prestoserve was last queried
Displaying Prestoserve statistics for write, read, and total operations since a specific time
To invoke
dxpresto, use the following command
syntax:
/usr/sbin/dxpresto
[option]...
You can specify X Window System options with the
dxpresto
command to control the display and window appearance.
See
dxpresto(8)
for more information.
Note
To use the
dxprestocommand to monitor a machine's Prestoserve activity, theprestoctl_svcdaemon must be running on that machine. Refer to Chapter 2 for information on theprestoctl_svcdaemon.
An example of the
dxpresto
command is as follows:
#dxpresto
Figure 3-1
shows a
dxpresto
window.
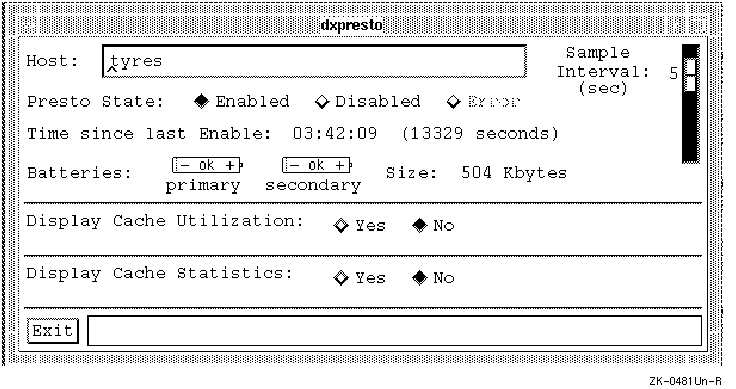
Figure 3-1: dxpresto Window
Figure 3-1 shows the following:
HostThis field displays the
name of the host that is running
dxpresto.
Presto StateThese buttons
show the Prestoserve state, either
Enabled,
Disabled, or
Error.
If the
prestoctl_svc
daemon is running, you can toggle the machine's Prestoserve state between
Enabled
and
Disabled.
You cannot change an
Error
state; contact your Compaq Customer Services representative
if an
Error
state occurs.
Sample IntervalThis slider
shows the interval of time between Prestoserve queries; it allows you to change
that interval.
When you invoke the
dxpresto
command, the
default
Sample Interval
is 5; therefore Prestoserve information
is gathered every 5 seconds.
If you want Prestoserve queried more often, move
the slider to the left and click on MB1 until 2 appears, for example; Prestoserve
is then queried every two seconds.
Time since last EnableThis field shows the time since Prestoserve was last enabled. The time is displayed in hours, minutes, and seconds and total number of seconds.
BatteriesThese graphics show
the state of the Prestoserve backup battery system.
An intact
battery with the word
ok
indicates that the battery has
sufficient power.
An intact battery with the word
low
indicates that the battery's power is low.
A broken battery indicates that
the battery is disabled.
Prestoserve goes into the
ERROR
state when the backup battery power falls below a minimum amount.
Refer to
your hardware documentation to determine the minimum amount of backup battery
power.
Contact your hardware Field Service representative if a battery has
insufficient power or is disabled.
SizeThis field displays the
number of kilobytes of nonvolatile memory that the Prestoserve cache is utilizing.
Note that Prestoserve can utilize less than the default maximum size of its
Prestoserve cache if you changed the cache size with the
presto
-s
command.
Display Cache UtilizationThese buttons allow you to display graphs that demonstrate how the Prestoserve cache is being utilized.
Display Cache StatisticsThese buttons allow you to display the cache statistics table.
ExitThis button allows you
to exit the
dxpresto
window.
Message barThis area at the
bottom of the window displays informational and error messages for the
dxpresto
command and for Prestoserve.
Error messages, such as those indicating RPC communication failure,
are displayed on the terminal from which you invoked
dxpresto.
Figure 3-2
shows an example of the
dxpresto
window with both the
Display Cache Utilization
graphs and
the
Display Cache Statistics
table displayed.
The example
shows the
Writes per second
and
Hits per second
trend line graphs.
Each point in the horizontal axis of each graph
represents a sample time interval as determined by the
Sample Interval
slider; the maximum number of samples that can be shown is 210.
When you reach the maximum number of samples, the graph shifts to the left
so you can see at least the last 105 samples, which is half the maximum number
of samples.
If you choose 5 in the
Sample Interval
slider,
Prestoserve is queried every 5 seconds; therefore it takes 1050 seconds (5
x 210) to obtain the maximum of 210 samples.
The vertical axis shows the average number of writes performed per second
within the sample time interval.
For example, if you choose 2 in the
Sample Interval
slider, Prestoserve is queried every 2 seconds,
and each point in the graph shows the average number of writes performed within
the interval of 2 seconds.
If the graph shows that an average of 5 writes
per second were performed within 2 seconds, Prestoserve actually performed
10 writes within those 2 seconds.
Figure 3-2: Expanded dxpresto Window
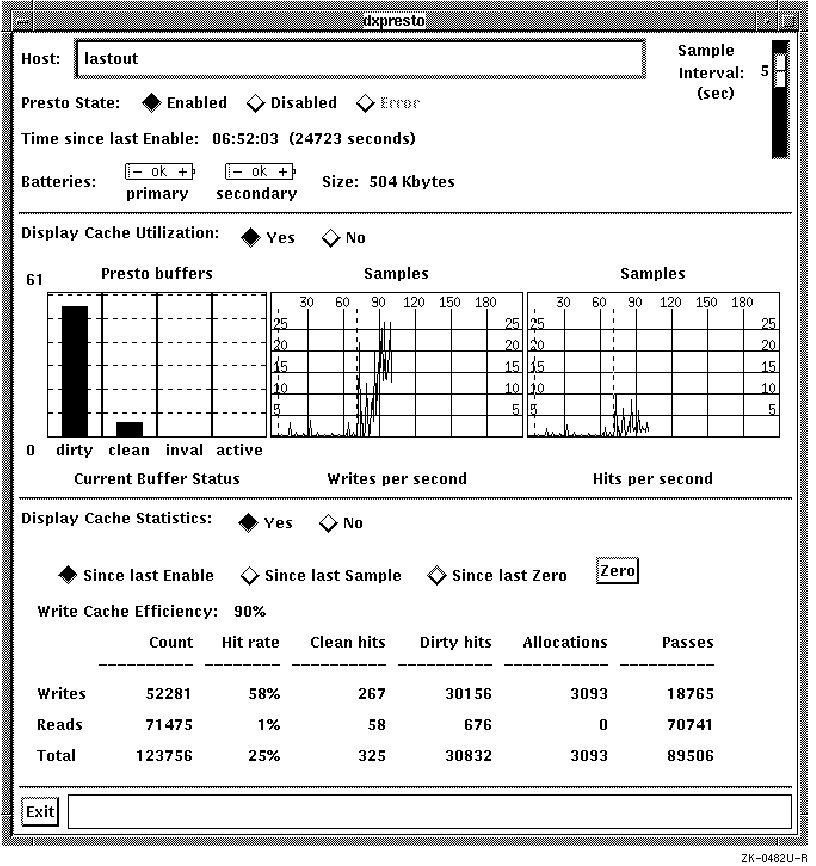
Figure 3-2 shows the following:
Current Buffer StatusThis
bar graph shows how the Prestoserve cache operations are distributed among
the Prestoserve buffer states, which are described in
Section 3.1.1.
The vertical axis shows the maximum number of objects or disk blocks that
the entire Prestoserve cache can contain.
The sum of the four bars is the
total number of buffers used in the Prestoserve cache.
Note that the size
of the Prestoserve cache can be changed by using the
presto
-s
command.
See
Section 3.3.3
for more information.
Writes per secondThis trend
line graph shows a recent history of the average number of writes per second
over the time intervals that are determined by the
Sample Interval
slider.
Hits per secondThis trend
line graph shows a recent history of the average number of Prestoserve cache
hits per second over the time intervals that are determined by the
Sample Interval
slider.
The Prestoserve cache hits represent the
total number of clean and dirty read and write hits.
Since last EnableThis button allows you to display Prestoserve statistics since Prestoserve was last enabled. This is useful when you want to determine how Prestoserve performs over a long period of time.
Since last SampleThis button
allows you to display the Prestoserve statistics for each sample time interval
as determined by the
Sample Interval
slider.
If no Prestoserve
activity occurs during the time interval, the numbers in the statistics table
remain at zero.
For example, if the
Sample Interval
slider
is set to 5 and the
Since last Sample
button is enabled,
the statistics table shows the Prestoserve statistics for each interval of
5 seconds.
Since last ZeroThis button
allows you to display Prestoserve statistics since you clicked on the
Zero
button.
This button allows you to determine how Prestoserve
performs over a specific period of time.
ZeroThis button sets the numbers
in the table to zero, allowing you to specify a time reference for the Prestoserve
statistics table.
At a later time, you can click on the
Since last
Zero
button to display the Prestoserve statistics since you clicked
on the
Zero
button.
Write Cache EfficiencyThis field shows the ratio of write dirty hits to the number of writes copied into the Prestoserve cache.
Prestoserve statistics tableThis table is similar to the information that is displayed when you use the
presto
-p
command.
For each Prestoserve cache read
or write operation, Prestoserve increments an appropriate counter.
The table
shows the following:
countSpecifies the sum of
the
clean hits,
dirty hits,
allocations, and
passes
hit rate percentageSpecifies
the ratio of
clean hits
and
dirty hits
to the total
count
clean hitsSpecifies the number of hits on the clean buffers
dirty hitsSpecifies the number of hits on the dirty buffers (each dirty hit represents a physical disk write that was avoided entirely)
allocationsSpecifies the number of new buffers that had to be allocated for the disk block images
passesSpecifies the number of I/O operations that Prestoserve passed directly to the actual device driver
3.3 Handling the Prestoserve Cache
The following sections describe how to write the contents of the cache
to disk, how to reset Prestoserve and clear the cache, and how to change the
size of the cache.
3.3.1 Writing the Contents of the Cache to Disk
You can use the
presto
command with
the
-F
option to write the contents of the Prestoserve cache
to the available disks but keep the contents of the cache intact.
If the
-F
option is used and the Prestoserve state is
UP, the contents of the cache are written to disk, and the state
remains
UP.
If the Prestoserve state is
DOWN,
then there is nothing to write to disk, and the state remains
DOWN.
If the Prestoserve state is
ERROR, as much of the
contents of the cache as possible is written to disk.
Note that, unlike the
-R
option, the data in the cache remains after it is written to disk.
The state remains
ERROR
until all the cache data is successfully
written to disk.
Note that if you cannot write all the cache data to disk
and the state remains
ERROR, you can use the
presto
-R
command to reset Prestoserve, clear the
cache, and set the state to
DOWN.
The
presto
-F
command can be used
to flush dirty Prestoserve buffers to a disk that was temporarily disabled.
For example, if a disk is powered down or disconnected from a bus, the Prestoserve
cache could enter the
ERROR
state.
When the disk is again
available, you can use the
presto
-F
command
to move the cache data to disk and change the Prestoserve state from
ERROR
to
UP.
3.3.2 Resetting Prestoserve and Clearing the Cache
If you are unable to clear the contents of
the Prestoserve cache and write the data to disk, you can force Prestoserve
out of the
ERROR
state.
You reset Prestoserve and clear
the cache by using the
presto
command with the
-R
option.
The
-R
option writes as much of the Prestoserve
cache data as possible to the appropriate disks, discards the data it cannot
write, purges all Prestoserve buffers, and sets the Prestoserve state to
DOWN.
Note
The -R option clears the Prestoserve cache by writing the data to the appropriate disks if possible. If a disk is unavailable, the data from the cache is lost, so take care when using this option.
Unlike the -d, -D, and -F options, the -R option discards the Prestoserve cache data that it could not write to disk. The option is useful when cache data is not needed. Note that the -R option takes effect before the -u or -U option.
In the following example, the
-R
option changes the
Prestoserve state to
DOWN:
#presto -Rpdirty = 0, clean = 61, inval = 0, active = 0 count hit rate clean hits dirty hits allocations passes write: 1188 65% 595 182 93 318 read: 10 0% 0 0 0 10 total: 1198 65% 595 182 93 328 state = DOWN, size = 0x7e000 bytes statistics interval: 00:00:00 (0 seconds) write cache efficiency: 0% All batteries are ok
You
can use the
presto
command with the
-s
option to change the size of the Prestoserve cache to the specified number
of bytes.
The size of the Prestoserve cache is specified in the Prestoserve
product description.
The
presto
-s
command has the following syntax:
presto
-s
size
You can specify the size variable using decimal or hexadecimal conventions. For example, both 262144 and 0x40000 represent 256 kilobytes.
To determine how Prestoserve performs with a reduced amount of nonvolatile memory, use the -s option. Note that the size of the Prestoserve cache cannot be larger than the default maximum size or smaller than the default minimum size. If you specify a size that is larger than the default maximum size, the default maximum size is used. If you specify a size that is smaller than the default minimum size, the default minimum size is used. Refer to your processor hardware documentation for information about the default size limits of the Prestoserve cache.
If you specify the
-s
option and the current Prestoserve
state is
UP, the state is set to
DOWN,
the Prestoserve cache is resized, and the state is set to
UP.
For example, the following command changes the size of a Prestoserve cache to 512 kilobytes:
#presto -s 0x80000 -pdirty = 119, clean = 3, inval = 0, active = 4 count hit rate clean hits dirty hits allocations passes write: 1350 66% 0 893 455 2 read: 0 100% 0 0 0 0 total: 1350 66% 0 893 455 2 state = UP, size = 0x80000 / 0xffc00 bytes statistics interval: 00:00:00 (0 seconds) write cache efficiency: 33% All batteries are ok
3.4 Displaying Debugging Information
You
can use the
presto
command with the
-v
option to obtain information that you can use to debug Prestoserve operation.
The
-v
option is used with other
presto
command options and displays extra information to standard output.
3.5 Checking Prestoserve
The system administrator can check to determine if Prestoserve is working properly by performing the following steps:
Log in to the server as root and disable Prestoserve:
#presto -d
See
Chapter 3
for information on the
presto
command.
Log in to a client system and mount one of the server's file
systems that is exported by the NFS and that has at least as much available
space as the size of the client's
/vmunix
file or some
other large file.
Use a mount point where the client can create files.
The
following example uses
/usr/tmp
as a mount point; the
commands establish the client's level of performance without Prestoserve:
client%mount server:/usr/tmp /mntclient%cd /mntclient%/bin/time cp /vmunix bigfile34.1 real 0.0 user 1.1 sysclient%rm bigfile
Enable Prestoserve on the server:
server#presto -u
Establish the client's level of performance with Prestoserve:
client%/bin/time cp /vmunix bigfile10.3 real 0.0 user 1.1 sysclient%rm bigfileclient%cd /client%umount /mnt
The real time reported by the commands in step 4 is expected to be about one third of (or about three times faster than) the real time reported by the commands in step 2 while Prestoserve was disabled. Your improvement will vary, but the expected range is between three and five times faster with Prestoserve enabled. If you see much less than a factor of three, make sure that all the other clients are idle and that your network is not being used by others at this time.