The AdvFS Graphical User Interface (GUI), available with AdvFS Utilities, provides a visual representation of the AdvFS file system. The GUI is designed to run under the Common Desktop Environment (CDE). You can use the GUI as a remote manager to monitor your system or to search for available volumes. The GUI does not exactly duplicate the file system management tasks available from the command line. Rather, it allows you to visualize your file system structure and perform the most common operations on volumes, file domains, filesets, and clones.
To access this utility, you must register the AdvFS Utilities license and you
must have root-user privilege.
For information about license activation see
Section 1.4.
6.1 Installing the GUI
To load the GUI, choose the AdvFS Utilities subset when you update or install the Version 5.0 operating system.
Table 6-1 contains the subset titles, names, and descriptions of the subsets that make up the AdvFS GUI. The disk space requirements for loading and running AdvFS Utilities software subsets are shown in Table 6-2.
| Subset | Name | Description |
| AdvFS Utilities | (OSFADVFS500) | Contains a set of advanced utilities licensed for managing AdvFS |
| AdvFS Graphical User Interface (dtadvfs) | (OSFXADVFS500) | Contains the AdvFS Graphical User Interface and online help files |
| AdvFS Agent (advfsd) | (OSFADVFSDAEMON500) | Contains the AdvFS agent, which runs in the traditional style of the UNIX daemon |
| AdvFS Japanese Graphical User Interface | (OISJPXADVFS500) | Localization files that must also be loaded when the Japanese version of the GUI is run |
Table 6-2: Disk Space Requirements for the AdvFS GUI
| Utility | /(root) | /var | /usr |
| Utilities Subset | 0 | 0 | 300 |
GUI (dtadvfs) |
30 | 20 | 7000 |
Agent (advfsd) |
0 | 50 | 800 |
| Japanese localization files | 0 | 1 | 661 |
There are two parts to the GUI:
advfsd, the agent, and
dtadvfs, the actual graphical interface.
The agent must be running for the
GUI to operate.
6.2.1 GUI Agent (advfsd)
The AdvFS GUI agent issues commands and obtains system information for the GUI.
The agent is automatically started at boot time and when the OSFADVFSDAEMON
xxx
subset is installed.
(For Version 5.0,
xxx
is 500.) It
runs unseen in the background.
Under normal conditions,
advfsd
does not need to be run manually.
If you wish to start or stop the agent, do so from the command line (see
advfsd(8)).
Only
one agent can be running on a system at a given time.
If you attempt to start a second
copy of
advfsd, it will fail.
The agent allows Simple Network Management Protocol (SNMP) clients such as NetView®
or Performance Manager (PM) to request AdvFS information.
This is not a two-way path:
SNMP clients cannot issue system configuration commands to
advfsd.
If the agent is not running, the GUI cannot operate.
The agent periodically
asks for information from the system on which it is running.
It then updates the file
systems and the storage device information passed to the GUI display.
It also evaluates
any free space alert conditions.
The time interval for when the agent scans the system
disks is the
agent state monitor interval.
To change the agent
state monitor interval, see
Section 6.3.1.
The interval is saved between
restarts of the agent.
6.2.2 GUI (dtadvfs)
Only the root user can start
dtadvfs.
It can be started in
a terminal window or from a CDE icon.
The file system operations that the GUI can
perform are described in
Section 6.4.
To start the GUI from the command line, type:
#
/usr/bin/X11/dtadvfs &
To start the GUI using Common Desktop Environment (CDE) icons:
Click the Application Manager on the CDE toolbar.
Double-click the System_Admin icon in the Application Manager window.
Double-click the Storage_Management icon in the System_Admin window.
Double-click the Advanced File System icon in the Storage_Management window.
When the GUI is running, window displays are periodically updated to reflect
the changing characteristics of the file system.
The
GUI refresh interval, the time interval between updates, is 15 minutes by default.
To change
the GUI refresh interval when the GUI is running, see
Section 6.3.1.
The GUI refresh interval is not saved between restarts of the GUI.
6.2.2.1 GUI Security
Each Tru64 UNIX system that the GUI will manage has two optional security files associated with it: a password file and a file of allowable hosts. The password file restricts the use of the GUI managing a particular system to administrators who know the password. The allowable hosts file allows only GUIs running on systems listed in the file to remotely manage it. These files are configured through an editor of your choice. They cannot be accessed directly from the GUI.
The root user creates the password file,
/var/advfs/daemon/socket/gui.passwd, on the system for which the password is to be used.
There is one password
file containing one password per system.
(It is not a good idea to use the root password.)
The file contains the password in plain text.
Only users who enter the correct password
can run a GUI connected to the system.
A user wishing to use the GUI to manage the
system from a remote location must know this password in order to connect to the system.
The allowable hosts file,
/var/advfs/daemon/socket/hosts.allow,
is also created by the root user.
It contains a plain text list of all systems (hosts)
on which a GUI may operate to manage the system.
The
hosts.allow
file will automatically include the GUI running locally on the system; that is, it
will include itself.
If you want to allow others to remotely manage your system, you
must include them in your
hosts.allow
file to authorize the agent
to send your file system information to their system.
If you have protected your system
with a password in the system's
gui.passwd
file, remote users will
also have to know that password.
See
advfsd(8)
and
dtadvfs(8)
for more information.
6.2.2.2 Ignoring Disks
Create the
/var/advfs/daemon/disks.ignore
file to specify
a list of disks that the agent will not examine.
The
disks.ignore
file contains a plain-text list of disk drives, one per line.
This file is useful
because performance may be reduced when there are offline HSZ devices or spun-down
disk drives.
Since the agent processes the
disks.ignore
file every time
the disks are checked, disks that fail can be added to the file and disks listed in
the file that become available can be removed.
It is not necessary to stop the agent.
See
advfsd(8)
for more information.
You cannot ignore an LSM volume by including the LSM volume name in the
disks.ignore
file; you must list the disks from which the LSM volume is
built.
To ignore a complete disk group, you must list all disks in it.
Because all
partitions on the listed disks will be ignored, unexpected results may occur if a
disk has partitions belonging to more than one disk group.
6.2.2.3 Log Files
Entries are generated in the agent log file,
/var/advfs/daemon/logs/advfsd, and the GUI log file,
/var/advfs/gui/advfs_gui.log,
as processing proceeds.
It is a good idea to periodically check these files.
Both
the agent and the GUI log files are periodically renamed to prevent unrestricted consumption
of disk space.
6.2.2.4 Help
The help system contains background information about the AdvFS file system
as well as specific information about the GUI.
Each operation is described.
Detailed
explanations of the dialog boxes used to perform file system activities are provided.
6.2.2.5 Monitoring Remote File Systems
From your system you can remotely monitor file systems that have your system
listed in their
hosts.allow
file.
You can attach to these systems
through the GUI:
Choose Host... from the AdvFS menu of the Main window.
The Select a Host dialog box appears in which you can select another host system or choose to modify the host list to add or delete host systems. This list is created by you and saved on your system to identify the hosts you connect to regularly.
Select the host and click Connect.
If you try to connect to a host but are unsuccessful, you are no longer connected to any host so you must repeat the connection process for another system.
Note that the host list is for convenience only.
It does not provide any additional
security.
You can always type a host name in the Selection block of the Select a Host
dialog box.
6.2.2.6 Managing LSM Volumes
If you are using LSM volumes, it is important to know how the GUI treats these volumes:
An LSM volume will be listed as available if it is labeled
unused.
Do not use LSM to change the size of an LSM volume that is in use by an AdvFS file domain. AdvFS is unable to accommodate this change.
If you have added the LSM volume
/dev/vol/volname
to the file domain from the command line, the AdvFS GUI does not recognize that it
is the same as
/dev/vol/rootdg/volname.
If the volume has mounted
filesets, it will appear as unknown in the Devices and Volumes window; if it has no
mounted filesets, it will appear as unavailable.
If you try to add it to a file domain,
you will get an error message saying it is in use.
If you encapsulate a volume in use by AdvFS into LSM while the GUI is running, the volume name will not be updated in the GUI window. You must exit and restart the GUI to display the correct name.
6.3 Displaying File System Information
The objects (components) that make up the file system (volumes, file domains, filesets, and fileset clones) are viewed in the GUI windows in an object tree that shows their hierarchical relationship to each other. If an object contains other objects, a folder icon appears to its left. Clicking on the folder icon expands or collapses the object tree; that is, displays or hides the objects below it in the tree. For example, clicking on a file domain folder icon displays or hides the filesets that belong to that file domain.
You can change your window views and look at critical information about the objects in a number of ways. You can view:
Main window information
The first window that appears, the Main window, provides a comprehensive view of the file system. It is the starting point for all GUI-managed tasks and the primary screen for monitoring file system status. Use the items on the View menu to show the status of file domains and filesets; file domains and volumes; and file domains, filesets, and volumes. You can also use the View menu to change from one of these views to viewing fileset quotas and back.
Devices and volumes
Choose Devices and Volumes from the Configuration menu for a different detailed view. The Devices and Volumes window displays all the physical disks, disk groups, and logical volumes on the system and can be used to determine volume type or partition availability.
Object characteristics
Choose Show... from the Configuration menu to display more complete information about the object that you have highlighted in the Main window display.
You can usually select Show... as an alternate way of performing the file system management tasks described in the following sections. For example, highlight the file domain and choose Show... to see an object dialog box that includes the creation date and number of log pages for that domain.
Note that double-clicking a file domain, fileset, clone, or volume in the object tree is the same as choosing Show... for that object. Double-clicking does not work for hosts, devices, or partitions or for the volume icon in the Devices and Volumes window. Single-clicking an object in an object tree only highlights it. No new information is presented.
Clicking the right mouse button on an object brings up a list of commands appropriate for that object.
If you attempt to access a menu item and find it unavailable (grayed out), check
that the appropriate object is highlighted.
For example, you need to select a fileset
before you can create a clone for it.
6.3.1 Choosing Units for Displaying Information
You can customize the display of your file system information by choosing Options from the AdvFS menu. All options except the agent state monitor interval are reset each time the GUI is restarted.
Units
Choose to display disk space usage in 512-kilobyte blocks, kilobytes, megabytes, gigabytes, or terabytes.
Update Interval
Choose the GUI refresh rate.
Choose the Agent state monitor interval.
Free Space Alert
Choose between space used > and free space <.
Choose to display space available as a percent or in the units you have chosen for the display.
Fileset quotas
Choose to calculate quotas by percent of space or by the amount of space used.
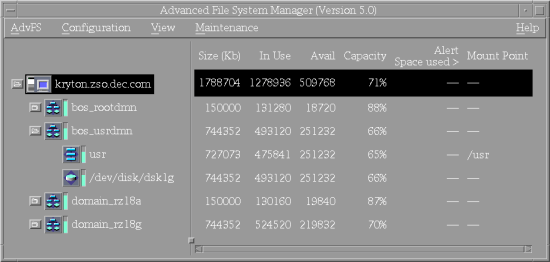
When the Main window, as shown in
Figure 6-1, is first
displayed, disk-space usage information is shown for the host and for file domains.
Options on the View menu let you display file domains, filesets, and volumes in different
combinations.
Figure 6-1: Main Window Showing Disk Usage Information
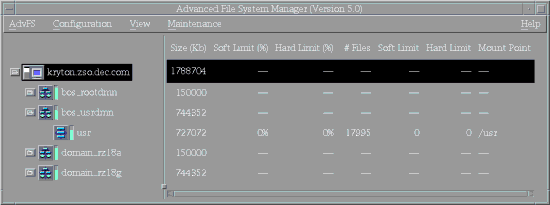
From the Main window you can also view fileset quota information, as shown in
Figure 6-2, by choosing
Fileset Quotas
from the View menu.
You can return to viewing file domain, fileset, and volume information
by selecting the items you wish to view from the same View menu.
Figure 6-2: Main Window Showing Fileset Quota Information
The Main window has menu selections to accomplish file system management tasks
for file domains, filesets, clones, and volumes.
Menu commands call up dialog boxes
to accomplish these tasks.
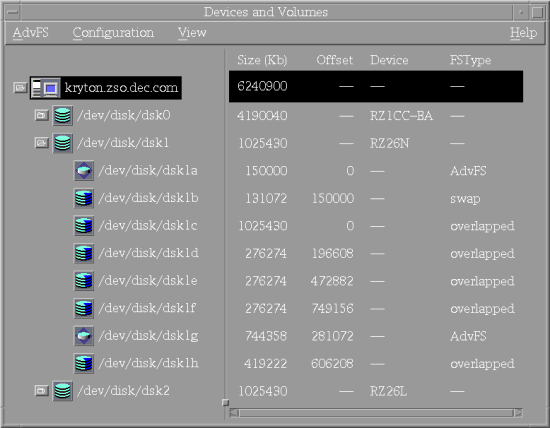
6.3.3 Devices and Volumes Window
The Devices and Volumes window, as shown in Figure 6-3, shows disk groups and logical volumes. It identifies the size and type of disks and what each partition is used for. This view is particularly useful if you wish to enlarge your file domain and need to locate a volume to use. From the View menu of the Devices and Volumes window, you can sort your objects, choose to show only available volumes, or choose to show overlapped volumes.
Figure 6-3: Devices and Volumes Window
6.4 Performing File System Operations
You can perform file system management tasks on file domains, filesets, fileset
clones, and volumes directly from the GUI.
In general, you must select the appropriate
object before you can proceed.
In the sections below, menu selections are shown in
bold face type.
6.4.1 Operations on a File Domain
File system management tasks for file domains are initiated from the Main window
by selecting
Show
or
File Domain
on the Configuration menu.
In addition, from the Devices and Volumes
window you can create a new file domain and add volumes to an existing file domain.
6.4.1.1 Creating a File Domain
To create a file domain, you must assign a name and select an initial volume. You can set a free space alert.
If your system predates DIGITAL UNIX 4.0D, you will have the option to access Advanced options that modify the bitfile metadata table (BMT). This will allow you to avoid out-of-space messages that may occur for file systems that contain a very large number of files (over about 50,000), such as file systems that support Usenet news servers. (Later versions of the operating system do not have this problem and the option is not offered.)
A file domain is not completely defined until you have created at least one fileset. A file domain is not active unless there is a mounted fileset. To create a file domain using the Main window:
Choose File Domain from the Configuration menu.
Choose New from the File Domain menu.
In the New File Domain dialog box, enter the file domain name and highlight an available volume in the object tree. You may need to expand the device list by clicking on the folder to the left of the device name. You can also set the free space alert.
If Advanced options is available, you can direct AdvFS to grow the BMT. You can either enter the number of files you expect and have the system estimate the extent size, or you can specify the number of extent pages directly. You can set the extent size to any value, but it is suggested that for every 100,000 files you increase the BMT extent size by 256 pages.
If you are not certain what storage device to use for the new file domain, work from the Devices and Volumes window (on the Configuration menu) to get a complete view of the storage on your system:
Choose Devices and Volumes from the Configuration menu of the Main window.
In the Devices and Volumes window, choose Show Available Volumes Only from the View menu.
Choose a volume that is labeled as available.
Choose New File Domain from the Configuration menu.
In the New File Domain dialog box, create the file domain and set the free space alert. If you a monitoring a file system prior to Version 4.0D, see the Main window instructions above for directions on using the Advanced button.
Creating a file domain automatically generates an entry in the
/etc/fdmns
directory.
6.4.1.2 Setting a Free Space Alert for a File Domain
Set a free space alert to inform you when the free space threshold in the file
domain is reached or passed.
When you set the alert, you can choose to automatically
run a script when the alert threshold is crossed.
See
/usr/advfs/daemon/scripts
for examples of scripts used by the agent to execute commands.
To set the free space alert from the Main window:
In the object tree, highlight the file domain.
Choose File Domain from the Configuration menu.
Choose Set free space alert from the File Domain menu.
In the File Domain dialog box, set the free space alert.
You must reset the free space alert when the size of a file domain has
changed.
Free space alert values are evaluated using actual size (for example, kilobytes),
not percentage of space.
6.4.1.3 Enlarging a File Domain
Add volumes to transform a single-volume file domain (except the root file domain, which can only have one volume) into a multivolume file domain or to enlarge a multivolume file domain (see Section 2.3.6).
To add a volume to a file domain:
In the object tree, highlight the file domain.
Choose File Domain from the Configuration menu.
Choose Add Volume from the File Domain menu.
In the Add Volume dialog box, highlight an available volume to add. You may need to expand the view of the volumes by clicking the folder icon to the left of the device name.
If you do not know which volume to add to your file domain, work from the Devices and Volumes window to get a complete view of the storage on your system:
Choose Devices and Volumes from the Configuration menu of the Main window.
In the Devices and Volumes window, choose Show available volumes only from the View menu.
Click a volume that is labeled available.
Choose Add to file domain from the Configuration menu.
In the Add Volume dialog box, choose the file domain to which the new volume will be added.
It is a good idea to balance your file domain after you have added a volume.
This will distribute existing files to the new volume.
6.4.1.4 Removing a File Domain
You can delete a file domain only after all filesets and clone filesets in the
file domain are unmounted.
You will get an error message if you try to remove a domain
with mounted filesets.
When you remove a file domain as a method of deleting all filesets,
its entry in the
/etc/fdmns
directory is removed.
However, this
may present a security hole since only pointers are changed and no data on the volume
is removed.
It may be possible to access the fileset data from the command line with
the
salvage
utility (see
Section 7.5.8).
If you need the increased security, remove each fileset individually.
The deleted file domain name remains in the
/etc/fstab
file
unless you modify the file by choosing the Modify /etc/fstab option in the dialog
box or change it from the command line.
If you do not update this file, you will get
error messages when you reboot the system or when you enter a
mount -a
command from the command line.
If you do not delete the file name from the
/etc/fstab
file, you can do so at a later time from the command line.
To remove a file domain:
In the object tree, highlight the file domain.
Choose File Domain from the Configuration menu.
Choose Delete from the File Domain menu.
In the Delete File Domain dialog box, delete the domain and back
up and modify the
/etc/fstab
file.
Note
When you unmount your filesets and clone filesets, you must choose to modify the
/etc/fstabfile. If you do not do so at that time, you must manually edit the/etc/fstabfile. Once you delete the file domain you no longer have access to the fileset.
6.4.1.5 Renaming a File Domain
You can assign a new name to an existing file domain (see
Section 2.3.9).
The old name remains in the
/etc/fstab
file unless you modify the
file by choosing the Modify /etc/fstab option in the dialog box or change it from
the command line.
If you do not update the
/etc/fstab
file, the
filesets in this domain will not mount when you reboot the system or when you enter
the
mount -a
command from the command line.
If you must update
the
/etc/fstab
file at a later time, do so from the command line.
Unmount all filesets before renaming the file domain. An error will occur if you try to rename a file domain with mounted filesets. You cannot rename a file domain with the name of an existing file domain.
To rename a file domain:
In the object tree, highlight the file domain.
Choose File Domain from the Configuration menu.
Choose Rename from the File Domain menu.
In the Rename File Domain dialog box, enter the new name and back
up and modify the
/etc/fstab
file.
File system management tasks for filesets are initiated from the Main window
by selecting
Show
or
Fileset
from the Configuration menu once you have highlighted the fileset on which
you wish to operate.
It is important that you choose to modify and back up the
/etc/fstab
file as you perform fileset operations.
If you do not, there
is a chance that the
/etc/fstab
file will not be correct for subsequent
operations.
If you must update the
/etc/fstab
file at a later time,
do so from the command line.
6.4.2.1 Creating a Fileset
You cannot create a fileset until you have a file domain with which to associate it (see Section 6.4.1.1).
To create a fileset:
In the object tree, highlight the file domain for which the fileset will be created.
Choose Fileset from the Configuration menu.
Choose New from the Fileset menu.
In the New Fileset dialog box, create the fileset, mount the fileset,
back up and modify the
/etc/fstab
file, set a free space alert,
and set fileset quotas (as desired).
Note that when you create a fileset, you can set the free space alert only as
a percentage of the available space.
6.4.2.2 Mounting a Fileset
When you mount a fileset, you make its files available. The display in the Main window indicates which filesets are mounted. A file domain is active when at least one fileset is mounted.
To mount a fileset:
In the object tree, highlight the fileset.
Choose Fileset from the Configuration menu.
Choose Mount from the Fileset menu.
In the Mount Fileset dialog box, create a mount point if it does not
exist and back up and modify the
/etc/fstab
file.
When you unmount a fileset, its files are no longer available. You must unmount the fileset before you can remove it or remove the file domain to which it belongs. The display in the Main window indicates which filesets are not mounted.
To unmount a fileset:
In the object tree, highlight the fileset.
Choose Fileset from the Configuration menu.
Choose Unmount from the Fileset menu.
In the Unmount Fileset dialog box, unmount the fileset and back up
and modify the
/etc/fstab
file.
6.4.2.4 Setting a Free Space Alert for a Fileset
Set a free space alert to warn when the free space threshold in the fileset is reached or passed. You must mount the fileset before you can set the alert. After you set the alert, you can choose to automatically run a script when the alert threshold is crossed.
To set the free space alert:
In the object tree, highlight the fileset.
Choose Fileset from the Configuration menu.
Choose Set free space alert from the Fileset menu.
In the Fileset dialog box, set the free space alert.
You must reset the free space alert when the size of a fileset has changed.
Free space alert values are evaluated using actual size (for example, kilobytes),
not percentage of space.
6.4.2.5 Setting Fileset Quotas
Set fileset quotas to limit the amount of space the fileset can consume. If you do not set quotas, any fileset can use all the available space in the file domain. You can only set quotas on mounted filesets.
To set fileset quotas:
In the object tree, highlight the fileset.
Choose Fileset from the Configuration menu.
Choose Set fileset quotas from the Fileset menu.
In the Fileset dialog box, set the fileset quotas.
You can view fileset quota information from the Main window by choosing
Fileset Quotas
from the View menu.
To return to viewing disk
usage, choose the items you wish to view from the View menu.
6.4.2.6 Removing a Fileset
You must unmount a fileset before you can delete it. You can do this as part of the removal process. You cannot remove a fileset that has a clone. You must remove the clone first. Removing a fileset removes all files in that fileset.
To remove a fileset:
In the object tree, highlight the fileset.
Choose Fileset from the Configuration menu.
Choose Delete from the Fileset menu.
In the Delete Fileset dialog box, unmount the fileset, delete it,
and back up and modify the
/etc/fstab
file.
If all the filesets are unmounted, the fastest way to remove all filesets is
to remove the file domain to which they belong.
However, this may present a security
hole because it may be possible to access the data with the
salvage
utility (see
Section 7.5.8).
6.4.2.7 Renaming a Fileset
You must unmount a fileset before you can rename it. You can do this as part of the renaming process. The new fileset name must be unique within the file domain.
To rename a fileset:
In the object tree, highlight the fileset.
Choose Fileset from the Configuration menu.
Choose Rename from the Fileset menu.
In the Rename Fileset dialog box, unmount the fileset, enter a new
name, and back up and modify the
/etc/fstab
file.
Note
If you rename a fileset that has never been mounted (does not already have an
/etc/fstabfile entry) and check the modify/etc/fstabbox, you do not get a new entry for the fileset name. You must manually edit the/etc/fstabfile to add the new entry.
If you rename a fileset, its clone can no longer track it.
You must delete the
old clone and create a new one because clones cannot be renamed.
6.4.3 Operations on a Clone Fileset
When you operate on a clone, it is important to modify and back up the
/etc/fstab
file as you perform clone operations.
If you do not, there is
a chance that the
/etc/fstab
file will not be correct in subsequent
operations.
If you must update the
/etc/fstab
at a later time,
do so from the command line.
6.4.3.1 Creating a Clone Fileset
Creating a clone fileset allows you to back up files while the file system is on line (see Section 4.2). You can create only one clone for a fileset.
To create a clone:
In the object tree, highlight the fileset that you want to clone.
Choose Clone from the Configuration menu.
Choose New from the Clone menu.
In the New Clone dialog box, enter a clone name, create a mount point,
and back up and modify the
/etc/fstab
file.
You must mount a clone in order to access it. An unmounted clone tracks changes to a fileset but cannot be read. Clones are mounted as read-only.
To mount a clone:
In the object tree, highlight the clone.
Choose Clone from the Configuration menu.
Choose Mount from the Clone menu.
In the Mount Clone dialog box, create a mount point if it does not
exist and back up and modify the
/etc/fstab
file.
You cannot access an unmounted clone, but it still tracks fileset changes.
To unmount a clone:
In the object tree, highlight the clone.
Choose Clone from the Configuration menu.
Choose Unmount from the Clone menu.
In the Unmount Clone dialog box, unmount the clone and back up and
modify the
/etc/fstab
file.
You must unmount a clone before you can remove it. You can do this as part of the removal process.
To remove a clone:
In the object tree, highlight the clone.
Choose Clone from the Configuration menu.
Choose Delete from the Clone menu.
In the Delete Clone dialog box, unmount the clone, delete it, and
back up and modify the
/etc/fstab
file.
File system management tasks for volumes are initiated from the Main window
by selecting
Show
or
Volume
from the Configuration menu once you have highlighted the volume on which
you wish to operate.
(In order to view volumes, the View menu must be set to
File domains and volumes
or
File domains, filesets, and volumes.)
6.4.4.1 Setting a Free Space Alert for a Volume
Set a free space alert to inform you when the free space threshold in the volume is reached or passed.
To set the free space alert:
In the object tree, highlight the volume.
Choose Volume from the Configuration menu.
Choose Set free space alert from the Volume menu.
In the Volume dialog box, set the free space alert.
When you set the alert, you can choose to automatically run a script when the
threshold is crossed.
6.4.4.2 Adding a Volume
Adding a volume is the same as enlarging a file domain (see
Section 6.4.1.3).
See
Section 2.2
for detailed information about volumes.
6.4.4.3 Removing a Volume
You can remove a volume from a file domain at any time without interrupting the logical structure of the filesets in the file domain (see Section 2.3.7). The data that was stored on that volume will be moved to other volumes in the domain. In order to complete successfully, there must be room for all domain data on the remaining volumes.
Before you can remove a volume from a file domain, all filesets in that file domain must be mounted. You cannot remove a volume while you are balancing or defragmenting a file domain associated with that volume.
To remove a volume:
In the object tree, highlight the volume.
Choose Volume from the Configuration menu.
Choose Remove from the Volume menu.
In the Remove Volume dialog box, confirm the removal.
File system maintenance tasks are initiated from the Main window through the
Maintenance menu.
The maintenance tools improve read/write performance by altering
the way files are mapped on the disk.
They can be run while the system is on line,
and their operation is transparent to system users and to applications.
The maintenance
tasks can be stopped without harm to the file domain.
The activity that has already
taken place will remain.
6.4.5.1 Balancing a Multivolume File Domain
You can use the GUI to initiate the balance process to evenly distribute files among volumes (see Section 5.2.3). You cannot balance a file domain while you are defragmenting, adding or removing volumes, or removing filesets on the same file domain. You can choose to abort the operation at any time. The file domain you want to balance must have all filesets mounted. If you try to balance a file domain that includes unmounted filesets, you will get an error message.
To balance a file domain:
In the object tree, highlight the file domain.
Choose Balance from the Maintenance menu.
In the Balance dialog box, start the balance process.
6.4.5.2 Defragmenting a File Domain
You can make files in a file domain more contiguous by defragmenting the file domain. Defragmenting also consolidates free space so files created later are also less fragmented (see Section 5.2.2). You cannot defragment a file domain while you are balancing, adding or removing volumes, or removing filesets on the same file domain. You can choose to abort the defragment operation at any time. The file domain you want to defragment must have all filesets mounted. If you try to defragment a file domain that includes unmounted filesets, you will get an error message.
To defragment a file domain:
In the object tree, highlight the file domain.
Choose Defragment from the Maintenance menu.
In the Defragment dialog box, start the defragment process and specify how long it is to operate.
6.5 Troubleshooting GUI Operation
Table 6-3
presents some GUI problems and solutions.
Check
dtadvfs(8)
and
advfsd(8)
for additional
information.
Table 6-3: GUI Troubleshooting
| Problem | Cause/Solution |
| GUI starts slowly | Mount at least one fileset from the command line. |
| Advanced File System icon not in the Application Manager - Storage Management window | Installation is not complete. |
Permission denied
message when entering
dtadvfs
from the command line |
You are not the root user. |
Password Error dialog when starting
dtadvfs
from CDE icon |
You have entered an incorrect root password. Do not reenter. Cancel the dialog and try again. |
Object key is invalid
or
Can't get the object data
error message |
GUI sometimes cannot track several actions simultaneously. Restart the GUI. |
| Slow performance or unexplained error messages appear | Network overload (the GUI cannot get configuration data in a reasonable number of attempts) or system overload (the agent gets few or no CPU cycles). |
If there are several offline HSZ devices,
unmounted filesets, or spun down disk devices, add them to the
disks.ignore
file. |
|
If none of the above appears to be the problem, the agent is probably hung. Exit the GUI and stop the agent:
Then restart the agent and the GUI:
|
|
| Incorrect error message | Configuration tasks are running simultaneously and more than one task failed. |
| Free space alert value incorrect | Reset. Alert values are evaluated using actual size (for example, in kilobytes), not percentage of space. |
| File domain deleted but associated volumes shown as in use | Manually change the disk label on the device; use
the command line
disklabel
command or the CDE Disk Configuration
utility. |
| Volume removed but shown | Manually change the disklabel on the device; use
the command line
disklabel
command or the CDE Disk Configuration
utility. |
advfsd
consuming high CPU and
I/O resources |
Change the agent state monitor interval to reduce the polling frequency (see Section 6.2.1). |
| Decrease the number of LSM disk groups and volumes. | |
Decrease the number of unmounted filesets.
Inactive domains are particularly slow.
Use the
disks.ignore
file
(see
Section 6.2.2.2
). |
|
If Performance Manager (PM) is not running, exit the GUI and stop the agent:
Then restart the agent and the GUI:
|
|
| System panics at boot time | Check for a bad file domain.
Panic will occur even
if the domain has been removed from the
/etc/fstab
file.
Do one
of the following in single-user mode, then reboot to multiuser mode: |
| - Repair the file domain. | |
- Move the bad file domain from the
/etc/fdmns directory to another directory.
(This will make repair difficult.) |
|
| Sort gives incorrect results | Check that no data fields to be sorted are marked unavailable. Mount filesets if needed. |
Volume in use
message, when adding
a volume |
Check that this is not an unrecognized LSM volume (see Section 6.2.2.6). |
| PM metrics incorrect | To use PM 5.0 to monitor Version 4.0x operating systems, the Version 4.0x systems must have the appropriate PM 4.0x kit with the cluster subset installed. |
| X or Motif® problems | Failures related to these can be ignored. Full keyboard support as defined in the Motif style guide is not implemented. |