This chapter describes how to manage files on your system. After completing this chapter, you will be able to:
List files
Display and print files
Link files
Copy, rename, and move files
Compare and sort files
Remove files from the system
Determine file type
To learn about managing files, follow the examples in this chapter. Do each example in order so that the information on your screen is consistent with the information in this book.
Before you can work through the examples, you must be logged in and
your login directory must contain the following three files created in
Chapter 2:
file1,
file2,
and
file3.
To produce a listing of the files in your login
directory, enter the
ls
command, which is explained in
Section 3.1.
If you are using files with different names, make the
appropriate substitutions as you work through the examples.
In
the following examples, when you are asked to return to your login directory,
enter the
cd
(change directory) command as follows:
$cd
In the preceding example, the dollar sign ($) represents the shell prompt. Your shell prompt may vary.
In addition, before working on the examples in this
chapter, create a subdirectory called
project
in your login
directory.
To do so, enter the following
mkdir
(make directory)
command from your login directory:
$mkdir project
For more information on the
cd
and
mkdir
commands, see
Section 4.2
or the
cd(1)
reference
page and
Section 4.1
or the
mkdir(1)
reference page, respectively.
3.1 Listing Files (ls)
You can display a listing of the contents of one or more directories
with the
ls
command.
This command produces a list of the
files and subdirectories (if any) in your current directory.
You can also
display other types of information, such as the contents of directories other
than your current directory.
The format of the
ls
command is:
ls
The
ls
command has a number of options,
called
flags
that enable you to display different types
of information about the contents of a directory.
Refer to
Section 3.1.3
for information about these flags.
3.1.1 Listing Contents of the Current Directory
To list the contents of your current directory, enter:
$ls
Used without flags in
this format, the
ls
command lists the names of the files
and directories in your current directory:
$lsfile1 file2 file3 project $
You may also list portions of your current directory's contents by using the command format:
ls
filename
The filename entry can be the name of the file or a list of file names separated by spaces. You may also use pattern-matching characters to specify files. See Chapter 2 for information on pattern matching.
For example, to list the files whose names begin with the characters
file, you would enter the following command:
$ls file*file1 file2 file3 $
3.1.2 Listing Contents of Other Directories
To display a listing of the contents of a directory other than your current directory, use the following format:
ls
dirname
The dirname entry is the pathname of the directory whose contents you want to display.
In the following example, the current directory is your login directory,
and you want to display the
/users
directory.
Your system
may contain another directory with a name similar to the
/users
directory.
The name of the
/users
directory is preceded
by a slash ( / ), which indicates that the system should begin
searching from the root directory.
$ls /usersamy beth chang george jerry larry mark monique ron $
The
ls
command lists directory
and file names in collated order as determined by the current locale.
For
more information about locales (as used with internationalization), see
Appendix C.
3.1.3 Flags Used with the ls Command
In its simplest form, the
ls
command displays only
the names of files and directories contained in the specified directory.
However,
ls
has several flags that provide additional information about the
listed items or change the way in which the system displays the listing.
When you want to include flags with the
ls
command,
use the following format:
ls
-flagname
The
-flagname
entry specifies
one or more flags (options) that you are using with the command.
For example,
the
-l
flag produces a long listing of the directory
contents.
If you want to use multiple flags with the command, enter the flag names together in one string:
$ls -lta
Table 3-1
lists some of
the most useful
ls
command flags.
Table 3-1: The ls Command Flags
| Flag | Action |
-l |
Lists in
long
format.
An
-l
listing provides the type, permissions,
number of links, owner, group, size, and time of last modification for each
file or directory listed. |
-t |
Sorts the files and directories by the time they were last modified (latest first), rather than collated by name. |
-r |
Reverses the order of the sort to get
reverse collated
order (ls -r),
or
reverse time
order (ls -tr). |
-R |
Lists
all
entries including hidden files.
Without this flag, the
ls
command does not list the names of entries that begin with a dot (.), such
as
.profile,
.login, and relative pathnames. |
-F |
Puts a
/
(slash) after
each file name if the file is a directory, or an
*
(asterisk)
after each file name if the file can be executed. |
-R |
Lists all subdirectories recursively. Descends into each directory and subdirectory to provide a listing of the entire directory tree. |
Example 3-1
shows a long (-l)
listing of a current directory.
The components of the listing are explained
once, even though they may appear on several lines.
Example 3-1: Long (ls -l) Directory Listing
$ls -ltotal 4[1]-rw-r--r-- 1 larry system 101 Jun 5 10:03 file1[2] [3]-rw-r--r-- 1 larry system 75 Jun 5 10:03 file2[4] [5]-rw-r--r-- 1 larry system 75 Jun 5 10:03 file2[6]-rw-r--r-- 1 larry system 65 Jun 5 10:06 file3[7]drwxr-xr-x 2 larry system 32 Jun 5 10:07 project[8]$
The following list items correspond to the numbers in the example:
Number of 512-byte blocks taken up by files in this directory. [Return to example]
1
--
Number of links to each file.
For an explanation of file links, see
Section 3.4.
[Return to example]
101
--
Number of bytes in the file.
[Return to example]
larry
-- User
name of the file's owner.
Your user name will replace
larry
on the screen.
[Return to example]
system
--
Group to which the file belongs.
Your group name will replace
system
on the screen.
[Return to example]
file3
-- Name
of the file or directory.
[Return to example]
Jun 5 10:03
--
Date and time the file was created or last modified in the format defined
by your current locale.
If the date is more than six months prior to the current
date, the year in four digit format replaces the time.
[Return to example]
drwxr-xr-x
--
File type and permissions set for each file or directory.
The first character
in this field indicates file type:
-
(hyphen) for ordinary filesb
for block-special filesc
for character-special filesd
for directories l
for symbolic linksp
for pipe-special files (first in, first out)s
for local sockets
The remaining characters are interpreted as three groups of three characters
each that indicate what read (r), write (w),
and execute (x) permissions are set for the owner, group,
and others.
If a hyphen (-) is displayed, the corresponding
permission is not set.
In addition, other permission information may also be displayed. For more information on permissions, see Chapter 5. [Return to example]
There are other
ls
command flags that you may find
useful as you gain experience with the operating system.
For detailed information
about the
ls
command flags, see the
ls(1)
reference page.
3.2 Displaying Files
You can view any text file stored on your system with a text editor.
However, if you want to just look at a file without making any changes, you
may view it (with or without screen formatting) using a variety of operating
system commands.
The following sections describe these commands.
3.2.1 Displaying Files Without Formatting (pg, more, cat)
The following commands display a file just as it is, without adding any special characteristics that govern the appearance of the contents:
pg
cat
more
page
For information on displaying files with formatting, see Section 3.2.2.
To display a file without formatting, the general format is:
command filename
The
command
entry
is one of the following command names:
pg,
more,
page, or
cat.
The
filename
entry can be the name of one file, or a series
of file names separated by spaces.
You may also use pattern-matching characters
to specify your files.
See
Chapter 2
for information on
using pattern-matching characters.
The
pg
command lets you view one or more files.
In
Example 3-2,
the
pg
command displays the contents of
file1
in your login directory:
Example 3-2: Output from the pg Command (One File)
$pg file1You start the vi program by entering the command vi, optionally followed by the name of a new or existing file. $
To view the contents of both
file1
and
file2, enter both file names on the
command line.
When you display files that contain more lines than will fit
on the screen, the
pg
command pauses as it displays each
screen.
To view the next screen of information in a file, press the Return
key until you reach the end of the current file.
When you reach the end of
the current file, you are prompted with the name of the next file.
When you
press the Return key at the end of the current file, the start of the next
file is displayed.
The
pg
command always displays multiple
files in the order in which you listed them on the command line.
In
Example 3-3,
(EOF):
(end of file) means
that you are at the end of the current file.
Example 3-3: Output from the pg Command (Multiple Files)
$pg file1 file2You start the vi program by enteringthe command vi, optionally followed by the nameof a new or existing file.(EOF): [Return](Next file: file2) [Return]If you have created a new file, you will findthat it is easy to add text.(EOF): [Return]$
At the
Next file:
filename
prompt, you can enter the
-n
option to go back to
the previous file instead of displaying the next file.
When you display files that contain more lines than will fit on the
screen, the
pg
command pauses as it displays each screen.
To see the next screen of information in a file, press the Return key.
The
more
command also lets you enter multiple file names on the command
line and is very much like the
pg
command in the way that
it handles long files.
If the file contains more lines than can fit on your
screen,
more
pauses and displays a message telling you
what percentage of the file you have viewed thus far.
At this point, you can
do one of the following:
Press the Space bar to display the remainder of the file a page at a time
Press the Return key to display one line at a time
Type
q
to quit viewing the file
The
page
command is identical to the
more
command, except
that it clears the screen and begins the display at the top of the screen
for each page when a file contains more lines than will fit on one page.
In
some operating environments or with some display devices, this difference
may not be noticeable.
The
cat
command also
displays text.
However, it is less useful for viewing long files because it
does not paginate files.
When viewing a file that is larger than one screen,
the contents will display too quickly to be read.
When this happens, press Ctrl/S
to halt the display.
You can then read the text.
When you want to display
the remainder of the file, press Ctrl/Q.
Because
cat
is not useful for viewing long files, you may prefer using the
pg,
more, or
page
command in
these cases.
The
pg,
more,
page,
and
cat
commands all have additional options that you may
find useful.
For more information, refer to the
cat(1),
more(1),
page(1),
and
pg(1)
reference pages.
3.2.2 Displaying Files with Formatting (pr)
Formatting is the process of controlling the way the contents of your
files appear when you display or print them.
The
pr
command
displays a file in a simple but useful style.
Note
The
prcommand does not interpret any text formatting information that may reside in your file. Theprcommand does not format files the same way asnroffortroff, for example. Files generated by word processing and desktop publishing software may not be recognized by theprcommand.
To display a file with simple formatting, the format of the command is:
pr
filename
The
filename
entry can be the name of the file, the relative pathname of the file, the
full pathname of the file, or a list of file names separated by spaces.
The
format you use depends on where the file is located in relation to your current
directory.
You may also use pattern-matching characters to specify files.
See
Chapter 2
for information on pattern matching.
You may
specify
filename
as a dash (-).
In this case, the
pr
command will read from your terminal
until you terminate the input with an end of file (usually Ctrl/D) mark.
Used without any options, the
pr
command does the
following:
Divides the contents of the file into pages
Puts the date, time, page number, and file name in a heading at the top of each page
Leaves five blank lines at the end of the page
When
you use the
pr
command to display a file, its contents
may scroll off your screen too quickly for you to read them.
When this happens,
you can view the formatted file by using the
pr
command
along with the
more
command.
The
more
command instructs the system to pause at the end of each screenful of text.
For example, to display a long file called
report
so that it pauses when the screen is full, enter the following command:
$pr report | more
When the system pauses at the first screen of text, press the Space
bar to display the next screen.
The previous command uses the pipe symbol
( | ) to take the output from the
pr
command
and use it as input to the
more
command.
For more information
on pipes, see
Section 7.4.2.
Sometimes you may prefer to display a file in a more sophisticated format. You can use a number of flags in the command format to specify additional formatting features. Table 3-2 explains several of these flags.
Table 3-2: The pr Command Flags
| Flag | Action |
|
Begins formatting on page number
For example, the
|
|
Formats page into
For example, the
|
|
Formats all specified files at the same time, side-by-side, one per column. For example, the
|
|
Formats double-spaced output. Otherwise, output is single-spaced. For example, the
|
|
Uses a formfeed character to advance
to a new page.
(Otherwise,
|
|
Uses a formfeed character to advance to a new page. (Otherwise, issues a sequence of linefeed characters.) Does not pause before beginning the first page if the standard output is a terminal. |
|
Sets line width to
For example, the
|
|
Offsets (indents) each line by
For example, the
|
|
Sets page length to
For example, the
|
|
Uses the specified string of characters,
rather than the file name, in the header (title) that is displayed at the
top of every page.
If
string
includes blanks or
special characters, it must be enclosed in
For example, the
|
|
Prevents
For example, the
|
|
Separates columns with the character
For example, the
|
You can use more than one flag at a time with the
pr
command.
In the following example, you instruct
pr
to format
file1
with these characteristics:
With double spacing (-d)
With the title "My Novel" (-h) rather than
the name of the file
$pr -dh 'My Novel' file1
For detailed information about the
pr
command
and its flags, see the
pr(1)
reference page.
3.3 Printing Files (lpr, lpq, lprm)
Use the
lpr
command to send one or more files to
the system printer.
The
lpr
command actually places files
in a
print queue, which is a list of files waiting
to be printed.
Once the
lpr
command places your files in
the queue, you can continue to do other work on your system while you wait
for the files to print, or you may terminate your session.
The general format of the
lpr
command is:
lpr
filename
The
filename
entry
can be the name of the file, the relative pathname of the file, the full pathname
of the file, or a list of file names separated by spaces.
The format you use
depends on where the file is located in relation to your current directory.
You may also use pattern-matching characters to specify files.
See
Chapter 2
for information on pattern matching.
If your system has more than one printer, use the following format to specify where you want the file to print:
lpr
-P printername filename
The
-P
flag
indicates that you want to specify a printer.
The
printername
entry is the name of a printer.
Printers often have
names that describe the location of the printer (for example,
southmailroom), the custodian or nearest monitor (for example,
leslie), or some other descriptive nomenclature.
If your system has several
types of printers available, they may be assigned names such as
slide
or
color
that describe their function or
capability.
See your system administrator for information on the printer configuration
available on your system.
If your system has more than one printer, one of them
is the default printer.
When you do not enter a specific
printername, your print request goes to the default
printer.
Use the
lpstat -s
command to find the names of
available printers on your system.
Example 3-4
shows how to use the
lpr
command to print one or more files on a printer named
lp0.
Example 3-4: Using the lpr Command
$lpr -P lp0 file1[1]$lpr -P lp0 file2 file3[2]$
The
lpr
commands function in the following manner:
The first
lpr
command
sends
file1
to the
lp0
printer and then
displays the shell prompt: a dollar sign ($).
[Return to example]
The second
lpr
command
sends
file2
and
file3
to the same print
queue, and then displays the shell prompt before the files finish printing.
[Return to example]
Several
lpr
command flags enable you to control
the way in which your file prints.
Following is the general format for using
a flag with this command:
lpr
flag filename
Table 3-3
explains some of the most useful
lpr
command flags.
For a complete description of the
lpr
command flags, see the
lpr(1)
reference page.
Table 3-3: The lpr Command Flags
| Flag | Action |
|
Prints
num
copies of the file.
Otherwise,
lpr
prints one copy.
For
example, the
lpr -#2 file1
command prints two copies
of
file1. |
|
Sets line width to
num
columns.
Otherwise, line width is 72 columns.
For example, the
lpr -w40 file1
command prints
file1
with lines that are 40 columns wide. |
|
Offsets (indents) each line by
num
space positions.
Otherwise, offset is 8 spaces.
For example, the
lpr -i5 file1
command prints
file1
with lines that are indented five spaces. |
|
Formats the file using
pr
as a filter. |
-T 'string' |
Uses the specified string of characters,
rather than the file name, in the header used by
pr.
Requires
the
-p
flag.
If the string includes blanks or special
characters, it must be enclosed in
' '
(single quotes).
For example, the
lpr -p -T 'My Novel' file1
command specifies "My Novel" as the title. |
|
Sends mail when the file completes printing.
For example, the command
lpr -m file1
specifies that
you want mail to be sent to you once
file1
prints. |
Once you have entered the
lpr
command, your print
request is entered into the print queue.
To see the position of the request
in the print queue, use the
lpq
command.
To look at the
print queue, enter:
$lpq
If your request has already been printed, or if there are no requests in the print queue, the system responds with the following message:
no entries
If there are entries in the print queue, the system lists them and indicates which request is currently being printed. Following is a typical listing of print queue entries (your listing will vary):
Rank   Owner      Job  Files                Total Size
active marilyn    489  report               8470 bytes
1st    sue        135  letter               5444 bytes
2nd    juan       360  (standard input)     969 bytes
3rd    larry      490  travel               1492 bytes
The
lpq
command displays the following for each print
queue entry:
Its position in the queue
Its owner
Its job number
Name of the file
Size of the file in bytes
For example, Marilyn's report (job number 489) is currently being printed, and the requests of Sue, Juan, and Larry are pending.
When you print files, the position of the request in the queue as well as its size may help you estimate when your request may be finished. Generally, the lower the position in the queue and the larger the print request, the more time it will take.
If your system has more than one printer, use the following format to specify which print queue you want to see:
lpq
-Pprintername file name
The
-P
flag indicates that you want to
specify a print queue.
The
printername
entry is the name of a particular printer.
The
printername
entry should be the same as was used to initiate
the print request.
Use the
lpstat -s
command to learn
the names of all the printers.
See the
lpq(1)
reference page for a complete description
of the
lpq
command.
If you decide not to print your request, you can
delete it from the print queue by using the
lprm
command.
The general format of the
lprm
command is the following:
lprm
-Pprintername
jobnumber
The
jobnumber
entry specifies the job number that the system has assigned to your print
request.
The
printername
entry
should be the same as was used to initiate the print request.
You can see
the job number by entering the
lpq
command.
For example, if Larry wants to cancel his print request, he can enter:
$lprm 490$
The
travel
file
will be removed from the print queue.
For complete information on the
lprm
command, see
the
lprm(1)
reference page.
This information provides a basic description of the commands to print
your files.
For additional details on the printing capabilities of the system
and the commands available, see the
lp(1),
cancel(1), and
lpstat(1)
reference pages.
3.4 Linking Files (ln)
A
link
is a connection between a file name and
the file itself.
Usually, a file has one link - a connection to its
original file name.
However, you can use the
ln
(link)
command to connect a file to more than one file name at the same time.
Links are convenient whenever you need to work with the same data in more than one place. For example, suppose you have a file containing assembly-line production statistics. You use the data in this file in two different documents -- in a monthly report prepared for management, and in a monthly synopsis prepared for the line workers.
You can link the statistics file to two different file names,
for example,
mgmt.stat
and
line.stat,
and place these file names in two different directories.
In this way, you
save storage space because you have only one copy of the file.
More importantly,
you do not have to update multiple files.
Because
mgmt.stat
and
line.stat
are linked, editing one automatically updates
the other, and both file names always refer to the same data.
3.4.1 Hard Links and Soft Links
There are two kinds of links available for your use: hard links and soft, or symbolic, links.
Hard links let you link only files in the same file system. When you create a hard link, you are providing another name for the same file. All the hard link names for a file, including the original name, are on equal footing. It is incorrect to think of one file name as the real name, and another as only a link.
Soft links or symbolic links let you link both files and directories. In addition, you may link both files and directories across different file systems. A symbolic link is actually a distinct file that contains a pointer to another file or directory. This pointer is the pathname to the destination file or directory. Only the original file name is the real name of the file or directory. Unlike a hard link, a soft link is actually only a link.
With both hard and soft links, changes made to a file through one name appear in the file as seen through another name.
A major difference between hard and soft links occurs when removing
them.
A file with hard-linked names persists until all its names have been
removed.
A file with soft-linked names vanishes when its original name has
been removed; any remaining soft links then point to a nonexistent file.
See
Section 3.4.5.
3.4.2 Links and File Systems
The term file system as used in this discussion of links differs from its earlier usage in this book. Previously, a file system was defined as a useful arrangement of files into a directory structure. Here, the same term acquires a more precise meaning: the files and directories contained within a single disk partition. A disk partition is a physical disk, or a portion of one, that has been prepared to contain file directories.
You can use the
df
command to discover the name of
the disk partition that holds any particular directory on your operating system.
Here is an example in which
df
shows that the directories
/u1/info
and
/etc
are in different file systems,
but that
/etc
and
/tmp
are in the same
file system:
$df /u1/infoFilesystem 512-blks used avail capacity Mounted on /dev/rz2c 196990 163124 14166 92% /u1$df /etcFilesystem 512-blks used avail capacity Mounted on /dev/rz3a 30686 19252 8364 70% /$df /tmpFilesystem 512-blks used avail capacity Mounted on /dev/rz3a 30686 19252 8364 70% / $
For more information on the
df
command, see the
df(1)
reference
page.
3.4.3 Using Links
To link files in the same file system, use the following command format:
ln
/dirname1/filename1 /dirname2/filename2
The
/dirname1/filename1
entry is the pathname of an existing file.
The
/dirname2/filename2
entry is the pathname of a new file name in the same
file system to be linked to the existing
/dirname1/filename1.
The
dirname1
and
dirname2
arguments are optional
if you are linking files in the same directory.
If you want to link files and directories across file systems,
you can create symbolic links.
To create a symbolic link, add an
-s
flag to the
ln
command sequence and
specify the full pathnames of both files.
The
ln
command
for symbolic links takes the following form:
ln -s
/dirname1/filename1 /dirname2/filename2
The
/dirname1/filename1
entry is the pathname of an existing file.
The
/dirname2/filename2
entry is a pathname of a new file name in either
a different file system or the same file system.
In
Example 3-5
you use the
ln
command
to link the new file name
checkfile
to the existing file
named
file3.
You then use the
more
command
to verify that
file3
and
checkfile
are
two names for the same file.
$ln file3 checkfile[1]$more file3[2]You will find that vi is a useful[3]editor that has many features.[3]$more checkfile[4]You will find that vi is a useful[3]editor that has many features.[3]$
The following list items correspond to the numbers in the example:
Create a hard link between the two files. [Return to example]
Display the text of
file3.
[Return to example]
Now display the text of
checkfile.
[Return to example]
Observe that both
file3
and
checkfile
contain the same information.
Any change that you make to the file under one name will show up when you
access the file by its other name.
Updating
file3, for
example, will also update
checkfile.
[Return to example]
If your two files were located in directories that are in two different
file systems, you would need to create a symbolic link between them.
For example,
to link a file called
newfile
that is in the
/reports
directory to the file called
mtgfile
in the
/summary
directory, you can create a symbolic link
by using the following:
$ln -s /reports/newfile /summary/mtgfile$
The information in both files is still updated in the same manner as previously explained.
For more information on the
ln
command and linking
files, see the
ln(1)
reference page.
3.4.4 How Links Work - Understanding File Names and File Serial Numbers
Each file has a unique identification number, called a file serial number. The file serial number refers to the file itself - data stored at a particular location - rather than to the file name. The file serial number distinguishes the file from other files within the same file system.
A directory entry is a link between a file serial number that represents a physical file and a file name. It is this relationship between files and file names that enables you to link multiple file names to the same physical file - that is, to the same file serial number.
To display the file serial numbers of files in your current
directory, use the
ls
command with the
-i
(print file serial number) flag in the following format:
ls -i
Examine the identification numbers of the files in your login directory. The number preceding each file name in the listing is the file serial number for that file.
$ls -i1079 checkfile 1077 file1 1078 file2 1079 file3 $
The file serial numbers in your listing will differ from
those shown in this example.
However, the important thing to note is the identical file serial numbers
for
file3
and
checkfile, the two files
linked in the previous example.
In this case, the file serial number is 1079.
Because a file serial number represents a file within a particular file system, hard links cannot exist between separate file systems.
The situation is entirely different
with symbolic links, where the link becomes a new file with its own, new file serial number.
The symbolic link is not another file name on the original file's file serial number,
but instead is a separate file with its own file serial number.
Because the symbolic
link refers to the original file by name, rather than by file serial number, symbolic
links work correctly between separate file systems.
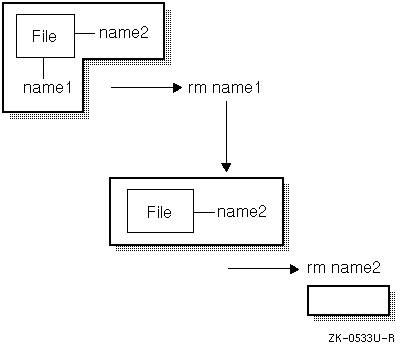
3.4.5 Removing Links
The
rm
(remove file) command does not always remove
a file.
For example, suppose that a file is linked to more than one file name;
that is, several names refer to the same file serial number.
In this case, the
rm
command removes the link between the file serial number and that file
name, but leaves the physical file intact.
The
rm
command
actually removes a physical file only after it has removed the last link between
that file and a file name, as shown in
Figure 3-1.
When
a symbolic link is removed, the file name specifying the pointer to the destination
file or directory is removed.
For detailed information about the
rm
command, refer
to
Section 3.9
or the
rm(1)
reference page.
Figure 3-1: Removing Links and Files
To
display both the file serial numbers and the number of file names linked to a particular file serial number,
use the
ls
command with the
-i
(print file serial number) and the
-l
(long listing) flags
in the following format:
ls
-il
Examine the links in your login directory.
Remember that the file serial numbers
displayed on your screen will differ from those shown in the example and that
your user name and your group name will replace the
larry
and
system
entries.
$ls -iltotal 3 1079 -rw-r--r-- 2 larry system 65 Jun 5 10:06 checkfile 1077 -rw-r--r-- 1 larry system 101 Jun 5 10:03 file1 1078 -rw-r--r-- 1 larry system 75 Jun 5 10:03 file2 1079 -rw-r--r-- 2 larry system 65 Jun 5 10:06 file3 1080 drwxr-xr-x 2 larry system 32 Jun 5 10:07 project $
Again, the first number in each entry shows the file serial number for that file name. The second element in each line shows the file permissions, described in detail in Chapter 5.
The third field for each entry, the number to the left of the user name,
represents the number of links to that file serial number.
Notice that
file3
and
checkfile
have the same file serial number, 1079,
and that both show two links.
Each time the
rm
command
removes a file name, it reduces the number of links to that file serial number by
one.
In
the following example, use the
rm
command to remove the
file name
checkfile.
$rm checkfile$
List the contents of the directory
with the
ls -il
command.
Notice that the
rm
command has reduced the number of links to file serial number 1079, which
is the same file serial number to which
file3
is linked, by one.
$ls -iltotal 3 1077 -rw-r--r-- 1 larry system 101 Jun 5 10:03 file1 1078 -rw-r--r-- 1 larry system 75 Jun 5 10:03 file2 1079 -rw-r--r-- 1 larry system 65 Jun 5 10:06 file3 1080 drwxr-xr-x 2 larry system 32 Jun 5 10:07 project $
This section provides information about how to copy files on a local system. For information about copying files to and from remote systems, see Chapter 12 and Chapter 14.
The
cp
(copy) command copies a file from one file
name to another file name in your current directory or copies the file from
one directory to another directory.
The
cp
command is especially useful to make backup
copies of important files.
Because the backup and the original are two distinct
files, you can make changes to the original while still maintaining an unchanged
copy in the backup file.
This is helpful in case something happens to the
original version.
Also, if you decide you do not want to save your most recent
changes to the original file, you can begin again with the backup file.
Compare the
cp
command,
which actually copies files, with the
ln
command, which
creates multiple names for the same file.
Section 3.4
explains
the
ln
command in detail.
Refer also to the
cp(1)
and
ln(1)
reference
pages.
The format of the
cp
command is:
cp
source destination
The
source
entry is the name of the file
to be copied.
The
destination
entry is the name
of the file to which you want to copy
source.
The
source
and
destination
entries can
be file names in your current directory or pathnames to different directories.
This statement is true when you are copying files from one directory to another.
To copy the contents of an entire directory to another directory (recursively,
using the
-r
option), see
Section 4.4.
To copy
files to a different directory, use the general format of the
cp
command.
In this case,
source
is a series
of one or more file names and
destination
is a
pathname that ends with the name of the target directory.
In the
source
entry you may also use pattern-matching characters.
3.5.1 Copying Files in the Current Directory
The
cp
command creates the destination file if it
does not already exist.
However, if a file with the same name as the destination
file does exist,
cp
copies the source file over the existing
destination file.
Caution
If the destination file exists, your shell may allow the
cpcommand to erase the contents of that file before it copies the source file. As a result, be certain that you do not need the contents of the destination file, or that you have a backup copy of the file, before you use it as the destination file for thecpcommand. If you use the C shell, see Table 8-6 for the noclobber variable that can be set to prevent the erasure of the destination file.
In the following example, the destination file does not exist,
so the
cp
command creates it.
First, list the contents
of your login directory:
$lsfile1 file2 file3 project $
Copy the source file,
file2,
into the new destination file,
file2x:
$cp file2 file2x$
List the contents of the directory to verify that the copying process was successful:
$lsfile1 file2 file2x file3 project $
3.5.2 Copying Files into Other Directories
You need a subdirectory to work through the following example, so create
one called
reports
with the
mkdir
command:
$mkdir reports$
To copy the
file2
file into the
reports
directory, enter:
$cp file2 reports$
List the contents of
reports
to verify that it contains a copy of
file2:
$ls reportsfile2 $
You can also use the
cp
command
to copy multiple files from one directory into another directory.
The format
of the command is:
cp
filename1 filename2 dirname
In the following example, enter the
cp
command
to copy both
file2
and
file3
into the
reports
directory, and then list the contents of that directory:
$cp file2 file3 reports$ls reportsfile2 file3 $
In the previous example, you do not have to specify
file2
and
file3
as part of the
dirname
entry because the files being copied are retaining their
original file names.
You may also use pattern-matching characters to copy files.
For example,
to copy
file1,
file2
and
file3
into
reports, enter:
$cp file* reports$
To change the
name of a file when you copy it into another directory, enter the name of
the source file (the original file), the directory name, a slash ( / ),
and then the new file name.
In the following example, copy
file3
into the
reports
directory under the new name
notes, and list the contents of the
reports
directory:
$cp file3 reports/notes$ls reportsfile1 file2 file3 notes $
3.6 Renaming or Moving Files (mv)
You can use the
mv
(move) command to perform the
following actions:
Move one or more files from one directory into another directory
Rename files
Rename directories
The format of the
mv
command is:
mv
oldfilename newfilename
The oldfilename entry is the name of the file you want to move or rename. The newfilename entry is the new name you want to assign to the original file. Both entries can be names of files in the current directory, or pathnames to files in a different directory. You may also use pattern-matching characters.
The
mv
command links a new name to an existing file serial number
and breaks the link between the old name and that file serial number.
It is useful
to compare the
mv
command with the
ln
and
cp
commands, which are explained in
Section 3.4
and
Section 3.5.
Refer also to the
mv(1),
ln(1),
and
cp(1)
reference pages.
3.6.1 Renaming Files
In the following example, first list the file serial number of each file in
your current directory with the
ls -i
command.
Next,
enter the
mv
command to change the name of file
file2x
to
newfile.
The file serial numbers displayed
on your screen will differ from the numbers in the example:
$ls -i1077 file1 1088 file2x 1080 project 1078 file2 1079 file3 1085 reports$mv file2x newfile$
Again, list the contents of the directory:
$ls -i1077 file1 1079 file3 1080 project 1078 file2 1088 newfile 1085 reports $
Notice two things in previous example:
The
mv
command changes the name of file
file2x
to
newfile.
The file serial number for the original file (file2x)
and
newfile
is the same - 1088.
The
mv
command removes the connection between file serial number
1088 and file name
file2x, replacing it with a connection
between file serial number 1088 and file name
newfile.
However,
the command does not change the file itself.
3.6.2 Moving Files into a Different Directory
You can also use the
mv
command to move one or more
files from your current directory into a different directory.
Caution
Type the target directory name carefully because the
mvcommand does not distinguish between file names and directory names. If you enter an invalid directory name, themvcommand takes that name as a new file name. The result is that the file is renamed rather than moved.
In
the following example, the
ls
command lists the contents
of your login directory.
The
mv
command moves
file2
from your current directory into the
reports
directory.
The
ls
command then verifies that the file has
been removed:
$lsfile1 file2 file3 newfile project reports$mv file2 reports$lsfile1 file3 newfile project reports $
List the contents of the
reports
directory to verify that the command has moved the file:
$ls reportsfile2 file3 notes $
You may also use pattern-matching characters to move files.
For example,
to move
file1
and
file3
into
reports, you could enter the following command:
$mv file* reports$
Now list the contents of your login directory to verify that
file1
and
file3
have been moved:
$lsnewfile project reports $
Copy
file1,
file2, and
file3
back into your login directory.
The dot (.) in the following
command line specifies the current directory, which in this case is your login
directory:
$cp reports/file* .$
Verify that the files are back in your login directory:
$lsfile1 file2 file3 newfile project reports $
Lastly, verify that
file1,
file2,
and
file3
are still in the
reports
directory:
$ls reportsfile1 file2 file3 newfile project reports $
You can compare the contents of text files with the
diff
command.
Use the
diff
command when you want to pinpoint
the differences in the contents of two files that are expected to be somewhat
different.
The format of the
diff
command is:
diff
file1 file2
The
diff
command scans each line in both
files looking for differences.
When the
diff
command finds
a line (or lines) that differ, for each line that is different the following
information is reported:
Line numbers of any changes
Whether the difference is an addition, a deletion, or a change to the line
If the change is caused by an addition,
diff
displays
the following:
l[,l] a r[,r]
The
l
is a line number in
file1
and
r
is a line number in
file2.
The
a
indicates an addition.
If the difference was a deletion,
diff
would specify a
d; if the difference was a change to a
line,
diff
would specify a
c.
The actual differing lines follow. In the leftmost column, a left angle bracket (<) indicates lines from file1, and a right angle bracket (>) indicates lines from file2.
For example, suppose that you want to quickly compare the following
meeting rosters in the files
jan15mtg
and
jan22mtg:
jan15mtg |
jan22mtg |
| alice | alice |
| colleen | brent |
| daniel | carol |
| david | colleen |
| emily | daniel |
| frank | david |
| grace | emily |
| helmut | frank |
| howard | grace |
| jack | helmut |
| jane | jack |
| juan | jane |
| lawrence | juan |
| rusty | lawrence |
| soshanna | rusty |
| sue | soshanna |
| tom | sue |
| tom |
Instead of tediously comparing the list by sight, you can use the
diff
command to compare
jan15mtg
with
jan22mtg
as follows:
$diff jan15mtg jan22mtg2a3,4 > brent > carol 10d11 < howard $
Here we find that Brent and Carol attended the
meeting on January 22, and Howard did not.
We know this because the line number
and text output indicate that
brent
and
carol
are additions to file
jan22mtg
and that
howard
is a deletion.
In cases where there are no differences between files, the system will
return merely your prompt.
For more information, see the
diff(1)
reference page.
3.8 Sorting File Contents (sort)
You can sort the contents of text files with the
sort
command.
You can use this command to sort a single file or multiple files.
The format of the
sort
command is:
sort
filename
The filename entry can be the name of the file, the relative pathname of the file, the full pathname of the file, or a list of file names separated by spaces. You may also use pattern-matching characters to specify files. See Chapter 2 for information about pattern matching.
A good example of what the
sort
command can do for
you is to sort a list of names and put them in collated order as defined by
your current locale.
For example, assume that you have lists of names that
are contained in three files,
list1,
list2,
and
list3:
list1 |
list2 |
list3 |
| Zenith, Andre | Rocca, Carol | Hamilton, Abe |
| Dikson, Barry | Shepard, Louis | Anastio, William |
| D'Ambrose, Jeanette | Hillary, Mimi | Saluccio, William |
| Julio, Annette | Chung, Jean | Hsaio, Peter |
To sort the names in all three files, enter:
$sort list*Anastio, William Chung, Jean D'Ambrose, Jeanette Dickson, Barry Hamilton, Abe Hillary, Mimi Hsaio, Peter Julio, Annette Rocca, Carol Saluccio, Julius Shepard, Louis Zenith, Andrew $
You also can capture the sorted list by redirecting the screen output to a file that you name by entering:
$sort list* > newlist$
For more information about redirecting
output, see
Chapter 6.
For a detailed description of the
sort
command and its many options, see the
sort(1)
reference page.
3.9 Removing Files (rm)
When you no longer need a file, you can remove it with the
rm
(remove file) command.
Use this command to remove a single file
or multiple files.
The format of the
rm
command is:
rm
filename
The
filename
entry can be the name
of the file, the relative pathname of the file, the full pathname of the file,
or a list of file names.
The format you use depends on where the file is located
in relation to your current directory.
See the
rm(1)
reference page for
a complete description of the command.
3.9.1 Removing a Single File
In the following example, you remove the file called
file1
from your login directory.
First, return to your login directory with the
cd
(change directory) command.
Next, enter the
pwd
(print
working directory) command to verify that your login directory is your current
directory, and then list its contents.
Remember that the system substitutes
the name of your login directory for the notation
/u/uname
in the example.
$cd$pwd/u/uname$lsfile1 file2 file3 newfile project reports $
Enter the
rm
command to remove
newfile,
and then list the contents of the directory to verify that the system has
removed the file.
$rm newfile$lsfile1 file2 file3 project reports $
You must have permission to access a directory before you can remove files from it. For information about directory permissions, see Chapter 5.
Note
In addition to removing one or more files,
rmalso removes the links between files and file names. Thermcommand actually removes the file itself only when it removes the last link to that file. For information about using thermcommand to remove links, see Section 3.4.5.
3.9.2 Removing Multiple Files - Matching Patterns
You can remove more than one file at a time with the
rm
command by using pattern-matching characters.
See
Chapter 2
for a description of pattern-matching characters.
For example, suppose your current directory contains the following files:
receivable.jun,
payable.jun,
payroll.jun, and
expenses.jun.
You can remove all four of
these files with the
rm *.jun
command.
Caution
Be certain that you understand how the
*pattern-matching character works before you use it. For example, for a regular user, therm *command removes every file in your current directory except those with a file name beginning with a dot (.). Be especially careful with*at the beginning or end of a file name. If you mistakenly enterrm *name instead ofrm*name, you will remove all your files, rather than just those ending with name. (If your system is backed up on a regular basis, your system administrator can help you recover lost files.)You may prefer to use the
-iflag with thermcommand, which prompts you for verification before deleting a file or files. See the end of this section for details.
To perform the examples for
pattern-matching, your directory must contain the files
record1,
record2,
record3,
record4,
record5, and
record6.
Create those files now
in your login directory by using the
touch
command as follows:
$touch record1 record2 record3 record4 record5 record6$
The
touch
command
is useful when you want to create empty files, as you are now.
For complete
information on the
touch
command, see the
touch(1)
reference page.
You can also use the pattern-matching question
mark (?) character with the
rm
command
to remove files whose names are the same, except for a single character.
For
example, if your current directory contains the files
record1,
record2,
record3, and
record4,
you can remove all four files with the
rm record?
command.
For detailed information about pattern-matching characters, see Chapter 2.
When using pattern-matching characters, you may find the
-i
(interactive) flag of the
rm
command particularly
useful.
The
rm -i
command lets you selectively
delete files.
For each file selected by the command, the operating system
asks whether or not you want to delete or retain the file.
If you want to remove four of the six files in your directory that begin
with the characters
record, enter:
$rm -i record?rm: remove record1?nrm: remove record2?yrm: remove record3?yrm: remove record4?yrm: remove record5?yrm: remove record6?n$
Note
In addition to removing one or more files, the
rmcommand also provides an option, the-rflag, that removes files and directories at the same time. See Chapter 4 for more information.
3.10 Determining File Type (file)
Use the
file
command when you want to see what kind
of data a file contains without having to display its contents.
The
file
command displays whether the file is one of the following:
A text file
A directory
A FIFO (pipe) special file
A block special file
A character special file
Source code for the C or FORTRAN programming languages
An executable (binary) file
An archive file in
ar
format
An archive file in extended
cpio
or extended
tar
format
An archive file in zip format
A compressed data file in
gzip
format
A file of commands text (shell script)
An audio file in
.voc,
.iff,
or
.wav
format
An image file in
TIFF,
GIF,
MPEG, or
JPEG
format
The
file
command is especially useful when you suspect
that a file contains a compiled program, audio data, or image data.
Displaying
the contents of these types of files can produce disconcerting results on
your screen.
You may not understand the purpose of each of these types of
files.
As you gain experience in the use of the UNIX commands their purpose
will be better understood.
The format of the
file
command is:
file
filename
The filename entry can be the name of the file, the relative pathname of the file, the full pathname of the file, or a list of file names. The format you use depends on where the file is located in relation to your current directory. You may also use pattern-matching characters to specify files. See Chapter 2 for information on pattern matching.
For example, to determine the file type of entries in your login directory, enter the following:
$cd$pwd/u/uname$file *file1: ascii text file2: English text file3: English text project: directory record1: empty record6: empty reports: directory $
The
file
command has identified
file1,
file2, and
file3
as
English text files,
project
and
reports
as directories, and
record1
and
record6
as empty files.
For more information on the
file
command, see the
file(1)
reference page.