This chapter contains information about the advanced features that are available for you to automate and customize the installation process. Topics covered in this chapter include:
An overview of the features that are available for you to automate and customize the installation and system configuration processes
An introduction to configuration description files (CDF) and how they are used for system cloning
The point at which user-supplied files are invoked during a Full Installation or Update Installation to perform customizations you want to make on a target system
The high level tasks that are performed by the administrator to set up user supplied files and CDFs
The theory of operation behind how the installation process invokes user-supplied files and CDFs
How to create and position user-supplied files and CDFs for use by the Full and Update Installation processes
6.1 How You Can Customize the Installation Process
The Full and Update Installation processes have the built-in capability to look for certain files at predefined times. If you copy these files to the right locations, the following can be achieved:
Installation
Cloning
-- an
install.cdf
file
contains the installation characteristics from an installed system and is
used to duplicate the installation to one or more target systems.
Configuration
Cloning
-- a
config.cdf
file
contains the system configuration characteristics from a configured system
and is used to duplicate the configuration on one or more target systems.
Configuration is the process of setting up the network, mail system, internet
access, and printers so that the system can communicate with other systems
and users.
Additional
customizations through user-supplied files
-- these
files are created to perform specific tasks on a target system at specific
times during a Full or Update Installation.
These files must be named
preinstall,
update_preinstall,
postload,
update_postload, and
postreboot.
This chapter provides a brief introduction to the
concept of configuration description files.
The remainder of this
chapter is devoted to the
task
of creating files
to perform customized tasks during an installation.
6.2 Overview of Configuration Description Files
Configuration description files (CDF) are used to
clone systems.
Two distinct CDFs store the installation and configuration
characteristics of an installed and configured system.
Installation information
is stored in the
install.cdf
file, and configuration
characteristics are stored in a
config.cdf
file.
To
briefly describe these two files:
An
install.cdf
file is generated whenever
a system is installed with the current version of the operating system by
the Full Installation process.
This file is located in the
/var/adm/smlogs
directory.
It contains a record of the file system layout, host-
and site-specific information, and the software that was installed during
a Full Installation.
The information in the file is used to clone the same
installation on other systems with similar hardware.
Because
Installation
Cloning
is an extensive subject that has many options, procedures
are documented in
Chapter 7.
The
theory of operation
described in
Section 6.6
shows
where in the Full Installation process the
install.cdf
file is invoked.
The
config.cdf
file contains network,
internet, printer, and mail configuration information that has been saved
from a fully installed and configured system.
The
config.cdf
file is created manually with the
sysman -clone -save
command
whenever you want to save configuration information.
The
config.cdf
file can be applied to a target system during a Full Installation,
or it can be applied manually to a running system.
Because
Configuration
Cloning
is an extensive subject that has many options, procedures
are documented in
Chapter 8.
The
theory of operation
described in
Section 6.6
shows
where in the Full Installation process the
config.cdf
file is invoked.
Table 6-1
shows at what points the Full Installation process searches for CDFs and the
file names it looks for.
Table 6-1: Invocation Points of Configuration Description Files
| Invocation Point During Full Installation | Full Installation Process Searches for a File Named | Action Taken If Found |
| Before the installation user interface is displayed | install.cdf
|
The information stored in the
install.cdf
file is used to clone the same installation on the
target system. |
| After the system reboots but before the tailored kernel build | config.cdf |
The information stored in the
config.cdf
file is used to configure the target system. |
CDFs can be used in combination with
user-supplied files
as described in
Section 6.4
to perform additional tasks on the target system.
6.3 Overview of User-Supplied Files
User-supplied files can contain scripts, executables, or programs
and are a way to extend and customize the installation process.
Table 6-2
shows the invocation points in the installation process, the file names that
are searched for, and the type of installation that searches for them.
The
Full Installation and Update Installation processes always look for these
files, and they are executed if found.
Except for the
postreboot
file, if a user-supplied file is executed and returns a non-zero
status (which indicates a failure), the installation stops.
Table 6-2: Invocation Points of User-Supplied Files
| Invocation Point | Installation Process Searches for a File Named | Searched for During Which Installation Type? |
| Before the Full Installation user interface is presented | preinstall |
Full and Cloned |
| Before the Update Installation user interface is presented | update_preinstall |
Update |
| After software is installed but before the first reboot of the generic kernel |
postload
|
Full and Cloned |
| After software is updated but before the system reboots | update_postload |
Update |
| After the first reboot but before the tailored kernel build | postreboot |
Full and Cloned |
Table 6-3
lists
some typical uses of user-supplied files.
Table 6-3: Typical Uses of User-Supplied Files
| User-Supplied File Name | Might Be Used To: |
preinstall |
Define a customized disk label to eliminate the need to do so during the Full Installation. |
postload |
Dynamically modify host-specific information
in the
config.cdf
file so that the target systems are
uniquely defined on the network as soon as the cloning process is done.
Appendix B
shows a sample script that performs this
function. |
postreboot |
Install additional optional software to simplify the software selection process. |
update_preinstall |
Automatically perform a backup of the operating system before the actual update process starts. |
update_postload |
Reinstall a layered product that you removed because it prevented the update installation from continuing. |
The remainder of this chapter is dedicated to the
relationship between CDFs and user-supplied files,
how the installation process searches for user supplied files, and
how to
create
and
position
the files.
6.4 The Relationship Between CDFs and User-Supplied Files
CDFs and user-supplied files
can be used independently or in combination.
The CDFs and user-supplied files
can be located on different sources.
For example, either the
install.cdf, the
config.cdf
or both CDFs can be on a diskette,
the
preinstall
file can be on the RIS server, and the
postload
file can be located in the
/isl
directory
of the RIS server.
However, if the
postload
file is intended
to operate on a
config.cdf
file, both files should reside
in the same location.
User-supplied files can modify CDFs dynamically.
6.5 Summary of Administrator Tasks
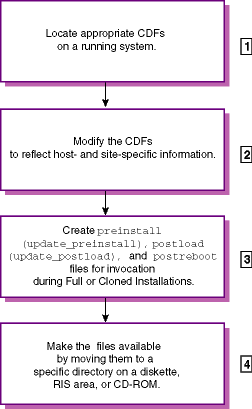
Figure 6-1
shows the high level system administrator
tasks required to set up CDFs and user-supplied files.
To execute user-supplied
files during a Full or Update Installation, a system administrator performs
Tasks 3 and 4 only.
Figure 6-1: Summary of Administrator Tasks
An administrator generates or locates CDFs suitable for cloning.
On systems that are installed with the current version of the operating system,
the
install.cdf
is located in the
/var/adm/smlogs
directory.
The
config.cdf
can be saved to
any directory by using the
sysman -clone -save
command,
but the default directory is
/var/adm/smlogs.
Installation
and Configuration Cloning procedures are documented in
Chapter 7
and
Chapter 8
respectively.
The administrator copies original CDFs to a working area for
modification.
At a minimum, host-specific information must be modified so
that the cloned system has a unique identity.
Original CDFs should be retained
in the
/var/adm/smlogs
directory because they contain information
about the initial system installation or configuration that could be valuable
for future troubleshooting.
The administrator optionally creates scripts or programs to be executed at three predefined points in the Full or Cloned Installation processes (two points in the Update installation process). The administrator determines the actions performed by these files. See Section 6.7 in this chapter for more information about creating these files.
The administrator moves the modified CDFs and any user-supplied
files to the
/
(root) directory on a diskette, to the
/var/adm/ris/clients/sets/profile_set
directory on a RIS server, or to the
/isl
directory on
a CD-ROM if the distribution media is being repackaged.
The files also
can be copied to the
/isl
directory within an extracted
RIS area.
See
Section 6.8
in this chapter for more
information about moving the files to the correct location.
Figure 6-2
contains a summary of how user-supplied files and CDFs are invoked during
a Full Installation.
Figure 6-2: Theory of Operation: User Supplied Files and CDFs
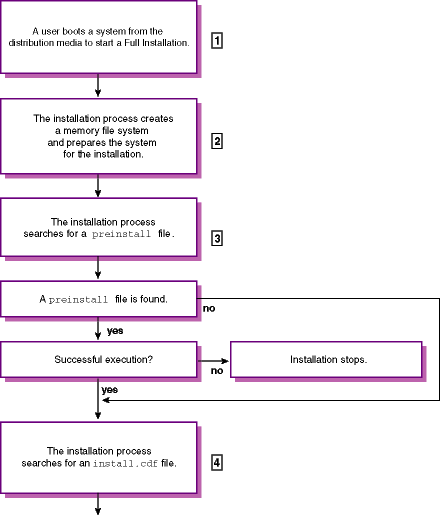
The system is booted from the distribution media to start a Full Installation.
The Memory File System (MFS) provides writable space required by the installation process.
The Full Installation process searches for a file named
preinstall.
The search order and file locations are described in
Table 6-4.
This file is a user-supplied script, program,
or executable containing specific actions to be carried out before the installation
process begins.
If this file is found, it is executed.
If execution is successful,
the installation process begins.
If execution is not successful (that is,
an exit status of non-zero is returned), the installation process stops.
If
a
preinstall
file is not found, the Full Installation
process begins the search for an
install.cdf
file.
If an
install.cdf
file is found in one
of the locations described in
Table 6-4, it drives
the rest of the installation and begins an Installation Cloning process on
the target system.
If an
install.cdf
file is not found,
a regular Full Installation process begins.
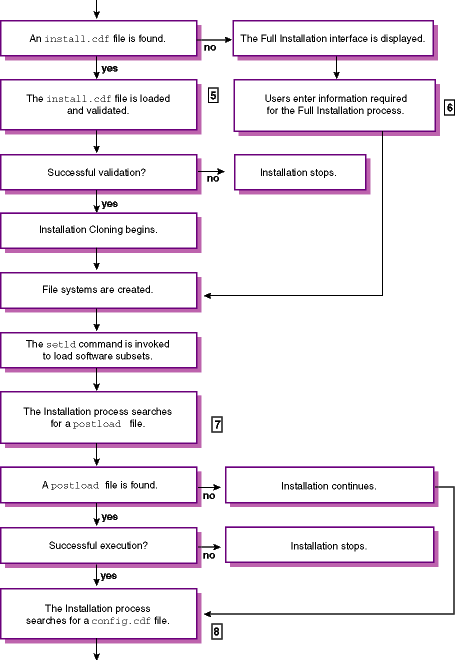
The installation process validates the
install.cdf
file before cloning the target system.
Validation includes ensuring
that the disk names and disk types specified in the CDF exist on the system
to be cloned.
For RIS installations, validation includes comparing the versions
of the software subsets included in the CDF with the software subset versions
that are installed in the RIS environment.
A CDF validation failure causes
the installation to stop.
Diagnostic messages display the reason for validation
failures.
Upon successful CDF validation, the Installation Cloning process
continues.
If an
install.cdf
file is not found, the
installer responds to the questions asked during a regular Full Installation.
After software subsets are loaded, the Full Installation process
searches for a file named
postload.
The search order and
locations are described in
Table 6-4.
This file
is a user-supplied script, program, or executable containing specific actions
to be carried out after software subsets are loaded.
If this file is found,
it is executed.
If execution fails, the installation process stops.
The Full Installation process searches for a
config.cdf
file in the search order and locations described in
Table 6-4.
If the
config.cdf
file is found, it is
copied to the
/var/adm/smlogs
directory where it will
be applied to clone the configuration of the target system later during the
system configuration phase of the installation process.
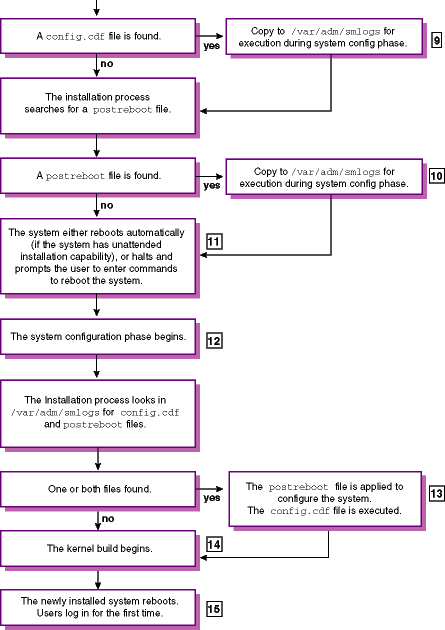
The Full Installation process searches for a file named
postreboot.
This file is a user-supplied script, program, or executable
containing specific actions to be carried out after the installation process
boots the installed system disk for the first time.
If this file is found,
it is copied to the
/var/adm/smlogs
directory for execution
during the system configuration phase.
The system automatically reboots after the software subsets
are loaded.
If your system does not have the capability for automatic reboots,
or if the
install.cdf
was not modified so that no user
invention is necessary, the installation process halts and prompts the user
to enter commands to reboot the system from the newly installed disks.
If
the system is not set up for automatic reboots, the screen displays the boot
commands that must be entered to reboot the system.
The system configuration phase begins automatically after the
system reboots.
Configuration refers to the process of tailoring the software
subsets, setting the host name,
root
password, date, time,
location and area, tuning the system, and building a kernel.
If values are
not defined for these attributes or if the installer did not enter a response
during the Full Installation, the installation process becomes interactive
to request it.
The Full Installation process looks in the
/var/adm/smlogs
directory to see if a
config.cdf
or
postreboot
file was moved there.
This is where the install process
moved the file; it is not a supported location for users.
If a
config.cdf
file is found, it is used to configure
the target system.
The Configuration Cloning performs validation checking,
which is described in
Section 8.8.
If the
config.cdf
file fails validation checking, a configuration cloning
will not take place, but the installation process continues.
To apply a
config.cdf
file to clone another system, the CDF must pass validation.
If a
postreboot
file is found, it is executed.
If execution is not successful, the Full Installation continues; execution
failure of the
postreboot
file does not prevent the next
step in the installation process: the kernel build.
For cloned installations, the type of kernel build is defined
by the
kernel_options=
attribute in the
install.cdf
file.
For regular Full Installations, the type of kernel build
depends upon the type of kernel components you chose to build into the kernel:
all, mandatory only, or a combination of mandatory and optional kernel components.
The last phase of any installation is the final system reboot
after which users can log in for the first time.
If this is a Full or Cloned
Installation,
root
is the only user that may log in.
The
contents of any user-supplied file depends upon what tasks you want to perform,
but all user-supplied files must have read and execute permissions.
When creating
your files, be aware of the environment in which they will be run.
For instance,
preinstall
and
postload
files only can call
commands and utilities that are available on the distribution media because
a full operating system environment is not yet installed.
The
postreboot
file can call any command or utility that is available on an installed
operating system.
The distribution media is comprised of file systems that are laid out
just as the software would be installed.
However, for performance reasons
and space considerations, the distribution media contains a combination of
uncompressed and compressed software subsets.
Only those commands and utilities
in the uncompressed software subsets are available during an installation.
To view the contents of the distribution media, mount it and use a combination
of the
cd
and
ls
commands to determine
what commands are available to use.
Section 6.7.1
contains more information about creating
preinstall
files;
Section 6.7.2
contains more
information about creating
postload
files, and
Section 6.7.3
contains information about creating
postreboot
files.
6.7.1 Creating preinstall Files
The first invocation point
of user supplied files during Full and Update Installations is before the
user interface is displayed, and in the case of a Full Installation, before
the search for an
install.cdf
file.
At this point, the Full Installation process searches for a file named
preinstall, which is a user-supplied script, program, or executable.
It contains specific actions to be carried out before the installation user
interface is presented.
The Update Installation looks for a file named
update_preinstall.
Actions to be carried out before file systems are created and software
subsets are loaded might include writing a customized disk label to one or
more disks.
Another use would be to dynamically modify a generic
install.cdf
file to include host-specific attributes and put that
file in
/var/tmp
so the Full Installation process finds
it.
You do not want the
preinstall
file to execute any
function that requires installed file systems and software to be available
because these phases of the installation have not yet been completed; however,
you can assume that file systems and software are available during an Update
Installation.
The
preinstall
and
update_preinstall
files and any files they call require read and execute permission.
It is not necessary that the
preinstall
file be
in the same location as other user-supplied files and CDFs (unless they are
being modified by the script).
The installation process queries the return status from the execution
of the
preinstall
and
update_preinstall
files and terminates the installation process if a non-zero return status
is received.
The
preinstall
and
update_preinstall
files are responsible for supplying their own status or error
messages.
The installation process does not guarantee the results of executing
the script or program but does guarantee that upon successful completion,
the installation process proceeds.
The sample
preinstall
script shown in the following
example applies a customized disk label to an
RZ26
disk.
Example 6-1: Sample preinstall Script That Calls Another File
#!/sbin/sh

#
# Write a custom disk label to the
# system disk before starting the installation.
#

# NOTE:  THIS FILE ASSUMES A DISK NAME OF dsk0 AND DISK TYPE OF RZ26

#
# First, zero the label
#
2>/dev/null disklabel -z dsk0

#
# Next, restore the label
#
disklabel -Rr dsk0 ./DISKLABELSAVE RZ26 ||                      [1]
{
	echo "\nError restoring disklabel on dsk0\n"
	exit 1
}

echo "\nThe disklabel that has been applied is:\n"
disklabel -r dsk0 | tail -10
exit 0
The
DISKLABELSAVE
file called by the
preinstall
script must reside in the same directory as the
preinstall
script and must have read permissions.
The sample
DISKLABELSAVE
file is shown in
Example 6-2.
[Return to example]
The
DISKLABELSAVE
file called by the
preinstall
script contains a disk label that was created by reading the disk
label of the disk at
dsk0
and redirecting the output into
a file.
To create this file, you would enter commands similar to the following:
#disklabel -r dsk0 > DISKLABELSAVE
Example 6-2: DISKLABELSAVE File Called by the Sample preinstall Script
# /dev/rdisk/dsk0a:
type: SCSI
disk: rz26
label:
flags:
bytes/sector: 512
sectors/track: 57
tracks/cylinder: 14
sectors/cylinder: 798
cylinders: 2570
sectors/unit: 2050860
rpm: 3600
interleave: 1
trackskew: 0
cylinderskew: 0
headswitch: 0		# milliseconds
track-to-track seek: 0	# milliseconds
drivedata: 0

8 partitions:
#      size  offset  fstype [fsize bsize  cpg]
 a:  131072       0  4.2BSD   1024  8192   16  # (Cyl.    0 - 164*)
 b:  262144  131072  unused   1024  8192       # (Cyl.  164*- 492*)
 c: 2050860       0  unused   1024  8192       # (Cyl.    0 - 2569)
 d:  552548  393216  unused   1024  8192       # (Cyl.  492*- 1185*)
 e:  552548  945764  unused   1024  8192       # (Cyl. 1185*- 1877*)
 f:  552548 1498312  unused   1024  8192       # (Cyl. 1877*- 2569*)
 g: 1210000  393216  4.2BSD   1024  8192   16  # (Cyl.  492*- 2009*)
 h:  447644 1603216  4.2BSD   1024  8192   16  # (Cyl. 2009*- 2569*)
At this point, after creating the
DISKLABELSAVE
file, you would edit the file to create the custom partition sizes you want.
6.7.2 Creating postload Files
Upon completion of
the file system creation, software subset load, and the preparation of the
configuration environment for the pending software configuration phase, the
Full and Update Installation processes search for files named
postload
and
update_postload
before the first system
reboot.
Actions to be carried out after software subsets are loaded might include
creating additional file systems or dynamically modifying a
config.cdf
file that will be applied to more than one target system.
Appendix B
contains a sample
postload
script, which shows how to set host-specific attributes in a
config.cdf
file.
The
postload
file and any files that
postload
calls require read and execute permission.
It is not necessary
that the
postload
file be in the same location as the user-supplied
scripts and
install.cdf
file.
However, if the
postload
file is intended to operate on a
config.cdf
file, both files should reside in the same location.
The installation process queries the results of the execution of the
postload
file and terminates the installation process upon a non-zero
return status.
The
postload
file is responsible for supplying
its own status or error messages.
The installation process does not guarantee
the results of executing the script or program but does guarantee that upon
successful completion, the installation process proceeds.
It is important to know that at this point of a Full Installation, the
newly created
/,
/usr, and
/var
file systems on the magnetic media are mount-relative with
respect to the
/mnt
directory until the system is rebooted
from the newly installed system disk.
That is, the
/
file
system is
/mnt, the
usr
file system
is
/mnt/usr, and so on.
The sample
postload
script shown in
Example 6-3
is creating a new file system called
users
and is then
adding the entry into the
/etc/fstab
file to mount the
new file system upon every reboot.
Example 6-3: Sample postload Script
#!/sbin/sh
#
# postload - script which is invoked after the subset load of a full
#	installation.  The script creates a new file system and
#	adds an entry in the fstab file.  Doing this will make the
#	file system available as soon as the installation completes.

#
# Create a new file system on dsk2c which is to be mounted at /usr/users
#

echo "postload:  creating new file system on dsk2c\n"

# Create the UFS file system on dsk2c, an RZ26L disk.

/usr/sbin/newfs -F /dev/rdisk/dsk2c RZ26L ||
{
	   echo "postload:  failed to create a new file system on dsk2c\n"

	   # We consider this a nonfatal error and allow the install to
	   # continue.  This is done by returning 0.  Otherwise, exit with a
	   # non-zero value.

	   exit 0
}
# Next, add an entry to fstab so that this new file system is
# automatically mounted when the system boots.

# NOTE:  the actual installed file systems are mounted at /mnt.
# Therefore, we want to add the entry to /mnt/etc/fstab and
# not /etc/fstab.

echo "/dev/disk/dsk2c	/usr/users	ufs rw 1 2" >> /mnt/etc/fstab

# Finally, make sure the mount point is created.  Once again, create it
# relative to /mnt.

/bin/mkdir /mnt/usr/users

# Process complete!

exit 0
6.7.3 Creating postreboot Files
To provide a place for users who have already written scripts to configure their systems as well as to allow supported scripting capabilities from a configured system, a third invocation point is available.
This user-supplied file is called
postreboot
to
signify its relative location in the installation process.
This file is searched
for and is invoked during the software configuration phase of a Full Installation.
The software configuration phase occurs after subsets have been loaded and
the system is rebooted with the generic kernel.
More specifically, the
postreboot
script is invoked after the check for a
config.cdf
file so that the
postreboot
script can take
advantage of a network-configured system.
In addition, the
postreboot
script is invoked before
the tailored kernel build so that additional layered software (for example,
those with kernel dependencies) could be installed and the required kernel
components will be satisfied by the tailored kernel build.
The
postreboot
script is searched for and executed if found during
a Full Installation; the Update Installation process does not look for this
file.
The installation process queries the results of the execution of the
postreboot
file but does not terminate the installation process
upon a non-zero return status.
The
postreboot
file is
responsible for supplying its own status or error messages.
The installation
process does not guarantee the results of executing the script or program
but does guarantee that whether or not the script succeeds or fails, the installation
process proceeds.
Section B.5
contains a sample
postreboot
script.
6.8 Copying User-Supplied Files and CDFs to the Right Location
CDFs and user-supplied files and all additional files they require must be located in the right directories so the installation process can find them.
Both the Full and Update Installation process search for the user-supplied
files and CDFs in the order shown in
Table 6-4.
As soon as a file is found, the installation process stops looking in the
remaining locations.
For example, if the installation process finds a
preinstall
file on diskette, it does not look on the RIS server.
Table 6-4: Acceptable Locations of User-Supplied Files and CDFs
| Search Order | Location | Copy Instructions Located In |
| 1 | In the
/
(root) directory
of diskette drive
floppy0
or
floppy1. |
Section 6.8.1 |
| 2 | In the
profile_set
subdirectory of the
/var/adm/ris/clients/sets/
directory
on the RIS server to which the client system is registered. |
Section 6.8.2 |
| 3 | In the
/var/tmp
memory
file system (MFS) on the system to be cloned.
|
Section 6.8.3 |
| 4 | In the
/isl
directory
on the distribution media (local CD-ROM or extracted RIS area).
|
Section 6.8.4 |
6.8.1 Copying Files to a Diskette
Before you can copy user-supplied files and CDFs to the diskette, you may have to format the diskette, write a new disk label, and then create a new file system using the following command syntax:
fddisk
-fmt raw_diskette_device
disklabel
-wr diskette_drive disk_type
newfs
raw_diskette_device_partition
Use commands similar to the following to format the diskette
in diskette drive
floppy0, write a new disk label specifying
the
rx23
type of diskette (standard 3.5-inch diskette),
and create a new file system on the entire diskette (partition c):
Format the diskette in drive
floppy0:
#fddisk -fmt /dev/rdisk/floppy0c
Write a new disk label to a standard 3.5-inch diskette:
#disklabel -wr floppy0 rx23
Create a new file system on the entire diskette, the
c
partition:
#newfs /dev/rdisk/floppy0c
If either the
preinstall,
postload
or
postreboot
files are located on the diskette, all files
called by the
preinstall,
postload
or
postreboot
files must be located on the diskette as well.
Use commands similar to the following to mount the diskette drive and copy the files to the diskette:
Mount the diskette drive on the
/mnt
mount
point:
#mount /dev/disk/floppy0c /mnt
Assuming that you are in the directory in which the files are located, enter the following commands to copy the files to the diskette:
#cp ./install.cdf /mnt/install.cdf#cp ./preinstall /mnt/preinstall#cp ./postload /mnt/postload#cp ./config.cdf /mnt/config.cdf#cp ./postreboot /mnt/postreboot#cp ./file_name/mnt/file_name
Enter the
chmod
command to ensure all files
have execute permissions:
#chmod 755 /mnt/*
Unmount the diskette drive:
#umount /mnt
6.8.2 Copying Files to a RIS Server Profile Set Directory
A
Remote Installation Services (RIS) server stores CDFs and user-supplied files
in logically organized subdirectories that are created by the RIS administrator.
These subdirectories, known as
profile sets, are located
in the
/var/adm/ris/clients/sets
directory.
When a system
is registered as a RIS client, you also can register the system to the profile
set that contains the CDFs or user supplied files you want to execute during
the installation.
For more information about profile sets and RIS administration, see the guide to Sharing Software on a Local Area Network.
After you or the RIS administrator have established naming conventions and a structure for the profile set directory on the RIS server, use procedures similar to the following to copy CDFs, user-supplied files, and any related files to a profile set directory:
Log in to the RIS server.
Change to the
/var/adm/ris/clients/sets
directory:
#cd /var/adm/ris/clients/sets
Using the naming scheme of your choice, create a profile set directory with a meaningful name. This example is creating a profile set directory for the Engineering department:
#mkdir engineering
Change to the new profile set directory to ensure that files are copied to the correct directory:
#cd engineering
Copy the right CDFs, user-supplied files, and all other related
files from your working area to the new
engineering
profile
set directory with your preferred copy tool (ftp,
dcp, or
rcp).
Enter the
chmod
command to ensure all files
have read and execute permissions:
#chmod 755 *
Invoke the
ris
utility to register the
target system (or systems) to the correct RIS software environment and profile
set directory:
#/usr/sbin/ris
Start the Full Installation on the target system (as described in the Installation Guide).
6.8.3 Copying Files to the /var/tmp Directory
The
/var/tmp
directory is a writable directory created during the installation process
and, therefore, it cannot be used to ship the CDFs and user-supplied files.
However, if a
preinstall
script is used, it can dynamically
copy the CDFs,
postload,
postreboot,
and any files needed by
postload
and
postreboot
into
/var/tmp
during the installation process.
The
preinstall
file itself cannot be invoked from
/var/tmp
as it is the only mechanism available to move files into
/var/tmp.
This feature is valuable if you are repackaging the operating system
and you are providing CDFs and user-supplied files on the CD-ROM.
This feature
is also useful for dynamically modifying a generic CDF that might exist in
the RIS area to which many client systems are registered.
User-supplied files
could be used to modify the CDF as appropriate for the client being installed
and configured and deposit the resulting file into the
/var/tmp
directory so it is found by the installation process.
The
/var/tmp
location is third in the search order
for user-supplied files.
If you are using this location as a writable area,
the first two locations (that is, a diskette drive or RIS area) must not contain
the same user-supplied files because once a file is found, the search ends.
When there is a need to modify or select an
install.cdf,
config.cdf,
postload, or
postreboot
file as part of the installation process, a writable location is
needed because the system cannot write to the CD-ROM.
For example, assume
that several CDFs are shipped on the CD-ROM for the purpose of supporting
different hardware or configurations from one distribution media.
In this
case, you can create a
preinstall
file that examines the
system on which the installation is being executed, and based on the examination,
select the right CDF file from among those shipped.
The
preinstall
file can then copy this CDF to
/var/tmp/install.cdf
where it later will be read by the installation process.
Similarly, the
preinstall
file could choose from among several
postload
files and copy the right one to
/var/tmp/postload.
The
preinstall
script should ensure that files copied
to
/var/tmp
have the correct permissions.
Issuing the
chmod 777 *
command is the safest way to ensure correct permissions.
6.8.4 Copying Files to CD-ROM
You can repackage the operating system CD-ROM to include
CDFs and user-supplied files in the
/isl
directory.
Note
Copying software may be done only for the purpose of licensed use of the operating system. A valid license agreement must be present for all instances of use of the copied operating system.
Use the method you usually use to create a CD-ROM (that is, write
to a CD-ROM) if you plan to provide the
install.cdf,
config.cdf,
preinstall,
postload,
and
postreboot
files to the
/isl
directory
on a CD-ROM.
The method you use depends upon the type of CD-ROM
burner you have.
Follow this basic procedure to create an image on a CD-ROM:
Mount the Tru64 UNIX Version 5.0A CD-ROM to determine
how much disk space is required on the magnetic disk to which you will be
copying the contents of the CD-ROM.
For example, to mount the CD-ROM
in drive
/dev/disk/cdrom0c
on the directory
/mnt, enter commands similar to the following:
#mkdir /mnt#mount -r /dev/disk/cdrom0c /mnt#cd /mnt
Enter the following command to determine disk space in kilobytes:
#df -k
Remember this number and make sure you have a disk large enough to meet the space requirement.
Write it down: _________________
Unmount the CD-ROM using commands similar to the following:
#umount /mnt
Erase the disk label of the magnetic disk before creating the image:
#disklabel -z /dev/disk/dsk2
Create an image of the operating system by copying the contents
of the base operating system CD-ROM onto a disk that is at least as
large as the figure obtained in Step
2.
In this
example, the input file is the CD-ROM device, ( /dev/disk/cdrom0c ), the output file is the magnetic disk ( /dev/disk/dsk2c ), and the input and output block size is
399 kilobytes ( 399k ).
#dd if=/dev/rdisk/cdrom4c of=/dev/rdisk/dsk2c bs=399k
Caution
The output file (
of=) must specify a disk partition that starts at block zero (usuallyaorc). Specifying a partition that does not start at zero (0) results in an operating system image that is not bootable.
Mount the disk to which you just copied the contents of the
operating system CD-ROM, and use the
cp
command to
copy the
install.cdf,
preinstall,
postload,
config.cdf, and
postreboot
files and any files called by these files into the
/isl
directory of the image.
For a Full Installation:
#mount /dev/disk/dsk2c /mnt#cp ./preinstall /mnt/isl/preinstall#cp ./install.cdf /mnt/isl/install.cdf#cp ./postload /mnt/isl/postload#cp ./config.cdf /mnt/isl/config.cdf#cp ./postreboot /mnt/isl/postreboot#cp ./filename/mnt/isl/filename
For an Update Installation:
#mount /dev/disk/dsk2c /mnt#cp ./update_preinstall /mnt/isl/update_preinstall#cp ./update_postload /mnt/isl/update_postload#cp ./filename/mnt/isl/filename
Depending upon the type of CD-ROM burner you have, use
the recommended method to burn a CD-ROM from the modified image on the
disk.
The label of the CD-ROM to be burned must match the label of the operating
system CD-ROM; otherwise the process will fail.
Use the
disklabel
-r
command and look for
label:
string
to determine the label on the operating system CD-ROM.
Note
To ensure that you have a valid, bootable operating system image, it is recommended that you verify the ability to boot from the image on the disk before burning the CD-ROM.