This chapter provides the following information:
Installing a hardware product kit during a Full Installation
Updating an existing hardware product kit during an Update Installation
5.1 Overview of Hardware Product Kits
All hardware requires modules in the kernel to support it. Without this kernel support, the operating system cannot interact with the hardware, and the hardware may fail to function altogether. Hardware product kits provide the kernel modules required for the operating system to interact with newly supported hardware and eliminates the need to update to a new version of the operating system in order to use the new hardware.
Hardware product kits are distributed on CD-ROM and can be installed either directly from the CD-ROM or can be loaded onto a Remote Installation Services (RIS) area for RIS clients that are using the network to perform a Full Installation. Refer to Sharing Software on a Local Area Network for information about loading a hardware product kit into a RIS area.
Your system must be running or installing Version 4.0F, Version 4.0G,
or Version 5.0A of the operating system to install hardware product kits using
the procedures described in this chapter.
5.2 Adding a Hardware Product Kit to a Running System
To add a piece of hardware to a system that is running the operating system, the hardware product kit must be located on a CD-ROM. Installation from a RIS server is not supported.
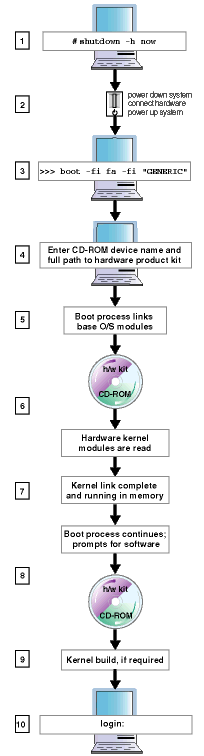
Figure 5-1
depicts the user actions and bootlink process
that installs a hardware product kit onto a system that is already running Version 5.0A
of the operating system.
The step-by-step procedure and actual prompts are
documented in
Section 5.2.1.
Figure 5-1: Bootlinking a Hardware Product Kit to a Running System
Use the
shutdown -h now
command to shut
down the system to console mode
Power down the system, connect the new piece of hardware, and power up the system after the new hardware is in place.
Boot the system from the generic kernel file using the
boot -fl fa -fi "/GENERIC"
system_disk
command.
The optional
system_disk
argument is the
console device name of your running system disk.
You only need to include
this argument if the
bootdef_dev
console variable is not
set to the disk containing the
/
(root) file system.
Note
A typical example of a full path to a hardware product kit is:
/PROD_NAME/usr/opt/PROD_VERSION/sys/hardware/kit_name
The boot process continues from the loaded system as the base operating system kernel modules are linked.
For each hardware product kit name you supplied in Step 4, the boot process prompts you to insert the hardware kit distribution media. When you press the [Return] key, the hardware kernel modules from the hardware product kit are linked into memory.
The kernel link is complete and the kernel is running in random access memory, not on disk. This kernel contains the same modules as the kernel on the disk in addition to the new hardware support modules.
The boot process continues and prompts you to insert the distribution media for the hardware kit so that the software associated with the new hardware can be installed.
If a kernel build is required, you will be prompted to build
a new statically-linked, machine-specific kernel.
This kernel is written to
disk in the
/usr/sys/conf/SYSTEM_NAME
file.
The system
reboots with the new kernel to complete the bootlink process.
The hardware product kit installation process is complete. Log into the system.
Use this procedure to install a hardware product kit onto a system that is running Version 4.0F, Version 4.0G, or Version 5.0A of the operating system.
Before you begin, make sure you know the CD-ROM console device name and the name of the hardware product kit. The kit name is included as part of the installation instructions you received with the kit itself.
Log in as the user
root
or use the
su
command to gain superuser privileges.
As a safety precaution, use the method of your choice to back up the user data on the system.
Use the
shutdown
command to halt your system
and bring it down to console mode:
#shutdown -h now
Power down the system and connect the new hardware.
Power up the system after the new hardware is connected. If the system automatically reboots, shut down the system to console mode again.
Determine the console device name of the CD-ROM drive in which you intend to insert the hardware kit CD-ROM if you do not already know it:
>>>show dev
Output will be similar to the following:
dka0.0.0.1001.0        DKA0        RZ28D    0010
dka500.5.0.0.1001.0    DKA500      RRD46    0557
dva0.0.0.0.1           DVA0
ewa0.0.0.1000.0        EWA0        hw_ethernet_address
pka0.7.0.1001.0        PKA0        SCSI Bus ID 7 5.01
pkb0.7.0.1001.0        PKB0        SCSI Bus ID 7 5.01
CD-ROM
drives are designated by the characters
CDROM
or
RRD.
In this example, the console device name of the RRD46-type
CD-ROM drive is
DKA500.
Write it down: _________________
Enter the following command to bootlink the generic kernel
from the
/GENERIC
file:
>>>boot -fl fa -fi "/GENERIC" system_disk
Note
The optional system_disk argument is the console device name of your running system disk. You only need to include this argument if the
bootdef_devconsole variable is not set to the disk containing the/(root) file system.
Enter the console device name of the CD-ROM device (that you obtained in Step 7) into which you later will insert the hardware product kit CD-ROM:
Enter Device Name, or <return> if done:
Enter the full path of the hardware product kit at the following prompt:
Enter Hardware Kit Name, or <return> if done with device_name:
Note
A typical example of a full path to a hardware product kit is:
/PROD_NAME/usr/opt/PROD_VERSION/sys/hardware/kit_name
Insert the hardware product kit CD-ROM into the drive and press the [Return] key at the following prompt:
Insert media for kit 'device_name:hw_kit_name'
hit <return> when ready, or 'q' to quit this kit
The
boot
utility reads the hardware product kit information into
memory.
Do one of the following when you are prompted to enter the name of another hardware product kit:
If you are installing another hardware product kit from the same CD-ROM device, enter the full path of the kit name, press [Return], and return to Step 10 to enter the device name.
If you are not installing another hardware product kit or you are using another device, just press [Return] to continue to the next step.
Do one of the following when you are prompted to enter another device name:
If you are installing another hardware product kit, enter the device name, press [Return], and return to Step 9 to enter the full path to the hardware product kit.
If you are not installing another hardware product kit, just press [Return] to continue to the next step.
Press the [Return] key at the following prompt because you are adding hardware support to a running system and the system disk is your boot media.
Insert boot media, hit <return> when ready:
The generic kernel modules are read and displayed so that the bootlink process can build the kernel into memory in the next step.
Insert the hardware product kit CD-ROM into the drive and press the [Return] key at the following prompt:
Insert media for kit 'device_name:hw_kit_name'
hit <return> when ready, or 'q' to quit
The kernel modules for the new hardware are read and the bootlink process builds the kernel in memory. This step is repeated for every device and hardware product kit you entered in Steps 9 and 10.
Press the [Return] key at the following prompt because the boot media is still your installed system disk:
Insert boot media, hit <return> when ready:
Note
If you installed more than one hardware product kit from different media on the same device, the
bootutility may prompt you for the location of some of the hardware support subsets. If you see this prompt, load the appropriate CD-ROM into the CD-ROM drive and enter the appropriate system device name, such as/dev/disk/cdrom0c.
The following processing occurs when you press the [Return] key:
The system is brought up to single-user mode to load and configure the software subsets for the new hardware product.
The
/GENERIC
file is rebuilt to include
the kernel modules for the new hardware product.
The kernel configuration and kernel build phase takes place.
Enter a name for the kernel configuration file at the following prompt if your system requires a kernel rebuild. The default response is the system name in upper case letters.
Enter a name for the kernel configuration file. [SYSTEM_NAME]:
You have the option to use the default response or to give the configuration file a new name. No matter what you decide, the system will confirm your selections before continuing.
If you decide to change the name of the kernel configuration file, the existing kernel configuration file is not overwritten. Retaining multiple kernel configuration files allows you to build kernels for different purposes.
Proceed to the next step after you have confirmed the name of the kernel configuration file to select optional kernel components to build into the kernel.
If the
Kernel Option Selection Menu
is
displayed, select the optional kernel components you want to build into the
kernel.
Enter
n
at the following prompt because
you do not want to edit the configuration file at this time:
Do you want to edit the configuration file? (y/n): n
The kernel build and configuration process begins when you answer this question.
Log on to the system. Your new hardware product is fully installed, configured, and ready to use or access.
5.3 Procedure to Install Hardware Kits During a Full Installation
Follow this procedure to install a hardware product kit during a Full Installation:
Perform the preinstallation tasks described in the Installation Guide.
Use the
shutdown
command to halt the system if the system is not already
at the console mode prompt (>>>):
#shutdown -h now
Power off the system, install or connect the new hardware, and power on the system.
Set the processor-specific console variables described in the Installation Guide, but do not boot the system using the instructions in the Installation Guide.
Enter one of the following boot commands at the console prompt:
If you are using a CD-ROM as the source of the software, enter the following command:
>>>boot -fl fa -fi "/GENERIC" cdrom_device
If you are using a RIS server as the source of the software, enter the following command:
>>>boot -fl fa network_adapter
During the boot process,
the
boot
utility issues the following prompt:
Enter Device Name, or <return> if done:
If you are installing the hardware product kit from CD-ROM, enter the console device name for the CD-ROM drive where the hardware kit will be inserted and press the [Return] key.
If you are installing the hardware product kit from a RIS server, enter
the word
local:
and press the
[Return]
key.
Enter the full path and kit name of the hardware product kit you are installing:
Enter Hardware Kit Name, or <return> if done with device_name:
The full path and kit name are included with the paperwork that was shipped with the hardware product kit.
The
boot
utility issues the following prompt:
Insert media for kit 'device_name:hw_kit_name'
hit <return> when ready, or 'q' to quit this kit:
If you are installing the hardware product kit from CD-ROM, insert the hardware product kit CD-ROM into the drive and press the [Return] key.
If you are installing the hardware product kit from a RIS area, press the [Return] key.
The
boot
utility reads the hardware product kit into
memory.
Do one of the following when prompted to enter another hardware product kit name:
If you are installing another hardware product kit from the same device, enter the full path to the kit name, including the kit name, and press [Return].
If you are not installing another hardware product kit or are installing one from a different device, just press [Return] to continue.
Do one of the following when prompted to enter another device name:
If you are installing another hardware product kit, enter the device name, press [Return] to enter a device name.
If you are not installing another hardware product kit, just press [Return] to continue.
Provide the boot media when the
boot
utility
reissues the following prompt:
Insert boot media, hit <return> when ready:
If you are installing the operating system from CD-ROM, insert the Operating System Volume 1 CD-ROM into the CD-ROM drive and press the [Return] key.
If you are installing the operating system from a RIS server, press the [Return] key.
The generic kernel modules are read so that the bootlink process can build the kernel in memory in the next step.
The
boot
utility issues the following prompt:
Insert media for kit 'device_name:hw_kit_name'
hit <return> when ready or 'q' to quit:
If you are installing the hardware product kit from CD-ROM, put the hardware product kit CD-ROM into the drive and press the [Return] key.
If you are installing the hardware product kit from a RIS server, just press the [Return] key to continue.
The kernel modules for the new hardware product are read, and the bootlink process builds the kernel in memory.
The
boot
utility issues the following prompt:
Insert boot media, hit <return> when ready:
If you are installing the operating system from CD-ROM, insert the Operating System Volume 1 in your CD-ROM drive and press [Return].
If you are installing the operating system from a RIS server, press [Return].
The system is brought up to single-user mode, and the Full Installation user interface is displayed.
Enter the responses requested by the Full Installation interface as described in the Installation Guide. When you are finished answering all questions, confirm and start the software load.
After the system reboots from the newly installed system disk, perform Steps 6 through 13 again to build the new kernel in memory. This step is not necessary for RIS installations because the hardware is already loaded.
Note
If you installed more than one hardware product kit from different media on the same device, the
bootutility may prompt you for the location of some of the hardware support subsets. If you see this prompt, load the right hardware CD-ROM into the drive and enter the CD-ROM system device name, such as/dev/disk/cdrom0c
The following processing occurs:
The system is brought up to single-user mode to load and configure the software subsets for the new hardware product.
The
/GENERIC
file is rebuilt to include
the kernel modules for the new hardware product.
The kernel configuration and kernel build phase takes place.
Log in as
root.
Check the installation logs for errors.
These logs are located
in the
/var/adm/smlogs
directory after the system has
been installed.
Perform the system setup tasks described in the Installation Guide.
5.4 Updating Hardware Product Kits
The following topics describe how the Update Installation process handles hardware product kits.
What happens when an Update Installation process detects a previously installed hardware product kit
Bootlinking hardware product kits during an Update Installation
Loading and configuring a hardware product kit during an Update Installation
5.4.1 Checking for Previously Installed Hardware Product Kits
During an Update Installation, the update process checks for previously-installed hardware product kits. This check happens during the analysis phase of the Update Installation, which is described in the Installation Guide. If the Update Installation process finds an installed hardware product kit, it is checked for compatibility with the new version of the operating system. One or more of the following conditions may apply:
If an existing hardware product kit will continue to function with the new version of the operating system, it will be retained, and you see a prompt similar to the following:
The following hardware was installed using a supplemental hardware
kit and will continue to work under the new operating system without
any modifications.

	KIT_NAME_1
	KIT_NAME_2


.
.
.
Press <RETURN> to continue...
The kits on this list are retained.
If an existing hardware product kit has been integrated into the new version of the operating system, the existing hardware product kit will be removed. You see a prompt similar to the following:
The following hardware support was integrated into the new release of
the Operating System product (nnn). As part of the Update
Installation the associated hardware subsets will be removed from the
system. These subsets will be replaced by the support delivered as
part of the new Operating System product.

	KIT_NAME_1
	KIT_NAME_2


.
.
.
Press <RETURN> to continue...
The kits on this list will be removed.
If an existing hardware product kit is not supported in the new version of the operating system, you are prompted to load an updated hardware product kit with the following procedure:
Provide new versions of the kits on the list when you see a prompt similar to the following:
The Update Installation has detected that the hardware support listed
below is loaded on your system and is not supported in the new
release of the Operating System (nnn). In order for the update to
complete successfully, you must provide the distribution media that
contains the nnn version of the hardware support listed below. The
Update Installation procedure will verify that the media you provide
contains the correct software.

	KIT_NAME_1
	KIT_NAME_2


.
.
.
Enter kit locations (e.g: /dev/rz3a or /mnt):
If you press [Return] without entering a location for the listed kits, you see a prompt similar to the following:
If you choose to continue the update without providing the necessary
hardware support media, the following hardware will not function
after the Update Installation completes. Also, without the necessary
hardware support the Update Installation may not complete successfully and
may leave your system in an unusable state. Compaq recommends that
you do not continue with the Update Installation without the appropriate
hardware support.

	KIT_NAME_1
	KIT_NAME_2


.
.
.
Do you want to continue? (y/n) [n]:
Enter
y
to continue the Update Installation
without updating the listed kits.
Caution
This option is not recommended. Your system may be unusable or related hardware may be inaccessible if you continue without updating the listed kits.
Enter
n
to return to the beginning
of this step.
Make sure that the hardware product kit CD-ROM is loaded into the CD-ROM drive.
In response to the
Enter kit locations
prompt, enter the CD-ROM console device
name or mount point of the CD-ROM drive where the hardware product kit is located and press
[Return].
After you record the kit information in the following message, press the [Return] key to continue.
The kit located at location contains support for hardware that is
currently installed on your system and is not supported under the new
version of the operating system (nnn). In order for your hardware
to continue to function properly you will be asked to supply the
following kit file names when the Update Installation reboots the
system for the first time.  Be sure to record these file names for
future use within the update install process.  Each kit file will
only need to be entered once for all of the associated hardware
support to be loaded.
        KIT_NAME_1 (Kit File: path_to_kit_file)
        KIT_NAME_2 (Kit File: path_to_kit_file)


.
.
.
Press <RETURN> to continue...
In this prompt, location is the kit file location that you specified in Step 1 and path_to_kit_file is the path to each listed kit file relative to location. Record the information in this message; you will need it later in the Update Installation.
Note
If there are hardware product kits to update for the new version of the operating system, the process returns you to Step 1. If all of the necessary hardware kits have been read, the Update Installation process continues.
5.4.2 Bootlinking Hardware Product Kits During an Update Installation
If the Update Installation detected a hardware product kit in the analysis phase
that has to be reinstalled, the system bootlinks the hardware support kernel
modules.
During the bootlink process, the
boot
utility
issues a series of prompts similar to the following, and you respond as shown:
Enter the console
device name for your CD-ROM drive, such as
DKA500
at the
following prompt:
Enter Device Name, or <return> if done:
Enter the name of the hardware product kit that you want to update and press the [Return] key at the following prompt:
Enter Hardware Kit Name, or <return> if done with device_name:
Insert the CD-ROM into the drive and press at the following prompt
Insert media for kit 'device_name:hw_kit_name
hit <return> when ready, or 'q' to quit this kit
When you press the
[Return]
key, the
boot
utility reads the hardware product kit information into memory.
Do one of the following when you are prompted to enter another kit name:
If you are installing another hardware product kit from the same device, enter the kit name, press [Return], and return to the previous step.
If you are not installing another hardware product kit or you are using another device, press [Return] and continue to the next step.
Do one of the following when you are prompted to enter another device name:
If you are installing another hardware product kit, enter the CD-ROM console device name, press the [Return] key , and return to Step 2.
If you are not installing another hardware product kit, press the [Return] key to continue.
Because you are adding hardware support to a running system and the system disk is your boot media, just press the [Return] key at the following prompt:
Insert boot media, hit <return> when ready:
The generic kernel modules are read so that the bootlink process can build the kernel in memory in the next step.
Insert the CD-ROM into the drive and press the [Return] key at the following prompt:
Insert media for kit 'device_name:hw_kit_name', press Return when ready:
When you press the [Return] key, the hardware product kit kernel modules are read and the bootlink process builds the kernel in memory.
Because the boot media is still your installed system disk, press the [Return] key at the following prompt:
Insert boot media, press <return> when ready:
5.4.3 Loading and Configuring a Hardware Product Kit During an Update Installation
If your system bootlinked a hardware product kit as described in Section 5.4.2, the Update Installation process loads and configures the hardware kernel modules at this point in the process, and you see prompts similar to the following:
If your hardware product kit CD-ROM is not in the drive or if additional kits are located on other media, you may see a prompt similar to the following:
The Update Installation has detected that the hardware support listed
below is loaded on your system and is not supported in the new
release of the Operating System (nnn). In order for the update to
complete successfully, you must provide the distribution media that
contains the nnn version of the hardware support listed below. The
Update Installation procedure will verify that the media you provide
contains the correct software.

	KIT_NAME_1
	KIT_NAME_2


.
.
.
Enter kit locations (e.g: /dev/rz3a or /mnt):
If you press the [Return] key without entering a location for the listed kits, you see a prompt similar to the following:
If you choose to continue the update without providing the necessary
hardware support media, the following hardware will not function
after the Update Installation completes. Also, without the necessary
hardware support the Update Installation may not complete successfully and
may leave your system in an unusable state. Compaq recommends that
you do not continue with the Update Installation without the appropriate
hardware support.

	KIT_NAME_1
	KIT_NAME_2


.
.
.
Do you want to continue? (y/n) [n]:
Enter
y
to continue the Update Installation
without updating the listed kits.
Caution
This option is not recommended. Your system may be unusable or related hardware may be inaccessible if you continue without updating the kits on the list.
Enter
n
to return to the beginning
of this step.
Make sure the hardware product kit CD-ROM is loaded into the CD-ROM drive.
In response to the
Enter kit locations
prompt, enter the system device name
or mount point of the CD-ROM drive where the hardware product kit is located and press
the
[Return]
key.
You will see a series of load progress messages,
then a series of configuration progress messages.
Note
Until all required hardware kits are loaded and configured, the process returns to Step 1.