| Previous | Contents | Index |
A serial connection is made between two systems using modems and telephone lines or other serial lines. DIGITAL TCP/IP Services for OpenVMS supports serial connections using the PPP (Point-to-Point Protocol) and SLIP (Serial Line IP, including CSLIP) protocols1. You can use any standard OpenVMS terminal device as a PPP or SLIP line. If the remote system is configured as a gateway to a network, local users can also reach other systems on that network through the serial connection.
If your OpenVMS system is part of a large network, you will probably use both PPP and SLIP for serial connections. An Internet standard, PPP is often preferred because it ensures interoperability between systems from a wide variety of vendors. PPP provides a way for your OpenVMS Alpha system to establish a dynamic IP network connection over a serial line without the use of an additional router or server hardware.
However, SLIP has been in use for a longer period of time and thus is
available for more kinds of hardware. SLIP is available for most
terminal servers and in most PC implementations of TCP/IP. Because SLIP
and PPP do not communicate with each other, hosts wanting to
communicate must use the same protocol. For example, if your terminal
server supports only SLIP, remote hosts that connect through this
server must also use SLIP.
5.5.1 Uses for PPP and SLIP
One of the largest applications for IP over serial lines is dialup access. With this type of configuration, your OpenVMS host answers calls and establishes a connection initiated by a user on a client host. The client host may be another OpenVMS system, a UNIX system, or a PC. Or, users on your host can originate the dialup connection to a remote host or terminal server running the same protocol.
Dedicated serial lines running PPP or SLIP can also be used to connect
separate LANs into a single WAN. In such a configuration, the host at
each end of the serial connection is always the same; no other hosts
are allowed to connect to either serial device.
5.5.2 SLIP
Use the worksheet in Figure 5-7 to record SLIP information for your system.
Figure 5-7 SLIP Configuration Worksheet
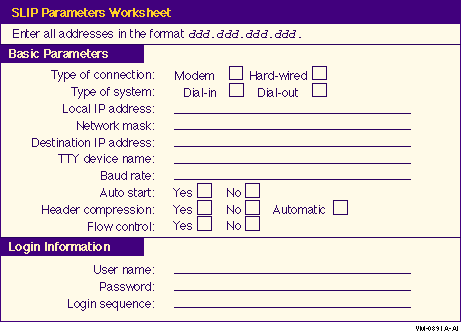
Table 5-13 describes the SLIP parameters.
| Parameter | Enter on Worksheet... |
|---|---|
| Type of connection |
Check whether the connection is hardwired, or you are using a modem.
If the systems are to be hardwired, make sure they are connected with an appropriate null modem cable. If they are to be connected by modem and telephone network, make sure modems and cables are configured correctly. |
| Type of system | Check Dial-in if the system is to answer calls from remote systems (dialup provider). Check Dial-out if the system is to place calls to a remote system (client). |
| Local IP address | Enter the IP address for the SLIP interface. Each SLIP interface must have an IP address. |
| Network mask | Enter the subnet mask. This must be the same for both systems. |
| Destination IP address | Enter the IP address of the remote system's SLIP interface. |
| TTY device name | Enter the name of a valid terminal device that has a cable connection. |
| Baud rate | Determine the serial port speed used to connect the systems to each other or the system to the modem. |
| Auto start | Check Yes if you want TCP/IP to automatically create the interface when TCP/IP starts. |
| Header compression | Check Yes, if SLIP is to use header compression. Check Automatic, if SLIP is to turn on header compress if the remote site begins using header compression. Check No, if SLIP is not to use header compression. |
| Flow control | Check Yes, if you want SLIP to handle XON and XOFF characters and if the remote host is running DIGITAL TCP/IP Services for OpenVMS. |
| Login information | Enter the user name, password, and login sequence (for example, the login prompt to use on the dial-out connection) to use on this interface. |
Use the worksheet in Figure 5-8 to record PPP parameter information for your system.
Figure 5-8 PPP Configuration Worksheet

Table 5-14 describes the PPP parameters.
| Parameter | Enter on Worksheet... |
|---|---|
| Type of connection |
Check whether the connection is hardwired, or you are using a modem.
If the systems are to be hardwired, make sure they are connected with an appropriate null modem cable. If they are to be connected by modem and telephone network, make sure modems and cables are configured correctly. |
| Type of system | Check Dial-in if the system is to answer calls from remote systems (dialup provider). Check Dial-out if the system is to place calls to a remote system (client). |
| Local IP address |
Enter the IP address for the PPP interface.
If you have a standalone system, you must assign it an IP address. If you are using PPP to link it to another host that is connected to the Internet, assign the local system an address that is on the same subnet as the remote host. If the other host is not connected to the Internet, assign the local system any IP address. |
| Remote IP address |
Enter the remote system's IP address if you are dialing out as a client.
If the local host is acting as a dialup provider, obtain the IP addresses to be assigned to the remote clients. |
| TTY device name | Enter the name of any valid terminal device, for example, TTA0. |
| Baud rate | Determine the baud rate of the modem (or hard-wired line) used to connect the systems and the terminal line specification. If your modem automatically senses the line speed or if you are using a null modem cable between hosts, you can specify any rate up to the maximum supported by the hosts. |
| PPPD options | Determine the required PPPD options. |
1 PPP is available for OpenVMS Alpha systems only. |
The Network Time Protocol (NTP) provides a means to synchronize time
and coordinate time distribution throughout a TCP/IP network. In TCP/IP
Services Version 5.0, NTP is an implementation of the NTP Version 3
specification and maintains compatibility with NTP versions 1 and 2.
5.6.1 Selecting a Time Source
In the NTP environment, time is distributed through a hierarchy of NTP time servers. Each server adopts a stratum that indicates how far away it is operating from an external source of UTC.2 Stratum 1 servers have access to an external time source, usually a radio clock. A stratum 2 server is one that is currently obtaining time from a stratum 1 server; a stratum 3 server gets its time from a stratum 2 server, and so on. To avoid long-lived synchronization loops, the number of strata is limited to 15.
Stratum 2 (and higher) hosts might be company or campus servers that obtain time from some number of primary servers and provide time to many local clients. In general:
Internet time servers are stratum 1 servers. Other hosts connected to
an internet time server have stratum numbers of 2 or higher and may act
as time servers for other hosts on the network. Clients choose one of
the available servers with which to synchronize. Usually this is one
from the lowest stratum servers to which they have access.
5.6.2 Determine the Operating Mode
The system manager of the local host determines which network hosts to use for synchronization and populates an NTP configuration file with a list of the participating hosts.
NTP hosts may be configured in one or more of the following modes:
peer 18.72.0.3 |
server 18.72.0.3 |
A local host may run more than one time service. For example, a host may have both NTP and DTSS (Digital Time Synchronization Service) installed. However, only one of these time services is allowed to set the system clock.
If you are running a time service in addition to NTP, you must stop NTP from setting the system clock by adding the following statements in the configuration file:
server 127.127.0 prefer fudge 127.127.1.0 stratum 0 |
These statements make NTP use its own system clock as a reference clock. The host continues to respond to NTP time queries but will not make any adjustments to the system clock.
Use the worksheet in Figure 5-9 to record NTP parameter information for your system.
Figure 5-9 NTP Configuration Worksheet
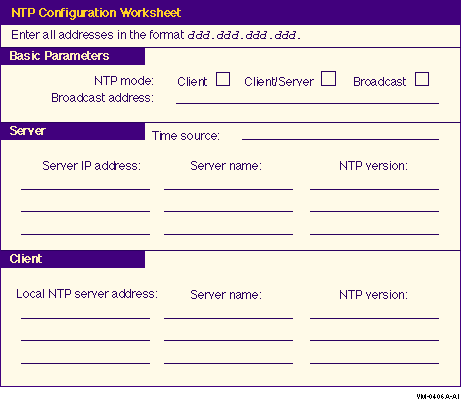
Table 5-15 describes the NTP parameters.
| Parameter | Enter on Worksheet... |
|---|---|
| NTP mode |
Check:
|
| Broadcast address | If the NTP mode is broadcast, enter the broadcast/multicast address to which NTP time broadcasts are to be sent. |
| NTP Server: | |
| Time Source | Enter if the time source is from an Internet NTP server or a local reference clock. |
| Server IP address | Enter the IP address of the Internet NTP server or the local reference clock. |
| Server name | The fully qualified host name of the Internet NTP server or the local reference clock. |
| NTP version | The version of NTP running on the Internet NTP server or the local reference clock. |
| NTP Client: | |
| Server address | Enter the IP address of the client's NTP server. |
| Server name | Enter the name of the client's NTP server. |
| Server version | Enter the NTP version running on the client's NTP server. |
2 NTP times are an offset of UTC, formerly Greenwich Mean Time (GMT). |
If you plan to allow a remote SNMP management client to obtain information about your host or to set network parameters, you will need to configure SNMP.
You can configure your host to:
Before executing TCPIP$CONFIG, use the worksheet in Figure 5-10 to record parameter information for the configuration procedure.
Figure 5-10 SNMP Configuration Worksheet
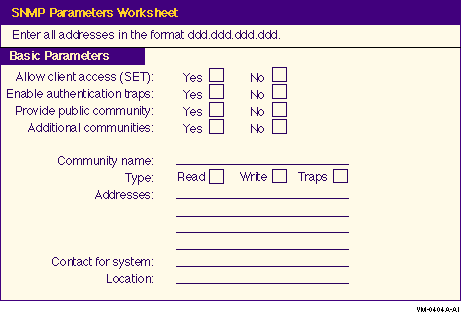
Table 5-16 describes the SNMP parameters.
| Parameter | Enter on Worksheet... |
|---|---|
| Allow client access (SET) | Check Yes, if you want to allow remote updates by clients. |
| Enable authentication traps | Check Yes, if you want SNMP agents to send authentication traps. |
| Provide public community | Check Yes, if you will configure the public community to allow read-only access to clients on any host. |
| Additional communities | Check Yes, if you want to provide additional communities. If you checked Yes to enable authentication traps or to allow enable client access, you will need to provide an additional community. |
| Community name | Enter the name of the community. |
| Type of access |
Check Read, if the master agent and subagents are to respond to a
client's read requests (gets) for network information.
Check Write, if the master agent and subagents are to process client write requests (sets) on your host's MIB data items. Check Traps, if the master agent and subagents are allowed to send alert messages (traps) to a client as a result of unusual events. |
| Addresses | Enter the IP addresses of those systems that are to have access to the community. |
| Contact for system | Enter the name of the person to contact about the system, up to 235 characters. |
| Location | Enter the physical location of the system, up to 215 characters. |
After executing TCPIP$CONFIG to configure SNMP, you can display the current SNMP configuration by entering the following command:
$ TCPIP SHOW CONFIGURATION SNMP |
You will need to set up accounts for local users, coordinate the establishment of corresponding accounts on remote systems, and create accounts for remote users who will be accessing server components on the local host.
When creating accounts for remote users, you can create one account for all remote users, an account for groups of remote users, or accounts for individual users. The strategy you use depends on your organization, system resources, and security needs.
Certain product components, for example, LPD/LPR, RMT/RCD, and NFS, act as servers for remote clients. You control access to your system and to these services by giving remote users proxy identities. A proxy identity maps a user account on a remote host to an OpenVMS account on the local host. The information you provide with each entry, along with the privileges you set for the account, let you specifically grant or deny access to your system.
When you configure the TCP/IP Services product, a proxy database file is created for you. Two types of proxies are required depending on the application used:
See the DIGITAL TCP/IP Services for OpenVMS Management guide for a more complete discussion of UNIX style identities and how the NFS server and client use the proxy database.
| Previous | Next | Contents | Index |