| Previous | Contents | Index |
Study your network and keep in mind the following guidelines to help you achieve your goals:
The master server is the authority, or best source of information, for one or more zones. You need one master server for each zone in your domain hierarchy.
Every time a host changes addresses, you need to update the zone file and reverse domain zone files on the master server. If your zone has many hosts, consider dividing the zone into separate subzones to balance the administrative work.
A master server can also be a master or a slave server for other zones
that exist in a contiguous or noncontiguous part of the name space.
5.3.4.3 Selecting Slave Servers
Your strategy for configuring slave servers is especially important in the initial stages of BIND operation. Once a server establishes a cache of frequently used names, the server will rarely need to locate a copy of the information it needs. However, well-planned copying of zone files can make the server's process of learning about names in a large network easier and more efficient.
When selecting slave servers for large networks, consider the following guidelines to enhance BIND service performance:
The value of implementing a caching-only server over a slave server
comes from not having to perform zone transfers. Over time, a
caching-only server builds up a cache of information most requested by
the resolvers querying the caching-only server.
5.3.4.5 Selecting Forwarder and Forwarding-Slave Servers
You can configure any server to act as a forwarder server. A BIND server can use a forwarder server to resolve queries. Because a forwarder server accepts queries from many other servers, it can develop an extensive cache compared to caches on other servers. Having a forwarder server in your zone can reduce the total number of queries from the zone to the rest of the Internet.
Configure forwarding-slave servers if you do not want specific hosts to
have access to the Internet, or you want to restrict the server to
using only specified forwarder servers. If you have a forwarding-slave
server in your zone, you must have a forwarder server as well.
5.3.4.6 Determining Server Placement for LANs and Extended LANs
You might be able to use just one server on a LAN. Factors influencing
your decision can include the expected lookup load and how you want to
distribute it, and the capacity of the systems that you plan to use as
BIND servers.
5.3.4.7 Determining Server Placement for Sites Connected by a WAN
When planning the placement of BIND servers in a wide area network (WAN) environment, avoid connections through WAN links. Place BIND servers so that most systems can access at least one server even if a WAN connection is unavailable.
At small sites connected to the rest of the network through a WAN, a BIND server is not necessary if the small site only occasionally uses resources on the other side of the WAN link. For example, if users at a small site sometimes contact nodes at the company's headquarters, it is probably sufficient to store the node names at headquarters, and it is not necessary to configure a BIND server at the small site.
Conversely, if a small site has many domains, configure a server there.
Also, if you expect users to make frequent name changes, create a zone
and store the information at the site's server. This further reduces
WAN traffic and improves performance.
5.3.5 Planning SOA Values
The SOA resource record for the master zone and reverse domain files contain parameters that affect the operation of the slave servers. These include:
The values you choose for these parameters affect the load on the servers and the propagation time of changes. Longer times lessen the load but increase the time for changes to take affect. Shorter times lessen the time for changes to take affect but increase the load on the servers and the network.
RFC 1537 recommends the following values for top-level domain servers:
86400 ; Refresh 24 hours 7200 ; Retry 2 hours 2592000 ; Expire 30 days 345600 ; TTL 4 days |
When planning the number and types of BIND servers, keep the following system points in mind.
After you plan your domains and zones, your next steps are to create
the necessary server files and to register zone and domain information
with the upper-level domain administrator and zone technical contact.
See Appendix A for information about domain registration.
5.3.8 Planning for Configuring BIND
Before you begin the installation and configuration process, you need to make some decisions about your BIND configuration. You can configure BIND as one of the following:
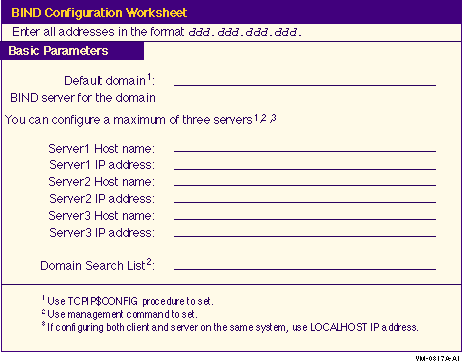
Before using TCPIP$CONFIG to configure the system as a BIND resolver, use the worksheet in Figure 5-3 to record BIND information about your system.
Figure 5-3 BIND Configuration Worksheet

Table 5-6 describes BIND configuration parameters.
| Parameter | Enter on Worksheet... |
|---|---|
| Default domain | Enter the domain name for the system. |
| BIND server for the domain | Enter the name and IP address for one to three bind servers. |
| Server host name | Enter the host name of the BIND server. |
| Server IP address | Enter the IP address of the BIND server. |
| Domain search list | Enter a list of subdomains to be searched. |
If you are configuring a system as a BIND server, you need to:
Table 5-7 shows the BIND database files that you need for each type of BIND server.
| File | Master | Slave | Caching-only |
|---|---|---|---|
| Forward translation file: domain_name.DB | Yes | No | No |
| Reverse translation file: address_IN-ADDR_ARPA.DB | Yes | No | No |
| Hints file: ROOT.HINT | Yes | Yes | Yes |
| Loopback files: 127_0_0.DB, LOCALHOST.DB | Yes | Yes | Yes |
| Configuration file: TCPIP$BIND.CONF | Yes | Yes | Yes |
Table 5-8 shows the BIND database files that you may need to create or edit depending on your current configuration and the type of server you are configuring.
| File | Master | Slave | Caching-only |
|---|---|---|---|
| Forward translation file: domain_name.DB | Create | No | No |
| Reverse translation file: address_IN-ADDR_ARPA.DB | Create | No | No |
| Hints file: ROOT.HINT | No | No | No |
| Loopback files: 127_0_0.DB, LOCALHOST.DB | No | No | No |
| Configuration file: TCPIP$BIND.CONF | Edit | Edit | Edit |
For instructions on how to populate the forward translation, reverse translation, and the TCPIP$BIND.CONF files, refer to the "Configuring and Managing BIND" chapter in the DIGITAL TCP/IP Services for OpenVMS Management manual. The remaining files (ROOT.HINT, 127_0_0.DB and LOCALHOST.DB) are created for you when you execute TCPIP$CONFIG.
After collecting the configuration information and preparing your database and configuration files, follow the steps in Table 5-9 to configure BIND on each server.
| Is this your situation? | If so, after you install DIGITAL TCP/IP Services for OpenVMS version 5.0, you need to: |
|---|---|
| First time installation of DIGITAL TCP/IP Services for OpenVMS |
|
| A previous UCX BIND configuration exists on the system |
|
| You want to use existing UNIX BIND database and configuration files |
|
Both the DHCP server and the BOOTP server components allow you to set up your system to pass configuration information to diskless hosts on the TCP/IP network.
With TCP/IP Services, you can configure your system to use the newer, more robust DHCP server functionality or the older BOOTP server functionality. You must choose one or the other; the TCPIP$CONFIG procedure prevents you from enabling both server components on your system.
The server capabilities are summarized in Table 5-10.
| Component | Description |
|---|---|
| BOOTP server |
Answers network bootstrap requests from diskless workstations and other
network devices such as routers, terminal servers, and network
switching equipment.
Allows the diskless client machine to discover its own IP address, the address of a server host, and the name of a file to be loaded into memory and executed. The BOOTP server uses BOOTP to communicate the configuration information. Then, if the client must retrieve the load file, it uses TFTP to transfer the file. |
| DHCP server |
Provides BOOTP functionality as well as the ability to assign temporary
or permanent IP addresses, subnet masks, and default gateways and other
configuration parameters for both BOOTP and DHCP clients.
An extension (or superset) of BOOTP, DHCP lets you centralize and automate IP address administration. You can use the DHCP graphical user interface (GUI) to configure various clients on the network from a single location to ensure that the configurations are consistent and accurate. |
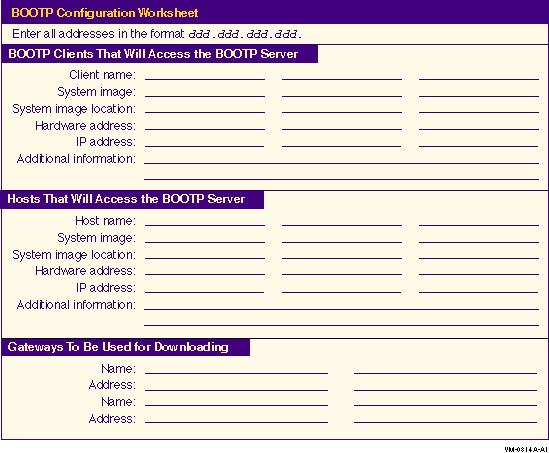
If you choose to configure your system as a BOOTP server, TCPIP$CONFIG creates the BOOTP database. This database contains entries for each client that requests service from the BOOTP server.
Use the worksheet in Figure 5-4 to record your client, host, and gateway entries for the BOOTP database.
For more information about configuring the BOOTP server on your system, see the DIGITAL TCP/IP Services for OpenVMS Management guide.
Figure 5-4 BOOTP Configuration Worksheet

If you currently use BOOTP to manage your IP address space, the TCPIP$CONFIG procedure can migrate your environment to DHCP. Before you execute TCPIP$CONFIG, answer these questions:
The TCPIP$CONFIG procedure does the following:
If you choose not to migrate your BOOTP clients to DHCP, the newly created DHCP configuration file remains empty and your BOOTP clients will not be served until you configure them with DHCP configuration.
Once the DHCP server is up and running on your system, you can use the DHCP graphical user interface (GUI) to do the following:
The basic DHCP GUI server parameters are listed in Table 5-11 and explained in more detail in the DIGITAL TCP/IP Services for OpenVMS Management guide.
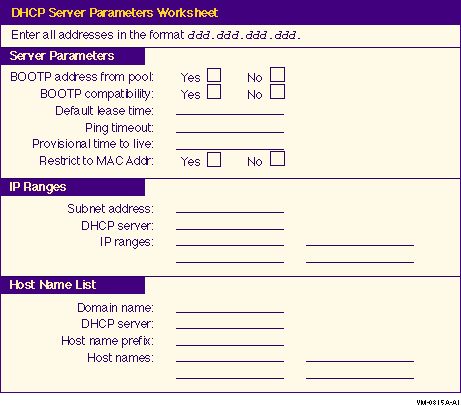
Use the worksheet in Figure 5-5 to record the server parameter information for your system.
Figure 5-5 DHCP Server Parameters

Table 5-11 describes the Basic DHCP Server Parameters.
| Parameter | Enter on Worksheet... |
|---|---|
| BOOTP address from pool |
If you want the DHCP server to support only BOOTP clients whose
addresses are configured in the BOOTP database, check No (default).
If you want the DHCP server to allocate an address from the pool to BOOTP clients, check Yes. The address allocation is permanent. |
| BOOTP compatibility | If you want the DHCP server to also function as a BOOTP server when a client requests a BOOTP address, check Yes (default). Otherwise, check No. |
| Default lease time | The value (in days, hours, minutes, and seconds) that lease times extend for all clients that have no other value configured. The default lease time is one day. |
| PING timeout | The time (in milliseconds) after which the PING request times out. The default is 500 milliseconds. If you do not want the DHCP server to PING before giving out an IP address, specify 0. |
| Provisional time to live | The maximum time (in hours, minutes, and seconds) that an IP address remains on the provisionally allocated list before it can be allocated to another client. This functionality prevents an IP address from being reused too quickly after a lease has expired. |
| Restrict to known MAC addresses | If you want to restrict service to only a client with a recognized, preconfigured MAC address that has been registered as known with the DHCP server, check Yes (default). To register a client for this purpose, use the DHCP GUI or DHCPDBREG utility. Otherwise, check No. |
| Use cluster failover | If you choose to use the DHCP Server cluster failover feature, check Yes. If you check Yes, decide which cluster nodes will act as potential DHCP servers. You need to configure a DHCP server on each of the nodes that you choose to be a potential DHCP server. Refer to the DIGITAL TCP/IP Services for OpenVMS Management guide for a discussion on how to set up a DHCP cluster failover environment. |
The basic DHCP GUI client parameters are listed in Table 5-12 and explained in more detail in the DIGITAL TCP/IP Services for OpenVMS Management guide.
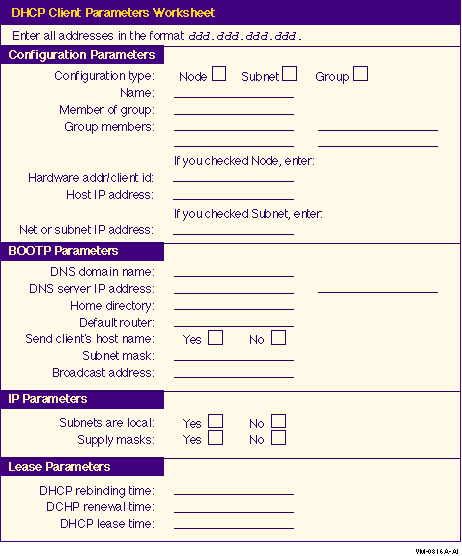
Use the worksheet in Figure 5-6 to record the client parameter information for your system.
Figure 5-6 DHCP Client Parameters Worksheet

Table 5-12 provides information on the DHCP parameters sent to clients.
| Parameter | Enter on Worksheet... |
|---|---|
| Type of configuration | Check the configuration type: node, subnet, or group. |
| Name of configuration | The name of the node, group, or subnet. |
| Member of group | The name of the configuration that provides the DHCP parameter values. Applicable for node, subnet, and group configurations. |
| Group members | The nodes, subnets, and groups that compose this group. For group configuration only. |
| Hardware address/Client ID | For node type configurations only. Enter the Ethernet address of the client node. |
| Host IP address (BOOTP only) | For node type configurations only. The host IP address for BOOTP clients. |
| Net or subnet IP address | For subnet configurations only. The IP address of the subnet. For example, if your subnet is 16.128, enter 16.128.0.0. You must include the trailing zeros. |
| DNS domain name | The domain name the client should use when resolving host names using the Domain Name System (DNS). |
| DNS servers | A list of IP addresses for DNS name servers available to the client, in order of preference. |
| Default router | Enter the IP address of the default router for the DHCP client. |
| Send client's host name | If you want to send the client's host name, check Yes. Otherwise, check No (default). |
| Subnet mask | The client's subnet mask as defined in RFC 950. The subnet mask allows the addition of subnetwork numbers to an address and provides more complex address assignments. If both the subnet mask and the router option are specified in a DHCP reply, the subnet mask option must be specified first. |
| Broadcast address | The broadcast address in use on the client's subnet. |
| Subnets are local | If all subnets of the IP network to which the client is connected use the same MTU as the subnet of the network to which the client is directly connected, check Yes. Otherwise, check No. The client should assume that some subnets of the directly connected network might have smaller MTUs. |
| Supply masks | If the client needs to respond to subnet mask requests using ICMP, check Yes. Otherwise, check No. |
| DHCP rebinding time | The time interval (in seconds) from IP address assignment until the client requests a new IP address lease from any server on the network. |
| DHCP renewal time | The time interval (in seconds) from IP address assignment until the client attempts to extend the duration of its lease with the original server. |
| DHCP Lease time | The amount of time (in months, days, hours, minutes, and seconds) the DHCP server allows a DHCP client to use an IP address. For example, 2 months 5 days 45 minutes. The actual lease time is negotiated between the client and server. |
| Previous | Next | Contents | Index |