Figure 5-10 Generate Group Report Screen

The system displays the Select a Text Editor screen as shown in Figure 5-8. The editor you chose previously is the default editor.
| Previous | Contents | Index |
To create and edit the Group report, follow these steps:
Figure 5-10 Generate Group Report Screen
Figure 5-11 Group Report Screen

The Group report shows the PATHWORKS LAN Manager groups that will be upgraded to PATHWORKS Advanced Server groups. Below each group is a list of its members. If there are groups in the report that you do not want upgraded, add a backslash (\) in front of the group name and all group members, or delete the names from the report. To delete a member from a group, add a backslash (\) in front of the member name, or delete the member name. Refer to Appendix B, Resolving Log File Error Messages, in this guide for more information about how to edit the Group reports.
After you finish editing the report, exit the editor and the system
returns you to the Generate Upgrade Reports screen. Now you can create
and edit the Shares upgrade report.
5.5.6.3 Create and Edit the Share Report
To create and edit the Share report, follow these steps:
Figure 5-12 Generate Share Report Screen

Figure 5-13 Share Report Screen

The Share report lists the PATHWORKS LAN Manager shares in the LAN Manager share file. The upgrade converts all PATHWORKS LAN Manager shares to PATHWORKS Advanced Server shares. If there are shares in the report that you do not want to upgrade, add a backslash (\) in front of the share name, or delete the name from the report. Refer to Appendix B, Resolving Log File Error Messages, in this guide, for more information about how to edit the Share report.
After you finish editing the Share report, exit the editor. The system
returns you to the Generate Upgrade Reports screen. Now you can create
and edit the Security report.
5.5.6.4 Create and Edit the Security Report
To create and edit the Security report, follow these steps:
Figure 5-14 Generate Security Report Screen

Figure 5-15 Security Report Screen
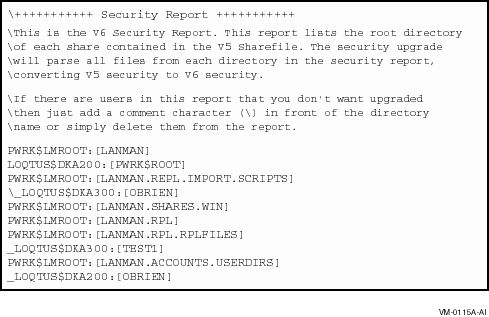
The Security report lists the root directory of each share contained in
the share report. The security upgrade checks all shares from each
directory in the Security report, converting LAN Manager security to
Advanced Server security. If there are directories in the report that
you do not want to upgrade, then add a backslash (\) in front of the
directory name, or delete the name from
the report.
5.5.6.4.1 Security Upgrade Restrictions
Note the following security upgrade restrictions:
After you finish editing the security report, exit the editor. The
system returns you to the Generate Upgrade Reports screen. Refer to
Appendix B, Resolving Log File Error Messages, in this guide, for information about how to edit the
Security report.
5.5.6.4.2 Upgrading Miscellaneous Components (Security Policy Parameters)
Security policy parameters are system-wide settings, such as password length or password expiration. These settings are upgraded when you start the upgrade if you selected the Miscellaneous option in the Select V5 Objects to Upgrade screen. If you did not select the Miscellaneous option, follow these steps:
The security parameters will be upgraded automatically when you start
the upgrade.
5.5.7 Step 6: Start and Track the Upgrade
When the upgrade reports are accurate, you can start and track the upgrade from the Start and Track the Upgrade screen as shown in the following figure.
Figure 5-16 Start and Track the Upgrade Screen

All the objects you selected in the Select V5 Objects to Upgrade screen for the upgrade should be listed 'Selected' on the Start and Track the Upgrade screen.
Follow these steps to upgrade any objects not marked "Selected" in the Start and Track the Upgrade Screen:
Before you upgrade security on any files, you must upgrade all users and groups. If you have users and groups that have not been upgraded, when you upgrade security, the security ACEs that belong to these users and groups will not be upgraded. The Upgrade utility displays a warning as shown in the following figure. |
Figure 5-17 Security Warning Screen

When you have accurate reports that accurately reflect your desired V6 environment, you can start the upgrade as follows:
Figure 5-18 Start Options Dialog Box

The Start Options Dialog Box allows you to choose the start options shown in the following table.
| To... | Select the... |
|---|---|
| Display a running status of the upgrade | Display detailed running status option. |
| Start the upgrade | Start button. |
| Cancel the upgrade and return to the previous screen, where you can edit the upgrade report | Cancel button or enter Ctrl/Z. |
The Logfile button allows you display error messages logged during the upgrade, as described in the following section. Refer to Section 5.7, Troubleshooting, in this guide, for more information. |
When the upgrade is complete, the system displays a message that the upgrade completed successfully, and displays the status of the upgrade for each object. Upgrade status messages displayed are shown in the following table:
| Upgrade Status | Meaning |
|---|---|
| Passed | Upgrade completed without warnings |
| Warnings | Upgrade encountered warnings or errors |
If there are no warnings and the upgrade was successful, you can exit the Upgrade utility. Warnings may be informational, but you should review them before you exit the Upgrade utility.
If the upgrade partially or completely fails, see Section 5.7, Troubleshooting, in
this guide.
5.6 Upgrading a Backup Domain Controller, Member Server, or Standalone Server
This section lists and describes the steps you use to upgrade a Backup Domain Controller (BDC), member server, or standalone server.
The sections following this table describe each step in detail
| Step | Section |
|---|---|
| 1. | Step 1: Enter Domain Information (Optional). |
| 2. | Step 2: Enter PDC Information. |
| 3. | Step 3: Log on to the PDC and Create SAM Database Files. |
| 4. | Step 4: Select Objects to Upgrade. |
| 5. |
Step 5: Create and Edit Upgrade Reports for Selected Objects , including:
|
| 6. | Step 6: Start and Track the Upgrade. |
When upgrading a PATHWORKS LAN Manager server as a backup domain controller in a domain where the primary domain controller is in a different TCP/IP subnet, you must ensure that the primary domain controller's address is in the LMHOST file on the PATHWORKS LAN Manager server. If this is the first time you activate the use of LMHOST, you must restart the file server.
If your domain configuration spans a wide area network, you must configure your servers running TCP/IP.
If you already installed the PATHWORKS Advanced Server server and it is running an upgrade as part of this installation, in addition to using the LMHOST file, you can choose to use WINS to locate the primary domain controller. Refer to the section on the PATHWORKS Configuration Manager in the PATHWORKS for OpenVMS (Advanced Server) Server Administrator's Guide for further details on how to configure the WINS server on the network. |
Start the Upgrade utility, as follows:
$ SET DEFAULT SYS$UPDATE |
$ @PWRK$V6UPGRADE |
Will this server be upgraded as a BDC? [no] |
Figure 5-19 Main Screen

If you are not changing domains, select the Continue button to advance to the Primary Domain Controller Information screen.
The Domain Information Screen allows you to change domains.
To change domain information, follow these steps:
Figure 5-20 Domain Information Screen

When you upgrade a BDC, the Upgrade utility requires that you make a connection to the PDC. This step lets you enter PDC information as follows:
Figure 5-21 Primary Domain Controller Information Screen

After you enter PDC information, follow these steps to log on to the PDC, as follows:
Figure 5-22 Log On to PDC and Create Database Files Screen

Now you are ready to upgrade users, groups, and other server upgrade
objects.
5.6.6 Step 4: Select Objects to Upgrade
To select objects to upgrade, follow these steps:
Figure 5-23 Select V5 Objects to Upgrade Screen

The Miscellaneous option refers to security parameters, such as password length or age, and security on devices, such as printers and CD-ROM drives. These settings are upgraded when you start the upgrade if you selected the Miscellaneous option. You do not need to create an upgrade report for the miscellaneous option. |
This section describes how to create and edit upgrade reports for selected objects including:
To create and edit the User report, follow these steps:
Figure 5-24 Generate Upgrade Reports Screen

Figure 5-25 Select a Text Editor Dialog Box

Figure 5-26 User Report Screen

The User report lists the PATHWORKS LAN Manager users that will be upgraded to PATHWORKS Advanced Server users. If there are users in the report that you do not want upgraded, type a backslash (\) in front of the user name or delete the name. Refer to Appendix B, Resolving Log File Error Messages, in this guide, for more information about how to edit User reports.
The User report is used as input to the Group report; therefore, you must edit the User report before you create the Group report. |
If you are upgrading a BDC into an existing domain that already has a PDC, or if you are upgrading a standalone server to a BDC, all users in the User report and groups in the Group report will be merged into the PDCs user/group database. If there are users or groups you do not want to merge into the PDC, comment them out of the Upgrade report.
After you finish editing the User report, exit the editor and the
system returns you to the Generating Upgrade Reports screen. Now you
can create and edit the Group report.
5.6.7.2 Create and Edit the Group Report
To create and edit the Group report, follow these steps:
Figure 5-27 Generate Group Report Screen
Figure 5-28 Group Report Screen
The Group report shows the PATHWORKS LAN Manager groups that will be upgraded to PATHWORKS Advanced Server groups. Below each group is a list of its members. If there are groups in the report that you do not want to upgrade, add a backslash (\) in front of the group name and all group members, or delete the names from the report. To delete a member from a group, add a backslash (\) in front of the member name or the member name. Refer to Appendix B, Resolving Log File Error Messages, in this guide, for more information about how to edit the Group report.
After you finish editing the report, exit the editor and the system
returns you to the Generate Upgrade Reports screen. Now you can create
and edit the Share report.
5.6.7.3 Create and Edit the Share Report
To create and edit the Share report, follow these steps:
Figure 5-29 Generate Share Report Screen
Figure 5-30 Share Report Screen
The Share report lists the PATHWORKS LAN Manager shares in the LAN Manager share file. If there are shares in the report that you do not want to upgrade, add a backslash (\) in front of the share name, or delete the name from the report. Refer to Appendix B, Resolving Log File Error Messages, in this guide, for more information about how to edit the Share report.
After you finish editing the report, exit the editor. The system returns you to the Generate Upgrade Reports screen. Now you can create and edit the Security report.
| Previous | Next | Contents | Index |